The interior lighting of the Priora does not light up
Sooner or later, most car owners are faced with the fact that the interior lighting stops working.
Let's look at the reasons for this malfunction and figure out what to do in this or that case. To understand where to look for the cause of a breakdown, you need to understand how the interior lighting system generally works. Here is a typical simplified diagram. It may include many more different devices, but the cars are different and it is impossible to draw a diagram for each specific instance. In most cases, the interior light is connected like this:
Now let’s go over the reasons that can cause interior lighting to fail.
Reason #1: Burnt out light bulb
It’s very simple and elementary, but some car owners start looking for a “fault” in the depths of the electrical system. No need - just check the lamp. You can just look at the thread, or you can ring it with a tester. The latter option will help you identify a burnt-out light bulb much more accurately - sometimes it is not the spiral that burns out, but the contact inside the base, and everything looks quite good in appearance.
Reason #2: Blown fuse
The second reason why the interior light may not work is a blown fuse . Almost always, interior lighting “shares” a fuse with other devices. Therefore, if, along with the light, a clock or radio tape recorder, for example, stopped working, then the likelihood of a blown fuse is extremely high.
Find the correct fuse in the appropriate block and make sure it is intact. If the fuse does blow, there is probably a reason for this - a short circuit. Therefore, it is not a fact that after inserting a new fuse everything will work. It is quite possible that it will burn out immediately. If this happens, there is definitely a short circuit. Need to know how to find a short circuit in a car
.
At the same time, a fuse does not always blow due to a short circuit. Its jumper may simply be old (tired) or made of poor quality material.
Reason #3: Oxidized contact
There are plenty of contacts in the interior lighting circuits. But the contacts inside the lampshade and door limit switches are most susceptible to oxidation. Limit switches very often oxidize in many Russian cars, since they do not have a rubber casing.
It is very easy to identify an oxidized contact - just look at it. Remove the lampshade, disassemble it and make sure the contacts are clean. If there is oxide, clean it with a small flathead screwdriver or fine sandpaper. Do the same with the limit switches - each such switch must be removed and inspected. Before removing the limit switches, it is better to disconnect the battery, because very often during removal the positive wire of the switch shorts to the body.
Reason #4: Broken wire
The reason why the light in the cabin does not work may be a broken wire. Wires that are forced to bend due to their location are especially susceptible to damage. So, the wires running into the trunk lid or doors often break. This occurs due to frequent twisting or bending of the wire when opening these body elements. In theory, the interior lighting wiring does not go into the doors or trunk, but the general meaning is the same - the wire can be broken, crushed or broken.
To find the location of the wire break, you will need a tester. With its help, you need to check every section of the electrical circuit, starting from the ceiling light to the fuse box.
Here are common reasons why your interior lights may not be working. However, as mentioned at the very beginning of the article, various devices can be included in the interior lighting scheme. For example, interior light control unit, alarm system, on-board control system unit, etc. The presence of such devices complicates troubleshooting, because the cause may be inside the unit and even represent an electronic “glitch”.
You can “calculate” a certain electronic unit that prevents the light from working using the same tester. Roughly speaking, if the voltage through the interior lighting wire enters this unit, but does not come out, then there is an electrical break inside. It is better to entrust the diagnosis of complex electronic devices to specialists.
Why did it happen so?
Maybe the automatic requests are not for you, but for another user accessing the network from the same IP address as you. You need to enter the characters into the form once, after which we will remember you and be able to distinguish you from other users coming from this IP. In this case, the page with the captcha will not bother you for long enough.
You may have add-ons installed in your browser that can make automatic search queries. In this case, we recommend that you disable them.
It may also be that your computer is infected with a virus program that uses it to collect information. Perhaps you should check your system for viruses.
If you have any problems or would like to ask our support service a question, please use the feedback form.
Have a nice day, dear Drayvovites! Everyone knows FAT
minus the trunk light of the Car Priora - it lights up only when the dimensions are on. In other words, if I need to put something in or get it out of the trunk at night, I have to go open the door, turn on the lights, open the trunk... a hassle, in short! It’s not thought through, well, one dim light bulb - as they said to Masha Dobkin “... this is lean crap!” Using figures of speech, let’s move on, specifically, to the topic of installing the trunk lighting in the same light theme with the lighting of the legs www.drive2.ru/cars/lada/p…shenkoeo/journal/3052497/, so that everything would be complementary.
The constant + was pulling from the + foot lighting, but it turned out that it was coming from the lampshade. Fortunately, the node of this contact is located next to the fuse block, in case something happens, I can power it from the cigarette lighter. The on/off key was placed on a plastic lining of the trunk lid.
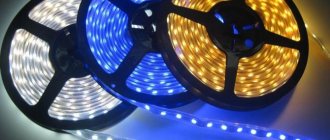
I used 70 cm of greenish diode tape (tape characteristics: 60 diodes per meter, diode dimensions 50x50, moisture resistant). Fastened the tape to a plastic construction corner
But very soon I stopped liking it, because the diodes are visible, the diodes are blinding, well, it’s somehow collective farm...
A duralumin profile for an RGB strip was purchased at a hardware store.
Sold by 1m. The length of the required profile is 75 cm. The kit includes a profile, a diffuser lens, and 2 plugs. The color of the aluminum is silver, which matches the color of my car. I didn't paint anything. I drilled a hole at the ends of the profile for attaching screws. I drilled one hole in the bottom of the profile to exit the wires of the tape. RGB tape was used. But I didn’t install a controller (I just squeezed the funds). I connected the Red+Green+Blue contacts into one and got a snow-white color. I brought out 4 wires (and this is Red + Green + Blue = 1 is minus and +). I brought out 4 wires for the purpose of the upcoming delivery of an RGB controller. I glued the tape to the bottom of the duralumin profile. I marked holes for fastening in the support, drilled and screwed in the profile screws. I didn’t change the location of the keys; I didn’t consider it necessary. This is what I got.
The content of the article:
Installation of additional trunk lighting for Lada Priora
Immediately after buying the car, I was depressed by the flashlight in the trunk. There was no sense in him at all. I replaced it with 6 massive LEDs. There was a lot more light, but it was still not enough, because the entire luggage compartment is lined with black light-absorbing material and there is nothing there to reflect the light. Some time ago I got hold of an LED strip at work. I carried it around for quite a long time and could not find a use for it. And that’s what I needed. I bought male and female connectors like this
I cut a piece of tape to the required length and soldered one of the connectors to it
Then I decided that I would power this tape through a separate fuse, so I didn’t even know approximately how much it consumes. I also soldered the 2nd connector.
Then I tested the tape and it turned out that it consumes only 250mA.
Without further ado, I attached the tape with 4 plastic clamps to the top crossbar of the Tekhnomaster body reinforcement. The tape went from the bottom of the crossbar.
A couple of times I had to remove this crossbar to transport large loads. It is easy to remove - it takes about 10 minutes. Therefore, if in the future it becomes necessary to remove it again, I will simply disconnect the connectors of the tape and remove the crossbar together with the tape.
I removed the connectors for clarity. In fact, they are hidden under the skin.
Well, here is the result of the work done. I took this photo specially without flash. Oh, yes, I powered the tape from the trunk light.
There is so much light that I can even give half to someone
Luggage shelf lighting for Lada Priora
Someone the other day was interested in how the trunk rack illumination would be implemented. Here is the report. It's simple. I bought a semi-luxury Priora lamp, installed colorful LEDs in it instead of the standard incandescent lamp, and embedded this lamp into the plastic trim of the trunk door. I laid the wires inside the rear door through the standard rubber corrugation. In other words, I simply added a couple of wires to those already there. I used fiberglass cable traction for these purposes.
The plastic is very soft and can be cut easily with a knife. By the way, it scratches just as well. It is powered by the standard trunk light.
The lampshade sits like its own.
Looks pretty good. It illuminates not only the trunk shelf, but also the area around the back of the car.
Why does the low beam on the Lada Priora not light up, and what fuse is it?
As practice shows, problems with low and high beams on products of the Volzhsky Automobile Plant are observed quite often.
According to statistics, this problem occurs in every third car. However, most owners do not know what to do in such a situation and turn to a car service, while the breakdown is usually easily fixed and does not require any special knowledge. In this article we will tell you what to do if for some reason the low beam on your Priora does not light up at all or only one headlight does not turn on. To be fair, it is worth noting that this kind of breakdown occurs not only in domestic cars, but is often found on foreign cars as well. For the most part, there is only one problem - wear and tear of one or more elements of the lighting system.
To watch online, click on the video ⤵
The light in the Prior's glove compartment does not go out. One of the circumstances. More details
Do-it-yourself illumination of the glove compartment in a Prior Read more
Replacing the glove compartment lamp with an LED from China Unpacking the Vase Read more
Replacing the cigarette lighter on a Priora and its backlight More details
Lada Priora backlight does not light up Read more
How to remove the center console on a Priora Read more
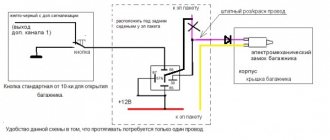
Additional trunk priority button Read more
Replacing Priora lamps in 5 minutes Read more
We eliminate the rattling of the checkpoint handle (Checkpoint is a point designed to control passage (visit) and access to the territory of any facility)
by car Lada Priora Read more
Illumination in the checkpoint handle (Checkpoint - a point designed to control passage (visit) and access to the territory of any facility)
Priors with your own hands. More details
Causes
If the far one is on, but the near one does not turn on, first of all, you should suspect the following malfunctions:
- destruction of the light bulb filament;
- fuse blown;
- electrical circuit problems (broken wiring).
Of course, there are more reasons, but the above are typical. All of them can be eliminated very easily.
It is important to remember that every car owner should have a multimeter in their car - this device is easy to use and allows you to detect most problems in the electrical network.
Burnt out light bulbs
The halogen lamps that the headlights are equipped with have two filaments.
The first is responsible for the high beam, and the second for the low beam. If one of them is destroyed, the other will most likely burn normally. This is important to keep in mind when starting to troubleshoot.
Burnout is also indicated by the following circumstance - for example, there is no light in the left headlight, while the right device is working normally.
Replacing the light bulb is very easy. The procedure is as follows:
- open the hood;
- remove the headlight protection;
- disconnect the power connector;
- unfasten the fixing springs;
- take out the lamp;
- insert a new one.
It is important to remember that halogen appliances require careful handling. Traces of fat on the flask usually lead to their rapid failure - therefore, before installation, the glass surface is wiped with alcohol or acetone.
How to turn on headlights without MUS
You can turn on the headlights when the light control module has failed by dismantling and removing the chip from it. On the chip you need to find contacts numbered 10 and 12 and insert a copper wire jumper between them. After installing the jumper, the headlights turn on when you turn the ignition key.
This method will help you get to the nearest service station in the evening. It is not recommended to use the jumper for an extended period of time as it does not provide proper contact and can cause heat to build up, putting you and your vehicle at risk.
Circuit breakers
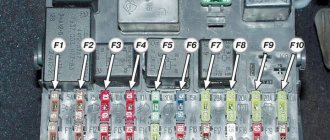
This is the second most common cause of low beam failure. If the left headlight does not light, then it is worth inspecting fuse F6.
Where is he located? It is located in a block hidden under the steering wheel. To get there, you need to remove the protective cover, which is held in place by three clips.
When the right light fixture does not function, look at fuse F7.
The protective devices mentioned above have the same rating - 7.5 amperes. The easiest way is to replace the damaged fuse with a working one. If one is not at hand, then as a temporary measure a “bug” is installed, that is, a jumper made of any suitable piece of copper or aluminum wire. In a pinch, even regular foil will do.
It is worth knowing that frequent blown fuses clearly indicate problems with the wiring. As a rule, a malfunction here often occurs due to the fact that the insulation of current-carrying elements is frayed. It is important to find the defective location and insulate it as soon as possible, since the occurrence of a short circuit leads to a fire in the vehicle.
Adjusting the lock
If you do not know how to adjust the lock on the trunk lid, then the instructions below will help you with this:
- the tightening of the screw that secures the rod is loosened (if its end is bent, be sure to straighten it);
- the lining of the locking mechanism is removed and the tightening of the nuts on which it is installed is loosened;
- the lock is moved to another position and the screw securing the rod is tightened, the ease of locking the mechanism is checked, and if necessary, this adjustment is repeated;
- The position of the latch is adjusted if a lot of force is required to close the tailgate.
Adjusting the trunk lid lock on the Lada Kalina is carried out by analogy; any car owner, even those without experience in car repairs, can cope with this procedure.
Wiring
First of all, when the low beam stops working, check the reliability of the connections in all the blocks involved in the low beam electrical circuit.
Their contacts often simply oxidize and after cleaning the problem is eliminated. Sometimes also due to vibration the connectors come loose and the circuit breaks. The contact groups need to be cleaned of oxides - a needle file or a school eraser is suitable for this. A nail file will also work (this tool will probably be found in any car lady’s purse).
Sometimes the light does not come on because the button that turns it on fails. There are contacts inside it, which, in turn, can also be damaged by corrosion. It is not difficult to verify that the starting device has failed - just disconnect the wires from it and short-circuit them. If this is the reason, then the light will come on. There is no point in repairing a button that has become unusable - it is easier to replace it with a new one.
Fuel system
Fuel tank, Water level sensor, Fuel level sensor, Tank vent valve, Fuel tank button, Fuel tank cap, Fuel neck, Fuel pump, Fuel pump, Fuel pump strainer, Fuel pump gasket, Fuel pump relay, Fuel injector, Injector ring, Throttle valve, Sensor throttle valve, Throttle pipe, Idle air regulator, Air receiver, Throttle valve heating tube, Turbine (turbocharger), Turbine gasket, Solenoid valve, Injection pump, Injection pump valve, Compressor, Compressor gasket, Carburetor, Fuel rail (rail), Fuel pressure regulator , Fuel line, Fuel valve, Fuel hose, Fuel pipe, Air flow meter, Engine control unit, Air pipe, Intake manifold, Intake manifold gasket, Additional air pump, Fuel pump, Gas pedal, Potentiometer, Throttle cable
Other reasons
Sometimes the high or low beam fails due to the fact that the car owner thoughtlessly makes changes to the electrical circuits of his vehicle, without having a proper understanding of their operation. If such interference took place, then you should carefully analyze your actions and check what exactly was done wrong.
When none of the above recommendations helped fix the problem, it would be better to contact a car repair shop, since, most likely, attempts to search will lead to an even worse situation. In this case, you will subsequently need much more money to eliminate the fruits of your inept actions.
