During a long trip, you can’t do without music or audiobooks, which should only be played through high-quality equipment. The stock VAZ-2115 acoustic shelf is not of the best quality. When the speakers are loaded, it creaks, which interferes with the enjoyment of your favorite music. It’s not difficult to make a shelf with your own hands, let’s figure out how to do it.
Why would you need to replace an acoustic shelf?
If the sound quality of the speakers initially satisfied you, then the need to make an acoustic shelf with your own hands may arise for the following reasons:
- damage to the stock part;
- decision to increase the number of speakers;
- to improve sound quality;
- wear of a previously installed element.
Drivers often encounter breakage of shelf fasteners, which occurs while driving on a rough road. Most often, this malfunction is encountered by drivers who do not slow down in front of potholes or on rural rough roads.
However, the vast majority of VAZ-2115 owners replace the acoustic shelf in order to improve the sound quality of music inside the car.
In this case, the shelf should be made of plywood with your own hands or to order. This material will help make the speakers sound clearer.
Troubleshooting solutions
An excellent way out of their current situation is to install the rear shelf of the VAZ 2114 yourself. Today, on numerous websites dedicated to cars, you can find a lot of options for making the necessary design on your own. If you don’t have the skills to work or free time, then an excellent solution is to buy an acoustic platform at an auto supply store. It is possible to select several modifications that differ from each other both in design and in the materials used in manufacturing. The price of the accessory depends on its design and the specific store, on average it ranges from 1,200 to 3,000 rubles.
Benefits of replacing the rear shelf
The main thing that car enthusiasts notice after installing a new, modified element is a more confident design that does not bend under the weight of even the most impressive-sized sound speakers installed on it. In addition, the acoustic characteristics of sound transmission are noticeably improved. This happens due to the fact that wood is the best conductor of sound impulses generated by speakers. In addition, the strength of the shelf and the reliability of its fastening prevent the appearance of unnecessary deformations, looseness, annoying squeaks and extraneous noise.
Preparing to make a shelf
First of all, you will need to prepare the materials and tools that will be required to complete the work.
Purchase in advance:
- plywood sheet;
- carpet for cladding;
- radio fabric;
- PVA glue;
- fabric glue;
- a box of self-tapping screws.
The tools that will be useful to you are a jigsaw, a drill or screwdriver, and a grinder. Please note that the plywood must be at least a centimeter thick, otherwise the shelf will be no more effective than the standard one.
Many people are interested in how to take the dimensions of a shelf correctly, so as not to make mistakes during manufacturing. To do this, experienced craftsmen recommend removing the standard shelf and using it for a pattern. In any case, you will have to dismantle it; it is better to do this before cutting the material. This way you definitely won’t go wrong with the size.
Removing the stock shelf is not that difficult. To do this you will need:
- Remove the rear seat.
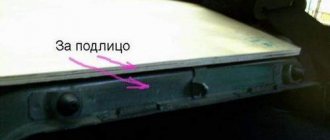
- Locate the four main acoustic panel fasteners and remove them.
- It is important that the seat belt is fully extended while working. To prevent it from gathering into the tension mechanism, move the two latches and remove the belt guide.
- Unscrew all side frame fasteners.
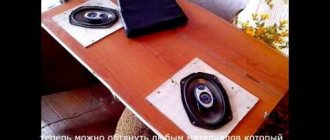
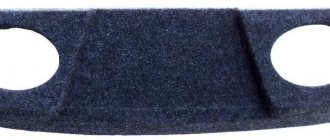
After dismantling, parts of the old panel can be used as a pattern. In this case, a drawing will not be needed. To do this, first draw them on cardboard, and then transfer them to plywood. You have to prepare the following parts of the structure: main, decorative and adjacent. Next, prepare the side supports and grates.
On the side of the seats, on the main part of the panel, there is no need to make cutouts in the corners, since attaching a homemade shelf can be done differently than a stock one. From the old shelf, cut out the part that fits the rear glass and attach it to the new panel. You can also not take the side walls from the design of the old acoustic panel, but cut them diagonally yourself. By stitching, adjust them to the main part. Assemble the structure with screws. It is enough to screw in only a couple so that in case of a mismatch in size, dismantling can be done easily.
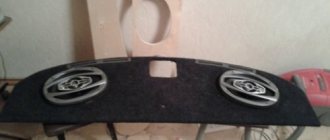
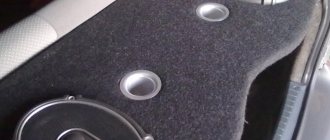
In the main part of the stock panel, two holes are usually pre-made for speakers. If necessary, you can make additional holes, for example, so that the shelf can accommodate several different speakers. In the decorative part, each of the holes should be several millimeters larger. Measure them against the speakers you plan to install. The heads must fit freely into the place prepared for them.
How to assemble correctly
The rear acoustic panel is quite easy to assemble:
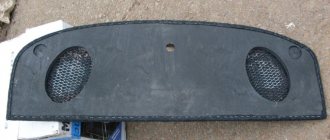
- Once you have secured the side and main parts, place the speakers in place, secure them and cover them with radio fabric. You can use a grid instead.
- Make a frame from PCB or plywood and cover it with mesh or radio fabric. Glue the material and leave it to dry for several hours.
- Next, glue all the plywood parts and cover the acoustic element with carpet. You can secure the material with glue, but some use a furniture stapler for this purpose.
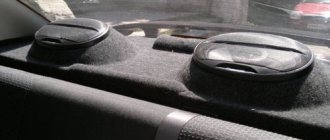
- A day later, after the shelf has completely dried, you can mount it using the corners. They will be located in the mounting areas of the rear seat of your car. This installation will not take much of your time and effort.
VAZ-2115: Installing the Audio Art RW12 subwoofer in the rear parcel shelf
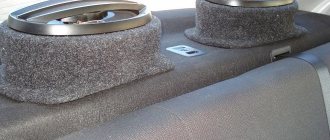
Photo report on increasing the strength of a store “acoustic” shelf designed for VAZ-21099 / VAZ-2115 cars, manufacturing a “closed box” with a volume of about 30 liters combined with it, which is a subwoofer housing, installing an Audio Art RW12 dynamic head with an Oris WG- protective grille 012 and, finally, mounting the finished structure in my VAZ-2115 car. The photo report contains 34 photographs, instructions for the dynamic head, as well as a description of the manufacturing and installation process of the subwoofer.
A store-bought “acoustic” shelf made of 8 mm thick plywood, cleared of carpet, sanded and reinforced with a 16 mm thick chipboard board. The drawer parts are made of a tabletop 26 mm thick, respectively, the thickness of the wall intended for installing the dynamic head is 50 mm. The box is assembled using 3.5×51 mm self-tapping screws. They are also used to attach the box to the shelf and fix the dynamic head. In addition, all joints of chipboard and plywood parts are glued with Titebond “liquid nails” in red packaging. The lower part of the shelf and the interior of the drawer are covered with Body 950 anti-gravel. The drawer and shelf are covered with carpet, glued with 88-HT glue and additionally secured with staples in places of strong tension. The dynamic head diffuser is protected by an Oris WG-012 grille. Its Oris WG-001 clamps are installed through shaped spacers made of 10 mm thick plywood, covered with carpet. The finished structure is attached to the body using two strips of 2.5 mm thick steel at the front and four corners of the same steel at the rear. To protect against corrosion, the fasteners are coated with ABRO primer. To connect the speaker cable, a Mystery MTN-30 terminal is installed on the subwoofer wall. From the very beginning of using the subwoofer, it became noticeable that a box with a volume of 30 liters is too large, and the 28 liters recommended by the driver manufacturer is indeed the optimal value, providing the best balance between return and accuracy (as the volume decreases, the return decreases, and as the volume increases, hum appears). To adjust the volume, a piece of foam plastic 50 mm thick was added to the box. The subwoofer is powered by an Audio System Twister F2-300 amplifier connected by a bridge. The amplifier's filters are turned off. The low-pass filter LPF of the corresponding channels of the Pioneer DEH-P88RS head unit has a cutoff frequency of 50 Hz and a slope of -18 dB/oct. and NOR phase.
Be sure to note that installing a 12-inch subwoofer in the rear parcel shelf of a VAZ-21099 / VAZ-2115, described in this photo report, is possible only after replacing the trunk lid torsion bars with shock absorbers.
Written later: Due to the sale of the car, the box became unnecessary. One fine day, a regular on the Bluesmobile forum wanted to buy it. It all happened exactly like this: I didn’t advertise, but he saw the photo and wrote to me. Naturally, I agreed. The “masterpiece of carpentry art” was placed in the trunk of a brand new Mazda 6, belonging to an acquaintance of the new owner, and “left” for Saratov. I got some free space in the cellar, and the new owner got a good quality subwoofer box for the VAZ-21099/VAZ-2115. Everyone was happy