- What is Elm 327
- What did I buy for myself?
- Adapters
- Enabling hidden features
- temperature sensor
- Why is diagnostics needed?
- How to launch the scanner program
- When is diagnostics needed?
- Options
- Plugin motordata elm327 obd diagnostics of VAZ, Lada cars
- Software
- Equipment connector
- Self-diagnosis
- The scanner is suitable for Vesta
- Scanners
- Rear wiper activation
- Typical diagnostic parameters for Lada vesta with m86 controller
- Installation
- Scanner functions
What is Elm 327
Initially, ELM 327 is a chip developed by . It converts a number of protocols used in vehicle diagnostic buses into a single RS232 protocol.
To simplify, all modern cars, despite having a single OBD 2 port, communicate with connected equipment in different languages. There are 9 such languages (they are called protocols) in different versions. ELM 327 serves as a kind of translator that translates all languages into one common one.
Equipment with installed software is able to communicate with cars from different manufacturers. That is, ELM 327 is an adapter or adapter for connecting your equipment to cars equipped with an OBD 2 port.
In modern equipment, the RS232 interface is no longer used. Previously, this standard was used in computer connections. Therefore, the currently produced ELM-327 device has a USB, Wi-Fi or Bluetooth converter on board, depending on the model.
It can be connected to a computer, tablet or mobile phone. Now this device has become popular and is manufactured by many companies. This happened due to the demand for the device among car enthusiasts and the ease of copying it. The cheapest costs 71 rubles, the most expensive costs more than 2,000 rubles.
This device may look different; the shape, color, name, and hardware may differ.
I would divide ELM327 into 3 main groups:
- Version 1.5.
- Pseudo version 2.1.
- Version 2.1.
Cars are constantly being improved. The amount of data that can be read via OBD 2 is increasing. Therefore, the device is also improving. The most common and average in price is ELM327 version 1.5 in a translucent blue case. It has 2 boards and is based on a PIC18F25K80 microcontroller.
Many sellers in online stores, in addition to the description of the device, have a photograph of the boards, from which you can indirectly understand whether the version is indicated correctly. Such a device costs on average 300 rubles.
If you want an inexpensive and hassle-free gauge that fits most cars, I would recommend buying this one.
Please note that the connection is via Bluetooth. It is much more convenient with it than with Wi-Fi or USB. If you have a smartphone not based on Android, but on iOS, then only devices with Bluetooth 4.0 are suitable for you. They are more expensive.
If you are looking at a box for 150-200 rubles, then it will be a pseudo-version 2.1. It is a later release and is considered better. But if we consider the cheapest devices, then everything is exactly the opposite. If you connect it to your phone, any car diagnostic program will detect it as 2.1.
For example, version 1.5 supports all firmware 100% (from early to 1.5). The hardware of cheap ELMs is weaker - only 1 board and a microcontroller of unknown origin are used.
Hence the cheap price. These ELMs also work, but not with all cars. They will not be able to fully open your software, since the hardware is too limited. Roughly speaking, these devices make very bad translators.
Many unscrupulous sellers try to pass off these unfinished devices as version 1.5. Therefore, be careful when choosing. If you are willing to spend a little more money (from 750 rubles), then you can count on a device with a full version 2.1. For example, the iCar device from Vgate.
Of course, it will support all the firmware that the 1.5 device supports. Many similar ELM 327 have Bluetooth 4.0 installed, which works faster. Thanks to it, you can connect your phone not only to Android, but also to iOS.
If you have the opportunity, it is better to buy a device in this price segment. The device itself does not read anything, it just converts the protocols into ones that your equipment can understand. Then everything depends on the special program that is installed on the smartphone.
Do-it-yourself diagnostics and testing of the Lada Vesta suspension
Lada Vesta differs from other Lada models not only in its external features, but also from a technical point of view. For example, AvtoVAZ equipped Vesta with a new suspension with L-shaped arms. Let's figure out how to assess its technical condition and independently determine the sources of knocking, squeaking or crunching.
You can check the front and rear suspensions of Vesta while driving on uneven roads. The suspension should work without knocks, squeaks and other extraneous sounds. After moving over speed bumps, the car should not continue to sway.
We inspect the tires; if one-sided tread wear is noticeable, this indicates a violation of the wheel alignment angles (as a result of wear of suspension parts) or incorrect adjustment.
The procedure for checking shock absorber struts without a special stand does not differ from the usual. Immediately after the trip (until the working fluid in the shock absorbers has cooled), we rock the front part of the body in a vertical direction several times. If the body, due to inertia, makes more than two oscillations, then one or both shock absorbers are faulty. The effectiveness of vibration damping is tested on a bench. We check the rear suspension shock absorbers in the same way.
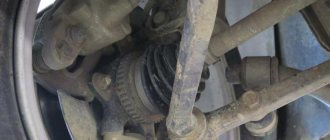
Rock the top of the wheel in the transverse direction. If there is even a slight play, knocks or clicks are heard, then it is necessary to check the condition of the suspension and hub in more detail. We hang the wheels and rock the wheel in the vertical and horizontal plane:
- If play is felt only with the brake pedal released (there is no play when the brake pedal is pressed), then the wheel bearing is most likely worn out.
- If there is play in both cases (with and without the brake pressed), then there is a malfunction in the Vesta suspension.
- If play is felt in the vertical plane, the ball joint is worn out or the strut mount is weak.
- If there is play only in the horizontal plane, the tie rod end is faulty (for the front suspension).
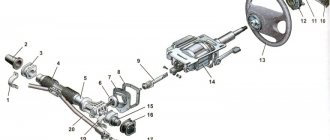
Vesta front suspension: 1 – additional subframe spar; 2 – front suspension subframe; 3 – lower front suspension arm; 4 – steering knuckle with hub assembly; 5 – telescopic front suspension strut assembly; 6 – stabilizer bar with struts assembly.
Vesta rear suspension: 1 – rear suspension arms; 2 – lower spring gasket; 3 – rear suspension spring; 4 – upper spring gasket; 5 – upper support assembly; 6 – compression stroke buffer with protective casing assembly; 7 – rear suspension shock absorber; 8 – rear wheel hub axis; 9 – brake drum with rear wheel hub bearing assembly.
Checking the shock absorber struts. First, we inspect them for mechanical damage and fluid leaks. Then, using a mounting blade, we apply force to the anti-roll bar; there should be no play (otherwise we change the struts).
We check the condition of the rear and front silent blocks of the lever by shaking the eye of the lower lever with a mounting blade. There should be no play, otherwise we change the lever.
Checking the ball joint. First, visually inspect the protective cover; it should be without damage. Then use a mounting blade to check that there is no play in the lower ball joint.
Visually check the anti-roll bar cushions; there should be no bulging or cracking of the rubber.
We check that the rear shock absorbers are securely attached to the lever and that there is no play in the connection. To inspect the rear shock absorber upper mount, you can jack up the rear of the vehicle and remove the wheel.
We check the silent blocks of the rear suspension arms, using the mounting blade as a lever. If there is play or damage to the rubber elements, replace the rear suspension beam.
Checking the stabilizer links. Turn the wheel out and grab the lower joint with your hand. If there is even the slightest gap during the lateral swing of the body, then the hand will feel it. Similarly, we check the play in the upper hinge. The process is also shown in the video:
Let us remind you that knocking and creaking in the Vesta suspension can be caused by a lack of lubrication of the rubber bushings or the washer of the upper strut support. We discuss a comparison of the Vesta suspension with other Lada models in this article. You will find other instructions for car repair and maintenance in the contents.
What did I buy for myself?
I purchased the Viecar 4.0 device. It is not cheap, it costs a little more than 1000 rubles. I chose the expensive version in a plastic container with delivery from Russia. I received it within 10 days. Nothing else is written on it, but this is ELM327 version 1.5 with Bluetooth 4.0.
Many people will ask why I recommended taking 2.1, but I myself took 1.5. When I chose it, I knew little about them, they recommended it to me, they said that they use it on the Lada Vesta without any problems. There are good reviews about it, but it is practically no different from the ELM 327 device for 300 rubles. Now I would take the expensive version 2.1 for this price.
Diagnostic methods for Lada Vesta
There are two types of reading errors from the memory of the car’s on-board computer.
- Self-diagnosis - the on-board computer can show the motorist any existing errors. A simple procedure allows you to perform repairs without additional equipment. The disadvantage is the impossibility of determining the exact location of the breakdown or its system - the BC will only indicate the direction in which the defect should be looked for.
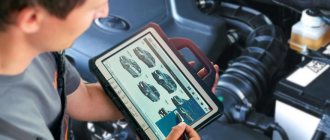
- Using a diagnostic scanner is a complex procedure that cannot be done at home. For normal diagnostics, you will need to connect a laptop or tablet with a special program to the machine. Usually this is done exclusively in specialized workshops.
temperature sensor
The first thing I wanted to change was the temperature sensor readings. Initially, I didn’t like the algorithm of its work. In the range from 55 to 105 degrees it always shows 90. After riding Vesta for a year, I got used to it, but I would like to narrow the range and set it to 70-105.
But with the current range of 55-105, we simply won’t see this; the engine will operate in underheating mode. I don’t want to set the real temperature, since the needle will jump from 80 to 100 degrees and distract attention. These are still acceptable limits.
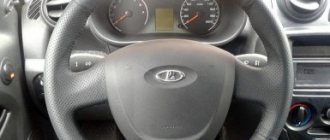
We connect the ELM to the diagnostic connector. On the Lada Vesta it is located near the hood release lever. It is important to insert it all the way.
I read a lot of comments where people did not understand why the ELM does not connect to the phone. Then it turned out that this was due to loose insertion of the device into the connector.
Procedure:
- Turn on the ignition and launch the EcuTweaker program on your phone.
- Wait for the connection to be established between the phone and the ELM. The green indicator in the program will light up.
- Click on the magnifying glass icon.
- Select "All".
- Click "Meter Cluster".
- Click “PP_vesta” - Settings - Settings 2.
In the menu that opens, you can make the necessary changes.
If you want to see the real temperature, then change the “stepped” item to “linear” and click Write Model Tempengine. But I made a range change. In the corresponding column, instead of 55, I indicated 75, then saved with the same button.
TOP Android applications for car diagnostics
Well, we come to the most interesting part - a review of the best programs for car diagnostics on Android.
Carista Obd2
The application has been operating since 2013, the last update in the Play Market was released on June 30, 2022. There is a paid version with extended functionality (1 week - $10, 1 year - $40). The developer company has its own adapter - if you buy it, a month of using the Pro version is free.
According to users, this is one of the best applications for diagnosing a car on Android, even at the level of free functionality (basic engine check, gas distribution system, exhaust toxicity analysis). Advanced scanning (no worse than in a service center) allows you to test all modules of the car - anti-lock braking system, brake system, airbags, tire pressure sensors, etc.
The program also provides additional functionality - personalizing settings, unlocking hidden functions, etc.
Hob Drive
Second place in our ranking of the best car diagnostic programs for Android goes to the Hob Drive client. The application is a triple service - an on-board computer, a gasoline consumption analyzer and a diagnostic tool via OBD2/ELM327.
Both paid and free versions are available on the Play Market. The latter allows you to perform ongoing diagnostics of vehicle errors, the former provides constant monitoring and prompt notification, as well as monitoring overheating and suspicious lags.
The on-board computer records fuel consumption and performs power measurements. The program has a built-in trip planning option - estimating driving time on the remaining tank, refueling records, route statistics, and cost calculations. The interface can be customized according to your preferences; there are many built-in themes.
InCar Doc
An Android application that performs full launch car diagnostics for a scanner with an elm327/OBD2 processor.
Performs a full scan of the vehicle, with diagnostics, monitoring and statistics logging. Recognizes the cause of the Check Engine light, deciphers error codes, and clears old codes.
There is a paid version with extended functionality. It works in real time - analyzes engine parameters, fuel consumption, records gas stations, shops, services, remembers the location of the car, etc.
How to launch the scanner program
Select “connect” and select our device. Reports that the firmware version is 2.1. As you can see, no parameters are displayed on the screen. Turn off the ignition, remove the diagnostic adapter from the connector and insert the adapter with firmware version 1.5. On the phone, we break the pairing with the previous adapter.
You can start the car to see the displayed parameters clearly. Looking for a new adapter. The adapter appears, enter the standard password 1234. After that, go to the main screen and open the OpenDiag Mobile program. Select the “connect” item.
The connection did not occur because the program is trying to connect to the previous adapter. Click again, connection is in progress. There is a connection to the car unit. The following items appeared: engine errors, the check light on the car does not light up. Information about the car, firmware, immobilizer data is also available.
How to reset errors on Vesta
After diagnosing and troubleshooting, it is necessary to reset the on-board computer errors for its normal operation in the future. If everything is left as is, the vehicle’s on-board systems may operate intermittently even in good condition.
Typically, on simpler modifications of the manufacturer, the numbers are reset by resetting the on-board computer counter or removing the battery terminals.
Lada Vesta errors are reset only when a diagnostic scanner is connected. The special program provides the ability to fully manage and monitor on-board systems in terms of electronics. By going to the appropriate settings section, the wizard can eliminate all error codes and failures from the device’s memory.
Plugin motordata elm327 obd diagnostics of VAZ, Lada cars
MotorData ELM327 OBD plugin Diagnostics of VAZ, LADA cars
If you use a smartphone, you can always diagnose your VAZ, LADA car using modern technologies. To do this, you need either the MotorData OBD application from the App Store and purchase the ELM327 diagnostic adapter.
What a diagnostic adapter is and how to choose the right diagnostic adapter can be found in the article Diagnostic adapters ELM327, written by the developers and engineers of our company.
Motordata OBD ELM327 is a program for self-diagnosis of cars using OBD2, EOBD protocols. Possible automatic connection of the ELM327 adapter makes using the application accessible to every car owner. The free version diagnoses the engine management system for malfunction errors, deciphers them, helps to find the cause of the malfunction, and after repair, turns off the Check Engine indicator.
Features of the MotorData OBD scanner in free mode
- reading and erasing diagnostic trouble codes of the engine ECU (OBD2 error codes in Russian);
- viewing freeze frame data – the state of the vehicle or system in which the malfunction occurred;
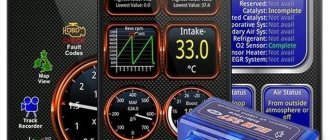
- reading engine and vehicle operating parameters in real time: speed, revolutions, temperature, pressure, oxygen sensor readings, short-term and long-term corrections and other parameters available according to the OBD II standard; (for example, you need to know the temperature values to prevent overheating of the engine or automatic transmission, variator and to avoid expensive repairs);
- graphs of parameter changes in real time;
- automatic connection to the engine control unit;
- recording logs for sending to technical support;
- reference book of fault codes P0 and P2 with decoding of OBD2 errors (DTC fault OBD2);
Why is diagnostics needed?
LadaVesta is a modern car; all components are controlled by an electronic control unit. All systems are equipped with sensors that transmit signals to the central body electronics unit (CBEC), the electronic engine control unit (ECU) and other electronic units. Operation error messages are displayed on the on-board computer monitor. It is also possible to receive information on a laptop or smartphone by connecting them through the diagnostic connector on the Vesta, called OBD2.
Diagnostics of Vesta. Photo source: drive2.ru
If there are problems in various vehicle systems, information about them is sent to the ECU and then recorded in the memory of the on-board computer. An icon called chek is displayed on the monitor. This means that there is a malfunction in some node.
To find out what error the BC gives, where there is a breakdown, you need to connect the scanner to Vesta via OBD2.
Software
To diagnose Lada Vesta via ELM327, there are several programs compatible with OBD2. The most popular, error-free and crash-free software for Vesta is OpenDiag. Also used:
- TorgiePro – application for use on Android;
- AutoEnginuti – program for IOS and Windows;
- PCMScan – for laptop computers.
Most software and drivers for adapters are available for download on specialized websites and online stores. It is recommended to use certified software.
How to reset errors on Vesta
After diagnosing and troubleshooting, it is necessary to reset the on-board computer errors for its normal operation in the future. If everything is left as is, the vehicle’s on-board systems may operate intermittently even in good condition.
Typically, on simpler modifications of the manufacturer, the numbers are reset by resetting the on-board computer counter or removing the battery terminals.
Lada Vesta errors are reset only when a diagnostic scanner is connected. The special program provides the ability to fully manage and monitor on-board systems in terms of electronics. By going to the appropriate settings section, the wizard can eliminate all error codes and failures from the device’s memory.
The scanner is suitable for Vesta
If you have a domestic-made car, then you should choose firmware version 1.5, because the adapter with firmware 2.1 does not work with the OpenDiag Mobile program, which is designed specifically for diagnosing domestic cars. In firmware version 2.1, some protocols are processed incorrectly.
If the adapter has firmware 1.5, then it will work with foreign cars after 1996 that support the OBD-2 standard, and with domestic cars through the OpenDiag Mobile program. Machines after 2008-2009 work reliably on an adapter with firmware 2.1.
Until 2008-2009, it happens that if a car uses a non-standard diagnostic protocol, then 2.1 may not connect to your car. Therefore, if you have a car from 1998, then it is better to choose an adapter with firmware version 1.5.
First, let's connect the adapter with firmware version 2.1. To do this, insert it into the diagnostic connector of the Lada Vesta and turn on the ignition of the car. Go to settings on your smartphone. Select Bluetooth, turn on the search for a new device, click on the found device.
We ask for a password, after which you need to enter the standard password for the Bluetooth adapter. Usually this is 1234 or 0000. After this, exit the Bluetooth menu and find the OpenDiag program. Vesta will also be diagnosed.
When is diagnostics needed?
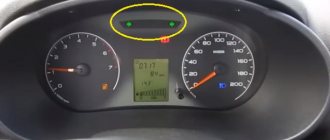
While the car is moving, when the driver does not notice any malfunctions, the icon (chek), schematically depicting the engine, may light up on the tachometer dial. This means that one of the systems has failed.
Check icon. Photo source: drive2.ru
In such a situation, there is no need to panic; perhaps this is a short-term equipment failure, then the chek lights up for a few seconds and does not appear again. If the error indicator blinks or is constantly lit, you must contact a service or dealer center for diagnostics. If you have the skill and necessary equipment, you can check it yourself.
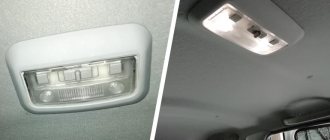
Rear wiper activation
The second thing I wanted to change in the Lada Vesta car from the first day of purchase was to disable the automatic operation of the wiper on the trunk lid. I have the “luxury multimedia” package. The algorithm works in such a way that if the windshield wipers have been activated within the last 2 minutes, then when reverse gear is engaged, the trunk lid wiper is automatically turned on. In most cases, it just rubs dry and ruins the glass.
We will also disable it using the Eku Tweaker program in Russian. ELM is installed in OBD 2, ignition is on.
- Select the “magnifying glass” icon – “BM LADA” – “Body Control Module”.
- Next, it is important not to get confused - select the line T4_VS_BCM_DDT2000_SW15_1.
- Next, click Rear Wiper – Rear Wiper Configuration.
- Scroll all the way to the right: instead of “true” put “false”.
- Save the changes to “send”.
It would be nice if somewhere in the settings there was a button to turn off the oil burner on the Lada Vesta. Whoever found it, write about it.
Enabling hidden features
There are a lot of hidden functions on Lada Vesta cars that can be activated using ELM 327. Or you can deactivate those that the car has, but for various reasons you don’t like. It’s a pity that there is no auto engine start among them. But this is a fixable issue - thanks to the OBD 2 connector, you can independently connect autostart with telematics, synchronized with the security system, in 40 minutes.
I'm talking about Vesta Connect. This is an auto-start system with a GPS tracker, which, in addition to auto-start from the standard key, makes it possible to start the car and control the central locking via an application using a smartphone. This can be done from any distance, even from another city.
You can also track the vehicle's location using GPS. In case of an emergency (car theft), the system will notify you with a sound signal. The system can be installed independently in 40 minutes without disturbing the standard wiring.
Everything connects to the car's standard connectors. There is a detailed installation video on the manufacturer's channel.
Other hidden functions include turning on the turn light, tire pressure sensor, changing the climate control algorithm, disabling the hill start assist system, and much more. Among this many, there are 2 changes that I would like to see on my Lada Vesta car.
To make changes you will need the EcuTweaker program. It is not in the Play Store, but can be found on the Internet. Download the program, databases, install it on your phone.
Typical diagnostic parameters for Lada vesta with m86 controller
14 August 2022 Lada.Online 11 461
When connected to the diagnostic block, we receive data from sensors that enter the engine control unit. Knowing the typical values of the main parameters, you can analyze the operation of the engine and its systems, find the cause of the malfunction or determine the direction in which to look for the cause of problems in the operation of the car. The following are typical diagnostic parameters for M86 Lada Vesta.
| Parameter | Unit change | Hol. Progress | 3000 rpm |
| Intake air temperature | °C | 15 – 45 | 15 – 45 |
| Cooling temperature liquids | °C | 90 – 103 | 90 – 103 |
| Onboard voltage | IN | 13.0 – 14.5 | 13.0 – 14.5 |
| Accelerator pedal position. | % | 11 – 15 | |
| Throttle position | % | 1 – 4 | 6 – 10 |
| Desired speed | RPM | 840 | |
| Engine speed | RPM | 840 ±40 | 3000 ±100 |
| Air flow | Kg/h | 7 – 12 | 27 – 35 |
| Cyclic filling according to DBP | mg/cycle | 115 – 125 | |
| Inlet pressure | mbar | 38,0 — 41,0 | |
| UOZ | ° according to K.V | 9 ±5 | 30 – 35 |
| Correction of SOP for detonation | ° according to K.V | 0 | ‑2,5…-5 |
| Load | % | 16 – 26 | 16 – 26 |
| Barocorrection factor | 0.89 – 1.02 | 0.8 – 1.02 | |
| Injection time | msec | 2.7 – 3.9 | 2.1 – 5.3 |
| Injection time correction according to DC | 1±0,15 | 1±0,15 | |
| Adaptation for parts loads | 1±0,15 | 1±0,15 | |
| Coeff. adsorber purge | % | 0 – 12 | 0 – 18 |
| Coeff. conc. fuel in the adsorber | % | 0 – 2 | 0 – 2 |
| Adaptation of fuel supply at idle | % | ±2,5 | ±2,5 |
| Leaks through the valve throttle at idle | kg/h | 3–5 | – |
| DC1 signal period | With | <1,8 | <1,8 |
| Misfire counter (toxicity) | |||
| Misfire counter (neutralizer) | |||
| Desired change moment for XX (int.) | % | ±8 | ±8 |
| Desired change moment for XX (prop.) | % | ±8 | ±8 |
| Neutralizer aging factor | <0,45 | <0,45 | |
| ADC battery | IN | 13,0 – 14,5 | 13,0 – 14,5 |
| ADC DK1 | IN | 0,18 – 0,95 | 0,18 – 0,95 |
| ADC DK2 | IN | 0,59 – 0,75 | 0,59 – 0,75 |
| Throttle Sensor ADC 1 | IN | 0,58 – 0,70 | – |
| Throttle Sensor 2 ADC | IN | 4,30 – 4,42 | – |
| Accelerator Pedal Sensor ADC 1 | IN | 0,5 – 0,85 | – |
| Accelerator Pedal Sensor ADC 2 | IN | 0,25 – 0,43 | – |
| Absolute Pressure Sensor ADC | IN | 1,56 – 1,66 | – |
| Sign of work at XX | Not really | Yes | No |
| Sign of work in the control zone | Not really | Yes | Yes |
| Basic mixture adaptation | Not really | Not really | Not really |
| Ready DK1 | Not really | Yes | Yes |
| Ready DK2 | Not really | Not really | Not really |
| Neutralizer readiness | Not really | Not really | Not really |
| Checking DK1 | Not really | Yes | Yes |
| Checking DK2 | Not really | Not really | Not really |
| Pulley training | Not really | Not really | Not really |
| Canister purge activated | Not really | Not really | Not really |
| Checking the safety management system | Not really | Not really | Not really |
| Clutch pedal sensor | Not really | Not really | Not really |
| Brake pedal sensor 1 | Not really | Not really | Not really |
| Brake pedal sensor 2 | Not really | Not really | Not really |
| Number of mistakes | Not really | Not really |
Note: * All parameters are given for positive ambient temperature. Parameter values are advisory in nature. Source newvesta.ru
Options
The electronic engine control device for the Lada Vesta is Itelma M86. All other nodes are controlled by CBKE. Communication with vehicle systems is carried out via the CAN data bus. In addition to the standard installed components, the ECU interacts with the following devices:
- alarm;
- GPS tracker.
Itelma block. Photo source: drive2.ru
The main requirement for connection is the ability to work using a protocol compatible with the engine ECU.
Through the TsBKE block it is possible to diagnose the main components of the car:
- automatic transmission;
- anti-lock braking system ABS;
- dashboard;
- electric power steering.
The condition of electrical accessories and airbags is monitored. The developers have provided more than 50 parameters by which you can control the operation of the devices. The owner's manual lists about a hundred common error codes that the engine ECU can report. There are a total of 3,000 faults that can be identified by diagnostics.
Electronic control systems are monitored and adjusted using the values approved in the manual. Based on the data received from the scanner, the following is determined:
- precise engine speed at idle and under load;
- coolant temperature;
- fuel consumption;
- on-board electrical network parameters.
The exact total mileage of the car is determined by the trip computer. The data received from the scanner may differ from the instrument readings. During diagnostics, you can clearly assess the technical condition of the car and receive graphic reports.
How to prevent errors on Lada Vesta
There are often cases when, after diagnosing and inspecting the car, technicians do not find significant problems in the equipment that could cause errors. With proper prevention and care of the machine, such situations do not arise.
Experienced professionals recommend performing certain actions while operating the vehicle.
- Avoid deep discharge of the battery. All on-board equipment, including sensitive sensors, react extremely sharply to voltage sags within networks, which can cause their failure or incorrect operation. You should also be careful about the operation of the generator - strong surges also negatively affect the durability of the equipment.
- Once a year, diagnose the condition of all wires and structural elements. When operating a car, all electrical components are exposed to temperature changes, moisture, and dirt. External factors greatly damage the cable braid, which leads to its drying out and cracking. Subsequently, the insulation is broken, leading to short circuits and errors.
- Periodically check the tightness of the connections and the condition of the terminal blocks. During active driving, the plastic clamps are subject to strong vibration - this often causes contact failure and loss of signal from the sensor.
Also, some experts recommend treating all connections with a special oil - this will prevent moisture from entering the terminals and oxidizing them, which also negatively affects the passage of the signal to the on-board computer. At the same time, the cost of such lubricants is relatively low, which allows you to take care of your car quite economically.
How to use
Before purchasing an adapter, make sure it is compatible with your car. After purchasing the adapter, it is important to correctly connect the scanner to the connector. As a rule, the OBD 2 connector is located in the passenger compartment under the dashboard. Models before 2006 usually have a 12 pin connector (GM), and to connect the scanner you will need a 16 pin adapter.
Information on the location of the connectors is presented in the table and photo below.
Location of diagnostic connectors and recommended auto scanners:
| No. | Brand VAZ | Connector location | Suitable and recommended scanners + program |
| 1 | 2105, 2107 (with injector) | On the left side of the steering column | VAG-Adapter + Adapter 12 pin + OpenDiag Mobile |
| 2 | 2108, 2109 | Below the storage shelf, in the center. | |
| 3 | VAZ 2113, 2114, 2115 | In the cigarette lighter area, approximately 10-12 cm lower. | Scan Tool Pro + 12 pin adapter + OpenDiag Mobile |
| 4 | VAZ 2110, 2111, VAZ 2112 | On the right side in relation to the steering column, under the dashboard. | |
| 5 | Lada Priora, Kalina, | In the opening located behind the glove compartment. | Scan Tool Pro 2022 + OpenDiag Mobile |
| 6 | Lada Vesta | Located under the steering column on the left, on the left near the handle for opening the hood, under the mounting block | |
| 7 | Lada Largus | Inside the glove compartment on the back wall and closed with a protective cap | |
| 8 | Lada Granta | Right above the cigarette lighter. |
Location of connectors on some vehicles:
Instructions for diagnosing VESTA via OBD2 connector with your own hands via a laptop or smartphone
Determine where the OBD2 connector is located
Determine which scanner is suitable for your car
The selection of a scanner (adapter) for LADA VESTA depends on the ECU model, as well as the needs of the diagnostician / car owner.
To select diagnostic equipment, use the calculator: “Selecting a scanner for Lada Vesta”
Download the diagnostic program for the scanner
The diagnostic adapter requires software that can be installed on a laptop or smartphone/tablet. Auto scanners with their own software shell and display do not require software.
To select a program for the adapter, go to the section: “Programs”
Use the instructions and carry out diagnostics
When you purchase an adapter, instructions are included with the adapter. More detailed instructions on diagnostic car scanners and descriptions of their operation are posted in the section: “OBD2 car scanner reviews”
Identify errors and decipher them
Error codes and their interpretation are displayed in the scanner program interface. You can also study the complete database of errors for your car in the section: “OBD2 error codes for Lada Vesta”
Make repairs according to the error code
The unit is repaired according to the decoding of the error (problem) or contact a car service to eliminate a particular malfunction.
Check errors again
Scan Tool Pro - budget multiscanner for Lada Vesta
A good choice for a novice diagnostician
Nowadays there are scanner models with different versions of firmware and chips on sale. Scan Tool Pro with firmware 2022 is the most stable version so far, and also has maximum compatibility with cars manufactured since 2001, including Lada Vesta.