What is needed to replace the radio
The seat on the car dashboard is designed for a 1 DIN size device. Therefore, to install a 2 DIN radio, you will need an adapter frame and a center console from the luxury version of Granta. You should also purchase fasteners and plugs. If the ignition switch does not have an ACC position that allows you to listen to music when the engine is not running, some electrical modifications may be required. Some advise connecting the audio system through the alarm unit. But there are other ways. Therefore additional relays may also be required.
Center console 2 DIN
Removing the standard radio in Grant Lux
The difference between grants of the luxury configuration: the MMS (multimedia system) installed from the factory. This is a 2 din device.
To remove standard acoustic grants :
- take a knife or plastic spatula to dismantle the acoustics and disconnect the decorative trims to the right and left of the radio. It is not necessary to take pictures;
- in the gap between the cover and the panel we find the head unit lock. There are two of them on both sides. Press it out with a screwdriver;
- we take out the GU on ourselves.
Everything is described in detail in the video:
Replacing the standard MMC in Grant
The process - after removing the acoustics, we install a new system.
Difficulties : you may have to finish the fastenings of the new system for VAZ ones. Plus you need the right frame. The factory MMC frame may not fit.
Have you bought a new 2 din radio, but there is no frame for sale? You can do it yourself . Example at the link.
Let's start installation
To install the radio, you need to remove the center console. It can be removed easily, just pry it from below and apply a little pressure. Then you should disconnect all wires connected to additional equipment. To ensure that the new audio device is recessed into the panel during installation, you need to remove the partition with a hacksaw. After all, the standard seat sizes in Granta are usually designed for 1 DIN size. Sometimes it is also necessary to slightly shorten the adapter flange leading to the central nozzles of the ventilation system. It won't harm her work in any way.
Center console disassembled
When installing, you should follow the recommendations from the instructions and use the wires and adapters supplied with the gadget. Sometimes it may be necessary to purchase additional items. This will be clear from the radio connection diagram. Usually the connection takes very little time.
After connecting and checking the functionality of the device, you should assemble the central console. To do this, install all the buttons and nozzles of the ventilation system, as well as the heater control unit from the old console. The nozzles and buttons must be secured with latches until they click, and the unit must be secured with two screws.
The console is secured to the dashboard with four clamping clips. They can be included in the kit or purchased separately. During installation, the frame is fixed from the inside with latches.
The console must be locked until it clicks. You should also secure it with screws. After this, the decorative frame snaps onto it. The radio is installed!
Installation completed
How to connect a car radio in a car with your own hands
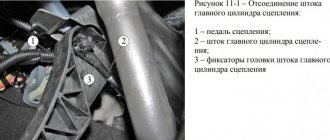
How to connect a car radio in a car - when installing the head unit in a car, always remember that the positive voltage power wire must be laid directly to the battery terminal with the obligatory inclusion of a special fuse block in its circuit, be characterized by high quality insulation and have a large cross-sectional area. It is most advantageous to install this fuse block in close proximity to the battery.
There are cases when inexperienced car owners make a serious mistake in the process of connecting the device, namely: - they take the positive power supply voltage of the radio from the cigarette lighter, this installation option is completely unacceptable. Consequently, due to such incorrect connection, the output power of the device is reduced, this is especially noticeable at maximum volume, when the backlight begins to blink. In addition, with a clear drop in power, distortion begins to occur at an earlier stage of melody playback.
The circuitry of the radio provides a pair of positive voltage wires, one of which is red and is the power wire, and the other yellow is the function of transmitting the control signal. The negative voltage wire is black. It is connected according to the standard scheme - to the car body or directly to the battery terminal with the “-” sign. It is considered preferable to use the second connection option, since it minimizes the likelihood of electrical interference.
The built-in audio power amplifier or active antenna is turned on via a blue “REM” wire.
Dynamic emitters are connected using separate pairs of wires, which have their own colors for each spatially located speaker.
For clarity, the connection diagram is shown below:
This diagram shows that one wire has a clearly defined color, and the other has a duplicate dark stripe; this wire is the conductor of negative voltage, that is, “minus”.
One of the important points during installation is the correct connection of speaker wires. Indeed, if the assembly is incorrect in relation to the color scheme, problems in establishing balance may arise in the future. If the speakers were connected without observing polarity, then the speakers installed at the rear will be out of phase, which will ultimately lead to a lack of low frequencies.
In addition to the usual schemes for connecting a radio to a car, there are several other possible options. For example, they connect directly to the ignition switch terminals. But this method is ineffective, to say the least, the fact is that such a scheme will not work if there is no key in the ignition. There is another option - connect to the alarm connector, but this solution also did not find wide support among car enthusiasts.
Sometimes during the operation of the device there is a need for preventive maintenance, repair or replacement of equipment, so to make this convenient, when installing the car radio, you do not need to shorten the wires, but it will be more effective to use ISO connectors and special adapters.
Here is another solution for connecting the device. The yellow wire goes to the 12v power terminal, and the red wire goes to the parking light connector. The contact point of 12v dimensions is located at some distance from the radio, for this reason it would be advisable to use an electromagnetic relay. Power for the relay can be obtained from the contacts of the ashtray light bulb.
Positive nuances of this scheme:
- The head unit itself starts working the moment the lights are turned on and at the same time retains memory.
- When the side lights are turned off, the head unit stops working. This is a significantly positive moment for those who, out of forgetfulness, do not turn off the light.
- The head unit can work even if the ignition is not turned on.
- If the side light circuit is implemented using LEDs, the electricity consumption is quite insignificant.
The video below shows the process of connecting a car radio in a production VAZ car:
Video:
Music in a car is considered one of the main indicators of driving comfort. Therefore, many car enthusiasts today are interested in the question - how to connect a radio in a car on their own and what is needed for this? In this article we will talk about all the connectors and their markings, as well as the procedure for installing a car radio with your own hands.
Settings
After all operations have been completed, you should configure the new device and check the voltage in the on-board network. Many Grants suffer from current leaks or have a weak generator. With a powerful audio system, this can drain the battery quickly. Therefore, it is necessary to determine the cause of the leak and eliminate it. The generator may also require modification or replacement. Cars from the first years of production often have problems with this unit.
The 2 DIN audio system is distinguished not only by high sound quality and ease of use, but also often by advanced functionality. Often this is a full-fledged multimedia complex based on Android. In addition, the device allows you to connect an amplifier and subwoofer, as well as a rear view camera.
Also watch the video tutorial on installing a 2 DIN radio:
Find out what kind of lighting to install in your car from our article.
Possible problems and how to solve them
When using the radio, problems may occur due to connection errors. For example, the device will not turn on due to incorrect connection of the power circuits. If there is a fuse, it will blow if a short circuit occurs due to careless handling or connecting the power wires to the terminals of speakers or service devices.
To solve this problem, you should turn off the radio, remove it, inspect the wiring and check the connection according to the colors of the wires. The incorrectly connected wires are then disconnected and reconnected according to their intended purpose.
If after turning on the device there is no sound, then you should set the volume control to a position other than zero. If the radio suddenly turns off or an error message appears on the display, then there is a leak or short circuit in the speaker wiring. To deal with this problem, the integrity of the insulation and the location of the wires are checked. Damaged cables are replaced and moved away from hot and sharp objects.
Reviews
| № | Positive |
| 1. | Victor, 39 years old: after buying the car, he did not change the radio, despite the push-button control option. The sound quality is good, the radio reception is excellent, that's enough for me. |
| 2. | Konstantin, 41 years old: bought the car second-hand, second owner. I didn’t change anything, I left the original radio. The functionality is good, the build quality is also good, it reads from a flash drive. |
| 3. | Vasily, 44 years old: I listen to the radio more, the reception in the city is good. True, it causes interference near metal structures, but this is natural. |
| 4. | Kirill, 36 years old: I work as a taxi driver, on wheels all day. The standard tape recorder saves the day, it works properly. My friends recommended replacing it with a touchscreen model from the new Granta, but so far the old one hasn’t failed. |
| Negative | |
| 1. | Victor, 38 years old: the standard audio module, although not bad, seemed to me not enough, so I replaced it with a foreign one and supplemented it with an amplifier. Now the volume is good, the quality is high. |
| 2. | Mikhail, 42 years old: I work as a courier, I drive for the entire shift. I expected more from the standard radio, so I had to replace it with a new one. The volume suits me, I plan to connect an amplifier - a crossover. |
| 3. | Ivan, 33 years old: I bought the car second-hand, immediately replaced the audio module, the reviews are not good. New and high-quality equipment from Trinity, no problems. |
| 4. | Vladlen, 40 years old: friends gave me a gift in the form of a radio with touch control for our anniversary. Before this there was a push-button one. Can't compare, quality, sound, control, functionality at a high level. |
ConclusionThe opinions of motorists on the functionality and sound quality of the standard radio are divided, which is obvious. Everyone evaluates according to their own criteria. Some people care about sound, others about functionality, and others about control. Regardless of the type of radio: push-button or touch-sensitive, the workmanship is good.
No massive breakdowns or defects were recorded. Maintenance is not expensive, parts and components are available both at official representative offices and on the Internet. Now it will not be difficult for the owner to remove the radio on the Granta liftback with his own hands without contacting a service station.
How to flash the firmware
- Buy an SD card, format it in FAT, exFAT format;
- We download the firmware for free on the manufacturer’s official website;
- We save the data in the root directory of the SD card;
- We insert the SD card into the slot on the radio, start it, wait for the update to finish;
- Turn on and off the module;
- We customize the new interface for ourselves.
If the firmware is installed incorrectly, additional screen calibration using the CAN bus will be required. It is impossible to do this yourself, only in a service station. After successful flashing, the following is available:
- graphic equalizer;
- viewing photos, pictures, videos;
- improved sound quality;
- possibility of installing a navigation system.
Disadvantages of a standard radio
- Outdated firmware from the “box”;
- Not all options are initially available;
- The need for periodic software updates;
- Push-button interface.
Audio preparation Grants of different configurations
In the “standard” configuration, the Lada Granta has pre-installed power wiring harnesses, which are located in the console opening. Electrical wires are connected only to the radio, so don’t be surprised if you don’t find them in the doorways. To wire to the doors, you will need to pull power wires, which are located under the console panel. In this configuration of the Lada Granta, the stereo system can be installed independently if due attention is paid to it.
In the Lada Granta Norma, the power wires coming from the console are already routed to the doorways. You only need to connect the audio system in accordance with the assembly diagram. It's not uncommon for the stock door wiring to not match up with some speaker connectors. To solve this problem, you need to purchase suitable wires and replace them in the doorway. Lada Granta Norma has a trim with a special pattern for the speakers. Based on it, you can cut the opening yourself.
During assembly at the factory, the Lada Granta luxury version is equipped with a touchscreen multimedia system and speakers. The improved radio tape recorder is complemented by Bluetooth function and a 5-inch display with line output. In addition, the built-in radio allows you to connect a USB 2.0 flash card, through which you can listen to recorded music.
The design of the Lada Granta Lux allows for replacement of the audio system, including speakers. It may be necessary to adjust the opening for the columns in accordance with the instructions.
When buying a car, every motorist is interested in installing car acoustics. These days, every driver spends a huge amount of time behind the wheel of his own car, preferring to listen to music while driving. Often in nature, fishing, or on vacation, music becomes something that many people simply cannot do without. Listening to music for each of us is passive relaxation and expression of inner experiences.
The abundance of car radios is great; choosing one is becoming increasingly difficult. The perfect choice of car radio depends entirely on certain rules. First you need to make sure that the car has a special connector for this type of equipment. If there is one, you need to find its dimensions and only later go shopping.
Next, the driver must familiarize himself with the functions of modern equipment: the ability to reproduce audio recordings, receive radio signals, and broadcast television programs. The latter is not welcomed by car owners, because there is no full ability to watch the TV while it is moving, and the quality of the signal leaves much to be desired.
Most modern car radios have additional functions: reading information from a flash drive, connecting a laptop and other devices, Bluetooth, navigation, remote control and almost everything else. Therefore, when buying a radio, you can get not only the opportunity to enjoy your favorite music on the road, but also many necessary and exciting functions.
The car radio is the main element of a car's stereo system; the sound quality depends on it. The subwoofer will provide surround sound. It must be chosen in accordance with the desires and requirements for the quality of music playback. All devices are divided into two types: 1 din radio tape recorders with a height of 50 mm and 2 din radio tape recorders with a height of 100 mm. One or another model is selected taking into account the opening on the car control panel. In this case, an adapter frame will help in installing the radio.
How to install a 2 DIN radio in Lada Granta FL 2018
Installing two speakers in the front doors
- dismantle the door card, handle, control unit;
- We compare the standard cutouts for the speakers with the actual dimensions. If necessary, expand with a file or fine sandpaper. It is strictly forbidden to use cutting objects, as there is a high risk of damage to the plastic of the door card;
- we check for the absence of roughness in the hole, install the speaker, fix it, connect the standard terminals with wiring;
- we check the operation of the speaker, install the door card, and fix the metal grille to protect the speaker from mechanical damage.
If the radio tape recorder dangles in the slide and rattles
It happens that the acoustics hold weakly in the sled, although they sit firmly. Solving the problem:
- Using the keys for dismantling (included with the control unit), remove the radio;
- We take a small piece of vibroplast (resin-based foil) and glue it onto the slide from the inside, top or bottom - this way we will ensure that the tape recorder is completely pressed against the slide without unnecessary vibrations;
- Once again, use a screwdriver to press down all the fastenings of the slide: some might have been under-tightened;
- We put the acoustics back and check - all unnecessary vibrations during shaking should disappear.
Vibroplast helps not only with soundproofing a car.
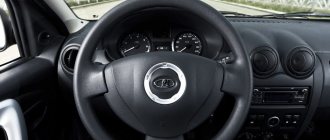
Connecting Pioneer to the multifunction steering wheel
If you need to install a non-standard radio in a car with a multifunction steering wheel and not lose control from its buttons, use an adapter. They are universal and specialized for specific brands. Look in stores for an adapter for a multifunction steering wheel. Its connection is carried out as follows:
- disconnect the battery from the car’s on-board network;
- remove the standard radio and pockets, if any;
- find the ISO connector for connecting the car radio - the adapter will be installed in it;
- connect the adapter cable (supplied with it) to the radio, and the adapter itself to the ISO connector of the car;
- configure the steering wheel buttons;
- reconnect the battery to the network.
What to do if the length of the wires and antenna is not enough
To get by without extending the wires, you will have to suffer:
- We put our hand under the panel in the glove compartment area;
- We put the radio in the slide and connect it to the plugs;
- We blindly connect the power, the connector for the speakers, the wires for the amplifier, and the antenna.
Disadvantages of the method: we spend a lot of time, the process is dreary and inconvenient. We'll probably rip off your wrist.
Plus: there is no need to build up wires, which will then interfere with the installation of the PG, resting against the back wall.
As you can see, immediately behind the GU in Grant there is a vertical partition, which greatly interferes with blind installation.