VAZ 2114 and VAZ 2115 are considered a kind of “star” of AVTOVAZ in the early 2000s. These models are truly distinguished by their unpretentiousness and durability. Every owner who closely monitors his four-wheeled friend understands how important it is to provide timely care for the mechanisms. To maintain engine operation in normal mode, it is enough to change the oil on time and monitor the cooling system. However, if changing the oil usually does not present any difficulties for drivers, working with the cooling system and, in particular, with the pump can cause some difficulties.
Why do you need a pump in a car?
Speaking about engine operation, one cannot help but appreciate the functionality of the cooling system. After all, it is thanks to its high-quality work that it becomes possible to operate the engine in any weather and in any mode.
The engine is a very complex component of any car. Constant friction of the pistons leads to the fact that the engine parts quickly heat up, this can lead to their “jamming”. There is only one way to prevent engine overheating - by constantly maintaining the standard temperature. It is for this purpose that the cooling system was created in the machine.
Coolant is poured into the expansion tank (on VAZ 2114, VAZ 2115 cars, both antifreeze and antifreeze can be used with the same success). From the tank, the liquid flows through tubes into the water pump (its second name is a pump), and from there into the radiator and to the cylinder block. It is the circulation of liquids that ensures high-quality and timely cooling of the engine.
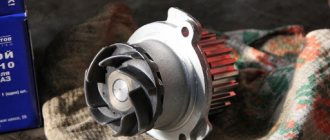
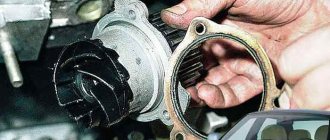
The standard product in a metal case is equipped with an impeller to create antifreeze pressure in the system
The water pump is set in motion after the power unit is started. On VAZ 2114, 2115 it is located in the timing system, that is, the pump impeller is driven by the timing belt. The impeller rotates the blades, due to which the antifreeze begins to circulate throughout the system. If there were no pump, then there would be no point in the entire cooling system.
The pump serves one single purpose - to create the necessary pressure in the system for uninterrupted circulation of antifreeze.
Why does antifreeze leak out of the expansion tank? We solve the problem without a service station
Increased pressure or temperature in the cooling system and, as a result, knocks the antifreeze out of the expansion tank, and the car is covered in a cloud of steam. The situation is unfortunately familiar to many motorists. Regardless of the car brand, the principle of cooling the propulsion system is the same for everyone. Typical malfunctions are also similar. Antifreeze leaks from the expansion tank for many reasons, and most of them are directly related to the cooling system, but can also be caused by a violation of the vehicle’s operating conditions. Signs and consequences Signs of a malfunction in cooling equipment that manifests itself in the expansion tank: Both situations mean changes in the normal functioning of the system and primarily indicate a violation of the tightness state, which causes squeezing out of the coolant. Malfunctions and their causes The design of the expansion tank is simple. This is a plastic container in which a sensor is installed to detect changes in the nominal coolant level. The container is hermetically sealed with a lid with a pressure regulator valve, which is activated when the pressure in the system exceeds the standard one. Depressurization caused by the tank can only occur in two cases - either the tank material has cracked or the valve on the lid has failed and air begins to flow into the system .The problem can be much more serious if the breakdown occurred due to a burnt-out gasket under the cylinder head (cylinder head). It is not always possible to determine such a malfunction by eye, because burnout could pierce the gasket both outside and inside the cylinder head. Here we recommend reading our article - “Symptoms of a broken cylinder head gasket.” The next reason may be a malfunction of the pump, which caused the circulation processes in the system to stop, which also occurs when the circuit depressurizes and air locks form. A thermostat failure also leads to a change in the physical condition of the coolant, its temperature rises, and as a result, the pressure rises and knocks the coolant out through the check valve of the tank. To add to the problem, the antifreeze may also boil. Troubleshooting Troubleshooting must begin with an analysis of the characteristics of its manifestation. When the coolant in the distribution tank behaves normally at idle, and when the speed increases, it begins to rise and spill out, then we can speak with confidence about such causes of failure as:
- loss of tightness in the pressure relief valve;
- thermostat failure;
- pump breakdown;
- pipe rupture.
When the cylinder head gasket breaks, antifreeze will be knocked out even at idle, regardless of the engine operating mode. The easiest way to determine such a breakdown is to look at the smoke from the exhaust pipe. If smoke comes with white steam, you can be sure that antifreeze is seeping into the cylinder head. If liquid drips from the pipe, then the most advanced motorists taste it. If the water tastes sweet, then it is antifreeze; if it tastes bitter, it is antifreeze; the taste is neutral - ordinary condensation. The reasons for the situation when antifreeze is knocked out of the expansion tank may be a breakdown of any unit involved in engine cooling. If this is damage to the cover or the pressure relief valve built into it, then you can fix such a breakdown yourself by replacing the cover with a working one. Replacing the thermostat and pump in a garage can also be done, but will require special knowledge and skills. But replacing the cylinder head gasket definitely needs to be entrusted to a specialist.
Replacing the pump on a VAZ 2114 (8 valves)
Replacing the water pump is a rare procedure that any car will need sooner or later. The design of the pump is a very simple device, which is why it breaks down infrequently. However, over time or due to aggressive driving style, any unit can fail.
How to check the pump
On VAZ 2114,2115 it is very easy to identify a faulty water pump. You do not need to have any special knowledge, since there are only three signs that you need to pay attention to.
Engine overheating
If even in the winter, when driving short distances, the fan cannot cope with cooling, then this sign may indicate that not everything is in order with the pump. If the gauge needle at the engine temperature is constantly above the operating mark of 90 degrees, then it’s time to carry out checking work:
- Start the engine and warm it up to operating temperature.
- Turn on the stove.
- If cold air immediately begins to flow from the stove, then the circulation in the cooling system does not work normally.
- It is necessary to replace the pump, as the malfunction is associated with damage to the impeller.
The appearance of fumes and heat from under the hood is a clear sign of severe engine overheating
Timing belt wears unevenly
When examining the hydraulic distribution mechanism of a VAZ 2114, VAZ 2115, you may notice uneven wear on the belt. Indeed, due to the fact that the pump is directly driven by the timing belt, it wears unevenly (for example, only on one side) - this symptom also indicates a breakdown of the water pump.
You will need to remove the belt to verify the reality of your guesses. Due to wear of the pump bearings, it can become loose and therefore quickly break. While the pump itself can still perform its function normally for some time.
Ideally, the timing belt should wear evenly on both sides
Pump leaking
If the water pump sits on the car for a very long time, then sooner or later the oil seal will wear out so much that it will begin to leak. An antifreeze leak in the timing belt under the pump is one of the signs of a pump malfunction. When a few drops are released per day, the situation cannot be considered critical: the pump generally copes with its job, providing high-quality cooling of the engine. However, if a large amount of antifreeze leaks from under the pump, you need to change the pump urgently.
Abundant leakage indicates a loss of sealing of the pump and its failure.
In some cases, leaks can occur both due to wear of the oil seal, and due to improper installation of the gasket when replacing the pump.
Causes of oil pump failure
The reason why the oil pump has failed can be determined by diagnostics. There are at least 8 main oil pump faults. These include:
- Clogged oil pickup strainer. It is located at the inlet of the pump, and its function is to coarsely filter the engine oil. Like the system’s oil filter, it gradually becomes clogged with small debris and slag (often such slag is formed as a result of flushing the engine with various means).
- Malfunction of the oil pump pressure reducing valve. Usually the piston and spring included in its design fail.
- Wear of the inner surface of the pump housing, the so-called “mirror”. Occurs for natural reasons during engine operation.
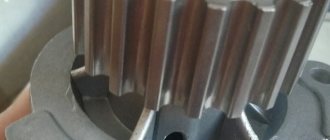
- Wear of the working surfaces (blades, splines, axles) of the oil pump gears. It happens both over time of long operation and due to rare changes of (very thick) oil.
- Using dirty or unsuitable engine oil. The presence of debris in the oil can be for various reasons - careless installation of a pump or filter, use of low-quality lubricating fluid.
- Careless pump assembly. In particular, various debris was allowed to get into the oil or the pump was not assembled correctly.
- Drop in oil level in the engine crankcase. Under such conditions, the pump operates at excessive capacity, which causes it to overheat and may fail prematurely.
- Dirty oil filter. When the filter is very clogged, the pump has to make significant efforts to pump the oil. This leads to its wear and partial or complete failure.
Regardless of the reason that caused the partial failure of the oil pump, it is necessary to carry out a detailed check of it and, if necessary, make repairs or complete replacement.
Preparing the tools
Regardless of what specific problem arose on your car, the only solution to fix it is to replace the pump. This work on a VAZ 2114, VAZ 2115 can be done independently, since the convenient design of the machine makes it possible to carry out all stages of work without special skills.
First you will need to prepare a simple tool:
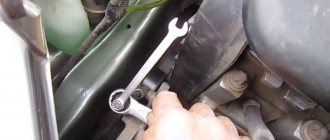
- wrenches 10, 17 and 19;
- socket head 10;
- flat screwdriver with a thin blade.
Without this tubular socket wrench it will be impossible to unscrew the hard-to-reach bolts on the pump mount
How to change the pump
The procedure for working on a VAZ 2114, 2115 with an 8-valve engine is determined as follows:
- Remove the protective cover from the timing belt.
- Slightly loosen the tensioner roller.
- Slightly reduce the tension on the alternator belt, and then remove the alternator belt and timing belt.
- Disconnect all hoses from the pump (antifreeze may leak out, so it is recommended to place a container under the pump in advance or cover the area with a rag).
- Drain the antifreeze from the system (just unscrew the cap from the radiator so that the liquid flows out in 10 minutes).
- Disconnect the pump protective cover and pull out the pump.
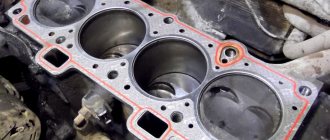
- After dismantling, be sure to clean the flange surfaces from smudges and dirt, and also remove the remnants of the old rubber gasket.
- Next, you will need to perform all work on installing the new pump in reverse order.
Video: DIY water pump replacement procedure
It is necessary to change the rubber gasket even if it shows no signs of wear or damage. To ensure reliable sealing, it is recommended to coat both the pump mounting location and its junction with the cylinder block with a heat-resistant sealant.
It is recommended to ensure that the new and old pumps are completely identical.
Dismantling
Before starting work, you need to understand where the part is located. The water pump is located on the left side of the engine compartment, under the camshaft pulley, so when it jams, the timing belt flies off.
The removal process is simple; the engine must cool down before doing this.
In a vehicle with an 8-valve engine, the following actions are required:
- Disconnect the terminal from the battery.
Disconnecting the terminal from the battery
- Remove the timing case (held on by 3 bolts).
Removing the timing case
- Place a mark on the camshaft so that it aligns with the mark on the engine. You need to jack up the car and slowly turn the right front wheel, having previously installed 4th gear.
- Move the timing belt. The product needs to be loosened; the tension roller will need to be removed.
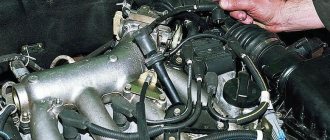
- Unscrew the ignition module mounting bolts without disconnecting the contacts. This is necessary to get to the antifreeze or antifreeze drain plug.
- Prepare a container where the liquid will flow and a hose.
- Unscrew the plug with a key set to “13”. Place the hose, which should be directed into the container.
- When the pressure becomes weak, the lid can be screwed back on. There is no point in draining all the liquid; to make the process easier, you can leave a little.
- Then remove the container.
- Remove the thin pipe. The part is connected to the throttle valve heating unit.
- Remove all heating pipes.
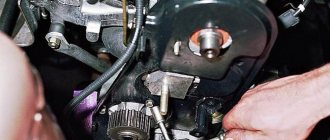
- Wedge the camshaft gear teeth with a screwdriver and unscrew the fastening bolt.
- Remove the pulley.
Pulley removal
- Remove the metal casing (secured with 5 bolts).
- Unscrew the pump. Using a wooden block, tap the device body and dismantle it.
- Clean the sealant from the seating area.
Attention! During the replacement process, it is recommended to check the timing belt and pulley. If the condition of the parts is poor, they must be replaced along with the pump.
Before installing a new pump, you need to check the old one for play. Check the tightness of the oil seal. If there is no play or leaks, the old pump can be reinstalled.
How to change pipes on a pump
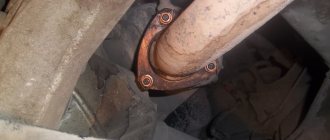
Replacing the pipe on the water pump is advisable in cases where the hose is swollen or has small cracks through which antifreeze leaks out. A significant disadvantage of changing the pipes is that they are located below the pump - that is, you will have to jack up the body and crawl underneath.
The old pipes are removed after the antifreeze has been drained and the pump itself has been dismantled. It is important to clean the landing site from dust, dirt and coolant leaks. Then connect new pipes to the new pump, installing a new gasket at the junction. It is recommended to use heat-resistant sealant to ensure reliable connections.
Before installing new pipes, it is necessary to drain the antifreeze from the cooling system.
How to install an additional pump on a VAZ 2114, 2115
Experienced VAZ owners know that the “fourteenth” and “fifteenth” are ideal for conducting a variety of experiments on installing this or that equipment. For example, if the standard heating on a VAZ 2114 through the stove is not enough for the owner, then you can install a second (additional pump). The essence of this procedure is that the pump will pump antifreeze in a small circle, thus providing better engine cooling and maintaining the temperature in the cabin in winter.
A second water pump keeps the cooling system running at peak efficiency.
Installing an additional pump takes a maximum of 10 minutes, but the procedure will increase slightly in time due to the fact that you will have to drain the antifreeze from the system.
You will need to purchase the following spare parts in advance:
- water pump (for models 2114 and 2115, the ideal solution is a pump manufactured by Bosch 0 392 020 034);
- elements of electrical equipment;
- several hoses of different lengths (depending on the diameter of the small circle) with clamps;
- fastening for the pump.
Assembling the structure
In this case, you will already need some experience in independently servicing a VAZ. So, to install an additional pump, you need to:
- Assemble this unit itself from three parts - a pump and two pipes (the shortest hose works for the outlet, the longer one for the suction of antifreeze).
- Next, drain the coolant from the system.
- Near the bottom of the car, feel for two hoses coming from the stove, remove the one that works for the outlet.
- Instead, connect the assembled unit.
- After this, attach the pump itself to the crankcase of the manual gearbox. It is better to use brackets and screws for this.
The final stage is pouring new antifreeze.
To mount the pump, you can use any type of fastener, the main thing is to ensure the reliability of the connection
Replacing the pump on a VAZ 2114, VAZ 2115 (16 valves)
The procedure for replacing the water pump on 8 and 16 valve engines will be slightly different. The fact is that on a VAZ 2114 with 8 valves there is only one crankshaft pulley, and on cars with a 16-valve engine there are two. That is, the designs of cars with different types of engines are somewhat different from each other.
In this regard, you need to be extremely careful: pumps for VAZ with 8 or 16 valves cannot be considered interchangeable. That is, when purchasing a new water pump, you should make sure that it is suitable specifically for your type of VAZ engine.
Part price
The water pump for 2114 is produced by many Russian and foreign manufacturers. In addition to AvtoVAZ products, spare parts from the brands Luzar, TZA and Gates are popular among owners of this car. Parts from other brands are also available for sale. Their prices vary:
- "AvtoVAZ" - 925 - 1170 rubles.
- "BelMag" - 750 rubles.
- KRAFT – 945-1055 rubles.
- TZA - 1480-1760 rubles.
- Luzar – 920 rubles.
- Valeo - 1880 rubles.
The most durable, according to the majority of owners of the fourteenth, are considered to be branded products of the automaker, TZA and Luzar products. They demonstrate the optimal combination of price and quality.