02/04/2022 7,964 VAZ 2106
Author: Ivan Baranov
The quality of operation of the VAZ 2106 engine depends on the condition of the cylinder head gasket. It is a disposable consumable that requires replacement every time the cylinder head is removed. The article describes what function the gasket performs and how to replace it on a VAZ 2106, and also attaches a video demonstrating the replacement procedure.
[Hide]
What is the function of the cylinder head gasket?
The cylinder head gasket is located between the cylinder head and the cylinders and performs several functions:
- seals the place where the head adheres to the cylinder block;
- prevents oil from leaking and coolant from entering the cylinders;
- Restrains internal pressure and heat.
Thus, it separates three systems: gas distribution, cooling and lubrication. Experiencing heavy loads, it wears out quickly.
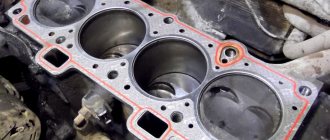
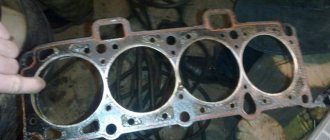
Gasket with traces of breakdowns
The following are signs that may indicate the need for replacement:
- insufficient pressure in one or more cylinders;
- foaming of the coolant, a drop in its level in the absence of an external leak, occurs due to gases entering the cooling system;
- emulsion on the oil dipstick, an increase in the oil level in the pan, the reason for this is the presence of antifreeze in the lubrication system;
- the appearance of oil stains on the surface of the coolant and the radiator neck indicates a broken gasket in the area of the oil channel;
- white smoke in the exhaust gases, while the coolant level drops;
- squeezing out the coolant fluid from the expansion tank in the form of foam indicates a violation of the tightness of one of the cylinders;
- The coolant level drops and the engine boils.
The video describes the signs of gasket burnout.
Damage to the gasket may be caused by:
- low-quality consumables;
- overheating of the power unit;
- improper tightening of cylinder head bolts;
- insufficient coolant level;
- Incorrect installation of the cylinder head.
How to replace clutch fluid on a VAZ 2101-VAZ 2107?
Draining: 1) First, before you start working, use a clean or slightly dirty rag to wipe the clutch reservoir, or just its cover, to make it more pleasant to work with.
2) Next, grab the tank cap with your hand, and thereby completely unscrew it and put it aside so as not to lose it.
3) Next, if the crankcase protection installed on your car bothers you, let’s say it’s too big, then remove it to gain access to the clutch slave cylinder. (For information on how to remove the protection, see the article: “Replacing the crankcase protection”)
4) Now perform the following operation, to do this, again using a cloth, wipe the protective cap located on the fitting of the clutch slave cylinder and at the same time clean the cylinder fitting itself from dirt.
5) After the dirt has been removed, take a wrench and use it to unscrew the fitting itself by about 3 or 4 turns (At your discretion), and after unscrewing the fitting, at this time let your assistant help you, thereby pressing the pedal clutch several or even more times, generally until all the fluid flows into the container you prepared in advance.
Note! When pressing the pedal, be sure to warn the assistant that it may fail, that is, fall to the very bottom and not go back, then in this case, let him return the pedal to its place with his hand, bending it to do this and thereby lifting it!
Filling: 1) When all the liquid has been drained from the tank, then in this case tell the assistant that you don’t need to press the pedal anymore, and at this time you tighten the bleeder fitting that was unscrewed earlier so that the liquid no longer pours out of the working cylinder and always remained in it.
Note! At the very end of the operation, fill the clutch hydraulic reservoir with brake fluid to the required level!
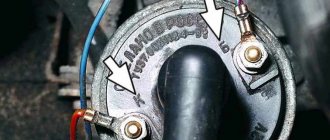
And after pouring the liquid before screwing the lid, visually inspect this lid for defects, and also check the compensation cavity, which is indicated by the arrow and which is also removed from the lid, so if after removal you see signs of rubber aging, signs of cracks and tears, then In this case, replace this cavity with a new one!
Advice! By the way! You can also replace the fluid in the clutch drive, displacing the old one, to do this you need to ask your assistant to add fluid to the reservoir as it is displaced, and do all this until normal, clean fluid begins to flow into the container you are holding!
Important! Be sure to bleed the car’s clutches when you finish replacing. (For information on how to bleed the drive, see the article: “Bleeding the clutch on a VAZ”)
in the article: “Bleeding the clutch on a VAZ”)
https://youtube.com/watch?v=IY7EtU6DLkY
Replacement process
If signs of damage to the gasket are detected, it should be replaced immediately.
Set of tools
To carry out the replacement procedure you need to prepare:
- set of wrenches;
- pliers;
- screwdriver;
- torque wrench;
- coolant container;
- clean rags.
A set of necessary tools
The car must be washed before replacement to prevent dirt from getting into the disassembled engine.
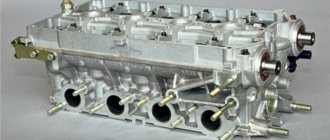
Features of the injector, list of equipment for replacement
This cylinder head is not suitable for installing an injector on it, since it has inlet holes of inappropriate shape and does not have studs for attaching the intake manifold to the receiver. Of course, you can remake it for cost-saving reasons, but if you do not have special knowledge, then it is better to purchase a ready-made cylinder head assembly from the modernized Niva - 21214.
In case of financial problems, you can purchase an empty cylinder head and replace the valves and other things from the old head into it. But again, this requires knowledge and experience. In addition to the cylinder head, you will need to purchase the following equipment from the VAZ 21214.
In addition to the above spare parts, you will also need to purchase:
It is better to buy electronics from the Lada 110 family for engines with 8-valve cylinder heads.
Stages
The procedure for replacing the cylinder head gasket on a VAZ 2106 consists of the following steps:
- Disconnect the car from power by disconnecting the negative terminal from the battery.
- Drain the coolant into a prepared container.
- Remove the air filter, valve cover, air damper control drive.
- At the next stage, it is necessary to align the timing marks on the camshaft and crankshaft so that you do not have to set the valve timing again during assembly.
- Next, you need to dismantle the carburetor and ignition distributor with high-voltage wires.
- After unscrewing the tensioner cap nut, you should loosen the tension on the timing chain.
- Having loosened the fastening of the gear, it is necessary to dismantle it.
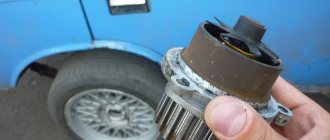
We remove the camshaft sprocket.
The chain should be tied with wire so that it does not accidentally fall into the engine. - Next you need to remove the bearing housing along with the camshaft.
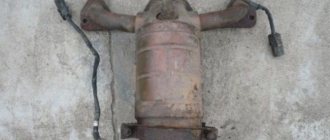
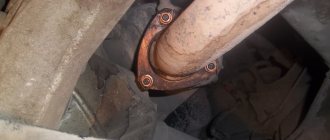
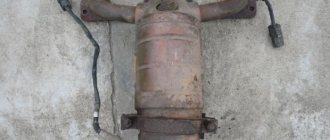
- The next step is to disconnect the exhaust manifold from the cylinder head and all pipes.
- After loosening the clamps, you need to remove the radiator inlet pipe and the thermostat bypass hose.
- Next, you need to unscrew the cylinder head mounting bolt located next to the ignition distributor.
- Then you need to unscrew the ten mounting bolts of the cylinder head and dismantle the unit along with the unscrewed bolts.
- Next you need to remove the old gasket.
- Before installing a new consumable, it is necessary to thoroughly clean the adjacent surfaces from dirt and remnants of the old gasket.
- Having degreased the contacting surfaces, you need to install a new consumable.
Installing a new consumable - The cylinder head mounting bolts should be tightened using a torque wrench with the tightening torque specified in the VAZ 2106 operating instructions.
- Next, we reassemble in reverse order. At the same time, we control the coincidence of the marks and adjust the belt tension. The valves should also be adjusted.
- After final assembly, you need to check the operation of the engine.
This completes the replacement of the gasket on the VAZ 2106.
There is nothing complicated in the procedure; a car enthusiast can do it independently, even with little experience in repair work. This way you can save on car service costs.
Installing the cylinder head
Now a few words about installing the cylinder head back onto the block. Firstly, be sure to replace the gasket, since it is installed only once. Of course, you must first clean the block and the surface of the head from traces of old gaskets. I did this using a special Dutch-made Ombra gasket remover, applying this liquid to the entire surface of the cylinder head:
As a result, after about 10 minutes of waiting and careful work with a regular clothes brush, you get a fairly noticeable result. For comparison, I decided to do it as follows: I cleaned the first three combustion chambers with various means, from gasoline to WD-40, and the last one with this special tool. You can see the result clearly:
After all this is done, you can begin to install the cylinder head back. In order to do this, you will need a special torque wrench, since these bolts must be tightened with a certain torque in the following order:
- First technique: moment of force from 33-41 N*m.
- The second is from 95 to 118 N*m.
It is also worth noting that the following order must be observed:
We install all the removed parts in the reverse order and finally assemble the VAZ 2106 engine. This is how you can remove the cylinder head yourself and install it back. I wish you success.
Purpose of sleeves
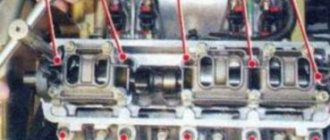
The main task of the valves is to supply the combustion chamber with a fuel-air mixture and remove exhaust gases from it. Each engine cylinder has two valves - intake and exhaust. A rod moves in the guide bushing, which lets in/out exhaust gases and the fuel mixture. The combustion chamber is sealed due to the precise “fitting” of the head on the seat.
The quality of engine valve operation depends on the guide bushings and seats. During operation, they wear out and cannot maintain high engine performance. In such a situation, they will have to be changed.
Typical breakdowns
The “Five” can notify its owner of problems with the steering not only by loss of controllability and the appearance of noticeable play, but also by knocking noises that appear when turning the steering wheel or crossing uneven surfaces. Most often, the steering column of the VAZ 2105 knocks, namely one of the worn-out crosspieces. Previously, there were smart people who pressed out the crosspiece and made repairs to it. Today the best solution is to completely replace the steering shaft, along with the cardan. It’s more reliable, faster and smarter. Replacement takes very little time, you literally need to unscrew two bolts. There is no need to worry when purchasing, because the shaft dimensions of the entire “classic” family are the same.
If knocking occurs in several places, then it is best to change the entire control, including the steering gear. Moreover, today they offer better quality spare parts than they cost initially. For example, the new VAZ gearbox has a more convenient system for changing the oil and disconnecting the bipod; there will be much fewer problems with it in the future than with the old one.
If damage to the boots or gaps is detected, the tips must be replaced. To replace them you will also need a special puller. Some owners of the “classic” once every few years redo the steering and measure the wear of the pins and other parts with a caliper. This gives you confidence that the car will not let you down on a long trip.
More serious damage is deformation of levers and rods. They happen when hitting an obstacle, a curb, or a speed bump at high speed. Sometimes it is very difficult to determine whether the tie rod needs to be replaced or not. Deformations are often difficult to see, so you also have to resort to measuring tools. Again, repairs come down to simply replacing deformed or worn parts. There is no point in trying to straighten or restore them.
If, when turning, the control does not knock, but crunches, it means that one of the bearings has crumbled. It can be located either inside the steering column or in the gearbox. In both cases, replacement is a rather complicated operation; disassembly requires incredible effort. The gearbox, of course, should be replaced entirely, but it is better to entrust the repair of the column to a workshop. It is worth remembering that after the steering has been repaired, it is necessary to adjust the camber and toe of the wheels.