Hidden cavities of Lada Kalina
Lada Kalina.
Anti-corrosion protection of the body During everyday use of the car, the paintwork and anti-corrosion coating of the body is exposed to an aggressive environment: de-icing agents (in winter), sand, small stones, vibration and temperature changes, which cause the appearance of microcracks in the protective coating of the body, through which water and oxygen penetrate the metal surface. As a result of exposure of the body to an aggressive environment, the process of metal oxidation (corrosion) begins, which leads to the loss of its strength properties, and the presence of large amounts of salts and acids in the water only accelerates the oxidation process.
The most susceptible to corrosion are the hollow profiles of the body, the bottom, the lower parts of the doors and pillars, as well as the connections of body parts, including spot welding areas.
Corrosion develops most quickly in hidden cavities and lower parts of the body when moisture, dirt, salts, and acids enter. In this regard, during the operation of the car, for additional protection of the internal surfaces and hidden cavities of the body, a special anti-corrosion composition is applied, and sealing mastics are applied to the joints of parts.
The anti-corrosion composition used to treat the internal cavities of the body and the bottom must meet the following requirements:
— contain corrosion inhibitors;
— be evenly distributed over the entire treated surface and create a protective film that is resistant to vibration and temperature changes;
— have good adhesion to body elements or previously applied coatings;
— be compatible with previously applied paint and varnish coatings and anti-corrosion compounds;
— maintain their physical and chemical properties for a long time under the influence of external factors;
— contain materials that, when processing a vehicle, meet fire and environmental safety standards.
Autopreservative "Movil" or "Movil-2" is used for treating hidden cavities. It is recommended to treat cavities every 1-1.5 years. The autopreservative allows the treatment of surfaces previously coated with nigrol or other oils, as well as rusty surfaces.
Protective lubricant NGM-ML is used for processing hidden cavities. The hidden cavities of new cars are treated with this material.
The protective film coating NG-216B is used to cover parts of the car under the body.
Bitumen anti-noise mastic BPM-1 is used to protect the underbody from corrosion and to reduce noise. Coating thickness 1.0-1.5 mm.
Plastisol D-11A is recommended for protecting the underbody from corrosion, abrasive wear and for sound insulation. Coating thickness 1.0-1.2 mm.
Plastisol D-4A is intended for sealing welds.
Non-drying mastic 51-G-7 is used to seal body joints.
The anti-corrosion substance is sprayed into the internal cavities using air and airless spraying.
When spraying by air, compressed air at a pressure of 0.5-0.8 MPa, a spray gun with a tank, hoses and extension nozzles for the gun are required. The best coating quality is achieved by airless spraying under a pressure of 4-12 MPa, which allows you to spray materials of significant viscosity.
To mechanically protect wheel arches from small stones and sand, in addition to the standard wheel arch protection installed at the manufacturer, plastic fender liners are used, additionally installed on the vehicle. The main disadvantages of additional fender liners are the drilling of additional holes in the wing for their fastening, deterioration of ventilation of the wheel arches, and the accumulation of dirt and salt in places where the fender liner protrudes above the wing flange. To protect the paintwork of the front part of the hood and the bottom of the doors, special anti-gravel transparent self-adhesive films are used.
Preparation and anti-corrosion treatment of hidden body cavities
Due to the use of complex technological equipment and the need for high-quality work, it is recommended that the treatment of hidden cavities be performed only at car service stations.
The procedure for performing operations to protect hidden cavities from corrosion is as follows:
— place the car on a lift, remove parts and upholstery that prevent access to hidden cavities;
— rinse with water at a temperature of 40-50 °C through the technological and drainage holes the hidden cavities and the bottom of the body until clean water flows out. Door sliding windows must be raised;
— remove moisture that has entered the interior and trunk, blow with compressed air all places where anti-corrosion compounds are applied;
— Drive the car into the chamber for applying the anti-corrosion compound and place it on a lift. Spray on anti-corrosion compound;
— lower the car from the lift, clean the outer body panels of dirt with a rag soaked in white spirit.
Answers (4)
According to AvtoVAZ, about 50% of the body surface area of the Kalina model is covered with zinc. To resist corrosion, Lada Kalina uses galvanized rolled steel, phosphating, effective technology of painting and applying primer, protection of flange and butt joints with mastics, and hidden sections are treated with special anti-corrosion compounds. At the same time, a zinc layer is not applied to the front panels of the model. If the car is operated in difficult climatic conditions, then additional anti-corrosion treatment must be carried out. In addition, if the car is already 2-3 years old, the manufacturer recommends such treatment, regardless of the conditions in which the car is operated.
It hit a tree and there was a dent above the back door. The paint has peeled off on the outside and hasn't rusted for six months. It rusted inside within a week.
Zynk on viburnum? funny. After 4-5 years of operation, the wings in the headlight area began to bloom. Black metal. For comparison, a friend has a Tagaz accent from 2007, the car spends the night on the street all year round, it is 11 years old - NO RUST. This is galvanized. And at AvtoVAZ they produce junk cars!
At Prior, for example, in the first years they produced 30% rated ones. Since 2009, they began to produce 100% galvanized ones.
"Kalina" will be galvanized
The use of galvanized steel should significantly increase the corrosion resistance of the body, which is important in Russian conditions. In addition, the press service reports that cars of the “tenth” family produced in 2003 will be protected from corrosion better than before.
Better resistance to rust can be achieved by installing sill fairings and special rubber gaskets between the hood and fenders. In addition, the door hinges will be additionally tinted. According to test data, Lada-110 bodies coated with a 2-component cataphoretic primer can now withstand about 1.5 thousand hours in a salt fog chamber.
Getting ready for winter - anticorrosive.
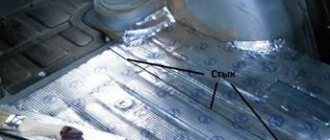
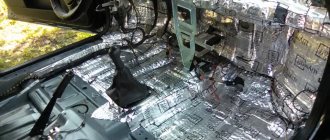
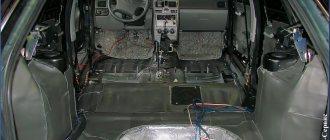
After installing the rear lockers, all that remains is to work on hidden cavities and other weak points, and there are plenty of these places... The weather cooperates - more than two months of sweltering heat without rain. In general, from the point of view of corrosion protection, Kalina is made quite well - a galvanized body, a thick layer of plastisol, lockers, competent organization of draining water from the body, etc. However, VAZ's saving on small things reduces all protection to nothing. Firstly, the car underneath is not completely covered in plastisol, just primed metal. A striking example is the front wheel arches, areas near the suspension springs. Secondly, total savings on rubber plugs/plugs. Many technological holes on the primed body are sealed with white tape, and a layer of plastisol is applied on top. The result is that after a year or two of sandblasting, the tape breaks, and the winter “cocktail” gets into the hidden cavities. There is not a hint about the 4 plugs that should be supplied with the car and installed at pre-sale. These plugs cover the holes on the bottom near the wheel arches, to which the car is attached during assembly on the conveyor. Anyway, let's get started! Unfortunately, it was not possible to drive the car into the pit, so I simply hung the side being processed as much as possible and placed supports under the wheels (boards, bricks). The anticorrosive agent itself had to be taken in an aerosol package, since I also don’t have a compressor. Materials: 1. Tectyl ML 600ml - 5 pcs - for hidden cavities. 2. Tectyl Bodysafe 600ml — 4 pcs — bottom/wheel arches. 3. Tectyl anti-gravel 500ml - 2 pcs - thresholds. 4. Floor plug 2108 - 10 pcs. 5. Floor plug 2101 - 4 pcs. 6. Large spar plug (?) - 4 pieces - it should be installed at pre-sale. Actually processing: 1. Rear part of the body from the inside. I did a light shake of the trunk and removed the trim. I processed cavities in the sidewalls of the body, near the roof, around the side windows, above the rear arches, partially in the rear side members and in the cross member between the gas tank and the spare wheel (through plugs on the trunk floor). Total 1 ML cylinder. 2. Thresholds. Pressure washed and also hand washed with Fairy dishwashing detergent. I opened those same long-suffering holes on the inside of the threshold and made sure that the cavities were absolutely clean.
I opened 2 holes on the cross member between the gas tank and the spare tire. To make it easier to apply the anticorrosion agent, I removed the plastic door sill trims, simultaneously pulling out the pistons for the self-tapping screws to secure them.
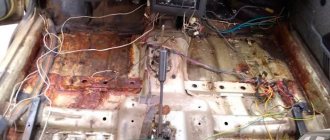
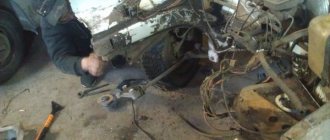
I also removed the plugs at the bottom of the B pillar and at the bottom of the rear door opening. I used a cavity cleaner to treat the sills, the above-mentioned cross member, the cavities to the right and left of the gas tank (there are oval-shaped holes about 1.5*3 cm), 4 holes that were not plugged at pre-sale. I plugged these holes with large plugs, the holes along the sills - 2108, 2 holes in the cross member - 2101. I returned the remaining plugs, pistons and interior parts to their place. Total 2 ML cylinders. 3. Front part. I took off the lockers, washed the front bumper under pressure, then by hand. A prime example of savings is a pile of primed, raw metal.
I processed the cavities of the “TV” and the front side members. As a bonus, I treated the joints between the front fenders and the bumper with a cavity cleaner, the space in front of the windshield (near the windshield wiper motor and cabin filter) and (most importantly!) the front pillars under the seals and drains. And then I recently found Kalina here, where dirt had clogged up in these places, and the pillars began to rust... I treated the sills and the plugs freshly installed on them, a couple of defects on the bottom and the entire front part with a product for external surfaces.
After drying, I applied several layers of anti-gravel to the thresholds. Total 1 ML cylinder, 2 Bodysafe cylinders and 2 anti-gravel cylinders. 5. The back is processed similarly to the front.
At the same time, I processed the door cavities, including the fifth door, through the standard holes. The remaining two floor plugs 2101 closed the holes in the cross member at the rear wall. These holes are difficult to find - you need to look at this cross member from the side of the wheel arch with the car hanging. In total, 1 ML cylinder and 2 Bodysafe cylinders were used.
After processing, I can safely say that I know the bottom of the Kalinka very well! Let's see how well the body survives subsequent winters!
Do-it-yourself anti-corrosion treatment of the bottom
I’ll say right away that I completely and completely trust the factory anti-corrosion treatment of the body on the Lada Kalina, and I have no doubt about its quality. But a few months ago I bought a jar of Tectyl anticorrosion agent just to treat the rear wheel arches, since I didn’t have fender liners. Then I didn’t process anything, and until recently the can was lying around the trunk.
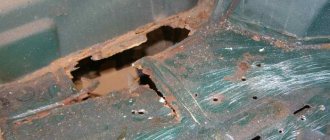
But a couple of days ago I drove the car into the pit to look at the bottom and the condition of the factory treatment. For 2.5 years and daily outdoor storage of my Kalina, the condition was excellent. The only thing that confused me was that in two places there was damage to the factory anti-corrosion treatment, just over 2 cm in size. This is roughly what it looked like, I took a photo:
And after what I saw, I decided to use the Tectyl can from Valvoline that I had bought a long time ago. I can’t say anything about the quality of this product, except that the history of this brand is quite long. And as far as I know, the company is one of the first to produce such materials. We'll see how she performs years later... If by that time Kalina is still in my possession.
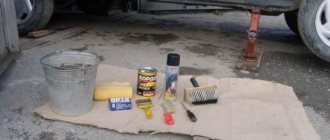
I decided to process most of the bottom, but without fanaticism, as they say, wherever my hands can reach. I bought a brush for 20 rubles and gloves for the same price. A jar of Tektil, if my memory serves me right, cost about 650 rubles a couple of months ago for a liter container. I dressed in overalls with sleeves, which I didn’t mind, and the whole process actually began.
- First, I thoroughly washed the underside of the car with warm water, using a stiff brush to thoroughly clean out all the dust and dirt.
- Then I dried it in the open air for about an hour. Luckily the weather is good now. During the day the thermometer did not drop below 35 degrees.
- Then, with a brush, I coated the entire bottom, where my hands could reach. First in the pit, and then on each side of the car lying on the ground.
I started from that very problem spot, first applying a thin layer of anti-corrosion material, so to speak - pre-treated.
And then I coated everything thoroughly with a second layer, not sparing the anticorrosive agent. I processed not only the bottom itself, but also the very bottom of the sills, exactly according to the factory - so as not to climb onto the visible part of the sill. After which I took a few more photos, although the final result is not particularly visible in the sun:
After all this work, I rushed along the dusty road, as many advise to do in this case. Although all around the village there are only dirt roads, so I had to adhere to this advice.
I removed all the stains that were here and there on the body with white spirit, slightly moistening the cloth and wiping it dry. This liquid cleans instantly and without any extra effort.
Similar articles
Anticorrosive on Kalina. What should you pay attention to?
Report We anticorroded the car over the weekend (where we could get to). A few impressions. From the factory the machine is already well processed. There are traces of Movil in the doors, but only along the bottom, but I would like the sides to be still Movil. We were surprised that even on the luxury version there is no energy-absorbing insert made of cellular plastic (only a thin metal triangle remains on which it should be attached). It is advisable to remove the rubber seals at the bottom of the doors until the excess Movil leaks out. Putting the rubber bands back in place is a pain in the ass if there are no new pistons (like an arrow) or the old ones couldn’t be removed. I still had the corner pistons in the door and I had to struggle with them to get the rubber band on them. So, if possible, it is better to buy this cheap part. The impressions on the front arches are vague. The original lockers are very good and installed perfectly. They are attached to the wings through a rubber gasket, which closes the gap very well and prevents the plastic from rubbing against the metal. The locker itself consists of 2 parts (a third in front and 2/3 in the back). The mudguards are attached with self-tapping screws under the sprocket, and the sprocket size for the front and rear mudguards is different. The metal in the arches is processed before painting, but not all of it. The rear arches are also partially processed before painting and there is also something to rot. So it won’t be superfluous to process and install fender liners. The thresholds are continuous along the length, but inside the threshold there is a longitudinal partition with holes along the entire length. Through the hole in the front arch (it’s larger) you can use a tube to get into both cavities, but here we were ambushed. They were treated with materials from 1 liter euro cylinders. The gun comes with a nozzle for anti-gravel and a tube with a nozzle for hidden cavities. We decided that the original 50-60 cm tube would be a little short and decided to replace it with a longer one, and then we noticed an unexpected effect: air flows, but nothing is sucked from the cylinder, but rather gurgles into it. It seems that in a long tube there is such resistance that the air goes through the cylinder along the path of least resistance. Having put on the original tube, everything immediately worked fine. We also sprayed it in all directions through the plug on the center pillar (outside). And again an ambush. Movil got on the seat belts, or maybe it flooded the mechanism of the seat belt pretensioners with the squib... In short, you need to be careful here, and before processing it is better to stretch the belt to its full length, then if it gets dirty, then only the part that usually does not get on clothes or upholstery The trunk and its lid were treated with the remains of Movil. The hood was not treated, since there was no time to wash it, dry it and wait for it to stop leaking (Movil), otherwise all the Shumka, and the entire engine compartment, would float in it. In total, one bottle of Movil is enough for the whole car, if you pour it carefully (although more could have been poured into the sills). One anti-gravel cylinder for 2 arches is approximately enough.
There is nothing wrong with the work, everything is quite simple. Maybe they did it in vain, but now we are confident that where they themselves treated the car will not rot for a long time. Yes, we know that there are still a lot of cavities that require treatment, but that’s for next time.
Do you still believe in fairy tales? According to technology, some body parts should be galvanized, but we live in Russia. Has anyone checked the quality of galvanization?
In any case, in places of welding and stamping with a strong fracture, it is necessary to process it.
Which Lada models have a galvanized body?
It is unknown what percentage of parts are galvanized. Various figures periodically appear in the media, but they are not officially confirmed. The degree of galvanization of Lada cars from the media (list):
- VAZ 2110 - 30%;
- Lada 4×4 (Niva 2121 and 2131) - cataphoretic priming, no galvanized steel.
- Lada Kalina 1 - 52%;
- Lada Kalina 2 - everything is galvanized except the front and rear side members, roof and hood;
- Lada Priora - since August 2008, the body has been galvanized by 29%, and after 2009 by 100% (video);
- Lada Largus - photos of galvanized parts were posted by tourists who visited AvtoVAZ as part of excursions;
- Lada Vesta - for the first time, the outer layer of the body was galvanized (the roof of the sedan is not galvanized, the station wagon is completely galvanized), and the sills and bottom have anti-gravel protection;
- XRAY - only the roof of the external panels is not galvanized, but this is normal practice for the global automotive industry. When testing the corrosion resistance of the body, the XRAY roof passed the test better than the Vesta roof.
Preparation and anti-corrosion treatment of hidden cavities.
Due to the use of complex technological equipment and the need for high-quality work, it is recommended that the treatment of hidden cavities be performed only at car service stations.
The procedure for performing operations to protect hidden cavities from corrosion:
– place the car on a lift, remove parts and upholstery that prevent access to hidden cavities;
– rinse with water at a temperature of 40–50 °C through the technological and drainage holes the hidden cavities (Table 11.2) and the bottom of the body until clean water flows out. In this case, the sliding windows of the doors must be raised;
– remove moisture that has entered the interior and trunk, blow with compressed air all places where anti-corrosion compounds are applied;
Rice. 11.5. Hidden body cavities: 1 – hood pockets; 2 – front door pockets; 3 – rear door pockets; 4 – cavities between the rear wheel arches and rear wings; 5 – rear floor spars; 6 – middle floor crossbar; 7 – front floor cross member; 8 – door thresholds; 9 – front floor spars; 10 – cavities of bulkhead shield amplifiers; 11 – cavities of bulkhead shield amplifiers (from the engine compartment side); 12 – cavities of floor threshold connectors; 13 – floor thresholds (from the ends); 14 – front side members; 15 – front floor spars (bottom of the body); 16 – front floor cross member (bottom of the body); 17 – middle cross member of the floor (bottom of the body); 18 – rear floor spars (bottom of the body); 19 – lower rear cross member
– Drive the car into the chamber for applying the anti-corrosion compound and place it on a lift. Spray anti-corrosion compound to the areas shown in Fig. 11.5;
– lower the car from the lift, clean the front surfaces of the body from dirt with a rag soaked in white spirit.
Anti-corrosion treatment of the body and hidden cavities
I recently noticed a small area of rust on my Kalina at the junction of the hood and its canopy. Since moisture often accumulates in such places and they are poorly ventilated, such areas are most susceptible to corrosion. Although no rust was found on the outside of the body or in other places, I still decided to buy a liquid anticorrosive agent, such as Moville, and treat the hidden cavities, sills, doors, hood and trunk from the inside.
First, I’ll tell you what I needed to perform anti-corrosion treatment:
Read more about the progress of anticorrosive treatment of Kalina
The first thing I did was remove all the rubber seals from my Kalina. First, I removed it from the roof of the car, which runs the entire length of the body and ends at the edge of the windshield.
The final result looked like the image below:
Then we remove the seals on all four Kalina doors. These rubber bands are attached from below and adhere to the thresholds when closing the door. They are fixed using plastic pistons, but first you can remove the rubber itself by carefully releasing it from the caps of these plastic chips.
But getting the clips out of the holes is not so easy; I personally did it with pliers.
They are not always removed successfully and in most cases break off, so it is better to stock up on a set of plastic products specifically for Kalina. There are all sorts of chips, caps and other fastening things. After we have dealt with all the doors, we carefully wash the places that we are going to treat and wipe them dry. Ideally, you need to dry everything with hot air so that there is no hint of moisture left. You can borrow a good hairdryer from your wife, which is what I did