The ceiling of Lada Priora cars is made of a material that is quite susceptible to various types of contamination, and the main problem in this case is to clean the stains that have appeared. Doing this manually for a long time is not very pleasant, and as for chemical compositions, not everyone can cope with various types of pollution.
That is why many owners, instead of removing stains, cleaning and tidying up the old Prioreza ceiling, decide to replace it with a new one. Of course, it’s not cheap, around 1800 rubles, but these days not all dry cleaners will cost less!
To remove the Priora ceiling we will need the following tools:
- Flat screwdriver
- Torx t20 tip
- Phillips screwdriver
Removing the interior trim of the Priora
Any parts of the car interior, in particular the ceiling, can be modified, for example, installing sound insulation.
The ceiling can also be improved and re-stretched. Of course, the first step in any type of tuning is dismantling the product. How to remove the trim from the roof of a Lada Priora car yourself? To carry out the operation of removing the car upholstery, you need a Phillips and flat-head screwdriver, as well as gloves, which must be clean, since the upholstery of the VAZ 2107 (Lada Priora) is very soiled and easy to get dirty. By the way, if you have your upholstery changed at a service station, but you need a car urgently, we recommend using the Kyiv car rental SVcar service. We assure you that you will be satisfied!
DIY BLACK ceiling Priora
Do you want to save this video?
- Complain
Report a video?
Sign in to report inappropriate content.
Did you like the video?
Did not like?
Hello everyone, my name is Turpal-Ali, and this is my first car, which I bought for $1500, initially for my own needs, but now I decided to make a Swallow out of it!
Competition for 300 rubles, there will be 3 winners, each will receive 100 rubles per account! I will announce the winners in the next video using a random number generator!
Conditions of the competition: 1) Subscribe to the channel. 2) Like this video. 3) Leave any comment under this video. GO FOR IT.
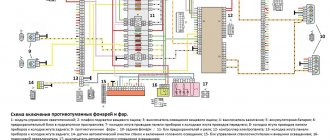
Priora, Priora 2, Priora 2022, Priora 2022, restyling, tuning, Priora 3, Priora hatchback, Priora sedan, lada priora, lada sedan, LADA PRIORA for PROJECT SHE WENT, tuning priors with your own hands, Priora tuning with your own hands, Priora, Lada , priora, lada priora, Lada Priora, lada, VAZ, auto, lada priora (automobile model), lada (automobile make), cars, wheels, car, test drive, review, tuning, auto, build, voice, quality, power trunk, command, tests, demonstration, stereo, sound system, trim, radio, acceleration, how to use new navigation, custom, wheels, megaretr, interior, internal combustion engine, automobiles, used, overview of features, car, new, engine, luxury, cars, cars mega, leather, engine, landing, auto show (event), Priora turbo, bunker, vaz, bpan, club, hp, dual exhaust, revving, crank, start up, shifting, auto., accelerating, exterior , demo, Kakhovka., filter, cans are falling, car, Shumka, straightening., extractor., test drive, Priora 2, test drive, avtovaz (automobile company), evil Priora, afterburner, repair, speed, basin, sound insulation, VAZ Priora, napneuma, garage, Lada Priora AMT, cans, rev, starting, 2018 lada, 2022 lada priora, blog, race, bmw, space, video, Khovansky, tight, threaded, tube, sump, priora & bmw x6 240 speed, canister, filter, vacuum, hand, capacity, valve cover, disassembly, cylinder head, adsorber, Zhora Revazov, vacuum, pan, diagnostics, repair, drained oil, antifreeze, intake manifold, vases, malfunction, compression, protection engine, kia review lada video repair zil elitech stihl Crimea, lada priora sedan, www lada priora ru, lada priora 1.6, new priora, lada priora new, lada priora ru, lada priora 2022, how to change the filter, how to change the fuel filter, service time, editor youtube, lada priora 2009. all details from the owner. part 1, Priora 7 years of operation, how to replace the fuel filter, Lada Priora owner review, Lada Priora, VAZ Priora, Priora sedan, Lada Priora price, Lada Priora 2, buy Lada Priora, by hand, Lada Priora 2022, new Lada Priora, lada buy, lada priora price, priora price, lada vaz priora, priora buy, priora credit, lada priora buy, bmw x6 (automobile model), engine protection, music, sound, kit, chelyabinsk, acoustics review, acoustics , autocast, avtokasta, buy auto acoustics, auto acoustics store, akademeg, cars, car audio, buy music, Chelyabinsk, lada priora gta 5, gta real boys, real boys in gta 5, gta 5 real boys, gta 5 real boys, real boys in gta v, real boys, real life in gta 5, gta 5 rp, crashed priora gta 5, accident on priora gta 5, got into an accident on priora gta 5, priora gta 5, accident gta 5, got into an accident on gta 5, car acoustics Internet, car acoustics Ural, compression, 21126, malfunction, diagnostics, disassembly, cylinder head, intake manifold, drain, threaded, tight, Priora station wagon, capacity, oil, antifreeze, Elista, Kalmykia, car audio store, car audio 2022, buy acoustics, the best auto acoustics, auto acoustics reviews, auto acoustics 16, car audio installation, car audio internet, Shumoff, brobox, Priora speed 290 km, Lada Priora with robot, Khacha diary, Armavir, low, air suspension, video car, used car sales in St. Petersburg, pneuma, air suspension, black, tuning, injection, russia, ussr, bunkerarmavir, vaz-2106, lanos., zaz., stand. gap, damage, hood, pull, propeller., pull, blow, TV, water GTA 5, gta 5 mods , water gta 5, water, shonms, water, body., academeg, stretching., slipway.body., coupler., gripper., shock, slipway.spotter.clamp., repair., straightener., welding., os media , hydraulics., chain., platform., sale of used cars in Russia Avito ru the latest, in the Krasnodar region, VAZ 2107, VAZ Niva, Lada, vaz niva, vaz 2107, vaz priora, anti test drive, Moskvich, doors, Shumka doors, life, Ossetia, AZLK, Vladikavkaz, 2107, niva, Gostu, stamps, according to, equipment, lowered, junk, tori, rails, exhaust, beast under the hood, turbine, Volga, M5, swat, pioneer, splen, 2012 lada priora , 2mm, vibroplast, color, outspirit, 2012 lada, lada priora 1.6l, car sales, used car sales, car market, zhogovo, vlog, tour, port, Lada hatchback, humiliated, clear, yura, avtoposadka, posadka, Lada Priora test drive with a robot video, lada tuning, lada priora robotic test drive video, lada priora amt video, Lada Priora robot video, lada priora robotic, priora tuning, priora supercharged, Lada Priora turbo, scandal, turbo, turbo, priora speed 290km, tuning Priora, Solaris is falling, Priora punished Solaris, who is faster, Lada Priora 2022, Lada Priora 2022, fast cars,
The procedure for removing the headliner:
- You need to open the glasses case and unscrew two bolts.
- The lampshade snaps off and is removed.
- It is necessary to disconnect all wiring harnesses from the lampshade.
- The plastic cover located near the interior mirror is removed, and the latches are snapped off with a flat screwdriver.
- Two bolts are unscrewed, the mirror and plastic box are removed.
- The side trims of the windshield pillars located on the driver's side are removed. To do this, you need to pry them off and snap off three clips.
- The pillar trim on the passenger side is removed in the same way.
- The pillar trim in the center (near the seat belts) on both the driver and passenger sides is removable.
- The plugs are removed and the bolts holding the upper handles are unscrewed.
- The three plugs near the rear window also need to be removed.
- The rear strut covers do not need to be removed; instead, it is recommended to snap off their upper part.
- If there is a central lamp used for interior lighting, it must also be removed.
Fabric for car ceiling upholstery
Before you start, you need to buy the right fabric. The selection of upholstery depends on the owner’s preferences and taste. Each material has its own characteristics, the ability to react differently to temperature changes. There are different types of fabric sold in the market. Let's get acquainted with the main ones.
Velours
The interiors of mid-priced cars are upholstered in velor. The peculiarity of the material is its soft texture and unique appearance.
Note! When choosing velor, you need to focus on products from well-known manufacturers. Inexpensive models, even if reupholstering rules are followed, will last a maximum of two to three seasons.
The disadvantage of velor fabric is its instability to mechanical stress. It is easily scratched and torn by accidental contact with blunt objects. But this is compensated by the ease of maintenance - you don’t need to buy expensive chemicals to clean the surface from dust and dirt.
When you need to update your ceiling on a limited budget, pay attention to flock. It is rarely used when updating the interior in a garage. The reason is the complexity of surface treatment technology. Standard adhesive for reupholstery is not enough, since the upholstery will come off when you first clean the surface. To increase strength, the flocking technique is used. It consists of:
- degreasing;
- spraying the primer composition;
- thorough impregnation of the material to increase its strength.
How to remove the headliner of a Lada Priora?
After carrying out all the above work, only the seals hold the casing in place. Using a flat-head screwdriver, the headliner is removed from under the seals. As soon as the front part of the ceiling is on the seats, the trim needs to be moved forward, then the rear part of the trim is brought out from under the rear pillars.
In order to remove the trim from a VAZ 2170 (sedan), you need to lower its left edge between the door and the seats, and then pull it out through the rear door. This must be done very carefully so as not to break the upholstery.
If the car is a VAZ 2171 (station wagon) or VAZ 2172 (hatchback), then in this case the headliner can be pulled out through the trunk. The roof sheathing is installed in the reverse order of the above.
Source
Necessary tool for replacing seat upholstery on Lada Priora
To reupholster the rear and front seats on a Priora, you will need the following tool:
- Pliers or side cutters (or a pair of pliers).
- Crosshead screwdriver.
- Awl.
- Nylon ties 2.5×150, or 3.6×150.
The new upholstery was from, a more classic pattern, the fabric itself is pleasant to the touch, and the seams are even and do not tear. If your style is business, then you can choose “Skif”, although it will be more expensive.
Naturally, you need to change the upholstery on all seats, but if you are going to reupholster it for the first time, we recommend starting with the back row, it will be easier with it than with the front ones.
Soundproofing Priors hatchback is a necessity
Any parts of the car interior, in particular the ceiling, can be modified, for example, installing sound insulation. The ceiling can also be improved and re-stretched. Of course, the first step in any type of tuning is dismantling the product. How to remove the trim from the roof of a Lada Priora car yourself?
To carry out the operation of removing the car upholstery, you need a Phillips and flat-head screwdriver, as well as gloves, which must be clean, since the upholstery of the VAZ 2107 (Lada Priora) is very soiled and easy to get dirty. By the way, if you have your upholstery changed at a service station, but you need a car urgently, we recommend using the Kyiv car rental SVcar service. We assure you that you will be satisfied!
How to remove headliner | Priora repair
The ceiling on Lada Priora cars is made of a material that is quite susceptible to all kinds of contamination, and the main problem in this case is to clean the stains that have appeared. Doing this manually takes a long time and is not very pleasant, and as for chemical compositions, not everyone is able to cope with various types of contaminants. That is why many owners, instead of removing stains, cleaning and tidying up the old ceiling on the Priora, decide to replace it with a new one. Of course, this doesn’t come out cheap, around 1,800 rubles, but nowadays not every dry cleaner will cost less!
In order to remove the ceiling on the Priora, we will need the following tools:
- Flat screwdriver
- Torx bit t20
- Phillips screwdriver
Removing and installing the ceiling on a Priora with your own hands
Please note that it is best to carry out repairs with gloves so as not to cause marks and stains on the sheathing (if you plan to leave the old ceiling), since removing them later will be problematic.
So, in order to begin withdrawal, we perform several preparatory steps, namely:
How to clean a car roof trim
The roof lining on a car is actually quite fragile, unlike the exterior, which can be easily cleaned by simply going through a car wash. At oneHOWTO we show you how to clean this important part of your car quickly and easily. You've no doubt wondered on occasion how to clean a car's roof trim , so we're here to give you the answer. You'll need to apply some elbow grease, but there's no reason to think you can't clean the roof yourself.
First of all, you should know that your car's roof lining is made up of several parts. Thus, it is vital that you pay attention to all of them so that they are completely clean and do not remain unclean or smelly. A car's roof liner is typically made from three different materials : foam, fiberglass, and fabric. The part we can actually reach and clean is the exposed fabric, although we have to be very careful when cleaning it so as not to wet the layers underneath that first layer.
To clean the inside of your car's roof trim, use a simple microfiber cloth rather than water. Gently and gently wipe the surface of the ceiling with the rag. Please note that the ceiling is fragile, so do not knock or apply excessive force.
Always wipe the cloth in one direction and ensure that there is no trace of dirt left on it that can be easily removed. The ceiling collects a lot of dirt and dust, but a microfiber cloth should remove it.
Another way to get rid of any dust or microfiber that may be clinging to the underlayment is to thoroughly vacuum the entire roof.
Once you have removed surface dirt, you need to perform a deep roof cleaning . You will need to use a cleaner that is specifically used for your car's interior material, otherwise you may damage it. Check with the manufacturer to determine what type of product you should use, although foam type cleaners are most recommended as they can get rid of any dirt that has accumulated under the first layer of padding.
Spray the roof of the car with a suitable cleaning product. Wait a few minutes and make sure the ceiling is well saturated with the cleaner.
Use a different microfiber cloth than the one you had before to wipe down the inside of the ceiling again, dampen it lightly with warm water and wipe the roof sheathing with straight strokes, removing the cleaner. As you move the cloth, you will see it come away covered in dirt , which was on the inside of the roof. When finished, the ceiling should look like new.
If stains still remain, you can use car cleaners Use them only sparingly and let them dry when you're done. Then, if you still don't look clean, use the cleanser from step 3 again. Another wipe down with a microfiber cloth should make it look like new.
Are there any home remedies that can get rid of stains on your car's upholstery ? The answer is yes! It's as simple as mixing three parts water with every part distilled white vinegar or apple cider vinegar. Soak a microfiber cloth in the solution, strain and gently clean the roof with it. This is incredibly effective at removing any greasy stains.
How to Remove Water Stains from a Car Headliner
One of the most stubborn stains on the headliner is water stain. The truth is that there are several products in specialty stores, known as shampoos, that are specifically formulated to remove this type of stain on the headliner of a car. You can also use carpet cleaners.
Simply spray a generous amount of cleaner with the product onto the entire surface of the ceiling. Let it sit for a few minutes and before it dries, use the small attachment on your vacuum cleaner to vacuum the roof in straight strokes, paying particular attention to the water lines. Spray a little more product if the mark doesn't go away the first time.
Let dry to see perfect results.
If you would like to read similar articles to How to Clean a Car Roof Trim , we recommend you visit our Automotive Maintenance and Repair category.
- If the backing fabric is black, using a lint roller is also a good way to get rid of stains.
- If there is a stubborn mark that will not go away with these methods, you can use a vacuum cleaner and a vacuum cleaner. If you don't have one, we suggest you visit a professional
.
Materials
Let's start, of course, with the materials used in sound insulation:
- Vibration insulation is a material that absorbs vibrations, based on bitumen, mastic or a combination of them, requires warming up before application
- Noise (sound) absorber - a finely porous material in which sounds fade away and are absorbed
- Sound reflector - a material whose structure reflects sound waves in the opposite direction
- Squeak suppressor (anti-creak) - a material used to eliminate friction between the rubbing elements of the interior trim and the dashboard (see Soundproofing a car's dashboard is always necessary)
It makes no sense to go into details about the construction of materials, so let’s get to work. I will list the most common brands - vibration insulation - Vibroblast or Bimast, sound absorber - Accent, sound reflector - Splen, squeak suppressor Madeline or Bitoplast.
You can purchase their analogues if the price of the ones I have given does not suit you, or these particular ones are not on sale.
How to remove the headliner on a car
If there is a need to make insulation in the roof of a car with your own hands, the question arises: how to remove the headliner on a car without damaging anything. Below is a detailed step-by-step algorithm of actions.
Rear side trims
- The right side trim is removed first, and then the left. To do this, you need to carefully remove the cover clip, which is not easy to do without special tools. It is advisable to warm up the car interior before the procedure to reduce the likelihood of damage to plastic parts;
- At the rear, the left ceiling piston and seat belt plugs are removed, and then the bolts on which the belts are attached are unscrewed. You need to unscrew it carefully so as not to round the bolt sprocket;
- Next, the seat belt fastenings are pulled out;
- The plugs securing the rear pillar trim are removed, and then the screws are unscrewed. The trim on the right and left sides is pulled off the holders.
Handles on the ceiling
- First, the handle linings are snapped off, then, using a slotted screwdriver, the latches to which the door handles are attached are unbent;
- The screwdriver needs to be inserted under the latch and turned 90 degrees, while at the same time pulling the handle down.
Lighting lamps
- You need to carefully pry up the front lenses and remove them. Disconnect the connectors from them, remembering or writing down the connection order, and remove the lampshade;
- Unscrew the screws that hold the diffuser frame and remove it;
- Remove the lampshades in the rear part of the body from the ceiling covering;
- Remove the flexible door seals, but not completely, but only to the middle of the openings.
Frontal stand
You only need to disconnect the cover of the left pillar, there is no need to touch the right one. This is done very carefully so as not to damage anything, but quite strongly. This opens up a view of the pump control mechanism, as well as the design of the rear window washer.
Electrical connector
- In order to turn off and block the rear window washer, you need to pull out the connector. To do this, press the plastic tab on it and, at the same time, pull out the connector itself;
- Next, the wire is pulled out from the plastic holders. At the attachment points, you can wrap the wire with insulating tape to protect it from mechanical damage.
Rear window washer pipe
- The washer tube is pulled off from the plastic fasteners of the A-pillar on the left side;
- You need to place a container to collect water, and then disconnect the washer tube;
- The same procedure is performed with the right rear part of the body. The tube should be blown out to remove water from it, first replacing it with a container.
Top part
- On the left, pry off the plug and unscrew the screw using a Phillips screwdriver;
- You need to pull the trim towards you and pull it off the holders. Pass the seat belt through the slot without removing it from the fastener;
- There is no need to remove the trim of the pillar on the right, just move it slightly so that you can remove the ceiling covering through it. This is done extremely carefully, as it has sharp edges;
- The visors in the front part are unscrewed using a Phillips screwdriver. Then they are removed and the fasteners of the visors and roof covering are unscrewed.
Ceiling
- With care, diagonally, remove the trim from under the pillars through the trunk door;
- The roof opens. If it is not painted, the surface should be treated with special anti-corrosion agents;
- The next step is gluing vibration insulation to the roof. Before this, the roof surface needs to be warmed up. Soundproofing should also be attached. This procedure makes the roof more rigid;
Replacing the door trim on a Priora
Welcome! The door trim is an exclusively decorative thing, besides this, it no longer serves any purpose in cars, thanks to it the metal door inside becomes more beautiful, and it also becomes more pleasant to drive cars because on some trims there are platforms on which you can rest your hand, In addition, in the event of a side impact (as a result of an accident), the human body suffers less, unlike if the car were without trim.
Note! It is most convenient to replace the trim in the garage or on the street, provided that there is a lot of space, because in this case you will have to open the door completely, and to replace this item, you will need to stock up on: A screwdriver, and be sure to have a set of clamps that secure the trim (These clamps can be can be found in any auto store, it’s just that when removing the trim, these latches break and have to be replaced with new ones), and you’ll also need a wrench, because you’ll have to work with the electronics (This is only if you have power windows installed on your door)!
Summary:
When should you replace your door trim? Someone changes it when it gets dirty, or in case of its deformation (It sometimes cracks), but the trim does not always need to be changed, in some cases it has to be removed in order to gain access to other parts that are located inside the door, and there are locks inside the door , the window lift mechanism itself and much more, for example glass, by the way, it also needs to be removed, while removing the trim from the car door.
How to replace the door trim on a VAZ 2170-VAZ 2172?
2) Now proceed to removing the inner door handle, to do this, unscrew the two internal screws that secure it (By the way, your cover may still cover these screws, so remove it) and then remove the inner handle from the door trim; when the handle is removed, squeeze Use your hand to secure the wire block to the power window buttons and then disconnect the block itself (see the small photo below, where the wire block is indicated by an arrow) and thereby remove the inner handle completely from the trim.
Note! Before performing this procedure, we recommend that you disconnect the minus terminal from the battery, this especially applies to you if you are changing the casing in rainy weather, because if moisture gets on the electronics (In our case, on the wire block), a short circuit will occur due to this maybe because of which the wiring will fail, for more details on how to remove the minus terminal from the battery, read the article entitled: “Replacing the battery”, everything is written in the first paragraph!
3) But not all cars will have electric windows on the trim, for example, if we take the rear trim, then on most cars of the Priora family (depending on the configuration) electric windows are not installed, but mechanical windows are installed and the handle is still present at the back, so it ( If you have one) you will have to remove it, this is done as follows: use a screwdriver to press the latch away from the handle itself (see photo 1) and then the latch is brought to the top (see photo 2) and as soon as the latch is removed, you can remove the handle itself from socket (The socket is a ring that will be behind the handle, in general, as soon as you remove the handle you will understand what we are talking about).
4) Well, after all the operations performed (This only applies to the trim that goes to the rear doors, but if you remove the front door, then also read point 4 and don’t forget about point 5) you can disconnect the trim from the door, for this you can use a screwdriver (We recommend this do, because the paint can be scratched) insulating tape is wound and with this screwdriver the trim is picked up in all places where it is fastened to the door with clamps (The places where the clips that secure the trim to the door are indicated by arrows in both photos below, but only in the photo numbered 1 the front door trim is shown, and photo number 2 shows the rear door trim).
Note! Don’t forget to also unscrew the door lock button, it turns out counterclockwise and also has a thread inside, for clarity so that you understand which button we are talking about, it was indicated in the photo just below with an arrow!
5) In conclusion, let’s point out the fact that the rear and front trim are attached almost identically, but only in order to remove the front trim, you will also have to unscrew the lower screws (Indicated by arrows) and as soon as they are unscrewed, pry up the trim with a screwdriver and then remove it completely from the car.
Installation: The new casing is installed in its place in the reverse order of removal, all broken fasteners are replaced with new ones (This is the case if you did not change the casing, but removed it to access other parts).
Ceiling soundproofing process
As the first layer of sound insulation, vibration-insulating material (Bimast Bomb) is used, the base of which is heated with a hairdryer until sticky, after which it is glued to the ceiling and leveled with a hard roller. The vibration-insulating layer can be pasted over from 60 to 100% of the ceiling surface. It is not necessary to glue the spars (stiffening ribs).
A sound-absorbing material (accent, BitoPlast or SPLEN) is used as a second layer of sound insulation We apply our material on top of the vibration insulation and cut it with a regular stationery knife. The basis of all these materials is a self-adhesive layer, thanks to which the subsequent insulation process is much easier and faster.
The second layer should cover the entire surface of the ceiling, with the exception of the places where the upper handles and upholstery rivets are attached.
3. Soundproofing of the upholstery and adjacent plastic is optional, but is not superfluous, as it enhances the soundproofing qualities of the interior. BitoPlast can be glued to the inside of the upholstery and to the facings of the pillars.
4. Assembly of all ceiling parts occurs in the reverse order. A thick soundproofing layer can become a problem, so it is better to immediately stock up on longer clips for attaching the upholstery.
To achieve the greatest noise insulation effect, it is better to carry out comprehensive work on sound insulation of the car, thanks to which not only external, but also internal noise will be eliminated.
Sound insulation of LADA Priora roof
The ceiling of the Lada Priora initially does not even have standard sound insulation, not counting the upholstery. Sound insulation of the Priora roof, as well as its other components, does not cause any particular difficulties. Therefore, every car owner who strives to reduce noise interference in the cabin of his car can perform it.
Before you begin installing sound insulation, you need to thoroughly prepare the working surface:
- First, you need to remove the upholstery material from the car ceiling.
ATTENTION! Now you can buy a completely new Pioneer MVH X580BT processor radio for only 2990 rubles! Don't believe me? Then follow the link and see for yourself! Read more"
- Secondly, the linings on the racks should be removed.
- Thirdly, thoroughly degrease and clean the roof frame from dirt and dust, for example, with a solvent.
After the working surface has been treated with special products, it is recommended to wait some time for complete drying. At this point, you can start preparing all the necessary materials for sound insulation, namely:
- Vibration-isolating material (STP or Shumoff);
- Sound-absorbing material (BiPlast or Accent) – 2 sheets;
- Thermal insulation material (Splen) – 2 sheets;
- Technical hair dryer;
- Construction scissors;
- A hard iron or plastic roller.
The immediate work process of installing sound insulation can be divided into several stages. The first stage includes the installation of sheet vibration-proofing material, for example, STP or Shumoff. Since Priora sound insulation is carried out specifically on the roof, sheets must be used in large sizes. Therefore, cutting them will rarely be necessary.
After the material has acquired the desired shape and size, its bitumen base must be heated with a technical hair dryer. This will cause the surface of the vibration material to become sticky. Now you should attach the heated sheets of vibration isolator to the ceiling of the Priora and carefully roll them out with a hard iron or plastic roller.
The pasted surface at this stage will vary from 55 to 100%, depending on what material you prefer for sound insulation.
The second stage involves 100% covering of the Priora ceiling with sound-absorbing (Accent or BiPlast) or heat-insulating (Splen) material. Since these materials have a self-adhesive base, gluing them will be noticeably faster and easier.
At the third stage of installing roof sound insulation, sound insulation of the upholstery material of the ceiling and the plastic adjacent to it is carried out. Experts recommend gluing the inside of the sheathing with Bitoplast, as well as the plastic cladding of the racks. Thanks to simple steps, you will be able to get rid of unwanted squeaks and crickets in the car interior.
At the fourth final stage, the ceiling is assembled after sound insulation is reproduced. Installation of upholstery material is carried out in the reverse order. It is worth considering the fact that the thickness of the noise-insulating layers should not be too bulky, as this may complicate assembly. In addition, the clips will not be able to support all the material.
How to remove the headliner on a VAZ 2110, 2111, 2112
As the car is used, not only various components and assemblies wear out, but also the interior. The plastic fades in the sun and begins to creak on uneven surfaces, the elegant coating peels off the door handles, the seats sag, and their upholstery tears and becomes greasy (in the absence of covers). And if you regularly smoke inside the car, the entire interior smells of tobacco smoke, and disgusting stains appear on the ceiling.
If we talk about a dirty ceiling, it can be saved by dry cleaning or simply replaced with a new one. However, one way or another, it must first be removed. Read below to see how this is done using the VAZ-2110 as an example.
Tools and materials
You will need the following things:
Installation
As the experience of the owners has shown, it is most convenient to install the ceiling lamp for the second row of Lada Vesta seats using simple self-tapping screws. This solution will relieve the car owner from the need to remove the headliner in order to attach the product to the roof reinforcements.
Of course, mounting to amplifiers is generally much more reliable, but this is a significantly more labor-intensive process. In addition, it is necessary to tie directly to the location of the roof stiffener, which limits the installation range.
Also, according to reviews from those who carried out the installation, even with self-tapping screws to the ceiling, the fixation strength is quite sufficient and no problems arise.
It all starts with measurements and making a stencil, for which cardboard is the best option. First, the purchased lampshade must be disassembled in order to mark on the template not only the outline of the lampshade itself, but also the places for the screws.
In this case, the outline of the cutout will be smaller than the outer side of the lamp.
As for the space on the ceiling, it is selected depending on the preferences of the sedan owner. However, the optimal point is considered to be the one with the following “coordinates”:
- From the side upper handles – 41 cm;
- From the central piston of the ceiling trim - 53 cm.
After marking, you can start cutting the hole. This must be done either with a scalpel or a knife, and the blade must be very sharp so that the edges do not come out torn. After cutting, you need to try on the lamp and, if necessary, correct the contour.
In the place where the self-tapping screws will be screwed in, it is necessary to place clamps - metal or plastic clips, etc.
In general, there are no problems with installing the ceiling lamp for the second row of seats in the Lada Vesta. Next we move on to the connection.
Causes of unpleasant sounds
Noise in the car - loud extraneous sounds, vibrations that distract and irritate the driver:
- They arise as if from external sources - the hum from cars passing by, music and screams from the street
- So in the car itself - the roar of the engine, the vibrations of the body and the rustling of tires, the sound of rain on the roof and pebbles on the bottom of the car.
- The cause may be internal malfunctions of the engine, transmission units and their mountings (pillows), steering and even brake discs or drums
- This noise and vibration can only be eliminated by repairing units, tightening fasteners, and turning discs (drums)
- Therefore, for Priora, sound insulation begins with car maintenance
- The remaining noise is dampened by comprehensively applying sound insulation to the machine
Complete self-soundproofing of Lada Priora - instructions
› Machine modifications
The standard sound insulation of the Priora car leaves much to be desired. Car enthusiasts strive to correct this deficiency with their own hands, since extraneous sounds irritate and distract the Lada Priora while driving.
They make noise on the doors, floor, arches, ceiling, engine compartment, hood, trunk, panels, dashboard - after this the Priora becomes a quiet car. The source of extraneous sounds can be a malfunction of the engine, its components, malfunction of suspension parts, brake system, steering, etc.
Unpleasant sounds occur when driving on gravel roads due to vehicles passing by, especially heavy vehicles. To get rid of unpleasant sensations, it is necessary to modify the standard sound insulation. You can do this yourself. Depending on the body type: hatchback, sedan, or station wagon, the Shumka technology is slightly different.
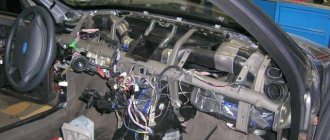
Removing the door trim — Lada Priora Hatchback, 1.6 l., 2009 on DRIVE2
Well, the day came when for the first time after the purchase I had to climb into the car)) The thing was that I began to notice that the front passenger door began to open poorly, people could not open the door normally, apparently the center did not press hard or the weight was bent, in In general, I decided to find out what happened there. If anyone is interested, I’ll write how to remove the casing, I just also first looked at the post on how to remove the casing, only then I got around to removing it myself, in principle, nothing complicated, but...
1. I unscrewed 2 bolts on the panel, I immediately say that they are made as a star, you can’t unscrew them with a screwdriver. And very carefully, because you can break the latches, first the left side, then the right, pull out the panel and disconnect the chip.
Here they are 2 star bolts
2. We unscrew 1 bolt on the door opening handle and also carefully pull it out - there are also plastic latches there.
3. Well, we unscrew the 3 bolts from the bottom of the casing and begin to remove the casing, trying not to break the clips, I did it without any losses, and just in case we need to have a couple of spare ones. Well, we have the casing in our hands)) It’s simple
We independently remove the door trim from the Lada Priora
Sometimes an annoying squeak appears inside the car. As a rule, either the dashboard or the door trim creaks. No car is immune from this, and Lada Priora is no exception. To get rid of the squeak, you will have to remove the door trim. We will talk about how to do this with your own hands in this article.
When dismantling is necessary
- The car owner decided to get rid of the squeaking noise that occurs when driving by gluing the door panels from the inside.
- It was decided to increase the sound insulation of the cabin by placing a layer of sound-absorbing material under the door trim.
- One or more mechanisms located under the trim have failed (primarily this applies to window regulators, door locks and handles).
Tools
- Flat blade screwdriver (medium size).
- Crosshead screwdriver.
- Set of new door holders.
- Insulating tape.
Removal sequence
- The front door on the driver's side opens and the rubber panel above the power window buttons is removed. Under the protective panel there are two self-tapping screws that can be unscrewed using a Phillips screwdriver. These pair of screws need to be unscrewed
- In the niche of the handle there is another self-tapping screw, which can also be unscrewed with a Phillips screwdriver. It unscrews with a Phillips screwdriver
- Three screws are removed from the bottom of the door.
- The door lock release button is turned counterclockwise several times and removed. There is a locking pin underneath it. It is neatly recessed down under the door trim. The lock rotates counterclockwise
- Now the trim panel is held in place only by plastic latches located along its entire perimeter. The panel is carefully pulled back, and the tip of a flat-head screwdriver is inserted under it. Using this screwdriver, the latches are opened one by one.
- After opening all the latches, the panel is carefully lifted up so that its upper edge comes out of the window glass groove. As soon as the top edge is free, the panel is removed and the wire from which the window regulator is powered is disconnected. Trim panel completely removed
- All of the above procedures are repeated for the front passenger door.
How to change the ceiling of a VAZ 2110 with your own hands: instructions
Years of use of the car take their toll on it: the headliner darkens and becomes dull, and the appearance of the interior is also not amazing. In some cases, dry cleaning helps, but when detergents don’t help, it’s time to act decisively and radically.
VAZ 2110 headliner
How to remove the headliner on a VAZ 2110 without removing the windshield?
- We remove the sun visors in the cabin, then the rearview mirror, the ceiling handrails, the central and front interior lights, and the temperature sensor;
- We take out both plugs above the driver's side door;
Plug above the driver's side door
- Remove the sealing rubber from the door openings;
Remove the sealing rubber
- Then use a screwdriver to pry up the pads on the front pillars and remove them;
Use a screwdriver to pry off the pads on the front struts
- Remove the plugs from the upper fastenings of the rear seat belts;
Removing the seat belt plugs
- Using a 17mm wrench, unscrew the bolts securing the belts to the rear pillars;
Unscrew the bolts with a 17 wrench
- Remove the covers from the rear pillars by prying them off with a screwdriver;
Remove the trim from the rear pillars
- Use a screwdriver to pry up the fasteners for the rear headliner;
We pry off the fastening clamp of the ceiling upholstery
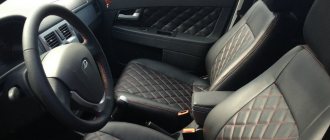
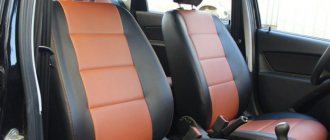
Lada Priora – steering wheel reupholstery, trunk shelf reupholstery and complete body sound insulation.
Lada cars can be criticized a lot for their build quality, reliability and appearance, which is difficult to compare with competitors. But there is one thing that cannot be taken away from our domestic cars - this is, of course, people's love. The availability of spare parts and ease of maintenance make us turn a blind eye to all the disadvantages that are present in AvtoVAZ products.
Today we have in our hands probably the most striking and recognizable representative of domestic cars - Lada Priora. This model received popular love for its relatively modern appearance and cheap price. The owner of the Priora came to Eastline Garage to completely soundproof the car body and change some interior elements, in particular to reupholster the steering wheel and trunk shelf.
The car that ended up in our studio is not entirely standard. The owner brought the car's interior almost to perfection, but our task was to reupholster the car's steering wheel. This procedure requires special care and painstakingness from the craftsmen, because the slightest defects in the work will immediately make themselves known and will be constantly visible. It is for this reason that the owner of the Priora turned to us, because our specialists have many years of experience in working on car steering wheels, be it a regular reupholstery or changing the anatomy.
The new steering wheel was reupholstered in natural smooth leather. Italian Nappa leather is an ideal material for a new steering wheel, as it gives an indescribable tactile sensation and, in principle, is a reliable and proven solution. The new steering wheel made of Italian leather fits perfectly into the exclusive interior of the car, giving it even greater severity, because the interior combines black plastic, black glossy inserts and seats made of smooth leather, unique to Priora, with double stitching on the central inserts. Black Lada Priora and black interior – everything is classic.
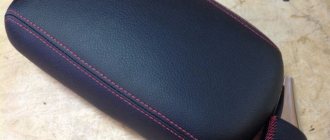
Black leather also took its place on the steering wheel pad; by the way, it has an interesting shape, with double stitching. By the way, the stitching was done with black thread, so as not to spoil all the severity that reigns in the interior of the Priora. Well, the black plastic insert under the steering wheel pad only reinforces the effect of the updated steering wheel.
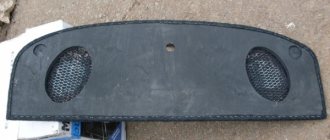
In addition to the steering wheel, the owner of the Priora wanted to stylize the trunk shelf to match the overall appearance of the interior. We have already mentioned that the seats in our car are not standard, so our specialists stylized the shelf to match the general concept of the seats. Like the center seat inserts, the shelf features double diamond stitching. Thus, we moved away from the now standard reupholstery of the trunk shelf in dark velor; in our Priora everything is strict and concise.
The vast majority of us have driven domestic cars at least once. And it doesn’t matter at all under what circumstances, be it a taxi or a trip with friends. But we are sure that absolutely everyone will agree that you can’t even dream of comfortable travel in Lada cars. One of the main roots of this problem is poor sound insulation of the body, or, to be more precise, its almost complete absence.
We have also corrected this shortcoming. Our specialists have carried out complete sound insulation of the body and now the level of comfort of the car is simply excellent.
The craftsmen from Eastline Garage work only with proven materials; we have long determined for ourselves that the best soundproofing materials on the market is Comfortmat. We typically use a combination of the Dark, Pro Lock and Soft Wave series.
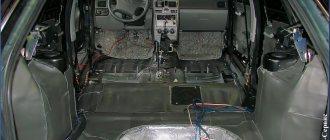
And this time was no exception. After completely disassembling the body, we applied all the necessary materials to the inside of the floor covering. The bottom of the car is the most vibration-loaded place, so it was important to carefully glue all the protrusions and joints between the metal elements of the body. The Comfortmat Dark material provides reliable protection against vibrations that can penetrate into the car interior, and the subsequent application of Soft Lock allows you to maintain silence in the car interior.
After the bottom of the car is completely glued, our specialists begin applying vibration-proofing materials to the ceiling and rear pillars, which are located in the trunk. The order is still the same - Dark and Pro Lock.
Preparation
1. Remove the upholstery and all adjacent plastic;
- First of all, we remove the lampshade and the entire adjacent plastic block with the rear-view mirror;
- Unscrew the sun visors;
- Remove the front plastic covers on the struts;
- Carefully remove the side pillar panels;
- Remove the rear plastic panels from the racks;
- We unscrew the handles for passengers;
- We take out the rear 3 clips.
2. Clean the ceiling from dirt, degrease the prepared surface with a regular solvent and let it dry.
3. Purchase in advance the materials necessary for sound insulation:
- Vibration insulation - 3 sheets, I used Bimast Bomb (there are many alternatives);
- BitoPlast – 2 sheets;
- SPLEN – 1.5 sheets;
- scissors;
- construction hair dryer;
- hard roller.
How to remove the ceiling trim on a Lada Granta with your own hands?
Hello. Today we’ll talk about how to remove the ceiling trim on Grant at home quickly and correctly, without breaking or damaging anything. The work is quite simple and does not require special skills or any special equipment. tools.
Why might it be necessary to dismantle the Grant ceiling? There may be several reasons, for example, you decided to soundproof the ceiling or reupholster the ceiling. It also often happens that during operation, stains appear on the ceiling trim, especially on light-colored ones, which spoil the appearance of the interior and make it uncomfortable.
You don’t need anything special for the job; all you need is a standard set of tools, a screwdriver, a pair of keys and a plastic clip extractor, although you can get out without it.
How to reupholster the ceiling in a Priora with your own hands
The upholstery of a car's interior wears out quite intensively during use. This also applies to the ceiling trim. Over time, finishing materials darken, fade, become clogged and crack. The most intensive wear occurs in the case of smoking. At the same time, the material is also saturated with odor. However, even with careful operation, over time, the ceiling of the car will need to be reupholstered, for example, if it is sagging.
First of all, you need to choose the material for the roof. There are several options: fabric, Alcantara, leather of artificial and natural origin. In any case, reupholstering the ceiling in a car requires approximately 5 square meters. m.
This material is considered the most suitable for re-upholstering the ceiling in a car with your own hands. Its advantages include high strength, resistance to abrasion and the effects of water, fire, detergents, moisture, temperature changes and the resulting durability, as well as ease of maintenance. The main disadvantage is considered to be the high cost. Artificial leather is an analogue of natural leather, therefore it is similar to it in many respects, as well as in appearance. At the same time, this material has the advantage of lower cost.
It is a synthetic fabric consisting of ultra-fine fibers. This material is considered an artificial analogue of suede: it is characterized by high durability, pleasant appearance and texture, and a wide range of colors. A special property of Alcantara is air permeability.
This fabric is not as widespread as a material for ceiling cladding with your own hands compared to the options discussed above. This may be partly due to the slightly more complex technology of reupholstering the ceiling in a car. The advantages of flock include resistance to wear, ease of maintenance, attractive appearance, noise-absorbing properties, variety of textures and colors.
This fabric is one of the most affordable among synthetic ones. Its advantages include wear resistance, resistance to mold and fading, noise and heat insulation properties.
As for the color of the ceiling, black is the most common. This is explained by the fact that, firstly, many contaminants are barely noticeable on such a ceiling, for example, such as black deposits from smoke, secondly, many cars have a black or dark interior, with which the black ceiling is combined, and thirdly, black material easier to clean. Light-colored fabric is not as practical to use as black material, but is also suitable for finishing the roof.
Fabric of bright colors is used much less often in the car. Firstly, such material will not match the interior trim unless it is covered with fabric of the same color. Secondly, the bright lining of the car’s ceiling and other interior elements tires the eyes. Therefore, it is best to cover the ceiling in a car with fabric in black or pastel shades.
To glue most of the materials considered to the ceiling with your own hands, all you need is glue, a hair dryer and a leather roller. Only flock requires a degreasing agent and a flocker.
88 is used as glue. Some people believe that it is possible to reupholster the ceiling with Moment, but experts say that this is unacceptable, since this glue emits toxic substances when exposed to sunlight.
You can also cover the ceiling using aerosol glue, but to use it correctly you need to read the instructions.
- You first need to prepare the tools and purchase sufficient quantities of material.
- In addition, it is advisable to find an assistant, since it is difficult to cover the ceiling alone, which will be clear from the description of the technology.
- Performers who do not have experience in this type of work should practice, for example, pasting over small elements such as door handles or inserts.
- To glue the fabric to the ceiling with your own hands, you should use cotton or cellophane gloves to avoid the appearance of fingerprints.
Reupholstering a car ceiling begins with dismantling the old material. For ease of work, the front passenger seat can be removed. You can also remove the ceiling by removing the glass. First of all, additional roof elements such as handles, visors, lampshades, and plugs are removed. Then remove the material and remove any remaining glue and foam using a hard sponge and solvent. After this, it is advisable to treat the surface with sandpaper. This will allow the material to be tightly glued so that it does not come off or sag.
Next, the ceiling of the car begins to be covered. The glue is applied in the center in a strip 10 cm long. The central part of the fragment of material should be glued to it. Continue gluing to the sides, applying strips of glue every 10 cm. During the work, you need to monitor the bends of the working surface. You should glue the fabric as firmly as possible so that the ceiling does not sag in the future. In this case, bends and recesses are places that require special attention. One stretches the fabric, and the other smoothes it. The edges of the material need to be folded and glued to the back side, and the excess is cut off. Finally, you need to make holes for the bolts of additional elements. After this, the ceiling is installed in the salon.
If the roof material is sagging, it is recommended to try treating it with a hairdryer, otherwise you will have to cover the ceiling again.
Exposure to moisture can cause the material to sag. Therefore, you should check the tightness of the roof. It is often mentioned that the ceilings of cars with a sunroof sag. If the material is sagging but not damaged, you can use it for reupholstery. In addition, you can make a ceiling with a starry sky effect. Most cars do not have this option.
To create a starry sky, you will need the following materials:
- some kind of fabric (usually dark);
- glue;
- LEDs;
- wires;
- capacitor;
- stabilizer;
- resistors;
- switch;
- diode.
Cutting devices and clothespins are used as tools. When creating a starry sky, you can choose materials at your discretion (type and color of fabric, size and color of LEDs). The above is just a general list of materials for the starry sky ceiling.
Making a starry sky is much more difficult than covering the ceiling with new material, since this will require electrical engineering knowledge. The starry sky must not only be created, but also carefully calculated to ensure durability. However, this is a very rare and spectacular accessory that gives the car exclusivity. It is enough to note that the Rolls Royce Phantom is equipped with a starry sky ceiling. This type of car ceiling lining provides a wide range for creativity.
Some workshops create starry sky ceilings to order, and some users make them with their own hands, selecting the parameters they desire. Therefore, everyone has the opportunity to receive or make a unique starry sky. So, you can cover the ceiling with any material, vary the number of LEDs, their brightness, size, color combinations and operating mode.
The ceiling is one of the most contaminated areas of a car. You may not notice the gray coating or greasy stains on the upholstery for a long time, but at the same time you will feel the general untidiness of the interior. In some cases, even the most thorough cleaning with chemicals does not give an acceptable result. And sometimes it even leads to the destruction of the coating. In any of these cases, reupholstering the car ceiling can be a salvation. Moreover, for this it is not at all necessary to go to a car repair shop: you can easily carry out this process with your own hands. It does not require special skills, but you must be prepared for long and labor-intensive work. Find helpers - this way things will go faster and the result will be of better quality. But before that, check out our tips and instructions.
Before starting work on re-upholstering the ceiling, you should decide on your preferred material. The automotive market today offers a wide variety of fabrics that differ not only in cost and color, but also in many other characteristics, such as wear resistance, durability and moisture resistance.
The most popular materials today are:
- leather (natural and artificial);
- alcantra;
- flock;
- carpet;
- velours.
So that you can make the right choice, we will analyze each of the materials in more detail.
Genuine leather is perhaps the highest quality and most durable, but at the same time the most expensive material for covering the ceiling of a car. Judge for yourself: leather is not afraid of fire, water, or temperature changes, it is not destroyed by chemical compositions used to clean the interior, and it is quite difficult to tear it.
It would seem that if leather has so many advantages, why even look towards other materials? But, unfortunately, due to the high cost, many motorists simply cannot afford it. Therefore, as an alternative, many use artificial leather, or, as it is now called, eco-leather.
genuine leather in the interior design will give the car a solid look
In many characteristics, eco-leather is not inferior to natural leather, and even surpasses it in price. This material is not afraid of low and high temperatures, has increased moisture resistance, and is also easy to clean with a damp cloth or sponge.
If you find oil stains on a ceiling covered with eco-leather, wipe it with a cotton swab soaked in ammonia or ethyl alcohol.
The untrained eye will not notice the difference between natural and artificial turf. Properties such as softness and smoothness are preserved in synthetic material.
At the same time, eco-leather does not lend itself to abrasion over a long period of time. However, it also has disadvantages: it has a slight smell, which not everyone finds pleasant. In addition, it actively absorbs foreign odors, which makes it unsuitable for smoking motorists. Faux leather is less durable than natural leather, so you should be more careful with it.
faux leather is similar in quality to natural leather, but much cheaper
In addition, the store will offer you a rich range of shades of this material. Note that buying colored eco-leather is much cheaper than dyeing natural leather. It is not surprising that in popularity this material is only slightly behind its natural counterpart.
In appearance, Alcantara is very similar to suede. Moreover, it is of synthetic origin and consists of many very thin fibers. This composition makes it quite strong, elastic and wear-resistant.
Alcantara is resistant to moisture and direct sunlight, so it will not become damp or fade even after prolonged use. This material has dirt-repellent properties, so the ceiling covered with it will have to be cleaned much less often.
One cannot fail to mention the pleasant texture of the material, its softness and silkiness. Coupled with a wide color palette, this makes it one of the most popular materials for auto tuning.
Alcanatra is an inexpensive and practical material for reupholstering the ceiling
Flock is an inexpensive material for updating the ceiling, but motorists rarely use it when reupholstering the interior themselves. The thing is that, unlike other materials, flock is not simply placed on glue: it will collapse after the first cleaning. A special process - flocking - includes degreasing, applying a primer and thoroughly impregnating the material to increase strength. Not many are willing to close their eyes to such a lengthy process for the sake of a low price. In addition, insufficiently high-quality work will reduce all your efforts to zero, since the coating may crack, crumble, or form many unsightly folds.
However, folk music also has a number of advantages: it has an original appearance and a wide range of shades. This material also absorbs noise well.
flock has good performance properties, but is very difficult to use
The most affordable and economical material for car ceilings is carpet. This is a synthetic non-woven fabric, the outer side of which is covered with decorative pile. This material boasts good resistance to moisture and fading, and caring for it is not difficult.
With all its advantages, carpet has a fairly low cost. And the wide variety of colors makes it especially attractive to car owners.
carpet is the most economical and practical option for reupholstering the ceiling
Many modern cars come with factory velor upholstery. If you don't like experiments, you can replace the old casing with a similar one. This material has a pleasant soft texture and attractive appearance.
When choosing velor, you should pay attention to the manufacturer: inexpensive brands are often of poor quality.
Unfortunately, even expensive velor is unstable to mechanical stress: it is easy to accidentally tear or scratch. But you can easily clean it with your own hands, without resorting to complex chemical compounds.
velor ceiling looks beautiful, but it needs to be carefully looked after
Another important step in preparing to reupholster a car ceiling is choosing the right adhesive. This process is not as simple as it might seem at first glance. There are many nuances in choosing an adhesive: upper temperature conditions, composition, exposure to sunlight and even smell.
One of the most popular compositions for reupholstering interiors is universal glue 88. It is inexpensive and holds the material quite firmly, so it is often used at home. However, it has significant drawbacks. The main one is fumes that have a strong unpleasant odor, which can be poisonous in large doses. General deterioration in condition, nausea and dizziness are not the best companions for a driver who must always be focused on the road. Whether to take risks and use this glue is up to you to decide, but we would recommend better compositions.
glue 88 will firmly hold your coating, but it should be used only in extreme cases
A common mistake motorists make is using Moment glue to reupholster the interior. The fact is that its upper temperature threshold is not suitable for using very hot elements. In hot weather, exposure to the sun can cause your car's roof to burn to such an extent that your entire roof paneling will blister and fall off in places. In addition, this type of glue can only be used on surfaces that have good air permeability.
Do not use this glue to reupholster your car's ceiling.
It is best to use a special glue designed for reupholstering car interiors. Unfortunately, such compositions differ from household ones in high cost and less availability. As a rule, they are two-component and come in the form of aerosols.
One of the best representatives of this type of substance is the German MAH glue. It is high temperature (upper threshold is 160 degrees) and holds surfaces together well. This glue is often used in automotive workshops.
MAN glue (namely with a white and black label and not with a white and green one) is packaged not in 0.5 ml but in 0.615 ml. This is a kind of protection against counterfeiting. That is, if you bought MAN glue in a container other than 0.615 ml, you should know that it is a FAKE.
Andrey Nikiforov
https://www.drive2.ru/b/372011/
This glue is of high quality and price
There is a reliable way to purchase a quality product: call trusted auto repair shops and find out if you can buy glue from them. This method is suitable if you are not short on funds: the price can vary from 700 to 2000 rubles per liter. In this case, a share of the cost is usually the markup of the workshops.
You can sheathe the ceiling with the material yourself, without resorting to the help of specialists from car repair shops.
To reupholster the ceiling yourself, you will need the following materials and tools:
- covering fabric;
- glue;
- degreaser;
- Screwdriver Set;
- hard sponge;
- fine-grained abrasive;
- masking tape;
- rollers for leveling the surface;
- hairdryer
You may also need new fasteners and caps for decorative elements.
In order to successfully cover the ceiling with new fabric, follow the following sequence of actions.
- Remove the car ceiling. To do this, you need to remove all fasteners and hanging elements. The ceiling is dismantled in accordance with the operating instructions for each specific model. In some cases, it may be necessary to remove the windshield or front seat. First turn off all electrical equipment.
- Clean the ceiling from the old coating using a hard sponge.
- Remove any remaining old glue using a degreaser.
- Sand the ceiling with a fine-grained abrasive to remove any unevenness.
- Apply a thin bead of glue to the center of the ceiling. The length of the strip should not exceed 10 cm.
- Apply the central part of the material to this place and smooth it thoroughly using a roller.
- Apply similar strips of glue every 10–15 cm.
- The fabric needs to be stretched and smoothed well. At this stage, you may need an assistant to do the job better.
- After all the fabric is glued, go over its surface with a roller again. You can additionally dry the surface with a hairdryer at a not too high temperature.
- Fold the edges and glue them from the inside. Trim off any excess fabric.
use a stiff sponge to clean off the old ceiling covering
Apply glue in thin strips and level the surface of the material
If necessary, dry the ceiling with a hairdryer
if you do everything right, the result will please you
It is very important to glue the fabric from the center to the edges. If you do everything correctly, you will get a coating indistinguishable in quality from the factory one.
In order not to spoil a large amount of material, first practice on small elements: handles, stands or visors.
There are also some types of fabric with a self-adhesive backing on sale. The principle of gluing them is almost the same as described above, except that the glue itself no longer needs to be applied.
The total amount you will spend on this entire process depends on factors such as price and volume of material, as well as the quality of the glue.
Most cars will require at least 5 m2 of material, and if you own a large car, then even more. Take extra fabric so that you can practice on small parts beforehand. Prices for genuine leather start from 2.5 thousand rubles, and vary depending on the manufacturer and the thickness of the product. Thus, covering the ceiling with leather will cost at least 12.5 thousand rubles.
If you opted for Alcantara, then reupholstery will cost you an order of magnitude cheaper. You can find material on sale for 900 rubles per linear meter. Using carpet will be even cheaper: its price starts from 200 rubles.
As for the glue used, a can of universal 88 will cost about 250 rubles. But specialized automobile trains will cost 6–7 times more.
Thus, you can reupholster the ceiling with only 1,500 rubles in your pocket. But will you be pleased with the quality of the coating, and how long will it last? This is a big question. However, you can make a pretty decent fit by spending 5-6 thousand rubles. But even the most expensive option using genuine leather and high-quality automotive glue will cost you much less than reupholstering in a car repair shop. This will cost at least 30 thousand rubles, and the upper limit of the price is practically unlimited.
If you don't want to completely update the trim, but don't mind making some changes to the overall look of the interior, you can repaint the ceiling a new color. This is even easier to do than gluing new fabric.
you can repaint the ceiling any color you like
Before you start painting, choose not only the color, but also the type of paint. There are several varieties of it:
- acrylic enamel;
- universal spray paint;
- aerosols for various types of fabric (velor, nubuck, suede, vinyl, etc.).
Acrylic enamel is the least preferred material for repainting ceiling coverings, however, this does not prevent many motorists from using it. Glossy enamel looks ugly in the car interior, and it is also easy to scratch. Even with the most careful use, acrylic paint will not last long.
Universal spray paint suitable for any texture. If you don't know exactly what the ceiling of your car is covered with, use this type. From a visual point of view, matte colors look best. However, they have their drawbacks: if the quality of the composition is not very high, the ceiling will become hard and unpleasant to the touch. In addition, fingerprints may remain on such a coating, and over time it begins to crumble.
Give preference to specialized dyes for each type of fabric . If your ceiling is covered with velor, then use velor paints, if with vinyl - vinyl, etc. In this case, the coating will remain soft even after drying, and it will last much longer.
Sometimes spray paint is used in combination with water-based paint. This allows you to prepare the coating, after which the paint layer will lie smoothly and without sagging.
As for the paint color, you can choose any one to your liking, creating your own unique design. However, remember that bright colors can distract the driver from the road, cause headaches and negatively affect the overall mood. You can paint the interior red and bitterly regret it after a couple of days. It is better to use softer, muted and dusty shades. Light gray and beige remain classic colors. A black ceiling looks beautiful, but visually reduces the space inside the car and can also create psychological discomfort.
bright colors have a negative impact on the driver’s psyche
The painting process is most conveniently carried out on a dismantled ceiling. However, if for some reason you do not want or cannot do this, you can try to apply the paint directly inside the interior. Be extremely careful. Cover all adjacent elements with film so that paint does not accidentally get on them. Just in case, cover the interior with unnecessary fabric.
The painting process itself will not cause much difficulty: hold the can or spray gun at a right angle at a distance of 30 cm from the surface. Apply the aerosol in even horizontal stripes until the color is even and saturated.
If you are using water-based paint, you must first mix it with water. The resulting consistency should resemble jelly. Using a foam roller, apply this composition in an even layer to the surface to be painted.
Make sure that there is no excess product on the instrument: moisture can cause the ceiling to become softer, which will lead to its deformation.
After drying, apply the aerosol as usual.
Using a water-based composition will significantly speed up the entire process and save money, because you will need much less aerosol paint. In addition, the surface of the ceiling will have a more pronounced color, and the texture will become softer and more pleasant.
Don't forget to use protective equipment: gloves, mask and goggles. Inhalation of paint particles has a negative impact on health.
There is nothing difficult about reupholstering or repainting a car ceiling with your own hands. If you have enough funds to purchase quality materials, the process will go much faster, and the result will undoubtedly please you. The most important thing is to adhere to all recommendations and carefully follow the instructions.
Is there a need
If we talk about the need for sound insulation in a car, of course it is necessary:
- Firstly , comfort and calm communication without raising your voice
- Secondly , great sounding acoustics
- Thirdly , peace of mind for your well-being and health
No, we are not going to scare you with non-existent dangers, just facts:
- Increased noise causes rapid fatigue and irritation, reduces the driver’s reflexes
- Leads to constriction of blood vessels in the body, which puts unnecessary strain on your heart
- Over time, such a load causes angina pectoris and even a heart attack.