As a rule, on many budget cars, the standard stove does not warm up the interior quickly and efficiently enough. To a greater extent, this applies to popular VAZ models (2109, 2114, etc.), as well as some foreign cars.
At the same time, not every owner is ready to spend money on installing expensive systems like Webasto and analogues. Of course, an active search begins for more accessible and simple solutions.
In practice, one of the most effective and affordable methods is an additional pump for the stove. Next, we will look at what the specified heater pump is, how to choose an additional pump, and also how to install an additional pump.
In what cases should you consider installing an additional pump?
It is recommended to install an additional pump in the cooling system if:
- When the air temperature is above 28-30°C, the engine reaches a critically high temperature (provided that the cooling system is working properly);
- In cold weather, the heater blows cool air at idle speed at normal engine operating temperature.
Most often, the problems described above occur on the VAZ-2109, VAZ-2114, VAZ-2110, rear-wheel drive “classics”, all GAZ Volga models, except for the GAZ-31105. In the latter case, the malfunction may also occur under normal temperature conditions. This is due to the large volume of coolant in the system and an insufficiently powerful pump. It is worth noting that there is no need to install an additional pump if overheating of the power unit or failure of the stove occurs at temperatures normal for central Russia (-25 - 25 ° C). The corrected standard system operates successfully in this thermal mode. Therefore, if it malfunctions, you should look for a malfunction.
Summer is the best time to think about winter
Life goes on as usual. And if it’s still warm outside now, winter will come sooner or later. Many pages have been written about how to warm up the Gazelle again, but it seems that there is simply no better solution than installing an additional pump.
Therefore, this additional pump is necessary to improve the circulation of refrigerant in heating and cooling systems. As for the principles of working with this system, here an additional pump for the Gazelle stove is mounted on the section of the hose to the radiator after the thermostat. In this way, the speed at which the hot coolant mixture passes through the heater can be significantly increased.
Which pump to choose
Unlike the standard VAZ and GAZ pump, which has a mechanical belt or chain drive, an electric pump is used as an additional driving force. Most often, motorists use an electric pump, which is standard equipment on the Gazelle car.
The unit has high performance, but the quality of its manufacture leaves much to be desired. Therefore, before installing such a pump, it is recommended to disassemble it, coat all seals with automotive sealant, reassemble it and let it dry for 24 hours.
Note: the above applies to old-style pumps. New GAZ pumps have good build quality. However, over time, they also begin to leak.
An alternative to GAZ products is to install an additional pump manufactured by Bosh. These units have high build quality and a different operating principle. The blade rotates under the action of a magnetic coupling, and not an electric motor, as in the first case.
By using such a scheme, the manufacturer was able to abandon sealing connections and almost completely eliminate the possibility of leakage. The disadvantages of the imported unit include its high cost and relatively low productivity (700 liters versus 1200 liters per hour for the GAZ unit).
Disadvantage of the Gazelevsky pump
This device has a serious drawback. Since its design is not fully thought out, after some use the pump leaks. It leaks through the seal. This problem can be solved, but the device will need to be disassembled and disassembled. Treatment consists of lubricating the gaskets with silicone or hot melt adhesive. And then the lid with gaskets is fixed.
No such deficiencies were found in Bosh pumps. This unit is assembled almost perfectly and there are no spacers. There is nowhere to lose.
How to install an additional pump
Installation of an additional pump on a VAZ stove can be done in the engine compartment or under the interior panel. The first option is preferable, since in this case the sound of the pump does not enter the interior, and there is also no risk of flooding the interior with antifreeze if it leaks. Depending on the installation location, the unit can be mounted at the mounting location of the standard engine compartment sound insulation or on additional brackets.
The installation of an additional water pump on the VAZ-2110 and other models of the domestic automobile industry is carried out on the heater supply pipe. In this way, it is possible to achieve a more active injection of coolant into the “furnace” radiator and increase heat transfer.
Note: increased pressure in the cooling system can lead to failure of poorly secured pipes or breakdown of the radiator. Therefore, before installing additional equipment, it is recommended to conduct a complete diagnostics of the CO.
Before installing an additional pump, the antifreeze is drained. After this, the pipe at the intended installation site is cut in half using a sharp blade, and the resulting ends are put on the pump outlets. It is important to ensure that the arrow drawn on one of the outlets, indicating the direction of fluid circulation, is directed towards the radiator. The pipes placed on the outlets are secured with clamps. It is better to use Norma brand screw clamps, since products from lesser-known brands often have sharp edges and cut the pipe.
The connection diagram to the on-board electrical network may vary depending on what goals the car owner sets for himself. If the pump is installed for more efficient cooling, it makes sense to connect it in such a way that it runs constantly when the ignition is on. The unit can be connected directly from the battery, but the circuit must be closed using a relay, which is activated after turning the start key.
If you plan to install an additional pump in the heating system to improve the operation of the stove at XX, it is better to connect it through a button. In this case, the power circuit will include a relay, a fuse, a pump button and a battery. Electricity is supplied via a single-wire circuit. The “minus” in this case is the car body. Using this scheme, the car owner gets the opportunity to turn on the pump only when there is a need for it. Note: it is better to install an additional pump using a second power supply connection scheme, since in extreme cold, its prolonged operation can lead to underheating of the motor and related malfunctions.
Connecting the interior heater pump
An additional pump can be connected to the vehicle's electrical network in several ways. The simplest is the introduction of an additional switch button into the cabin with two positions “On” and “Off”.
But a more suitable way is still to connect the heater pump using a dual control system:
• the “on/off” button is used only for one-time activation and deactivation of the additional heating system with the onset of cold weather and its end; • if the “On” button is pressed, the system is activated every time the vehicle starts moving. The control signal can be taken, for example, from the handbrake light of a manual transmission. Every time you release the car from the handbrake, the pump will automatically turn on.
How to find out what exactly the pump on 2109 has failed
The main problem that prevents the continued use of a water pump is its loss of tightness, which leads to the leakage of working fluid. Slightly less often, problems are caused by bearing wear.
In the first case, the pump remains suitable, therefore the easiest way to protect the power unit from overheating is to regularly restore the volume of liquid in the cooling system. This measure, however, gives only a temporary effect, since the leak will intensify day by day.
Bearing damage is much more serious. At first, this element signals its wear and tear with a fairly loud noise. If you do nothing, the destructive process will accelerate, and, most likely, the matter will end in the complete destruction of the part. The backlash formed in it is manifested by the following signs:
- loud grinding noise;
- pump jamming.
Ultimately, the likelihood of the drive belt breaking or even damaging the engine valves increases.
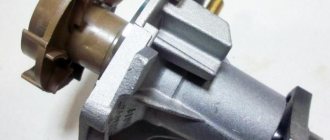
The pump installed on 2109 cannot be repaired, and therefore, if its improper operation is detected, the unit is dismantled and a new one is installed in its place.
The procedure, fortunately, is not particularly complicated, which means that replacement with a VAZ can be done without going to a car repair shop. The pump is located in an easily accessible place and no overall engine components (for example, a carburetor) will have to be touched.
We recommend: Camshaft sensor Kalina 8 valves
Where to begin?
There are some signs of failure of the VAZ pump. In these models, the pump ensures the passage of antifreeze through the cooling jacket, hoses and pipes, as well as through the radiator. During the warm season, even a slight malfunction of the pump can lead to overheating.
It is worth noting that the symptoms of a pump malfunction on the VAZ-2112, 2107, 2109, 2114 and some other models should be determined as soon as possible. The fact is that in these models the pump is driven by a timing belt. If the pump jams for any reason, it will fail. This, in turn, leads to deformation of the valves in the engine. This situation is observed in most cases when such a failure occurs
Therefore, it is important to independently identify signs of pump failure in the cooling system.
Knowing the symptoms of failure of the VAZ-2114, 2112 or earlier models, you can avoid expensive engine repairs or constant overheating.
It is worth noting that the cooling system water pump has a certain service life. Once the expiration date has passed, this system component must be replaced. In cars with a pump driven by a timing belt, this element of the system should be replaced every 60 thousand. km mileage This distance is usually around 48 months (with regular driving).
Expected results
After all the necessary elements have been installed and connected, road tests should be carried out, during which the pump must run continuously for at least an hour. During this, it is necessary to carefully inspect all its connections to the cooling system to eliminate leaks.
After the inspection, you should check the car while driving. It may happen that a unit functioning properly at idle speed will fail when the pressure in the pipes increases.
If everything was done correctly, the heater begins to supply warmer air, and the engine is effectively cooled even under heavy loads.
If standard heating is not enough, the problem must be solved somehow. You can try installing a second radiator, but a more obvious solution would be to install an electric pump. It is additional and pumps liquid along a small circuit. An additional pump can be installed on the VAZ-2114 stove in 5 minutes. The problem is that the coolant needs to be drained. Otherwise, there will be no difficulties: all parts are standard and are produced by AvtoVAZ itself.
The result of our efforts is what is shown in the video. Let's see.
Cavitation, bearing damage
When considering the symptoms of a motor pump failure, you should pay attention to such a negative phenomenon as cavitation. This is the process by which air bubbles form in antifreeze.
They damage the internal surfaces and individual parts of the pump. As a result, scratches remain on them. Then they rust.
Air bubbles appear in the pump inlet. When the pressure in the system increases, they are destroyed. This process causes significant system damage and can cause engine failure. Therefore, it is better not to save money and buy a new pump. It will be much more reliable than a refurbished pump.
It is very important to install it correctly in its original place
Particular attention is paid to seals and proper tightening of fasteners. In some cases, a special sealant is used for joints
Eliminates leakage. However, it is not always possible to use the presented material. This will prevent you from later loosening the engine mounts to secure the timing belt on some car models.
If you know the signs of a bad pump, you can replace it on time. First you need to remove the cover from the timing belt. If necessary, the tensioner will need to be loosened and removed. Then reduce the mounting force on the generator. Its belts and timing belt have been removed. The hose from the pump can be disconnected. Then the antifreeze is drained. After this, you can remove the protective cover and pump.
After installing the new pump in place, align the alignment marks. This is necessary because the crankshaft can move relative to the camshaft.
Cooling system and its features
From thermostat 29 to tap 21 there is a “supply hose”. We are not interested in him! The pump is inserted into hose 19. It is connected to the pump supply pipe (part 20).
Everything here is trivial
If we look from under the bottom, we will see two hoses near the partition. We need the one that is fixed closer to the right wheel. And now, instead of hose 19, an assembly is installed: the same hose “21083-8101010-01”, an electric pump, hose “2101-8101204” (to pipe 20). That's all, actually.
Each hose is attached to the nozzles with two clamps. The article number of one clamp is “2108-1300080-10”.
Purchase parts in advance:
- BOSCH pump 0 392 020 034 or pump 32.3780-01 for Gazelle with 18 mm pipes (important);
- Electrical parts;
- All hoses and clamps;
- The BOSCH pump requires VAZ fasteners: a intake pipe clamp, as well as a bracket for this clamp (all from LADA-2101).
The pump from the Gazelle will have to be modified: the body is disassembled, degreased, the rubber gasket is lubricated with sealant...
GAZ pump after modification
When assembling, use screws with nuts instead of standard self-tapping screws (see photo).
By installing an additional pump on the VAZ-2114, you don’t even have to connect it. Everything will work as before. The main thing is that the pump does not leak, and we have already indicated the solution.
Pumps: descriptions and technical specifications
Among domestic manufacturers, products can be distinguished. This company has been producing heat pumps for a long time. The products include devices for gazelles and modifications.
For Gazelles, the company offers a series of devices based on pump No. 47.3780. This is a household additional pump for the Gazelle stove. Technical characteristics allow you to work efficiently in the heating system. The device is powered by 12 V. The operating current required for this pump is 4.2 A. The pump works with antifreeze or antifreeze. The device is connected to the network via a single-wire connector. The nozzle size here is 20mm.
You can see another pump from the same manufacturer. It has a smaller nozzle diameter. Here this size is 18 mm.
Additional pump for the Gazelle Business stove differs from the usual one in the presence of two wires instead of one.
Need to know
You can add a heater to the car’s heating system yourself; to do this, you need to buy an additional heating element. Or you can try and make it yourself; for these purposes you will need a second radiator and a housing for a new heating element, which can also be made at home.
Where to put
- In the distance between the front seats where the tunnel is located.
- Under the front seat.
Suitable Models
- Technomaster-8110.0500.10 and 8110.0700.10 (Tolyatti). Its price varies within 3000 rubles.
- Helios, Xeros and Zenith (Eberspächer) - are more expensive, from 3500 rubles.
Approximate procedure for installing an additional pump
If all the necessary parts have been purchased, do the following:
- A “unit” consisting of three parts is assembled.
The short hose is the “outlet”.
- Below is an example with a BOSCH pump.
Antifreeze drainage unit
External outlet hose
BOSCH pump mounting method
Be aware that the plug from the knock sensor will fit into the pump connector (you need to buy it). The connection diagram is discussed below.
Example with a GAZ pump
Clarifications for the domestic pump:
- Do the “assembly” as in step 1 (see above);
- The “assembly” is assembled;
- The pump mounting location is the upper corner of the manual transmission housing (see photo). Without the details of an iron constructor about here .
GAZ pump mounting method
Variant of the scheme for the VAZ-2114
We connect the motor through a fuse and a relay rated at 10 Amps. The relay will be turned on by a button attached to the device.
Scheme (simple version)
The “+” voltage was taken directly from the battery, but this can be done - a sealed holder “hangs” on the wire, where the fuse (5A) is located. Installing a button looks simple:
- Remove all the handles;
- Move the plastic panel towards you;
- We install a new button and connect the wires.
As a result, you can see what is shown in the photo.
Circulation button
What can be improved
- A diode is connected in parallel with the relay winding in the “back to front” direction, thereby extending the service life of the button;
- Connecting to the battery directly is bad. It’s better to find another point with a “plus”;
What we got
How to properly organize the electrical part of the connection
Turning on the pump can be solved as follows: connect the negative terminal directly to the battery.
The positive one is carried into the cabin along with the gas pedal cable, for example. The button is placed under the steering wheel in any convenient place and so that it does not interfere. As a result, absolutely all Gazelle drivers with such a solution noted that in winter weather the car becomes noticeably warmer. It is also convenient that even with a cold engine you can turn on the pump, and after a couple of minutes heated air will begin to flow into the cabin. This is a fairly simple method, but it has weaknesses. If you forget to turn off the button in advance, then when you next start the car to warm up, the operating device will begin to take heat from the cold engine. The time it takes to warm up to operating temperature will increase. You can make a double control system so that the pump does not operate in the warm season and does not turn on automatically when it starts. To do this, you will have to add a two-position relay to the circuit.
Negative aspects of installing an additional stove in the cabin
- An increase in the heat capacity of the cooling system entails slow heating of the coolant.
- The characteristic noise of the stove in the cabin will be added, since now there will be two of them working.
- The air flow from the stove will raise dust from the interior.
- In the warm season, hot hoses under the floor covering will additionally heat the interior of the car, but there is a way out of this situation - install a tap in the engine compartment when making changes to the cooling system.
- If you do not install another heater regulator and heat dissipation to the side, then there will be no uniform heating, but only one part of the interior will become very hot.
Installing a second heater radiator on a VAZ-2109 will be advisable only in areas with very low temperatures in winter, where the basic heater, despite its proper operation, does not cope with the task and the car does not warm up properly.
Electricity
Before connecting an additional pump to the Gazelle stove, you need to look at the connection diagram for the overhaul. There are several options. One of the easiest ways is to move the button to two positions inside the machine. It's simple: on / off. For example, if it’s cold you can turn it on, if you heat it up you can turn it off.
This is a simple method, and it has a drawback. If you forget to turn off the additional pump, then the next time you start the car for heating from the alarm remote control, the pump will start and absorb heat from the cold engine. This will extend the engine warm-up time.
Professionals advise using a more complex, but more effective method. There will be a dual control system. This button is only intended to be turned on in winter and turned off in spring. This is done to ensure that the pump does not work unnecessarily.
When the button is turned on, the pump for the additional heater of the Gazelle stove will turn on/off completely automatically when the engine starts and the car moves. This circuit requires a two-position relay. The pump has a certain power, so the relay needs a current of 3 A.
What is needed to install a new pump on a car?
Alas, many cars, regardless of the manufacturer, do not withstand any criticism in the harsh Russian conditions in matters of interior heat supply. Simply put, the performance of the stove does not live up to the expectations placed on it, and in the car, even with a big minus outside, it is simply cold. But it turns out that everything can be fixed, and with our own hands. The main thing is to have a head on your shoulders and instructions for use.
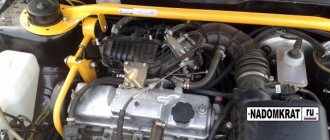
Modernizing a car's heating system involves installing an additional electric pump. Let's look at the example of the tenth VAZ model, since most often the owners of these cars complain about the lack of sufficient heat in their cars, especially when the engine is idling. To carry out the operation you need:
1. Electric pump from Gazelle. It is this model that is better suited to this role of an additional heat pump into the cabin. It is a simple centrifugal pump in which the fluid flow is rejected from the center to the periphery by means of blades.
We recommend: Transportation of construction equipment
2. Relay. It is best to take the starter or ignition relay, where the contacts are best open.
3. Small pieces of aluminum and reinforced hose.
4. Coolant in a volume of at least two liters.
5. Clamps, six pieces are enough.
How to choose an electric pump
It seems that we have sorted out what the additional pump gives us.
Now let's find out how to choose it:
- The Gazelle electric pump is usually the most popular option. It will fit perfectly. This element is a conventional centrifugal pump. The disadvantage of this pump is that it cannot pump air due to the large gaps between the impeller and the housing.
VAZ 2109 electric pump from the old Gazelle
Note. Gazelle pumps are also different. Old and new pumps are known. As a rule, new electric pumps vibrate less and their use is more rational.
- “Advanced”, so to speak, motorists are advised to install, as a better option, an electric pump from Bosh.
- An option like a pump from Elara will also do. The manufacturer has recently significantly improved the element by introducing a new seal that does not leak. In addition, the cross-section of the fittings was increased, and this gave a double increase in productivity.
- A pump from Advers will also do.
The owner himself decides which pump to choose. There is practically no difference between the pump options, but you need to choose a pump that does not leak. In addition, by choosing a high-quality pump, the likelihood of it breaking or performing poorly will be reduced to zero.
Pump installation process
Before starting work, cool the engine naturally. Then drain the coolant into a clean container. We will need it later, so we have to worry about its cleanliness.
After this procedure, take a new pump and, on the side where the impeller is located, unscrew the four screws. The gasket made of rubber material, which is found in this place, is lubricated with conventional sealant. Next, we reassemble the pump, but instead of the removed screws, we install elongated thin bolts under the nuts. Only this approach ensures the best sealing of the connection.
The next step is to determine where to install the additional electric pump. There are several possibilities for this:
— on the washer reservoir mounting stud;
— on a pin near the battery;
— on the mounts of the standard Shumka, located on the engine shield.
Usually, preference is given to the standard approach, which is described in the instructions included with the electric pump, that is, the second option. Therefore, the pump must be positioned in such a way that its horizontal pipe faces the block, for which the iron fastening clamp must be loosened.
The next step, after installing the pump in the selected position, is installing the hoses. To do this, remove them from the stove and from the tube coming out from under the manifold. Next, take a reinforced hose of sufficient length and try it on in place. The main thing is that it reaches from the collector brass tube to the pump tube without kinks or stress.
Preparing to remove the heater
The work itself will not take much time if you follow the usual method:
- The intake module screen is removed (after removal, you need to tighten the oil filler cap)
- The MAF terminal is disconnected.
- The housing mounting bolts are unscrewed.
- The expander hose, secured with a plastic clip, is disconnected.
- The clamps of the injector pipe are loosened and the pipe itself is moved to the side.
- The four bolts holding the housing cover are unscrewed.
- The adsorber is removed from the landing site by pulling upward.
- Before removing, all that remains is to unscrew the rubber cushion located closer to the battery.
If, after dismantling the air filter housing, coolant leaks are detected, the pipes must then be sealed with sealant. This will ensure the safety of the antifreeze in the system and the absence of air locks.
The next thing you have to do is drain the coolant and remove the hoses to the stove. You need to be careful to reduce the amount of drips past the prepared container.
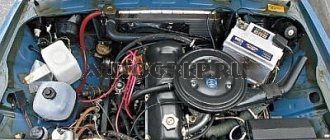
Installing an additional pump on a VAZ 2109
In this article we will learn how to install an additional pump on a car like a real auto electrician. The VAZ 2109 is a car that allows you to constantly modernize and improve something, however, like all models of this family. Let us present to the reader two algorithms on how to mount a pump from Gazelle and from Bosh.
Installing a Gazelle pump
As mentioned above, this is the most common option for installing an additional pump. Tools and materials:
- The Gazelle pump is standard. Costs about 1000 Russian rubles.
- Relay with normally open contacts. Standard relays from the starter or ignition will do, where you just need to bridge the necessary contacts.
- Some reinforced hose.
- 2 liters of coolant (regular antifreeze).
- Medium-sized clamps in the amount of 5 pieces.
- We wait until the coolant in the system cools down. The antifreeze is drained from the tank into some clean container if its reuse is intended. If you intend to use new antifreeze, then you can drain it for recycling.
- On top of the pump we see 4 screws. They will need to be unscrewed to get to the rubber seal of the impeller. We lubricate this gasket with a sealing compound.
- We assemble the pump, but instead of standard self-tapping screws we install long thin bolts, on the advice of an auto electrician. The VAZ 2109, by the way, is a car in which the Gazelle pump is quite successfully installed.
Advice. Some motorists who are installing an electric pump for the first time are wondering: where is it better to install the pump, in the gap in the heater supply pipe or in the outlet pipe? In fact, there is no difference in this, as long as the pump is installed downstream of the coolant flow.
Auto electrics for VAZ 2109 – electric pump
Note. You can mount the additional pump on the VAZ 2109 directly to the stud of the washer reservoir or to the stud near the battery. In addition, some craftsmen advise installing it on the factory Shumka mount, which, as you know, is located on the engine shield. It is most rational to place it near the battery, which is what we will do.
- Unclench the iron clamp.
- We install the pump with a horizontal pipe towards the block.
Now you need to think about how to establish a connection. It is most practical to transfer the connection to the recirculation button. If not, then you can put it on the SAUO unit or on heated mirrors.
- Two wires are disconnected from the recirculation valve: with a white-blue stripe and a yellow-blue stripe.
Note. Let us remind you that the recirculation valve is located on the engine compartment panel, and two thin hoses go to it.
- We connect the blue-white wire to one terminal of the relay.
- Yellow-blue to the second relay terminal.
- We connect the third terminal of the relay to the wire of the electric pump.
We recommend: Where to rent a car in Krasnodar
Now it's time to check how the pump works. When you press the button, the pump should begin to hum and blow air. If this does not happen, then something was done wrong. We continue with the installation:
- Disconnect hose 1, which carries coolant to the heater from the outlet pipe.
- We connect it to the horizontal pipe of the pump (the length is enough, if anything).
- Now you need to connect hose 2 to the vertical pipe of the pump, which itself consists of 2 S-shaped pipes (it is located between the tap and the heater radiator). As a last resort, instead of this hose, you can use another one of a suitable size and type.
- The second end of this hose must be pulled to the block head, from where hose 1 was removed.
- Tighten the clamps.
- Be sure to tighten the drain plug in the block.
- Fill coolant to the maximum mark.
- We turn over the engine.
- Visually inspect the pumps for leaks.
- Then we turn on the ignition again and check for leaks, which we fix if found.
- We tighten the clamps.
- Let the engine run for about 30 minutes.
- Refill coolant to the required level.
Checking the new pump
It is advisable to check in air when the temperature is about -10 degrees Celsius:
- The engine temperature should be +85.
- We turn off the engine.
- We turn on the heater at first speed and watch how semi-warm air blows.
- We turn on the additional pump and immediately see the difference: hot air blows! Hot air flows until the engine temperature cools down to +45 degrees.
- We start the engine again, heat it to the desired temperature and check everything again.
- If everything repeats, then the pump is functioning normally.
Bosh pump installation
Auto electrics for VAZ 2109 – Bosh electric pump
- A pump from Bosh, which costs about 1,300 rubles.
- Relay with chip.
- Two wires of 5 meters of different colors.
- 20 different terminals.
- A button with an LED, usually used on foreign cars.
- Special connector for pump.
- First of all, we lay the electrical wires.
- It is advisable to install the relay behind the car radio.
- From the relay we lay a 12V wire to the pump.
- The other wire goes to the button with the LED.
- Don't forget to connect ground to the button.
- The plus appears from the radio when the ignition is turned on.
- As a result, when the car is running, after pressing the button, the LED lights up and the additional pump begins to function.
- Now we install the pump itself.
Note. A common problem when installing an aftermarket pump can be threading the factory hose onto the pump. Let us note right away that it is easier to go and buy a new one than to try to tighten the standard one.
- We thread a new hose for the stove 18 mm.
- We place the pump and cover it with double-sided tape, and then secure it well with a clamp.
- We lead the +12V wire into the engine compartment to the ECU.
- Connect and you're done.
The costs of such an installation are minimal. If it costs about 2,000 rubles, that’s still a lot. Refinement of the standard system will only give positive results. The instructions given above will tell you how to do everything with minimal loss of time and money. Videos and photos will help you gain practical understanding in the process, so we don’t ignore them. The cost of installing an additional electric pump will not affect the family budget in any way if you do everything yourself.
Foreign pump
Imported devices have a number of advantages over domestic ones. One of them is weight. For example, the Bosch device is lightweight, so it can be freely connected directly to pipes. The difference in the design is that the Gazelle pump is an oil seal. At high speeds it creates increased pressure in the system and leaks. The imported device has a non-contact design and the electric motor is in no way connected to the pump.
As for performance, it is better to purchase an additional imported pump for the Gazelle stove. Its description shows that it is superior in quality and efficiency to its domestic counterpart. Its parameters are the same as those of the domestic version. The device is powered by 12V and the tube size is 18mm.
As for the reviews about the operation of this additional pump, those who updated the heating in the Gazelle in this way were satisfied. In the harsh Russian winters, the car interior became warm and comfortable.
It would seem that now is not the time for pomp. But, as they say, prepare your sleigh in the summer. It also makes a difference in the summer in the sun, poking around under the hood, draining coolant, or during the first frost. By the way, I managed to dig around in the cold, well, first of all.
There are a lot of descriptions for installing an additional pump; there is something to compare with, if anything. In addition, there is always the opportunity to choose what to be guided by. I will not argue whether this modification is necessary or unnecessary. Let's say the reader of this post comes to the conclusion that you need to install a pump in your car. I will describe my experience, the difficulties I encountered and how I solved them.
1. Pump selection. GAZelle standard pump. Well, what should one do with such a fool?
When I went to buy it, I recommended it as a “new sample”, without an oil seal. And the size was smaller and the price was decent.
I took it, installed it, skated it for a month and went to shoot in the cold. Firstly, it’s not a thing without a gland. There is a rubber ring and there is a ceramic ring, which for some reason burst. The antifreeze worked, it flooded the pump motor, it stalled, and in short there was nothing to it.
What should I do? Those who like to save always pay twice. Actually, I opted for a new pump, only I had already decided to get a good, branded, imported one. Well-known manufacturer.
And this device is on my desk. Connectors, including original ones for some car brands (obviously for foreign cars) or standard ones. As a connecting connector, I simply took a connector from a VAZ brake fluid level sensor, etc. It could have been made simpler and better by purchasing a native connector. It is the same as the knock sensor or VAZ injectors, etc. But he wasn't in the store. So I still go with this connector. This pump basically cannot leak. It does not have an oil seal, an impeller drive shaft, or a magnetic system.
The new Bosch pump costs a little more than the so-called GAZelle pump. But you can save money. Everyone in the cities is having troubles. Let's go there and buy a used one from some Mercedes or Boomer, or from a minivan. My son-in-law, for example, inherited a 124 Mercedes. It was removed from the car, embedded in the ground. I took it home, tried to plug it in, it wouldn’t boot. Disassembled, cleaned, lubricated with Teflon grease. And that’s it, she earned it for two seasons and worked without complaints.
2. The choice has been made, now installation. There's not much to talk about or color in here. Everyone has their own imagination, everyone has their own preferences for the state of the engine compartment. I placed mine on the left cup, on the washer reservoir mounting pin. She settled in very well there. Brother-in-law is hanging right on the pipes. The trick is that it is very light, unlike our bandura. And my son-in-law didn’t even have to answer the phone. They simply cut the hose at a convenient location and connected it directly to the pump. I changed the tube and bought a piece of tube with an internal diameter of 18mm. I stuck it all into the heater radiator supply hose. The photo below shows where it is located and also shows how it is connected.
I agree, it's not very pleasant. But this was a temporary option, hastily.
3. Electrical connection. I talked about the connector, and such components were purchased.
Recirculation button. Relay ZPTF 23.3777 (self-locking). Expensive, but, again, the showdown has everything. Button connector. Air fuse. Unfortunately, I didn’t find the ZPTF relay connector in the store and didn’t go for disassembly. I had to improvise. Clips are also visible in the background. I never recommend anyone to use them. Only twists (according to science are of high quality) or welds. Thin wires, terminals, shrink film.
Remove the excess tails from the button connector. I tore everything up. New terminals crimped. Edit button. It must not have been repaired. Remove the marked bracket.
I also quickly connected it to the ZPTF relay. After that, I changed the connector for the power window buttons, which, unfortunately, I didn’t photograph.
Then we connect everything according to the following diagram.
1 relay 23.3777. Pinout: 1 Constant +12 volts. I ran the fuse directly from the battery. 2 Not used. +3 Land, wherever your heart desires, there’s a lot in the salon, I think there’s something for everyone. 4 Worker (consumer is authorized). In my case, a relay, from which, in turn, the pump is powered. 5 Signal, signal to turn on or off. It is operated by pressing a non-fixed button once. 6 + 12 volts from the ignition switch, from anywhere on the mounting block. The ignition signal is easily triggered by a multimeter or test. 2. Our button itself has changed and is not fixed. 3. A relay that does not need to be installed at all. But I made sure that the pump was closer to the power source. 4. And the pump itself. 5. Fuse. 15 amps is enough. Tested when turning off “our” leaking pump.
Well, in the end, all these connections are needed, the snot from the threads needs to be put in order and you can use it. The scheme is suitable for any car.
How does it all work? The ignition is turned on, and you can use the pump. Turn it on with one click of a button. Tired of heating up, turn it off with one click. Also, when you turn off the ignition, it also turns off. And the next time you turn on the ignition it does not turn on. Comfortable.
Notes: The Bosch pump is completely quiet, unlike ours. Ours hums like crazy, so the engine is inaudible (well, figuratively, of course). The system worked for me for three seasons. There are no cons. The only positive thing is that, at a minimum, the stove is fried, as if the glass begins to melt earlier when moving. At 40 degrees hot air is already blowing, at 80 degrees the hand at the terminals of the heating element begins to burn.
What does it give
An additional VAZ 2114 pump provides warmth and comfort in your favorite car. You can save a lot on warming up your car if you like comfort. In practice, the car will noticeably heat up within 5 minutes after turning on the heating system, which cannot be achieved using a standard heating system.
Speaking of pros and cons: firstly, the domestic pump has only a plus, and the minus is the unit housing itself, and secondly, it is better not to leave a plus on the battery, despite the fuse, it is better to look for another point to connect it.
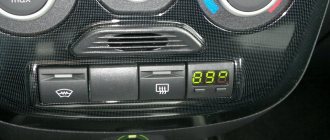
How the LADA Kalina stove works
The vehicle's heating system must work properly. It is not difficult to achieve uninterrupted operation of the stove if you know the structure of the LADA Kalina stove. The heater creates a comfortable stay in the car interior, creating visibility for the driver. The stove design provides for the use of small-class machine options. The production of Kalin cars began over ten years ago. The following options are included for the base model:
- Anti-lock braking system.
- Airbags.
- Electric power steering.
New LADA Kalina models were developed, which were already equipped with additional options:
- Electric door window lifts.
- Reliable heater.
- Heated seats.
- Interior air conditioning device.
- Kalina heater diagram
- General layout of the Kalina stove
- Heating device control unit
- Interior ventilation of LADA Kalina
- Kalina stove electrical circuit
- Checking ventilation and heater LADA Kalina
- Possible heater malfunctions
- Summary
Let's sum it up
Taking into account the above information, it becomes clear that an electric pump for a stove is a fairly simple and convenient solution that allows you to increase comfort and safety when operating a car.
In practice, after installing such a pump, it is possible to warm up the interior faster, which is important when making short trips over short distances or while driving fast on the highway in winter. The glass warms up faster and sweats less during a trip, it is easier and faster to remove snow and ice from them, etc.
As for the choice of the pump itself and its installation, the additional GAZelle pump is in demand, primarily due to its low cost. At the same time, we are not talking about quality.
Finally, we note that an additional pump in a VAZ 2109, 2114 or on a budget foreign car can significantly increase the level of comfort, save on warming up the car, etc. If the installation is done correctly and the pump is working properly, the interior will heat up faster compared to the standard heating system.
The only thing is that you should periodically check the tightness of the cooling system, since even standard elements can leak. If we are talking about additional non-standard elements, in this case the connection points require separate control.
What does water injection into an engine provide, the principle of operation, the main advantages and disadvantages. How to inject water into the engine yourself, available methods.
Checking the car cooling system pump. Main symptoms of malfunctions. Diagnostics of the water pump without removal, troubleshooting with removal from the engine.
How to check the car engine cooling system for leaks and operability of all components. Diagnostics of the pump, thermostat, pipes, etc.
Common engine cooling system failures: water pump, thermostat, radiator, cooling fan and others. How to determine the reasons yourself.
Pump device. The operating principle of a centrifugal pump, an engine cooling system with two pumps and a switchable pump. Pump malfunctions and repairs.
Sources
- https://nadouchest.ru/ustanovka-jelektropompy-na-vaz-2109/
- https://auto-park24.ru/uhod/ustanovka-dopolnitelnoj-pompy-vaz-2109.html
- https://serenity-service.ru/uhod-za-avto/ustanovka-dopolnitelnoj-pompy-vaz-2109.html
- https://carnovato.ru/ustanovka-dopolnitelnojj-pompy-v-avtomobil-svoimi-rukami/
- https://litezona.ru/pompa-ot-gazeli-na-vaz-2109/
- https://remontvazov.com/dopolnitelnaya-pompa-na-pechku-vaz-2114-uteplyaemsya-k-zime
Checking ventilation and heater LADA Kalina
Car owners claim that the Kalina heater heats much better than previous VAZ models. It sometimes breaks down and requires repair. Do a full system diagnostic to ensure it's working properly.
- We start the car engine.
- Turn the left handle counterclockwise and place it in the blue zone.
- We place the fan speed switch in each of the 4 positions one by one. If the fan does not rotate in one of the positions, then check the power supply circuit of the device.
- Turn the speed controller to maximum.
- Using the right handle (damper control) we check the redirection of air flows. If we notice that there is no change, then the damper drive needs to be repaired.
- Warm up the engine to 90°C. Turn the left handle to the extreme position of the red zone.
- The air that comes out of the panels should blow warm air.
- Return the left stick to the blue zone. Cold air will come out of the nozzles again.
- If the temperature of the air flow does not change due to a change in the position of the regulator, then the control of the central damper drive is faulty.
The car owner may not immediately understand that the Kalina interior heater, the circuit of which is simple, is damaged. You constantly add antifreeze in small quantities, and the carpet in the cabin is dry and there is no smell of antifreeze. A stove leak does not appear immediately, and the main thing is that the liquid can evaporate. The Kalina radiator does not have pipes leading into the cabin that could leak.
READ Car rear view camera which one to choose