The gas distribution mechanism and its drive of the seven engine produced by the Volzhsky Automobile Plant remained the same - chain. Extraction and excessive wear of the timing chain on the VAZ 2107 power unit by the injector-type power supply system leads to:
- difficulty starting the engine;
- unstable operation in all modes, especially at idle;
- a sharp increase in fuel consumption;
- formation of carbon deposits on valve seats;
- Damage to the injection control system sensors and catalytic converter may occur.
In order to avoid the negative consequences of weakening or stretching the chain drive of the VAZ 2107 car engine, it is necessary to carry out routine maintenance in a timely manner. The list of maintenance operations for the power unit with the injector power system is determined by the service book. The condition of the timing chain and the gaps between the camshaft cams and valve levers is monitored every 30 thousand km.
On warranty VAZ 2107 with an injector-type power system, such work is best carried out at an authorized auto repair center. If malfunctions occur due to the fault of the car plant, they will be eliminated at the expense of the manufacturer. At the end of this period, maintenance of the timing belt and other vehicle systems can be performed independently.
Timing shaft diagnostics
In the removed state, you can easily assess what defects are on the shaft. Visually, you can detect damage such as scuffs and scratches, as well as wear on the cut on the cams and coating of the aluminum word on the necks.
Even if minor traces of deformation were noticed, the camshaft on the VAZ 2107 must be replaced.
We present a table that shows the permissible values of the dimensions of the shaft journals for its further use.
| Part number (report starts at the front) | Threshold of permissible size values, mm | |
| Minimum | Maximum | |
| Shakey | ||
| 1 | 45,91 | 45,93 |
| 2 | 45,61 | 45,63 |
| 3 | 45,31 | 45,33 |
| 4 | 45,01 | 45,03 |
| 5 | 43,41 | 43,43 |
| Supports | ||
| 1 | 46,00 | 46,02 |
| 2 | 45,70 | 45,72 |
| 3 | 45,40 | 45,42 |
| 4 | 45,10 | 45,12 |
| 5 | 43,50 | 43,52 |
If these values are not met, it is important to replace the “bed” or timing shaft
Performing powertrain maintenance
VAZ 2107 cars with injection engines are still produced at enterprises in our country. They are highly reliable and economical at an affordable price, which is what determines their high popularity among consumers.
Both on the carburetor engine of the VAZ 2107 car and on the injection engine, the gas distribution mechanism along with the drive remained the same, that is, chain. With excessive wear and stretching of the chain, a number of the following negative consequences are observed:
- Problem starting the engine.
- Significant increase in fuel mixture consumption.
- The appearance of carbon deposits on valve seats.
- Abnormal motor operation in all modes.
- Malfunction of the injection control sensor.
To avoid such negative consequences, it is necessary to carry out preventive work in a timely manner. We will learn more about how to set timing marks on a VAZ 2107 Lada family car with an injector power system.
Timing phases and when to set them according to marks
Valve timing refers to those moments at which the piston in the engine moves up and down over a certain interval. When irregularities in the valve timing occur, the pistons move incorrectly along the interval, resulting in uneven engine operation on the VAZ-2107.
If the driver notices that the car’s power decreases, fuel consumption increases, and engine interruptions occur, then it is necessary to resort to setting the valve timing according to marks. How to set marks on a VAZ 2107 carburetor and injector, we will learn from this material, since the design of the timing mechanism is identical.
How to set timing timing marks
The procedure involves performing the following manipulations:
- The VAZ 2107 needs to be placed on a hard surface, with chocks placed under the wheels and the hand brake pressed all the way. The gear shift lever must be set to neutral mode.
- The cover is removed from the cylinder head by first unscrewing all the fixing nuts to “10”. It is better to replace the gasket with a new one, even if the old one shows no signs of damage.
- Using a key set to “24”, you need to turn the crankshaft on a VAZ 2107 car. This is done in order to be able to align the marks on the moving and stationary parts of the mechanism. To carry out these actions, it is recommended to use good lighting or use a flashlight. The crankshaft rotates until the mark on the pump and generator drive belt pulley coincides with the long mark marked on the block.
- Combining these risks, the mark on the sprocket should eventually coincide with the ebb on the camshaft bed. If the mark ends up at the bottom, then you should rotate the crankshaft 360 degrees.
- If you can’t make sure the labels match, then proceed to the next steps, which are described below.
- The crankshaft is rotated until the marks on the star and the bed ebb align.
- Using the key at “13”, you need to loosen the tensioner. The 2 nuts securing the tensioner are unscrewed, after which this device is removed.
- The bolt that secures the sprocket to the camshaft is unscrewed. To do this you will need to use the key at “17”.
- The sprocket is removed, after which it must be rotated until the marks on the VAZ-2107 timing belt pulley coincide with the long mark on the block. The star fastening bolt does not need to be unscrewed, since after removing the tensioner the camshaft star rotates.
- We put a chain on the sprocket, if it was decided to unscrew it, and install it in place. Finally, the tensioner is installed, for which you should tighten it with 2 nuts to “10”. You can install the tensioner first, but later you will need to use a crowbar or pry bar to get the sprocket into place. Finally, screw the tensioner nut to “13”.
This relative arrangement of the parts allows the piston of the 4th cylinder to be positioned at top dead center TDC.
Features of servicing the timing mechanism
After the timing marks are installed on the VAZ-2107, you need to perform the following actions:
- The timing chain of the VAZ-2107 is being tensioned.
- Adjusting the valves, or more precisely, the thermal gap between the camshaft cams and the rocker arm.
- Setting up the ignition system.
The process of adjusting the valves on the VAZ-2107 is carried out according to the following scheme: initially 6 and 8 valves are adjusted, the report must be carried out from the radiator. After they are adjusted, you need to start adjusting valves 4 and 7, then valves 1 and 3, and finally valves 2 and 5.
How to adjust the valves on a VAZ-2107 car can be found out in more detail in the relevant material on this site. In conclusion, it is worth noting that VAZ-2107 cars are one of the most reliable vehicles, the production of which began back in the 90s.
Preparation for service operations
Control of the tension of the chain drive of the gas distribution mechanism begins on an engine with a power system such as an injector or carburetor that is identical to each other. The operation is performed in the sequence established by the manufacturer:
- We place the car on a level area with a hard surface and secure it to move spontaneously by installing wheel chocks and engaging the parking brake. Set the gear shift lever to the neutral position.
- Remove the cover from the cylinder head by unscrewing all the nuts along its contour using a tubular wrench. In this case, it is recommended to change the old gasket; the use of sealants is not allowed.
- Using a key set to “38”, we turn the crankshaft of the VAZ 2107 engine in order to align the marks on the moving parts and the stationary ones. When performing this act, care must be taken, and the locations of the control points should be illuminated with a flashlight or carrying device.
- We combine two marks: 1st - on the generator drive belt pulley with a special protrusion on the cover body, 2nd - on the upper sprocket of the gas distribution mechanism of the VAZ 2107 unit with an injector power system.
Malfunctions of the VAZ 2107 camshaft, their symptoms and causes
Considering that the timing shaft is subject to constant dynamic and temperature loads, it cannot last forever. It is difficult even for a specialist to determine that this particular unit has failed without detailed diagnostics and troubleshooting. There may be only two signs of its malfunction: a decrease in power and a quiet knocking sound, which manifests itself mainly under load.
The main camshaft faults include:
- wear of the working bodies of the cams;
- wear of the surfaces of the bearing journals;
- deformation of the entire part;
- shaft fracture.
Wear of cams and journals
Wear is a natural occurrence for a constantly rotating part, but in some cases it can be excessive and premature. This leads to:
- insufficient oil pressure in the system, as a result of which lubricant does not flow to loaded areas or is supplied in smaller quantities;
- low-quality motor oil or one that does not meet established requirements;
- defect in the production of the shaft or its “bed”.
If the cams wear out, the engine power is noticeably reduced, since they, being worn out, cannot provide either the appropriate phase width or the required lift of the intake valve.
When the cams wear out, engine power drops
Deformation
Camshaft deformation occurs as a result of severe overheating caused by malfunctions of the lubrication or cooling systems. At the initial stage, this malfunction may manifest itself in the form of a characteristic knocking sound. If you suspect such a breakdown, further operation of the car is not recommended, as it can damage the entire gas distribution mechanism of the engine.
Deformation occurs due to malfunctions in the lubrication and cooling systems
Fracture
A camshaft fracture may be a consequence of its deformation, as well as poor timing. In the event of this malfunction, engine operation stops. In parallel with this problem, others arise: destruction of the shaft “bed”, bending of valves, guides, damage to parts of the piston group.
A shaft fracture may be a consequence of deformation
How do you know when the camshaft needs to be replaced?
You can find a camshaft malfunction without opening the hood based on two signs:
- knock;
- decrease in oil pressure in the engine.
The main reason for malfunctions in the camshaft is the occurrence of gaps. They occur between the shaft support journals and the bed bearings on which the camshaft rests. The cracks are formed due to the fact that parts of the camshaft are worn away. The gaps lead to the shaft becoming movable in the vertical or horizontal axis. If the free play of the shaft is 1 mm, then this affects the operation of the motor. Prerequisites for the occurrence of gaps:
- the camshaft was not replaced in a timely manner;
- do not change the oil on time;
- introduction of bad oil;
- The driver drives at low speeds, so the timing belt does not receive enough oil and the parts wear out faster.
The camshaft also needs to be changed if the oil channels in it are clogged. Before changing the part, look to see if there is any free play, fracture, deformation or kinks in the shaft.
Replacing the timing belt of Zhiguli 2105
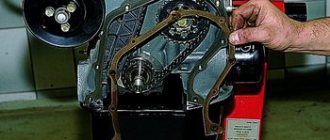
Replacing a belt on a VAZ-2105 is much easier. To gain access to it, you must first remove the alternator drive belt and the timing belt protective cover.
Removing the alternator belt
Afterwards, marks are placed on the camshaft gear with a mark on its body, as well as on the crankshaft pulley and the drive cover. Then remove the drive belt protective cover, which consists of three parts.
| Marks on the crankshaft pulley | Marks on the camshaft pulley |
The next step is to loosen the tension pulley bolt and turn it to loosen the belt tension. Then the belt is carefully removed from the camshaft gear, removed from the tension roller and removed from the crankshaft gear.
Tension roller location
After putting on a new belt and after tensioning it with a roller, you need to check that all marks match. Then everything is put back together.
As a result, it should be noted that the main condition for replacing a belt or chain is that the installation marks match, so when removing the drive and installing a new one, watch the shafts so that they do not turn, so everything must be done extremely carefully.
Preparatory stage
To set the ignition on a VAZ 2107 , no special conditions are required; the operation can be done both in the garage and on the street, including in winter. For work, prepare the following set of tools:
- flat screwdriver;
- metal probe 0.35 mm thick;
- open-end wrench size 13 mm;
- a car light bulb designed for a voltage of 12 V with wires soldered to it;
- a wrench with a long handle designed to turn the crankshaft;
- key for unscrewing spark plugs.
Note. Instead of a special key to rotate the crankshaft, you can use a regular open-end wrench measuring 36 mm. If you don’t have such a key, then you will have to set the marks in the old proven way: by engaging 4th gear and raising the rear wheel, turn it manually, thereby turning the crankshaft.
Do-it-yourself removal and repair of the Niva 2121 camshaft - step-by-step instructions
In order to remove and replace the camshaft on a Niva 2121, you must perform the following procedure:
- Prepare the necessary tool Preparation for replacement consisting of: wrenches; torque wrench; chisels; socket heads for 10, 13 and 17.
- At the first stage of work on removing the shaft, the following actions are performed: Removing the negative terminal from the Niva 21213 car battery (2121 and any other domestic modification of this car); Removing the cylinder head cover; Install the camshaft in a position where the mark on its sprocket coincides with the corresponding protrusion on the bearing housing. And the mark on the pulley is with the protruding part of the shaft drive. Using a chisel to bend the blades around the lock washer of the bolt securing the sprocket.
- Next Unscrew the sprocket bolt of the part being removed (key “17”) and remove it from the hole;
- Dismantling the timing chain tensioner;
- Removing the camshaft sprocket (it is recommended to tie a chain to it - this will ensure that there is no jumping);
- Uniformly unscrew (using a 13mm wrench) all the nuts securing the shaft bearing housing and remove it from the cylinder head studs along with the camshaft.
- Unscrewing, using a 10mm socket wrench, the fastenings of the thrust flange to the bearing housing;
- Removing the flange and then the camshaft.
- If it is necessary to replace the valve levers, these parts are also removed immediately after dismantling the shaft. To do this you should:
- Move the presser spring legs to the side;
- Remove the lever;
- Remove the spring.
- At the same stage, diagnostics of the condition is performed. If there are noticeable damages (cams are worn by 0.5 mm or more, scratches, grooves and nicks are visible on the surface), indicating the impossibility of repair, proceed to the process of installing a new part. The camshaft, which can be repaired, is brought back into working condition. If the question about the need to replace the camshaft of any Niva model (including 2131 and more modern versions) receives a positive answer, you should purchase a new part. As a rule, they are sold complete with cases. It is worth noting that installing a new shaft requires replacing its rockers and hydraulic compensators, which increases the cost of repairs by approximately one and a half times.
- Before installing the shaft inside the bearing box, lubricate the working surfaces of the journals and cams with engine oil.
Now you should install the camshaft so that its pin is located exactly opposite a certain reference point - the upper hole of the thrust flange. The part is fixed and the fasteners are tightened, adhering to certain rules: the nuts must be tightened, trying to maintain a force of 19 Nm; • twisting is carried out in a certain sequence, which can be seen in the diagram: - Now unfasten the wire that secured the timing chain to the sprocket (leaving marks for ease of installation), and install both of these parts on the shaft. Having unscrewed the fastening bolt, bend the petals of the lock washer. And as a final stage:
- installing a tensioner for the timing chain (observing the marks made);
- returning previously removed parts to their place in the reverse sequence;
- adjustment of thermal clearances of old or newly installed valves.
- The result of the replacement is a new camshaft installed on your Niva 21214, 2121 or 2131, which can last at least another 100 thousand km - without the appearance of knocking and most other problems with the engine. At the same time, funds are saved that could have been spent on paying for repair services, and relatively little time is spent.
Signs of Camshaft Wear
The operation of the camshaft is associated with constant exposure to high loads, as a result of which the part gradually wears out and requires replacement. The need for repair arises when characteristic symptoms appear:
- knocking when the engine is running under load;
- reduction in power indicators.
There are a number of reasons why the RV fails:
- natural wear and tear;
- low-quality motor oil;
- low oil pressure in the lubrication system;
- insufficient oil level or so-called oil starvation;
- engine operation at high temperatures, which leads to deterioration of the lubricant properties;
- mechanical damage (wear or broken chain).
The main malfunctions that impair the performance of the camshaft are scuffing on the working surfaces (journals and cams) and deterioration of the limiter.
It is quite problematic to determine from the sounds coming from the engine compartment that the problem is related specifically to the camshaft, but it is still possible. The knocking sound of the engine resembles the dull blows of a hammer, which become more frequent as the engine speed increases. However, the best way to diagnose a shaft is to dismantle, disassemble and troubleshoot it. During inspection, the shaft should not move in the housing relative to the axis, otherwise a dull sound will be produced when hitting the limiter.
Video: reasons for the longitudinal play of the VAZ camshaft
Power reduction
The drop in power on classic Zhiguli cars is a phenomenon caused by wear of the camshaft and rockers. With proper engine operation (timely oil changes, monitoring its level and pressure), the problem only appears over long vehicle runs. When the cams wear out, the required phase width and valve lift at the intake are no longer ensured.
The RV can become deformed under extreme heat, which is caused by problems in the cooling and lubrication systems. At first, the problem may manifest itself as a knocking sound. Therefore, if there is a suspicion of this breakdown, for example, the motor has overheated, then it is recommended to diagnose the shaft in order to avoid more serious troubles with the engine timing belt.
VAZ timing chain
To replace a VAZ chain, you need to purchase a new VAZ timing chain
for your engine type. Since the cylinder blocks of the VAZ 2101-07 engine have different heights, the length of the VAZ timing chain and the number of chain teeth for different VAZ cylinder blocks are different, so you must be guided by the following parameters when purchasing.
Chain size - (number of links), for VAZ -2101, 011, 05 engines with a standard VAZ cylinder block height, is:
• Chain 2101, 05 and 011 – 114 links.
VAZ 2103-06 engines have an increased cylinder block height and a 7 mm increased crankshaft crank radius, which means a larger number of timing chain links:
• Chain 2103 – 2106 – 116 links • Chain length = 495.4–495.8 mm, chain replacement when chain stretched to 499.5 mm
In addition, the chain tensioner shoe No. 7 in Fig. 1 and the chain guide No. 3 in Fig. 1 are different; their markings are applied to the working surface - 2101 or 2103 on the shoe and on the guide. In addition, the shoe is drilled on a bracket welded to the shoe.
The VAZ 2101 chain tensioner shoe has a mark at the top of the bracket, and 2103 – at the bottom. If the shoe is selected correctly, the chain tensioner will press with its protrusion exactly into the center of the shoe bracket.
You can check the VAZ timing chain for links by its shape, by laying it on a workbench. Since the chain for 2103-06 has an even number of links “58”, it will have both blunt ends if you connect both parts of the chain. The chain for 2101 has an odd “57” number of links and therefore one end of it will resemble the roof of a house.
The chain must be replaced complete with sprockets and is usually purchased as a set:
• Chain No. 2 in Fig. 1 • Camshaft sprocket (large) No. 1 in Fig. 1 • Intermediate shaft sprocket (large) No. 4 in Fig. 1, the shaft is better known to car enthusiasts as a “pig” • Crankshaft sprocket (small) No. 5 in Fig. 1
In order to check the sprockets for further use, a new chain is put on the removed sprocket and grabbed from below by hand, connecting its links so that the chain tightly covers the sprocket. Then you need to use your hand to try the tightness of the chain links on the teeth of the sprocket, shaking it from side to side. If the VAZ timing chain
sits tightly and the links move on the teeth with difficulty, then the star can be left for further use.
When the chain links “dangle” on the sprocket teeth, the sprocket must be replaced. In addition, on a worn sprocket the teeth will be blunt and much lower in height.
Checking the new chain. The chain is removed from the box and folded, then in this state it must be lifted and placed horizontally. The chain should “stand” almost straight without bending. In order to have something to compare with, do the same with the old chain after removal, before buying a new one. An old, worn VAZ timing chain will immediately sag like a rocker arm.
During the check, also run the chain like a “snake” and the links should easily roll relative to each other without biting, which will indicate the quality of workmanship. When the links of the chain “move” with difficulty relative to each other, then this is an obvious defect and you cannot buy such a chain, even if there is no other one on sale at the moment. By taking and installing such a VAZ timing chain, you will simply buy yourself a problem with your own money.
Be careful and good luck with your purchase!
About replacing a single-row chain with a double-row one
In early VAZ 2107 models, predominantly double-row timing chains were installed. This technical solution had its advantages:
The main disadvantage of the double-row chain was its heavy weight. It is for this reason that in later VAZ 2107 models they decided to abandon it. However, drivers concerned about engine safety and reliability can always return the double-row chain back. To do this, you will need to replace not only the chain itself, but also the entire tensioning mechanism, from the sprockets to the damper and tension shoe. The shoe, as you might guess, should be wider, i.e., designed for two rows of links. The shaft sprockets must also be double-rowed.
Previously, all these parts could be purchased in a single set. Nowadays, such kits are becoming increasingly rare, so drivers have to buy everything separately. Products are in great demand. This manufacturer produces not only chains, but also double-row sprockets.
The sequence of installing a double-row chain on a VAZ 2107 is no different from the above. There is only one peculiarity: instead of single-row sprockets, double-row sprockets are installed. The same goes for the tension shoe. The procedure for installing a double-row chain using marks is no different from that described above.
So, the timing chain is the most important part of the engine. The consequences of failure of this part can be catastrophic. In especially severe cases, a seized engine cannot be restored at all. It is for this reason that the car owner must carefully monitor the condition of the circuit and change it at the slightest suspicion of a malfunction. Even a novice car owner can replace the chain. Despite the apparent complexity of this procedure, there is nothing terrible about it. The main thing is to correctly install the chain according to the marks, and no problems with its further operation will arise.
Source
Labeling procedure
Let's say the specifics of your case require the need to set timing marks. What will you need to do? First of all, prepare some tools. To be more precise, we are talking about the following tools:
- 10-gauge wrench;
- flat screwdriver;
- jack.
Please note that the tools presented above are only necessary for adjusting the position of the motor shafts and, accordingly, setting marks. To disassemble the gas distribution mechanism and carry out its repair, the tools are determined based on the specific design of the vehicle being repaired and the existing breakdown.
The timing belt marks are set as follows:
- First of all, we disconnect the battery and organize access to the mechanism;
- Then, using a jack, slightly lift the right front wheel off the ground;
- After that we find the camshaft and crankshaft. Simply put, these are the largest gears connected by a timing chain or belt;
- Shafts found? It's time to ask the question of how to set the timing marks. To do this we need:
- Find the risk on the shaft pulley;
- Find the mark on the engine block;
- By rotating the front wheel, align both indicators;
- Remove the crankshaft flywheel plug and check whether its mark matches the mark on the engine block housing;
- If not, then we turn the wheels until the risks of the pulley and the engine block coincide again. Otherwise, we take no action.
The following images visualize this process more accurately;
Having completed the alignment of the shafts, we assemble the car structure to its original form. Before doing this, do not forget to double-check the marks for correct placement, so that later you do not need to disassemble everything again.
Checking the alignment of the timing marks
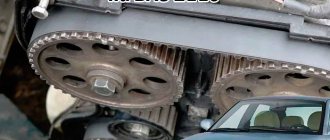
If you do not compare the marks of the crankshaft and camshaft, the engine will not work correctly. Placing timing marks on a VAZ 2107 injector is no different from the procedure given to us on carburetor engines. The mark on the crankshaft pulley must coincide with the mark on the front cover of the engine. And the point on the rim of the camshaft sprocket must be opposite the beacon on the bed.
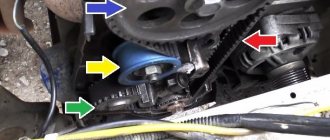
Align the mark on the star with the protrusion
When you put on the sprocket, lock the camshaft so that it is stationary. Do not tighten the star nut all the way. Align the marks on the camshaft by turning the sprocket. The chain must remain in the initial position, so move the links until you achieve alignment of the mark and the ebb on the bed. Then use the wrench to move the crankshaft a quarter turn counterclockwise. Turn the crankshaft to the reverse position so that the marks on it coincide. When the marks are aligned on both the crankshaft and the camshaft, tighten the nut on the camshaft sprocket with a torque wrench. Tightening torque – 5 kgf*m. Adjust the chain tension using the tensioner.
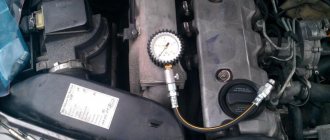
Diagnostics of timing chain VAZ 2107i
Over time, the timing chain stretches, resulting in lateral vibrations in the downstream section of the chain. These vibrations can break the damper, and in extremely advanced cases, lead to the chain jumping on the sprocket and, as a result, damage to the engine. When the chain is stretched, a characteristic metallic sound appears in the front part of the engine, increase the speed a little and if the sound becomes weaker or disappears altogether, this is a clear sign of wear on the timing chain. If you have a semi-automatic tensioner installed, try tensioning the chain. The procedure is described above. If this does not help, you will have to change all elements of the gas distribution mechanism.
Cost of work and parts
The cost of replacing a chain at a service center is around 700 rubles, and the price of complex replacement of a chain, sprockets, tensioner and chain guide is about 1,800 rubles.
The cost of a chain is from 350 to 600 rubles, a set of sprockets (crankshaft sprocket, camshaft and oil pump) is about 400 rubles, a classic tensioner shoe (with a rubber lining) is about 100 rubles, a modernized one with a sprocket on a bearing is about 1,400 rubles, a chain guide is about 80 rubles.
When buying a chain, carefully inspect its rivets ; they should all be well flattened so that not a single pin pops out and the chain does not come apart.
It is recommended to buy a new chain tensioner with a sprocket on a bearing, even despite its high cost. It increases the life of the chain and the noise level with it is much lower than with a classic “shoe”.
In addition, while the engine is running, the rubber pad on the shoe wears off, and all the chips fly into the oil, for this reason the chain needs to be tightened more often. A tensioner with a bearing does not have these problems, and its service life is much longer.
Split Gear Function
Principle of operation, instructions for replacing the VAZ-2106 camshaft A conventional gear mounted on the camshaft is designed to transmit torque from the crankshaft to the camshaft of the gas distribution mechanism. The part is a single piece without any moving parts. A split gear consists of two components - they can move relative to each other. This design allows the camshaft angles to be changed without affecting the tension of the timing belt or drive chain.
For example, this part on VAZ engines can rotate the shaft 5° in one direction or the other. Here you need to understand that you can change the engine operating characteristics in this way only in specific modes - in the upper or lower ranges.
Very often, to increase power and other engine characteristics, the camshaft and its gear are changed. If you replace them, you can adjust the valve timing differently. It will also be possible to change the valve lag angles. If a split gear is installed on the engine instead of the factory one without replacing the camshaft, then only the overlap angles can be changed.
How to choose high quality parts
Buy a camshaft from a reliable and time-tested company, for example, PJSC Avtovaz. The packaging has a seal with a hologram. It shimmers in the light and features the company's logo. There is also a sticker with a barcode on the box. The item is packaged in blue translucent film. There is a stamp from the Quality Control Department inside the package. Buy rockers together with adjusting bolts. There are levers of the newest and old standards. Their holes vary in diameter and number of cuts. If you buy rockers and bolts separately, there is a possibility that they will not fit together.
Replacing the camshaft along with the housing on a VAZ 2101-2107
Changing the camshaft along with the housing is not such a difficult process, so you can handle it yourself, let’s look at the example of a VAZ 2101-2107 car. First of all, suspicions were related to a faulty valve, since one cylinder was faulty, but after opening the housing itself, a damaged camshaft housing was noticed, a part was knocked out, and the roller with a spring was also damaged. Therefore, we took care in advance and purchased new parts, and got to work.
For work, we stock up on certain tools; in principle, they can be found in any garage.
After completing all repair procedures, be sure to adjust the valves.
The photo presented shows the main cause of the breakdown.
Purchased replacement part.
First of all, we get rid of the valve cover, armed with a 10mm wrench, unscrew all the fastening nuts, it should look something like in the photo.
Using a flat-head screwdriver, pry up the washer located under the camshaft sprocket nut.
Unscrew the nut using a 17 wrench.
We get rid of the tension bolt located on the timing chain, located on the right side in front.
After loosening the chain, we will try to knock on the sprocket a little to remove it.
Next, remove the nut holding the camshaft cover on a VAZ 2101-2107 car; see the photo for an example.
Next, we remove the housing with the camshaft; to do this, you can only pull it towards you with a little force.
What you should get as a result can be viewed in the photo below.
We replace rockers and replace them with new ones. After all, there is wear on worn rockers, so adjusting the valves is almost impossible, but you will be guaranteed the presence of a knock. Changing them is very simple; to do this, pull upward with force and remove.
The springs also need to be replaced, the prices are not bad, for about one spring you will have to pay only 3 rubles, when installing new rockers you will not have to follow any sequence, but when installing old rockers you will have to follow it. Next, armed with a new camshaft 2101-2107 already assembled, we fix it on the cylinder head, then we fix the nuts using a torque wrench.
Tightening should be done in strict sequence, shown in the diagram with a force of 18-21; exceeding the range will lead to damage to the thread.
Installing a new shaft
The new camshaft must be lubricated with engine oil before installation.
- Check the lever springs. If they are broken or bent, replace them.
- Screw the adjusting bolts into the space.
- Install the springs, then attach the rocker to them.
- Now you can insert the camshaft with housing. Lubricate the levers, cams and camshaft necks with oil. Fit them on and tighten them with a torque wrench. The procedure is carried out from the center to the edge. Tightening torque – 2 kgf*m.
The diagram for tightening the VAZ 2107 camshaft nuts is in the photo
Diagram of the camshaft nut tightening order
How to set marks on a VAZ 2107 Injector
As for the VAZ 2107 carburetor engine, therefore, on the injection engine, the gas distribution mechanism in combination with the drive remained the same, in other words, the chain. If the chain is excessively worn, there are a number of negative consequences:
- Problem starting the engine.
- Significant increase in fuel consumption.
- The appearance of soot on valve seats.
- Abnormal engine operation in all modes.
- Faulty injection control sensor.
Timely preventive work is necessary to avoid such negative consequences. We will learn more about how to set time stamps on the VAZ 2107 Lada family with an injection power system.
Valve timing is when the piston in an engine moves up and down over a period of time. If the valves fail, the pistons move incorrectly for a certain period of time, and as a result, the engine on the VAZ-2107 runs unevenly.
If the driver notices that the car's power is decreasing, fuel consumption is increasing, and interruptions occur when the engine is running, then it is necessary to resort to setting the valve timing. We will learn from this material how to stick markings on the carburetor and injector of a VAZ 2107, since the design of the synchronization mechanism is similar.
The procedure includes the following manipulations:
- The VAZ 2107 must be installed on a hard surface, the wheels are blocked, and the handbrake is fully compressed. The gear shift lever must be set to neutral.
- The cover is removed from the cylinder head, having previously unscrewed our client, the fastening nuts remain at “10”. It is better to replace the gasket with the latest one, even if the old one shows no signs of damage.
- Use the “24” key to turn the crankshaft on the VAZ 2107. This allows you to align the marks on the moving and stationary parts of the mechanism. We recommend using low light or a flashlight to perform these steps. The crankshaft rotates without adjusting the torque quality until the mark on the pump and generator drive belt pulley matches the long-term risk inherent in the unit.
- Combining these dangers, the star rating should match the tide on the camshaft over time. If the mark is finally at the bottom, turn the crankshaft at full speed.
- If this doesn't work for label matching, proceed to the following steps:
- The crankshaft rotates until the marks connect with the sprocket and bed bosses.
- Using the “13” key, the tensioner must be loosened. 2.4 The tensioner nuts are unscrewed, then this device is removed.
- The screw is unscrewed, which secures the sprocket to the camshaft. To do this you will need to use the key at "17".
- The sprocket is removed, then it should be turned without performing high-quality torque adjustment until the marks on the VAZ-2107 timing belt pulley coincide with the long-term risk on the block. It is impossible to unscrew the sprocket mounting bolt because the camshaft sprocket rotates after removing the tensioner.
- The chain is put on the star if you decide to twist it and put it in place. Finally, the tensioner is installed, which must be tightened with 5 nuts to "10". You can install the tensioner first, but later you will need to use a breaker or mount to install the sprocket in this area. Finally, tighten the nut to “13”.
WEAK to set the time to zero? Camshaft, power chain and chain markings
This relative arrangement of the parts allows the piston of the 4th cylinder to be positioned at top dead center TDC.
If the VAZ-2107 is equipped with gas distribution markings, you must perform the following steps:
- The VAZ-2107 timing chain is tensioned.
- Adjusting the valves, or more precisely, the thermal gap between the camshaft cam and the rocker.
- Setting up a set of ignition accounting programs.
The process of adjusting valves on a VAZ-2107 is as follows: valves 6 and 8 are first adjusted, a report should be stored by the radiator. Once they are adjusted, you need to start adjusting 4 and 7 valves, then 1 and 3 valves, and then 2 and 5 valves at the end.
Adjustment operations
The current valve adjustment scheme for the VAZ 2107 consists of the following combinations:
- sixth to eighth;
- fourth to seventh;
- first-third;
- fifth-second.
The entire countdown starts from the crankshaft sprocket. When the first pair is adjusted, we turn the crankshaft half a turn (180 degrees). This will allow you to move the necessary pistons to the uppermost position of one of the power strokes.
Next, we’ll look at how to adjust valves on a VAZ 2107 (injector). To do this, set the crankshaft to the starting position in accordance with the marks. They will allow you to move the fourth cylinder to top dead center. In this case, the distributor slider will be opposite the contact. This position allows you to adjust the following valves:
- on the 7th and 8th cams - exhaust and intake valves on the 4th cylinder;
- 4th cam – release on the 2nd;
- 6th cam – release on the 3rd.
We control the gap by inserting a feeler gauge into the space near the ruckers. It is considered optimal to pass with little effort at first, and then it enters more easily. This position does not need restructuring.
If the measuring tool fits in freely or cannot squeeze through, then you need to use keys. Unlock the retaining nut with a 17mm wrench, then use a 13mm horn to tighten or loosen the gap. We counter with the horn at 17. We check again, and then proceed in this way in each case.
Possible faults
In the family of cars of the Volzhsky Automobile Plant, which are called “classics”, the timing drive is made in a chain version. The service life of a good double-row chain is longer than any belt, and the chain is better protected from any external influences while being inside the engine block. Instant stretching of the chain is excluded; moreover, the chain, unlike the belt, will not slip when the engine is suddenly revved up. The downside: noise and some cumbersomeness are not so noticeable when operating the VAZ-2107.
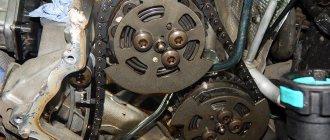
Tensioner diagram: 1 — camshaft sprocket; 2 - timing chain; 3 — chain damper; 4 — auxiliary drive sprocket; 5 — crankshaft sprocket; 6 — tensioner shoe; 7 — hydraulic chain tensioner; 8 - oil line fitting
Unfortunately, the chain also does not last forever. It also stretches - only not immediately, but gradually, as a result of the metal fingers working against the gear teeth.
Signs that the chain has stretched and you need to diagnose the degree of its serviceability are the following:
- extraneous knocking and clanking when the engine is running;
- severe stretching and metal wear can lead to irregular valve timing, increased fuel consumption and other malfunctions.
If the chain has only slightly stretched, you can compensate for the sag by increasing the pressure with the tensioner shoe. When the limit of adjustments has been exhausted, only replacing the chain can help.
Chain stretch even of a few millimeters is noticeable to the eye
In order to better understand when you can get by with little blood and when to change the chain, the manufacturer has established the approximate resource for normal operation of the timing drive, which on the “seven” is 60 thousand kilometers. When used beyond the specified period, there is a risk of not just stretching, but the teeth jumping during operation, or the unit breaking.
Jumping the chain by one or two gear teeth leads to a violation of the valve timing, which will affect malfunctions even at idle speed, not to mention operation under load.
An open circuit leads to the disappearance of synchronization between the revolutions of the crankshaft and camshaft. As a result, the pistons, by inertia, hit the valves open inside the cylinder, deform themselves and deform them. The pistons of the “seven” engine have special grooves that protect the valves from bending. But if the engine has undergone a major overhaul with the replacement of the cylinder-piston group, the pistons may well not have recesses, then the risk of serious damage increases. Monitor the drive chain and change it on time.