Replacing timing chain and sprockets (injection engine)
Remove the cylinder head cover (see here).
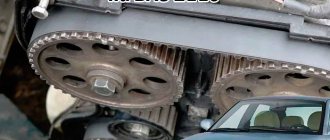
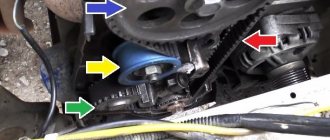
Rotate the crankshaft until the mark (hole) on the camshaft sprocket coincides with the mark on the camshaft bearing housing.
Remove the crankshaft pulley (see here). Disconnect the camshaft sprocket with the chain from the camshaft (see here). Remove the chain from the sprocket.
For clarity, we show the chain removal operations on a dismantled engine.
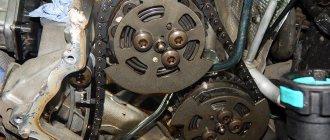
We unscrew the three bolts securing the oil pan to the camshaft drive cover (see here).
Using a 10mm socket, unscrew the three nuts and six bolts securing the camshaft drive cover to the cylinder block.
A “ground” wire is secured under one nut (on the left side).
Remove the camshaft drive cover.
. and a sealing gasket. |
Using the “17” head, unscrew the axis of the hydraulic chain tensioner shoe. |
We take out the tensioner shoe. |
Remove the chain from the crankshaft sprockets and the oil pump drive shaft.
We take out the camshaft drive chain.
Using a puller, press the sprocket from the toe of the crankshaft. |
The sprocket is fixed on the crankshaft with a segment key. To remove the key. . Carefully, trying not to damage the key and shaft, use a chisel to knock it out of the groove of the crankshaft. |
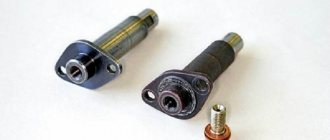
Using a chisel, loosen the bolt securing the oil pump drive shaft sprocket. |
Using a 17mm spanner, unscrew the sprocket mounting bolt. We hold the sprocket from turning with a screwdriver resting through the hole in the sprocket on the head of the bolt securing the thrust flange of the roller. |
. and the oil pump drive shaft sprocket. |
Location of camshaft drive and oil pump parts. |
Install the drive mechanism parts in reverse order. Having installed the key in the groove of the crankshaft, we put on the sprocket.
. and press it onto the crankshaft, tightening the pulley mounting nut with a wrench.
Having unscrewed the nut, we press the sprocket with a tool head of a suitable size (a piece of pipe). |
Before installing the chain, align the mark (mark above the keyway) on the crankshaft sprocket with the mark (protrusion) on the cylinder block. |
. and the mark on the camshaft sprocket with the mark on the shaft bearing housing.
Having installed the chain and hydraulic tensioner, turn the crankshaft clockwise two turns and check that the alignment marks match.
We install the removed parts in reverse order.
Video
Source
How is the replacement made?
If chain stretching is detected and the decision is made to replace only the hydraulic tensioner, then this is an incorrect assumption. It is necessary to replace all parts: chain, hydraulic tensioner, seals, gaskets. Replacement is done in the following sequence, using all the necessary tools:
Use a spanner wrench to unscrew the tube fitting, which has a “10” head. The tube is designed to supply oil to the hydraulic tensioner.
Having loosened the fitting, the tube is removed and moved upward so that it does not interfere with further work. The two nuts securing the device itself are also unscrewed using a “10” wrench.
The device is ready to be removed from its mounting location. We grab the protruding part with our hands and pull out the device. There is a gasket on it, which also needs to be removed to replace it with a new one.
A used device cannot be repaired and requires the installation of a new one. Before installation, it is necessary to coat the gasket with a layer of sealant to prevent oil leakage.
Replacing an old device does not require serious mental and especially physical effort. Installation of a new one is carried out in the following steps:
- The device is inserted into the new seat, having first checked that the structure is identical to the old tensioner.
- Screwed in with two fastening nuts.
- The tube is inserted and secured.
It is simply impossible to make a wrong replacement. After installation, the operation of the motor and the tension of the new chain are checked. An important point is to replace the timing chain in order to 100% protect the car and your health from unexpected breakdowns on the road. This article will tell you how to replace the chain.
Now the owners of the Chevrolet Niva can, without doubt and without errors, correct the existing problem with weakening the chain tension. Remember that if your car has traveled more than 100 thousand km, and there are no characteristic sounds from under the hood, then do not neglect the situation, but disassemble and check the looseness of the chain and the functionality of the tensioner. Happy renovation work!
Recently, an old friend of mine came to see me in his old Chevrolet Niva with the characteristic sound of an extended chain.
In addition to the timing kit, I had the foresight to purchase even a front cover gasket, a crankshaft oil seal and a kilo of marinated meat. I could not refuse such an offer. So, Niva Chevrolet replaced the timing chain and front crankshaft oil seal.
First, let the engine cool to an acceptable temperature. Remove the pipe by unscrewing the bolt by 10 and loosening the clamps.
Next, we unscrew the eight nuts by 10 and move aside the throttle cable and all the pipes that will interfere with us, remove the valve cover.
Remove the air conditioner belt by unscrewing the bolt 13 of the tension roller.
Then loosen three 13mm nuts and one bolt of the generator belt tension roller and remove it.
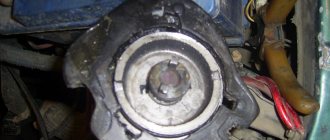
Now comes the fun part. To unscrew the pulley nut, we need a 38mm socket. Since the elongated head does not fit under a regular wrench (the radiator is in the way, but we don’t want to remove it), we use a pry bar, carefully sawed off from the hub key of some large car.
Everything fits perfectly. Unscrew the nut and remove the crankshaft pulley.
Unscrew the deflection roller.
We dismantle the reinforcing plate.
We unscrew the six nuts securing the front timing chain cover to the block and the three bolts securing it to the pan and remove it.
Set the top dead center. The key on the crankshaft should align against the mark on the block.
The mark for the camshaft sprockets is against the ebb of the camshaft housing.
Next, unscrew the oil supply pipe and two nuts 10 of the chain tensioner.
Next, unscrew the tensioner shoe, damper and remove the timing chain.
Compare the new and old timing chain. It could be worse.
New timing kit.
Reinstall the chain, guide and tensioner shoe. We tighten the chain by hand and check that the marks match.
To make it convenient for us to check the marks after installing the front timing cover, we find the factory mark on the crankshaft pulley and mark it with a white marker. This mark at TDC should be opposite the center of the crankshaft sensor.
We install the front cover, crankshaft pulley and tensioner. Let's check the marks again. We install all the removed parts in the reverse order of removal. Fill with fluids, start the engine and enjoy.
>
Useful post?
Yes
No
How to set timing marks on a VAZ 21214
Today I was doing some minor engine repairs; it was necessary to align the TDC marks on the RV and KV. I decided to leave a note here so as not to forget)), and maybe it will be useful to someone else. There is a mark on the RV, there is only one of its kind.
There is also a mount for the phase sensor marker, we don’t need this.
On the HF damper it is a little more difficult, due to its inaccessibility (if the radiator is not removed). But looking at the removed pulley, everything becomes clear. You can find the missing tooth spot by touch, count 20 teeth counterclockwise, and look for the mark there.
And so in a real situation. Opposite the mark you can put a mark with a marker, it will be clearly visible.
To find it, you don’t need to remove anything additional, your hand can go through freely, turn the pulley to a position where you can comfortably draw a line. Well, in conclusion, it’s easier to first set a mark on the RV sprocket and then look for the mark on the damper, it will be somewhere near the crankshaft sensor (DPKV). Since the crankshaft makes two revolutions during one revolution of the RV, you need to look in the area of +- 5 teeth.
on how correctly the timing marks are set on the Chevrolet Niva . Regular diagnostics and monitoring of its tension helps to prevent breakdowns in time and increase the life of the engine.
- During scheduled maintenance (if the mileage is 100 thousand km). If the marks on the camshaft sprocket do not match the mark on the bearing housing identified during phase diagnostics. When the pump that drives the “water pump” fails. If the chain is damaged (wear, stretching or cracking), requiring urgent replacement and adjustment according to the marks.
Marks are marks and notches located on the gears of the gas distributor. For clarity, below is an example of installing a notch on a drive gear disk. It coincides with the center of the DPKV (crankshaft position sensor).
The marks on the camshaft pulley are fixed against the ebb on the bearing housing, which fixes the main shaft on the platform.
Prepare a screwdriver and wrenches for “8”, “13” and “10” , devices for turning the crankshaft and additional parts:
- Oil seal (front) New cylinder head gasket Pump gasket Tensioner Damper bar, limiter and chain guide Sealant Engine oil and oil filters Coolant Crankshaft seal Gears
- Installation of the risk on the VAZ-2123 (according to the standard) is carried out in the inspection hole. Put the car on the parking brake. Shoes are placed under the front wheels. You need to wash the engine and fender liners. The air filter is removed. Drain the engine oil, unscrew the oil filter. Drain the coolant. The valve cover fastenings are unscrewed. To prevent engine oil from leaking into the cylinder head area, it is recommended to replace the cylinder head gaskets. By rotating the crankshaft pulley, marks are set on the camshaft gear and bearings.
If the notches do not match, work continues:
- The “whiskers” of the lock washer are bent. The fixing bolt is unscrewed using a key set to “13”, and the position of the camshaft sprocket is loosened. The first gear on the gearbox is engaged, allowing you to avoid spinning when unscrewing the crankshaft gear bolt. The fastener is removed with a lock washer. To prevent the bolts from falling into the engine sump, use a deep-head wrench or unscrew the bolt by hand. Remove the chain tensioner using a screwdriver. It should be replaced if it is stretched or strained, during scheduled maintenance, after 60-80 thousand kilometers.
- The camshaft sprocket is removed. If you pull it towards yourself (a distance of 5-10 cm), it will be removed along with the chain. Check for wear on the sprocket teeth, which form an inverted “V” shape. The part must be replaced if there are grooves on the leading part of the teeth. On a working mechanism, the chain moves on the teeth. The scrolling step is one tooth. The sprocket with chain is placed on the camshaft flange. When the chain moves on the sprocket, its holes will not line up with the pin. The crankshaft should be rotated in the specified direction until the mark and pin match. It is important to secure the part with a bolt and washer (without tightening it all the way). After turning the crankshaft twice with a special wrench, check the placement of marks on the camshaft gear and bearings. If the marks correspond, their adjustment has been successfully completed. The fastenings of the crankshaft and camshaft sprockets are tightened tightly.
If there is a discrepancy, you must repeat the steps.
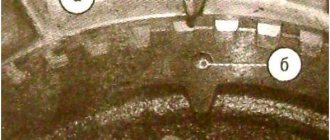
For clarity of the obtained result, it is suggested to look at the example in the photo .
In the upper corner is an overview of the notch placed against the DPKV core. Below is an asterisk on the flange. The dot is visible opposite the bed in the aluminum cylinder block.
Timing marks on Niva Chevrolet
The Chevrolet Niva from the jeep family is equipped with a chain drive in the timing mechanism. The performance characteristics of a chain are even greater than those of a belt drive. The chain also has the best technical performance, which affects the transmission torque. If a loose belt causes the pulley teeth to slip, a weakened chain does not allow this to happen. But with the operation of the car, the gas distribution chain also tends to wear out, stretch, explode and become unusable, which requires its replacement. At the step of replacing the chain, it is important to carry out the installation observing the marks. This article will tell you what tags are, their purpose and how to place them on a VAZ-2123.
Replacing the Niva Chevrolet chain guide
Replacing the Niva Chevrolet chain guide
We change the chain damper. Do it yourself!
Well, everything is clear with this, they installed it and assembled it, BUT... it started it up and one dick rattles.
The pilot is of course also ok, they promise 25! After installation, tension the chain and secure the tensioner nut.
Choosing a chain guide In a Chevrolet Niva car, replacing a chain guide if a fault is detected in a timely manner will only require removing the fragments of the broken part and installing a new one.
If you operate the car for a long time without this device, the sprocket teeth become unusable, which can lead to sagging of the chain. Then you will have to make more complex repairs and replace the entire set.
The Niva part can be purchased from plastic or metal with rubber inserts. A metal device is more reliable and durable.
Chevrolet Niva, hydraulic chain tensioner
When choosing a part, you need to pay attention to the reliability of fastening the upper working layer of the damper to its steel base. The connection must be made qualitatively and cannot be pryed off with a sharp object.
If the vulcanized layer is of poor quality, the part will not last long. The plastic part has its advantages.
If it breaks, it will simply crumble into small fragments and will not be able to harm the engine. If a plastic part is poorly cast, it will quickly collapse.
Therefore, you need to purchase a dampener from a reliable manufacturer. Replacement process First, you need to remove the valve cover and loosen the chain tension.
Replacing the chain tensioner
The two damper mounting bolts should be removed. First you need to dismantle the lower fastener, then you need to remove the camshaft sprocket and move it along with the chain to the side.
Then the top bolt is unscrewed. Then you should inspect the fragments of the part and try to remove them all; for this it is best to use tweezers or a clamp.
The next day, an autopsy showed that the full size was what I could get. Well, of course, the bushings remained on the bolts. I removed the top one using a cable tie, and the bottom one using a magnet tied to a long screwdriver.
Parts and consumables:
I spent a long time poking around, getting out pieces of the old stabilizer, because at first I didn’t want to unscrew the sprocket and the chain got in the way. But in the end I still had to remove it, because the new one wouldn’t fit. By the way, the engine is clean, the oil is half blue after purchasing LiquiMolly, I checked the Marks just in case, everything is fine.
In case someone doesn’t know a couple of photos from the Internet There is a mark on the crankshaft pulley opposite the DPKV while the mark is on the camshaft sprocket in this position. I didn’t jack it up, I turned it by pushing it in fifth gear.
Well, everything is clear with this, they installed it and assembled it, BUT... it started it up and one dick rattles.
And then I finally decided...to stage “Pilot”. It’s just that when I was consulting with a car service over the phone, the following phrase sounded: So along the way, my tensioner either died or something got clogged there, I didn’t bother to deal with it.
I installed everything according to the instructions, it sucks just to unscrew and tighten it because the thermostat and pipes get in the way.
What are tags and their purpose in the Shnivy mechanism
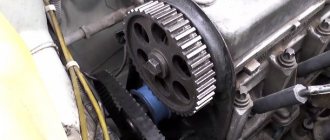
Marks in the timing system on a Chevrolet Niva car are special types of notches and holes that are located on the gas distributor pulleys. The photo shows pulleys with marks along which the timing chain is aligned.
See:
Aligning the chain with marks is done so that it is better fixed and holds the gas distribution mechanism itself. If you install the chain without following the marks, then the operation of the pulleys will be uncoordinated and will then lead to their rapid wear. Therefore, it is important, whenever replacing a chain or parts of a gas distribution mechanism, to install them in accordance with the marks. There may be a malfunction of the timing system when the chain tension is loosened or it is stretched. In order to correctly set the timing mechanism according to special marks, we will look at the procedure for installing the gas distributor phases on the VAZ-2123.
Setting the timing of the gas distribution mechanism using special marks
So, setting the phases in the timing system according to special marks on a Chevrolet Niva car includes the following sequence of actions:
Timing marks VAZ(LADA) 21214 NIVA
Installing timing marks
for VAZ(LADA) 21214
NIVA
. Sorry about the quality. The camera died.
Part 2. Valve piston = repair Niva Chevrolet NIVA Chevrolet 44
Overhaul of the Chevrolet NIVA engine.
After repair work, it is recommended to replace the cover gasket.
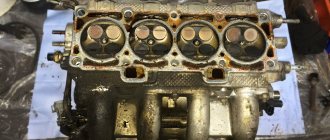
After the cover was removed, the following view is observed, shown in the photo below.
Under the valve cover
See:
Important! When unscrewing the bolt, it is necessary to control its position, because it is not fixed by anything and can freely fall into the engine sump. It is recommended that when loosening the tightening, unscrew it by hand or with a deep-head wrench.
When assembling, do not forget to replace the gasket on the cover!
The work carried out does not require much time, but is the key to the successful operation of the parts of the gas distribution mechanism of the Niva Chevrolet car. Drawing a conclusion, I would like to note the importance of setting the timing chain according to special marks. If for some reason you forgot to align the pulleys with the marks, then it is better not to start this process and make the adjustment again. This will extend the life of the timing system and all its components.
Do you still think that diagnosing a car is difficult?
If you are reading these lines, it means you are interested in doing something yourself in the car and really saving money , because you already know that:
And of course you are tired of throwing money down the drain, and driving around the service station all the time is out of the question, then you need a simple CAR SCANNER ELM327, which connects to any car and through a regular smartphone you will always find the problem, turn off CHECK and save a lot of money.
We ourselves tested this scanner on different machines and it showed excellent results, now we recommend it to EVERYONE! To prevent you from falling for a Chinese counterfeit, we publish here a link to the official website of Autoscanner.
Source
Adjusting the timing chain according to marks
Do-it-yourself overhaul of the VAZ 21213 engine.
The gas distribution system of the Chevrolet Niva has marks, presented in the form of notches and holes, and placed on the timing pulleys.
The chain must be aligned precisely according to these marks for better fixation and support of the entire gas distribution mechanism. Otherwise, the pulleys will not work smoothly and will wear out much faster. This is why installation with strict adherence to labels is so important. The chain may also become loose or stretched, causing the timing system to malfunction.
To correctly align the timing chain when replacing it in a Chevrolet Niva, you need to rotate the crankshaft until the marks on the camshaft gear and the bearing align. If the marks on the crankshaft and on the chain cover match, then the drive is installed correctly. If the notches do not match, the phases must be adjusted. The mark is oblong - this makes it easier to align.
We recommend
“Replacing the timing chain on a Skoda: when to do it and where” Read more To adjust the phase position in a Chevrolet Niva, you should disconnect the fastening of the lock washer, and then unscrew the bolt from the camshaft gear with a 13 mm wrench. Next, the gearshift lever is moved to the first gear position. This will lock the crankshaft gear mounting bolt and prevent it from turning. Then this bolt must be unscrewed and removed along with the lock washer.
It should be taken into account that this bolt will not be fixed after performing these operations; accordingly, it may fall into the engine sump. Therefore, work should be performed with a wrench with a deep head.
Then, if necessary, the tensioner is removed. If there is no need to replace this element, the chain can be removed by pressing the plunger with a screwdriver. Next, the chain drive should be slightly pulled towards you to remove it from the crankshaft sprocket.
The timing drive is adjusted and set according to marks, for which it needs to be moved by one tooth. When replacing the timing belt on a Chevrolet Niva, it is more convenient to install a sprocket with the chain already on. It is required that the holes in the timing chain line up with the locating pin. This is achieved by turning the crankshaft in the desired direction until the notches coincide.
Next, install the lock washer. The mounting bolt should be tightened, but not tightened. Then you need to check if the marks match. To do this, the Chevrolet Niva crankshaft is turned with the appropriate key 2-3 times. When all the notches match, the adjustment process can be considered complete. Otherwise, all operations are repeated from the beginning.
Despite the apparent complexity, the entire adjustment process takes a little time
It is important to ensure that the marks on the timing belt of the Chevrolet Niva match. Engine performance will depend on this
In addition, you need to change the gasket when installing the valve cover, because when you remove the old gasket, it may develop microscopic cracks through which lubricant will leak.
How to tension a chain on a VAZ 2121, replacing the chain tensioner, when it needs to be replaced
Chain tensioner - as is already clear from its name, it is needed only to tension the chain so that it does not loosen while the engine is running, and so over time this part breaks for various reasons, this happens, sometimes the tensioner simply cannot withstand very heavy loads breaks, for example, if you keep the engine speed in the red zone for a long time, the tensioner cannot withstand and breaks, but it can also break because it is not very durable, for example, there are a lot of very bad tensioners on the market at the moment qualities that really fail very quickly and after that they will need to be replaced with a new one, and you will learn how to do this from this article.
Chain tensioner. Installation.
When replacing the hydraulic chain tensioner and installing a mechanical tensioner, I always remove the valve cover, and after “pulling out” the pin, use a ratchet wrench to make one full revolution of the crankshaft. This way you can avoid one “mean” moment. A slack chain can come out of the grooves of the tensioner and chain guide shoe, and if this is not noticed and corrected, very unpleasant consequences are possible (this applies to a single-row chain). Also, as a result of the first revolution, the primary slack of the chain is selected and, as a rule, the rod immediately comes out one or two more clicks, relative to the first shot.
The hydraulic tensioner is designed to adjust the chain tension in the Niva Chevrolet. Since this part plays an important role, the engine cannot operate without it.
Over time, any part can wear out, especially for those parts that constantly rub against each other or rotate, and the timing chain can stretch during operation. Chain stretching, experts say, is normal. That is why a hydraulic tensioner is installed on the car.
Design and symptoms of timing chain malfunction on Niva
Structurally, the VAZ 21214 engine installed on the Chevrolet Niva is similar to any engine of a classic Zhiguli . The differences lie in the use of a hydraulic tensioner in the timing mechanism, hydraulic valve compensators and a single-row chain instead of a double-row. In addition, the engine of a modern car is equipped with fuel injection, air conditioning, and hydraulic booster, which somewhat complicates repairs.
The chain in the timing mechanism is considered more reliable than a timing belt . It does not tear and has an additional margin of safety. The factory instructions require replacement at 100 thousand km, or at the first sign of malfunction. In this case, not only the chain is subject to wear, but also the camshaft and crankshaft sprockets. The development and natural stretching of the chain leads to a shift in valve timing and deterioration of engine performance.
Symptoms of Chevrolet Niva timing faults:
Important! The simplest and most reliable way to determine a malfunction is to evaluate its operation by ear. A thin metallic ringing from under the cover indicates a weakening of the chain tension. With severe wear, the sound becomes similar to the rattling of a diesel engine.
The main reasons for accelerated wear of the chain and sprockets in the timing mechanism are low-quality oil and its irregular replacement, engine operation in extreme conditions, and defective replacement parts.
How to replace the chain tensioner on a VAZ 21213-VAZ 2131
Cars of the Niva family are very old models, in my opinion the very first cars went back to 1977 if memory serves, but these are new times and the car is still being produced and refined, so here are the chain tensioners that AvtoVAZ installed on its cars in Depending on the year of production, they may differ from each other, so for example, somewhere before 2000 or even higher, these cars of the Niva family came with the most common spring chain tensioners, these tensioners are very easy to remove, but one of their drawbacks (Or maybe an advantage) is the fact that they do not tension themselves, that is, from time to time you have to tighten them yourself, which is very inconvenient, but this is for someone, because it only takes 1-2 minutes to tighten the chain tensioner!
Now let’s look at a new type of tensioner that came on cars that were produced much later, so to speak, during Russia and not during the USSR, and so in new times, the so-called hydraulic chain tensioner was installed on this family of cars, its whole advantage is that you won’t need to constantly tighten it, that is, it was installed at the factory, and you, as they say, forgot about it, but it’s not so simple, if this tensioner suddenly jams or something else happens to it, then you will have to change it to a new one , and today you will learn how to replace this type of chain tensioner in this article. (By the way, you can see what a hydraulic chain tensioner looks like in the photo below)
By the way, if you have a regular tensioner of an old model, but it looks like it is shown in the photo, then read more about how to replace this unit in the article entitled
Removing the chain tensioner
1) At the very beginning of the operation, use a wrench to unscrew the tube that is connected to the hydraulic chain tensioner itself, and after this tube is unscrewed, disconnect it and move it aside.
2) Then, using a wrench or a socket with a universal joint (If it is difficult to get to), unscrew the two nuts that secure the hydraulic tensioner to the car engine (One of the nuts is not visible in the photo, but when you look at this tensioner on the car, then you will immediately understand where the second nut is, since it is located nearby) and then carefully remove it from the hole in which it is located.
Installing a new
Installing a new tensioner occurs in the reverse order of removal, and by the way, after installation, close the hood and sit behind the wheel of your car, then try to start the car and if that chain rattle disappears, then you did everything correctly and that’s why the chain rattled the tensioner itself.
Checking the tensioner for wear
Mechanical chain tensioner. Main manufacturers.
The photo shows three main options common in Russia. The first product is made by the people and on the forums of the ANC “auto pilot”. The second product is manufactured by Rusmash, usually called the pilot. The third tensioner belongs to the designer Isaev, colloquially Isay. My team and I personally have installed several dozen of each type of tensioner on cars, so I have the right to talk about statistics and operating features. Something from behind the scenes. The first two tensioners belong to the pen of one person. Designer Igor Medvedev. On motor forums under the nickname Rhodes-M. As far as I know, patents for these inventions or utility models are registered in his personal name. I work together with this person on other projects, so the information about the designs and manufacturing features is first-hand.
Autopilot. Principle of operation. Rack. Of the three, this is the undisputed leader. I have not noticed any shortcomings in operation. Cars with mileage of more than 150 thousand have already arrived where I installed autopilots from the very first batches. It is very convenient to work when replacing the camshaft; it does not need to be removed from the cylinder head. Flaw. It is difficult to find an “original” that has passed quality control. Medvedev left and the quality of input immediately dropped greatly. The cost of production has become cheaper.
Pilot. The operating principle is a toothed rack. Good quality tensioner. The big brother of "autopilot". Stable quality. It is also possible to work without removing it from the cylinder head. The main disadvantage is the huge percentage of fakes on the market. This tensioner was the first successful design, and the Chinese grabbed onto it. If Autopilot is impossible to find at all, then Pilot is very difficult to find “original”. Based on the St. Petersburg market, I estimate the prevalence of counterfeits for this tensioner at 70%. I work with Rusmash directly, so this as a “minus” is insignificant.
Isaiah. The operating principle is a clock spring. To avoid questions and insinuations, I contacted the designer directly and in 2015, we installed several dozen of them. The main disadvantage of the product, which the designer passes off as its advantage, is that there are no precision parts. When the rod doesn't move out too much, everything is fine. When the chain is worn out and the rod goes beyond half, it “walks” quite a lot. If we are talking about a production engine without “pretensions” for tuning, this may be acceptable. If the engine is “more serious” this is unacceptable. The tolerance for axial “walking” of the chain and sprockets in the timing tract is only 0.3 mm.
Summary. We try to install Autopilot (if available) on tuned cylinder heads. For the most part, we work with Pilot, but if a client, based on forums or his own views, asks to install Isai, then we do not dissuade him. For double-row chains and -213 engines the situation is similar.
chain tensioner Pilot for 21213
Selecting tools and spare parts for replacement
Replacing the timing chain on a Chevy Niva is impossible without an inspection hole or a lift . Therefore, before you decide to carry out such repairs yourself, you need to find a suitable place. Convenient access from below is necessary to remove the engine protection and conveniently unscrew the auxiliary pulleys. You will have to remove the radiator with fans and drain the coolant. On average, the entire replacement operation will take from 3 to 5 hours.
Necessary tools for repair:
With spare parts for repairs everything is also simple . Buy them only from trusted stores and well-known brands. The abundance of spare parts for VAZ engines in stores does not always mean a quality product. Timing units from factory manufacturers and official conveyor suppliers have proven themselves to be the best.
Important! Parts for different VAZ engines may differ in design. The Chevrolet Niva has the VAZ 21214 engine model, while the classic Niva may have the VAZ 2106, 21213, 21214, 21218 engine and their modifications.
We will need:
Advice. It is convenient to combine such a labor-intensive operation of replacing the chain with other work on the engine. For example, replacing the pump, radiator, leaking oil seal, drive belts of mounted units and other minor repairs.
The purpose of the timing chain and its length
To understand the purpose of the timing chain, it is necessary to outline what the engines of classic VAZ models are. All these engines are overhead engines. That is, the timing shaft (aka timing) is located in the upper part of the engine, above the crankshaft and above the oil pump shaft.
The timing chain is the main connecting link in the VAZ 2107 engine
All these shafts are equipped with sprockets, onto which the timing chain is placed. The chain's job is simple: it must transmit torque from the timing shaft to the crankshaft and to the oil pump shaft. From the crankshaft, torque is transmitted to the chassis, and from there to the drive wheels. They begin to rotate and the car moves forward. Thus, the timing chain is the most important connecting link between the three engine shafts, and any breakdown of this link will inevitably lead to either serious problems in the operation of the motor or to its complete jamming if the chain breaks.
Timing chain length for VAZ engines
If the driver decides to replace the timing chain on his “seven”, he will go to the spare parts store, where he will inevitably be faced with the question: which chain to choose?
You should know a simple rule: all engines on the VAZ “classic” are equipped only with chains. The only difference is in the length of the chains, or more precisely, in the number of links:
- chains with 114 links. They are installed on VAZ 2102, VAZ 2101 and VAZ 21011 (these short chains are designed for small engines - from 1.2 to 1.3 liters);
- chains with 116 links. They are installed on VAZ models from 2103 to 2107 inclusive. The same chains are installed on the Niva (VAZ 21213). The need for a longer chain is due to the increased volume of engines, which varies from 1.5 to 1.7 liters.
Based on all of the above, the driver in the store will have to determine what kind of chain he is buying - short or long. There are two ways to do this:
- The first way is obvious: simply count the number of links. If there are 116 of them, the chain for the VAZ 2107 has been found;
- the second method is simpler: you need to fold the chain in half, and then look at the pair of end links. If these links are symmetrical, then the chain has 116 links. If not, the chain is short, 114 links.
It should also be noted here that recently counterfeit timing chains have often been found on store shelves. Fortunately, the fakes are made rather carelessly, so an attentive car enthusiast can immediately suspect something is wrong.
Cause and investigation
We received a lot of questions by email: why was the double-row adjustable gear removed from sale, why don’t you offer a good double-row timing kit? The reason is simple: I don’t see the point. The double-row timing chain and the rubber coating on the tensioner shoe “ate” all the fine adjustments. Since I don’t like criticism and loudmouthing, without offering an alternative, I picked up and tested a single-row kit for a carburetor engine. Now you can put a good split gear on it, a tuning camshaft, and you will really feel the nuances when adjusting.
Step-by-step instructions for replacing the timing belt yourself
Repairs begin by preparing the car for partial engine disassembly . To do this, the machine is placed on a pit or a lift. Remove the engine protection, drain the antifreeze from the radiator, dismantle the main radiator with cooling fans. Loosen the fastening of the power steering pump and generator, remove the drive belts.
With an air conditioner, there are 2 options : drain the refrigerant and dismantle the radiator, or carefully move it to the side and hang it so as not to break the hoses. We disconnect all the cooling system hoses that interfere with the repair area. Remove the air filter, throttle cable, air pipe. In this semi-disassembled form, you can proceed directly to replacing the timing chain.
Installing timing marks VAZ 21214
There is a standard 21213 NIVA, the engine of which has tractor traction at the bottom and lacks traction at speeds above 3000. Replacing the chain, all the sprockets, the camshaft with the bed did not solve the problem. Rearranging the chain on a tooth back and forth, too. It was noticed that the mark on the camshaft sprocket is not installed strictly opposite the protrusion; it can be placed half a tooth forward or backward. It was decided to check the valve timing. A device for adjusting valves with an indicator is welcome, but not at all required. However, I have it. The valve clearances must be properly adjusted!
When replacing the lower sprocket, check that the marks on the small sprocket and the pulley match. They correspond to TDC.
For example, we got 15 degrees.
By simple calculations (in our head) we find the valve overlap point (15 + 12.5)/2 = 13.75 degrees. This point, located at TDC, is considered optimal. In our example, the overlap point moved 1.5 degrees after TDC. You can check the pie chart of the valve timing and compare the result:
On my car, the mark, with new sprockets and chain, turned out to be shifted forward by 5 (!) degrees. This is where the tractor came from. Perhaps VAZ specifically places this mark with an offset in order to increase the torque at the bottom, or maybe during assembly they use sprockets from Lada cars. In NIV, the block is slightly higher, which is why the mark shifts. Don't know. To correct the situation, a split (adjustable) sprocket was purchased and installed:
With its help, you can smoothly adjust the position of the camshaft relative to the crankshaft + - 1 tooth.
If we set it so that the overlap point does not reach TDC, we get earlier opening of the intake, an increase in power at high speeds and a drop in traction at low speeds, and vice versa, the overlap point after TDC - we have tractor traction at low speeds, and stupidity at high speeds. Exact recommendations like “how many degrees should I turn?” no one will give it to you. It all depends on the condition of the engine and personal feelings. However, you should not go more than half a tooth away from the point of zero overlap. It must be remembered that at large angles the pistons may collide with the valves. I made it so that the overlap point was shifted by 2.5 degrees before TDC, I got a good pick-up after 3000 rpm, and at low speeds the thrust remained almost unchanged. After all the manipulations, it is necessary to re-set the ignition timing, and it may be necessary to adjust the idle speed.
Consequences of untimely replacement
Often the cause of repairs is an imperfect design of the hydraulic tensioner. To avoid this, many people replace the Chevrolet Niva chain tensioner from hydraulic to mechanical. Otherwise, operating the timing chain longer than expected can lead to disruption of the normal operation of the engine , and in advanced cases, to its overhaul.
The increased functional life of the components and simple replacement allow you to regularly replace the timing mechanism yourself. In combination with high-quality oil, this will significantly extend the life of the engine, and will save the car owner money and nerves.
Chain 21214, operation
This is the most important part in the revised article. Operators and mechanics have a slang expression about the operation of mechanisms and engines - “in operating or normal mode.” Let me explain with a comparison, like the son of a doctor. A person has blood pressure and pulse, which are considered normal. Let it be 120/80 and 60-70 beats per minute. And suddenly there was a pounding in my temples, my pulse quickened - hello high blood pressure. In both the first and second cases, you will walk, think, eat. But in the first case, your body and heart in particular are working “in working mode,” and in the second, the situation needs to be corrected. The doctor has a tonometer and a stethoscope in his hands, and the control unit has a knock sensor that listens to the noise level in the engine. In fact, its purpose is to measure detonation in the cylinders, but if there are still extraneous loud sounds in the engine, then it will add them to the overall picture. In professional diagnostic programs, it is possible to look at the data before entering the ADC (analog-to-digital converter). For this circuit, the knock sensor readings are lower than on Ditton, from 3% and higher. The service life of this chain is also higher than that of the Baltic one; operation “in operating mode” is more than 100 thousand km. Just install chain 21214, not on factory stamped sprockets, but on turned sprockets, with teeth made on a gear-cutting machine, otherwise there will be no fun. It is for this reason that I do not recommend purchasing a chain separately. Or at least with a set of sprockets, or better yet a complete timing belt set.