No charging of the VAZ 2109 battery, signs of a malfunction.
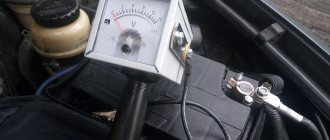
Signs of a malfunction when the VAZ 2109 battery is not charging are a warning lamp with a picture of the battery that does not go out and signs of a dead battery (weak rotation of the crankshaft by the starter when starting, dim light of the lamps). But this is not an indicator of a lack of charging, but only a signal that something is not working properly. There are times when the battery is charging, but the lamp does not go out and the lamp does not light up, but there is no charging. To determine whether or not the VAZ 2109 battery is charging, you need to measure the voltage at the battery terminals. Measurements must be made without load and with the load on. The voltage should not go beyond 13.5 -14.5V. a voltage less than 13.5V indicates that the VAZ-2109 is not charging and it is necessary to find and eliminate the cause.
general information
VAZ 2109 electrical faults
Let's start with general information. You should know that the VAZ 2109 has two power sources - the battery and the generator. The battery is designed to supply current when starting the power unit of a car, as well as to power the starter and other 12 V consumers when the engine is not running. When the engine starts, all the “initiative” goes to the generator. Now this element provides current to all consumers, even the ignition system and battery.
When the generator does not provide current
Note. Every driver must know that if the red charging lamp is on on the instrument panel, then no charge is supplied from the generator to the on-board network, that is, the stored battery energy is consumed. It is clear that the supply is limited and depends on the size of the battery and its capacity. Of course, in this case you can drive home without a generator, but you can no longer turn off the car and you will have to drive non-stop.
Work order
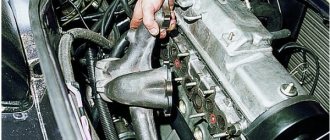
Working with a generator
Note. There are two wires coming from the battery: the thick one connects the battery to the starter, and the thin one is the one we need.
If there is no charging again, then you need to check the generator itself (see VAZ 2109: malfunctions on the generator and how to eliminate them). To do this, it is better to contact specialists or follow the advice that can be found on our portal.
Advice. As mentioned, you can drive with a damaged generator to a service center or your own garage. In order to minimize the battery current consumption, it is necessary to turn off all devices at this moment, such as the car radio, unnecessary lighting fixtures, fan, air conditioner, heater, etc.
Regulator check
If the motorist is experienced, then he can be advised to check the generator voltage regulator. This component is required to maintain the generator voltage within specified limits, even if the speed and load changes. It is possible that it has “worked out” and the generator is not functioning correctly. By car:
Checking the removed regulator:
Voltage regulator test circuit
Note. If the regulator on a VAZ 2109 was produced before 1996, then it is better to check it together with the brush holder. This will make it possible to immediately detect broken brush leads and poor contact between the ends of the regulator.
Circuit breakers
VAZ 2109 electrical faults
Fuses are a kind of protectors and scouts. They are the ones who signal the danger of a short circuit or other electrical problems if they burn out a second time. But electrical problems cannot be put on the back burner, because this threatens to ignite all the electrical wiring and cause a fire.
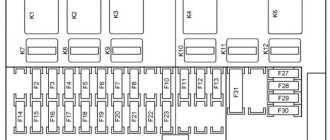
Note. Remember that it is strictly forbidden to replace a damaged fuse with a new one with a higher rating. Advice. To make troubleshooting easier, it is recommended to use the diagram below.
It is worth noting that different units can be installed on the VAZ 2109: old and new. A distinctive feature of the new fuse box is that it uses new fuses. Instead of cylindrical fuses (as on the old block), blade fuses are used here. In addition, new compact relays are also used in such a unit.
VAZ 2109 electrical wiring faults
Let us now analyze the fuse diagram for the VAZ 2109, since this is very important for working with the car’s electrical system. We will abbreviate the fuses by the letter P if the mounting block is of an old type and by the letter P if it is new. So:
VAZ 2109 electrical equipment malfunction
Fault options.
The most common malfunction is that the charging indicator light does not go out. If the control lamp continues to burn brightly, then the voltage regulator is faulty or the wire from the control lamp to the generator is shorted to ground. If the control lamp continues to light, but not at full intensity, and lights up brighter as the speed increases, then there is a current leak through one of the additional diodes of the rectifier bridge. At the same time, the generator performs its function, charging the battery and powering consumers.
To check, you need to measure the voltage at the battery terminals with the headlights on high beam and rpm 1200 - 1500. If the voltage is more than 13.5V, then the generator is working and if the lamp burning at full intensity does not irritate, then you don’t have to do anything. Otherwise, you will have to change the diode bridge.
If the voltage is below normal, then disconnect the thin wire from the generator with the engine off and the ignition on. If the control lamp does not go out, then it is necessary to find and eliminate the wire short to ground. If the warning light goes out, then with the engine running, connect the free terminal to terminal 30 (a contact bolt with two thick wires). If charging appears, then eliminate the loss of voltage in the contacts from the control lamp to the generator.
If charging still does not appear, turn off the ignition and remove the brush assembly with voltage regulator from the generator, if the design of the generator allows it, or remove the generator completely and remove the regulator. Check the removed regulator using a test lamp and battery. How to do this is described in the article “Checking the voltage regulator.” If the regulator is working, then it is necessary to remove and repair the generator. The most common malfunction in this case is wear of the armature slip rings. It is also possible that the wire from the slip rings may break.
The principle of operation of the device and its diagram
The electric generator acts as an autonomous source of energy in any car; it is designed to evenly recharge the battery.
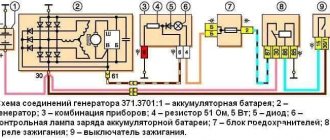
If the generator fails or wears out, the battery stops receiving the required amount of energy and cannot ensure stable operation of the technical component of the machine. As soon as its charge runs out, the vehicle stalls. Starting a car after something like this is not the easiest task. To get a visual representation of the operation of the electric generator, you will need its diagram. The VAZ 2108 generator diagram is shown in the figure
All elements that are important in the operation of the device are numbered on it.
- Electric generator.
- Negative diode.
- Spare diode.
- Positive diode.
- Battery discharge control lamp.
- Instrument block.
- Voltmeter.
- Mounting block.
- 100 ohm backup resistors.
- Ignition relay.
- Ignition power.
- Battery battery.
- Capacitor.
- Rotor winding.
- Voltage controller (available only in car models produced before 1988).
VAZ 2108 generator diagram. 1 - generator; 2 - negative diode; 3 - additional diode; 4 - positive diode; 5—battery discharge warning lamp; 6 — instrument cluster; 7 - voltmeter; 8 — mounting block; 9 — additional resistors of 100 Ohm, 2 W; 10 - ignition relay; 11 — ignition switch; 12 — battery; 13 - capacitor; 14 — rotor winding; 15 - voltage regulator
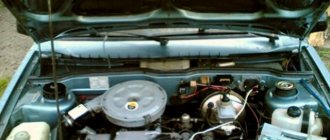
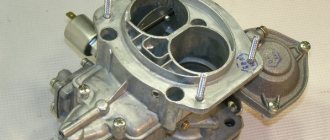
The electric generator on the VAZ 2108 is located under the hood of the car; it operates using a special belt. The main reasons for equipment failure are:
- brush wear;
- charging relay failure;
- diode bridge malfunction;
- rotor shaft bearing stopper.
Low voltage on the generator.
Another common malfunction is when the warning light goes out while the engine is running, but over time signs of a dead battery appear. There may be several reasons for this. The first reason is the breakdown of the main diode of the rectifier bridge. It is detected by measuring the voltage at terminal 30 of the generator with the high beam headlights on and off. If the voltage is normal or close to normal when the headlights are off, but begins to drop when the headlights are on, then the diode bridge needs to be replaced. If a KATE generator is installed, this can be done without removing the generator from the engine. But before changing the diode bridge, pay attention to the belt tension and the condition of the generator pulley. If the bottom of the pulley is shiny, this indicates that the belt is slipping due to pulley wear, which is the second reason for poor charging. In this case, the belt must be replaced, and if the new belt falls into the pulley groove, then the pulley must be replaced. In this case, it makes no sense to pull the belt through the belt. In addition, it can lead to damage to the armature bearings.
Why is the battery not charging?
The generator stops charging the battery if the brushes, diode bridge, rotor or stator winding, as well as the belt connecting the rotor to the crankshaft fail.
| What's wrong | What to do |
| Worn graphite brushes are the most common generator malfunction. | They have their own resource and wear out over time. Thus, the contact of the brushes and rings on the rotor weakens, and the VAZ 2109 does not charge. There is only one solution to the problem: replacing the brushes with new ones. They are inexpensive and are sold at any auto store. |
| Due to poor connection of the output contact, diode bridge and stator winding, the bridge heats up, melts and fails. | But it was precisely on the VAZ 2109 and VAZ 2108 models that the most reliable diode rectifiers were installed from the factory. Tested by time. Therefore, the bridge on the “nine” rarely fails. Well, in the event of a breakdown, the entire bridge will have to be replaced. |
| Another common case is a broken, slipping or insufficient tension of the generator drive belt. | To check whether the belt is tensioned, press in the middle part and check the downward deflection. The permissible deviation standards are specified in the VAZ operating manual. The pulleys can also wear out, causing the belt to slip. Well, if the belt breaks, we simply replace it with a new one. |
VAZ 2109 no charging instrument panel does not work
- To the beginning of the forum
- Forum Rules
- Old design
- FAQ
- Search
- Users
The instrumentation has failed except the speedometer, the turn signals do not work, only emergency lights, no charger,
Judging by the diagram. 1) fuse F10 in the mounting block 2) relay (No. 4 according to the diagram) 3) ignition switch Further based on the above. Connection diagrams. Turning and emergency lights https://www.autoprospect.ru/vaz/2105-zhiguli/images/7-34.jpg Tidy https://www.autoprospect.ru/vaz/2105-zhiguli/images/7-41.jpg
Please post a photo or a link of what kind of relay it is and how to change it. Same problem(((
sometimes it appears when you are driving and disappears again where to drip?
Solder all the contacts in the dashboard and the problem will go away.
Drip solder onto the dashboard contacts. you have no mass
Well, what side does the tidy take when turning, unless, of course, the vehicle messed up anything and described the problem correctly?
The tidy has failed, the turn signals don’t work, only emergency lights, no charger,
There might be something wrong with the charge light on the panel. I heard somewhere that if it dies, then the charge disappears, it could be complete nonsense, I don’t know
Well, what side does the tidy take when turning, unless, of course, the vehicle messed up anything and described the problem correctly?
The vehicle didn’t make a mistake here, it’s the same problem, despite the fact that the turn signals work as emergency lights without problems, but for their intended purpose they simply don’t turn on.
Added after 8 minutes 33 seconds:
Before this problem appeared, I had the following: when connecting the battery, there was a terrible short circuit and smoke was coming out in the area of the generator. The generator was replaced with a Bulgarian one, I don’t remember the manufacturer. And after starting the engine, it turned out that part of the instrument panel did not work: the fuel level did not show the temp. The coolant does not show, the oil pressure does not show when the engine is started, only the charging lamp is on + there is a problem with the turn signals.
Diagnostics
The search for a faulty element begins with checking the battery charge level. To measure the voltage at the terminals, use a multimeter or voltmeter. It is necessary to take readings in two modes:
- without load with the ignition turned off and the minus terminal removed;
- under load: by turning the key in the ignition and turning on any consumer (low beam headlights, air conditioning).
The multimeter probes in voltmeter mode are connected in series: the positive terminal is a red contact, the negative terminal is a black one. The normal value of the battery voltage at rest with a 100% charge is 12.05 - 12.6 Volts.
Important! The battery voltage directly depends on the state of charge: if the level is reduced to 10%, then the maximum voltage without load at the terminals will be about 11.3 Volts. The test under load should be carried out carefully, observing safety precautions: when turning on the ignition, do not touch the power terminal and cable with bare hands
The multimeter readings are taken twice: when the engine starts, and after 20-30 seconds. When starting the engine, the power current can reach a peak of up to 670 Amps, depending on the power of the unit. The battery supplies a significant part of the energy to the starter for the initial crankshaft rotation - at this moment the voltage at the terminals drops. A value of 8-9 V is considered normal; if the drop during startup is critical and reaches 6 V, then the battery is completely faulty
The test under load should be carried out carefully, observing safety precautions: when turning on the ignition, do not touch the power terminal and cable with your bare hands. The multimeter readings are taken twice: when the engine starts, and after 20-30 seconds. When starting the engine, the power current can reach a peak of up to 670 Amps, depending on the power of the unit. The battery supplies a significant part of the energy to the starter for the initial crankshaft rotation - at this moment the voltage at the terminals drops. A value of 8-9 V is considered normal; if the drop during startup is critical and reaches 6 V, then the battery is completely faulty.
After measuring under load, the voltage on a working battery is restored within 15-30 seconds. It is measured again, determining the charge capacity. Next, be sure to check the oxides on the terminals, the condition of the power cable for damage to the insulation, and the reliability of fastening the ground wire to ground.
A blown fuse in the mounting block is diagnosed by the condition of the fusible link. In order to determine which of them is responsible for the battery indicator light, you need to use the electrical diagram in the technical description of the car (the location differs depending on the brand of the power unit). The fuse is included in the common circuit and controls several consumers: all indications on the dashboard, cigarette lighter illumination, interior light. Typically this is socket F3, rated at 10 Amps.
The electrical circuit is first inspected, checking the contact fastenings and breaks. If no visible violations could be detected, then the multimeter is turned on in ohmmeter mode and each section is “ringed” separately: from the battery to the generator, from the rotor terminals to the fuse mounting block, the ignition coil and the instrument panel (contacts of the control light).
Why is the battery charging light on?
A faulty relay in the mounting block is tested for voltage with the on-board power supply turned on. The voltage at the relay output must be at least 9 Volts.
The diode bridge and the generator voltage regulator relay are checked with the engine running: at idle, the unit speed is increased to 4000 rpm and the voltage is measured with a multimeter at the rotor terminals. If the indicator is around 14.5 Volts, then the generator components are working properly.
Often the reason for the lack of battery indication is a minor reason: a burnt out light bulb or a poorly secured fuse in the socket. To eliminate the violation, it is enough to move the fallen fuse and put it in place in the socket until it stops.
If the failed element is not installed and the warning light does not light up, then computer diagnostics are carried out, reading error codes in the ECM. To do this, use the ODB-2 connector (under the steering column), a computer or laptop with the program installed, or a special scanner. All errors are recorded by the system in the ECU (electronic control unit) memory log; the structure of the codes is given in the technical description of the car - they are different for all models. Using a scanner or laptop, they decipher the system error and determine the cause of the failure. This diagnostic method provides a complete picture of the condition of all components over the entire period of their operation.
Why is the VAZ 2109 battery not charging?
The generator and battery on the VAZ 2109 are sources of electrical energy. The battery helps start the engine and also supplies electrical energy consumers when the engine is not running. The main voltage initiator in a car is the generator. It powers all devices while the engine is running and at the same time charges the battery.
Therefore, in most cases, if the VAZ 2109 battery is not charging, it means the operation of the generator-battery tandem is broken. You need to look for the cause of the discharge either in the design of the generator itself, or on the path from it to the battery. Sometimes the reason is also poor contact or excessive wear of the battery itself. This problem needs to be corrected urgently, since the battery can only operate the car for a few hours (depending on the capacity). It is necessary to identify the fault in the power source link and eliminate it.
Causes
By providing voltage, the generator exhausts its resource. Its individual elements wear out over time, resulting in the following malfunctions:
- brush abrasion;
- breakdown of both stator and rotor windings;
- loose or broken drive belt;
- burnout of the diode bridge.
The reason that the generator does not charge the battery well also often lies in a simple break in the wiring or poor contact at the connection points.
If the machine has been in use for a long time, then the graphite brushes should be inspected first. They are always the first to fail. As wear occurs, contact with the rotor rings is lost and the generator ceases to perform its functions. In this case, it is necessary to replace the damaged element with a new one. The price of the brushes is low, and they are sold in virtually any specialized retail establishment.
Poor operation of the generator is also caused by a break or excessive stretching of the drive belt. Over time, it loses its elasticity and sags. A new one is installed to replace the damaged one. It is not difficult to check the degree of tension - just press on it with your hand in the central part.
The design of the generator allows, if necessary, to replace any of its main elements. Therefore, if there is a break in the rotor or stator windings, they are replaced with new ones.
How should a good generator work?
To understand why the battery is not charging, you need to have a clear idea of how the generator operates in normal mode. First, let's understand that the generator is much more important than the battery. The second performs only two functions in the car: starting the ignition system and powering electrical consumers when the engine is not running.
Therefore, the battery of the VAZ 2109 carburetor and VAZ 2109 injector functions more as an auxiliary current source. It consists of lead plates combined into sections. These elements interact with the electrolyte (water + sulfuric acid). In this way, the battery converts chemical energy into electrical energy.
The generator consists of the following basic elements.
- Stator (a stationary element made of round steel sheets).
- Stator winding (coils placed in its slots).
- Rotor (a movable element rotating inside the stator; consisting of a shaft with a core on which many layers of copper wire are wound - an electromagnet, and 2 six-pole cores are installed on top).
- Back and front covers.
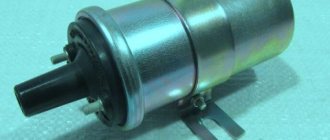
- Brush holder with graphite brushes; Since 1993, the brush holder for the VAZ 2109 has been equipped with a voltage regulator.
- Contact rings.
- Voltage output contact.
- Diode bridge.
Why can't the generator start the engine on its own? Because of the principle of its operation.
In order for this current source to begin generating electricity, the rotor must be transferred to rotational motion from the crankshaft. The crankshaft and rotor pulleys are connected by a V-belt. The crankshaft begins to rotate, transmits torque to the rotor shaft, the electromagnet creates induction, and voltage appears. The circuit between the battery and the generator is closed and the battery is no longer needed. Then the generator itself supplies energy to all devices and, most importantly, charges the battery.
The battery wire is connected to the brush holder on the back cover through the ignition switch. Graphite brushes are constantly pressed against the slip rings of the generator using springs and ensure good contact. On the same cover there is an output contact for outputting the voltage generated by the generator.
But the current produced by the generator is supplied from the stator winding to the output contact not directly, but through a diode bridge. The bridge plays the role of a rectifier. It converts the alternating current of the stator winding into direct current, which is necessary for all Nine electrical appliances. The brush holder also has a voltage regulator that prevents high voltage from reaching consumers. Due to a breakdown of the main components of the generator, the battery may not be charged.
I recently lost my car charger
Checking the battery charge
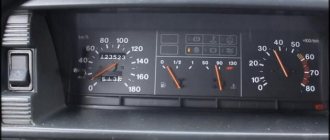
The easiest way to determine the lack of charging is using the car’s instruments, that is, the charging indicator lamp and the sensor (voltmeter) on the instrument panel. The sensor arrow should be in the green sector, and the battery lamp should not light up when the engine is running. Otherwise there is no charging.
But the best way is to check the voltage on the battery with a multimeter. When there is a charge, the voltage on it lies in the range of 13.6-14.2 V, and when there is no charge, it will only have its own voltage of 12 V (± 0.6 V). Under no circumstances remove the terminals from the battery to check to avoid damage to the RR, ECU and other electronic devices on your car.
To troubleshoot battery charging problems, you must use the following tools:
- control lamp 12 V;
- multimeter with a measuring range of up to 60 V AC and DC voltage;
- flat blade screwdriver;
- shaped screwdriver with a Phillips blade;
- pliers;
- knife;
- emery cloth.
The operating principle of the VAZ 2109 - 2114 generator.
In order to understand why on the VAZ 2109 - 2114 the generator gives little charge or does not charge at all, you need to understand how it works and know the principle of its operation.
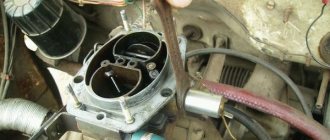
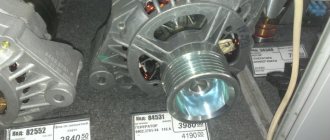
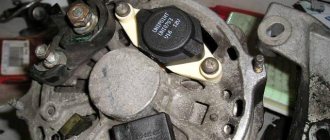
The generator consists of five main parts shown in the figure below: armature - 5, stator - 6, relay-regulator paired with brushes - 10, diode bridge - 9, housing - 3.7.
The operating principle is as follows:
- a positive wire goes from the battery to the diode bridge (9) and the diode bridge (9) is connected to ground through the housing (3.7) of the generator
- voltage through the diode bridge (9) is supplied to the stator (6) of the generator and a magnetic field appears in the stator
- when the car starts, the engine, using a belt drive, turns the generator rotor (5)
- in the rotor (5), rotating in the magnetic field of the generator (6), a current appears
- The current is removed from the rotor by brushes (10) and through a relay-controller (10) is supplied to the car battery.
Failure to comply with any of the points leads to a malfunction of the VAZ 2109 - 2114 generator.
Reasons why the VAZ 2109 - 2114 generator does not charge.
To find the reason why the VAZ 2109 2114 generator does not work or does not charge well, you need to check for serviceability each of the points above that describe the operation of the generator.
Point one: the diode bridge does not receive positive voltage from the battery.
The cause of the malfunction in this case may be the wire itself or its connection to the diode bridge or battery. Try cleaning the connection terminals, and if that doesn’t help, test the wire.
Poor contact with the negative wire is not considered, since in this case the engine would not start at all.
Point two: diode bridge and generator stator.
If voltage comes to the diode bridge, but charging does not occur, then it should be checked for functionality. To find out how this is done, read the article “Checking the diode bridge of VAZ 2109 - 2114”.
After checking the diode bridge, if it is working properly, we ring the stator winding. To do this, select the continuity mode on the multimeter and apply the probes to the first and second contacts of the stator, and then to the first and third.
If there are no cliffs anywhere, we move on.
Point three: VAZ 2109 - 2114 alternator belt.
The carburetor version of the VAZ had a thin V-belt, and the injection models have a wide belt with cores, but this does not change the operating principle. Charging may not go well due to belt slippage. This malfunction is manifested by a strong belt whistle. The belt may also start to whistle when you turn on energy consumers such as headlights, heated glass, stove fan, etc. If you hear a belt whistle, try to replace it as soon as possible. This is one of the reasons why the VAZ 2109 -2114 generator does not charge well. The popular Bui casino is here and now.
Point four: generator armature VAZ 2109 -2114.
There should be no breaks in the armature, as well as in the stator. Test it by placing the multimeter probes on the brush tracks.
If the anchor does not ring, it should be replaced.
Point five: brushes with a relay-controller.
The brushes of the VAZ 2109 -2114 generator wear off over time on the armature tracks. If their length is less than 5 millimeters, then they are not able to press tightly against the anchor, thereby not charging the vase battery.
But it happens that the relay-regulator fails before the brushes are worn out. To check it you will need:
- 12 volt light bulb
- car battery
- two 1.5 volt batteries
- several wires
We connect the light bulb and battery to the relay regulator as shown in the figure below. In this case, the lamp should be on.
Now we add two batteries to the circuit, as in the figure below. The light should not be on now.
If the light comes on in both cases - the relay - the regulator needs to be changed.