Is the car shaking, is it difficult to maneuver, or is the engine difficult to start? One of the reasons for such malfunctions may be related to fuel pressure. Consider the instructions for measuring fuel rail pressure, as well as the characteristics that may occur during this event.
Checking the fuel pressure is performed the same way for all Lada cars (Granta, Kalina, Priora, Largus, Vesta, Niva 4×4 and XRAY), since all these models have the same engine type.
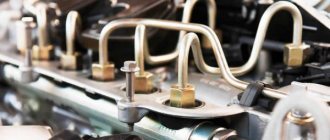
The process of checking the pressure in the fuel system
You will need: an air (or preferably a water) pressure gauge, onto which you need to put a hose with a diameter of 12 mm and tighten it with a clamp. The engine should be cold and the generator covered with a rag.
- Unscrew the cap of the control fitting on the fuel rail (fitting). Near the timing belt (on the right in the direction of travel), or on the left near the oil filler neck (for the VAZ 21129 engine);
- Unscrew the spool from the fitting using the wheel valve cap. At this moment, due to the residual pressure in the rail, gasoline will splash out (you can first relieve the rail pressure by removing the fuse from the fuel pump with the engine running and wait until it stalls).
- We put the pressure gauge hose on the ramp fitting and secure it with a clamp;
- Turn on the ignition. The fuel pump will turn on;
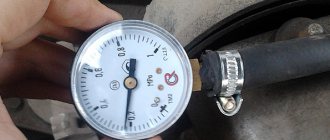
- We check the readings on the pressure gauge.
What pressure should be in the fuel rail? On VAZ 2110, 14-15, 99 models it should be in the range of 2.8 - 3.2 bar. On modern engines (Priora, Granta, Kalina, Vesta, XRAY, etc.) the pressure should be 3.6–4.0 bar. The process is also shown in the video:
Preparatory work
- We take a pre-prepared pressure gauge, and to prevent fuel spills and air leakage, we wrap flax or fum tape around the tip.
- We are preparing a hose with a maximum internal diameter of 9 millimeters, and clamps will be needed to secure them.
- We place the prepared rags on the engine in such a way that the hose and pressure gauge fixed on it cannot roll off the surface. This is done to prevent excess fuel from spilling over the surface of the engine.
- We wrap flax or tape around the pressure gauge, then fix the hose on it and tighten everything with a clamp.
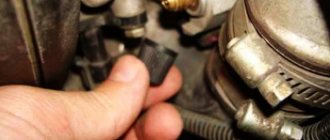
- On the ramp, unscrew the spool valve from the nipple (in this case, fuel splashes are possible due to the presence of residual pressure - approx.).
A regular wheel cap came in handy. - We put a hose with a pressure gauge on the ramp connections and secure everything with a clamp.
Pressure gauge with pipe assembly.
We place the pressure gauge on a previously prepared rag, and the preparatory work can be considered completed.
Measurement procedure
Before you start working, you can try to relieve the pressure in the fuel system. To do this, remove the fuel pump fuse (which is located on the right side of the panel, under the front passenger’s left foot - approx.). Where 3 relays and 3 fuses are located. In the photo below it is located under the number “5”. After removing the fuse, turn on the ignition and check by ear that the fuel pump is not pumping. We start the car and wait for the engine to stall.
Additional block
- After everything is ready, we check the already attached end of the pressure gauge with the hose for a secure connection.
- Next, start the engine and look at the readings that appear.
Thus, we diagnose the results that appear and compare them with the results of the norm.
After all the work has been done, unscrew the hose with the pressure gauge, screw in the spool and return everything to its original state.
Note!
The peculiarity of measuring pressure using a pressure gauge is such that its initial value on the scale has a certain inaccuracy. That is, when the air analogue has a measurement period of 15-20 atmospheres, and for fuel control the required maximum value is 5-7 atmospheres, then all measurements taken will have an error equal to the initial values on the device. Therefore, pressure testing should be carried out on a pressure gauge with maximum values of up to 8 atmospheres.
Troubleshooting
No pressure in the fuel rail? Causes:
- Clogged fuel filter;
- Clogged fuel pump filter;
- Fuel pump malfunction;
- Malfunction of the fuel pressure regulator (FPR). And with high blood pressure too.
If the pressure in the fuel rail gradually drops, the cause may be:
- leaking fuel pump connections;
- leaking injectors;
- fuel pump malfunction.
Let's check it like this. We clamp the leading rubber hose of the fuel rail:
- the pressure has become stable - the fuel module is leaking or the pump is faulty;
- the pressure drops - the injector(s) are leaking.
Checking the RTD. Connect the pressure gauge hose to the outlet fitting of the fuel pump and turn on the ignition:
- the pressure is low but stable - this means the RTD is faulty and is releasing pressure too intensely.
If the pressure in the fuel rail is within normal limits, we look for the causes of engine malfunctions elsewhere.
Share on social networks:
Found an error? Select it and press Ctrl+Enter..
Article source: https://xn--80aal0a.xn--80asehdb/do-my-self/repair/repair-lada-vesta/1007-kak-proverit-davlenie-v-toplivnoy-rampe-avtomobiley-lada.html
What happens if the pressure deviates from the norm?
If the pressure in the fuel pump is too high, too much fuel will be supplied to the carburetor.
The air will mix with it through the filter and burn in the cylinder. But if there is a lot of fuel and not enough oxygen, the mixture will not burn completely. At the same time, black smoke comes out of the exhaust pipe, and fuel drips from its end (may even be mixed with soot).
If the pressure in the system is very low, the mixture will be lean. There is too much oxygen. At the same time, the engine power is radically reduced; at idle speed the engine simply stalls, and the choke, of course, will not help, since it only regulates the operation of the throttle valve in the carburetor.
It is interesting that the on-board computer will not report a breakdown of the fuel pump - this is truly a huge mistake by VAZ engineers. In Priora, you can only read indicators when you connect a computer to the EMU unit, but not everyone can do this. And the indicators may not be true if the on-board computer itself is damaged. That's why checking with a pressure gauge on the ramp is the best option for checking pressure.
Lada Priora. Fuel pressure
Lada Priora. Fuel pressure
Slymas » 24 Aug 2022, 23:01 | Message: #1
The black Priora has arrived. Beaten by life outside the Slegonets. The owner says that he drove it and didn’t bother until his friend, who drives Priors a lot, drove this car. And a friend said that all the priors are falling down, but this one doesn’t go at all. He already knows that! That's how she came to me. Mileage 153 thousand km.
I did a test of the efficiency of the cylinders, but it showed that when the shoe is turned to the floor, all the cylinders try to accelerate, but they fail - a massive failure begins in all cylinders.
I connected the fuel pressure gauge and this is what I found:
Malfunction No. 1. After starting at xx 3.5 bar. I found on the Internet that it should be 3.8 - 4.0 bar.
Malfunction No. 2. When re-gasping before cut-off, the pressure drops to 2.5 bar.
Malfunction No. 3. Over the course of about five minutes during fault detection tests No. 1 and No. 2, the pressure at xx gradually dropped to 3.0 bar. When re-gasping to the cut-off, it very briefly dropped to 2.5 bar, then instantly jumped up a little above 3.0 and then stopped at 3.0
After turning off the engine, the fuel pressure hardly dropped. Those. The check valve in the fuel pump and the RTD are working properly.
There is a problem with the fuel system. But how can I identify what exactly is faulty based on my experiences?
1. Definitely change the external fine filter. 2. Coarse filter too. 3. Should I change the fuel pump? Probably yes. Even based on mileage and after a visual assessment of the coarse filter. 4.And is the pressure regulator working? HZ. I think not, because... it is he who limits the pressure from above. But why did his regulation threshold change after 5 minutes of operation?
Tell me, please, am I right in my reasoning?
The car left, but will come later to replace what I say.
Re: Lada Priora. Fuel pressure
CFL » 24 Aug 2022, 23:56 | Message: #2
Re: Lada Priora. Fuel pressure
Mikhail58 » 25 Aug 2022, 05:37 | Message: #3
Re: Lada Priora. Fuel pressure
Slymas » Aug 25, 2022 10:41 am | Message: #4
CFL, got it right. The question is how to properly cull everything? With filters, everything is clear and unambiguous - they need to be replaced. How to reject a fuel pump? I take it out of the module, connect the power, the output to the pressure gauge and lower it into gasoline. We look at the pressure in the wall. Is everything right?
About pressure drop
When it comes to pressure problems, it looks something like this:
- when the engine is running in idle mode, 2.8 atm is displayed, stable pressure, builds up quickly;
- after turning off the engine, the pressure instantly drops to 2.5 atm;
- after a minute or two it drops again to 2 atm;
- after 10 minutes – 1.6 atm.
New Lada: Lada Kalina engine heats up at idle: photo, video
Why does the pressure drop? There are definitely problems in the fuel system, and, as a rule, this is due to the fact that the check valve of the pump does not hold. This is why the pressure drops so quickly after the ignition is turned off.
Fuel pressure control
In extreme cases, it is possible that the DDT pressure sensor fails. Methods for checking both options are given below.
Is the pressure sensor working?
- Remove the tube from the pressure regulator.
- Look at the indicators on the pressure gauge scale. If they have not changed, then the regulator (sensor) is faulty. In normal condition, the needle should jump after turning off the DDT.
You can diagnose a check valve like this:
- pinch the return hose on the working engine;
- the pressure should jump again, this time even more than in the case of the sensor.
If the indicator does not increase when the return line is compressed, but the pressure level in the system is normal, this can only mean one thing - gasoline is not flowing through the fuel drain line. Or there is a leak in the fuel supply pipe.
Often a slow increase in pressure is caused by a clogged coarse mesh in the pump. The mesh needs to be cleaned or better replaced with a new one.
The fuel pump can also cause a drop in pressure in the system. It makes sense to diagnose it for normal functioning. Many people take it and simply measure the pressure directly from it. The pressure gauge should show high values, within 6 atm. If not, then the pump is most likely faulty.
In general, the actual functioning of the pump is confirmed by a buzzing sound when the ignition is turned on. If the fuel pump is installed in an open place, its operation can be checked by touching the housing (vibration should be felt).
If the pump does not work, then you must first test the fuse or relay responsible for its operation.
The process of checking the pressure in the fuel system
You will need: an air (or preferably a water) pressure gauge, onto which you need to put a hose with a diameter of 12 mm and tighten it with a clamp. The engine should be cold and the generator covered with a rag.
- Unscrew the cap of the control fitting on the fuel rail (fitting). Near the timing belt (on the right in the direction of travel), or on the left near the oil filler neck (for the VAZ 21129 engine);
- Unscrew the spool from the fitting using the wheel valve cap. At this moment, due to the residual pressure in the rail, gasoline will splash out (you can first relieve the rail pressure by removing the fuse from the fuel pump with the engine running and wait until it stalls).
- We put the pressure gauge hose on the ramp fitting and secure it with a clamp;
- Turn on the ignition. The fuel pump will turn on;
- We check the readings on the pressure gauge.
Fuse and relay
Both elements can affect the fuel pump. How to check it? Simply remove the fuse cover.
See if there are burnt elements. There is a diagram on the lid that indicates which fuse is responsible for which electrical device. As for the relay, it may be located under the glove compartment or in the engine compartment. How to check the fuel pump relay? Everything is very simple. To do this, you need an assistant who will turn on the ignition at your command. At this time, you touch the relay with your hand.
It should click. If not, most likely it has become unusable. It also happens that a part does not work due to poor contact. Clean the terminals and check it again. If this does not help, replace the relay.
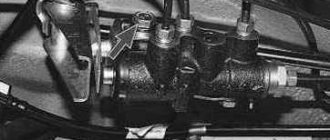
VAZ 2170 (Priora) 2004+ Checking the pressure in the engine power supply system
The main indicator of the health of the engine power system is the fuel pressure in the fuel rail.
If the fuel pressure is insufficient, the following may occur:
– unstable engine operation;
– stopping the engine at idle speed;
– reduced crankshaft rotation speed at idle;
– insufficient acceleration of the car (the engine does not develop full power);
– failures in engine operation when the vehicle is moving.
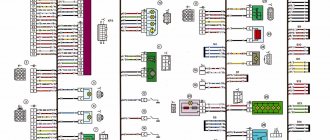
To begin with, we recommend checking the reliability of the electrical contacts in the ECM wiring harness blocks responsible for the fuel supply (fuel pump module, injectors, fuel relay and corresponding fuses).
The fuel pressure in the power system is checked using a professional pressure gauge and a hose with an original fitting for connection to the valve located on the fuel rail.
1. Turn on the ignition and listen: within a few seconds you should hear the sound of the electric fuel pump. If you can't hear it, check the electric fuel pump power supply circuit.
If you turn on the ignition three times without attempting to start the engine, the electric fuel pump will not turn on again, which is not a sign of a malfunction. It will turn on simultaneously with the starter starting the engine.
2. Reduce the pressure in the power system (see “Reducing fuel pressure in the engine power system”).
3. Unscrew the protective cap of the fitting for monitoring the fuel pressure at the end of the fuel rail. Please note that the cap has an O-ring. If the ring is torn or has lost elasticity, replace it or the entire cap.
For clarity, the work is shown with the decorative engine cover removed.
If it is not possible to use a professional pressure gauge, use a regular pressure gauge with a hose and clamp. The pressure gauge must have a measurement scale of no more than 1000 kPa (10 kgf/cm 2 ) and a division value of no more than 20 kPa (0.2 kgf/cm 2 ). Pay attention to the reliable connection (rolling) of the pressure gauge and hose.
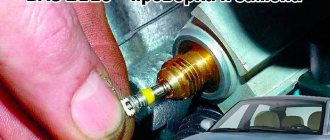
4. Using a metal tire valve protective cap, unscrew the valve spool (the same as in the tire)…
When turning the spool valve out, a small amount of fuel may leak out, so first place a rag under the fitting.
| 5. ...and remove it from the fitting. | 6. Connect a hose with a pressure gauge to the fitting. Secure the hose to the fitting with a clamp and check the reliability of its fastening. Start the engine and check the pressure using the pressure gauge. It should be 380–400 kPa (3.8–4.0 kgf/cm2). |
The following reasons for decreased pressure are possible:
– the fuel pressure regulator is faulty;
– the fine fuel filter or fuel inlet filter is clogged;
7. Stop the engine and reduce the pressure in the power system (see “Reducing fuel pressure in the engine power system”).
8. Disconnect the pressure gauge from the pressure control fitting, screw the spool into the fitting and install the protective cap on the fitting.
Installing a new sensor
Before removing, be sure to relieve the fuel pressure in the rail.
To do this, turn off the power to the fuel pump and start the engine. Or carefully unscrew the spool valve from the fitting in the ramp (this option will be more suitable if the internal combustion engine does not start at all). Next, you work according to this scheme: Disconnect the negative terminal from the battery. Disconnect the hose from the vacuum valve of the VAZ 2114. Unscrew the nuts and drain the gasoline. Please note that there may still be gasoline under pressure in the fuel system
Therefore, take precautions. Fix the tube and washer. Unscrew the bolt screwed into the clamping element. Remove the clamping element. Unscrew the nut that holds the drain hose and pressure sensor. Remove the bolts connecting the fuel rail to the pressure sensor. Dismantle the pressure regulator in the system. Install a new device in the reverse order.
As you can see, there is nothing complicated. The main thing in repair is to imagine what this or that element of the system is responsible for. And then you can quickly give an accurate diagnosis based on the signs
Install the new device in the reverse order. As you can see, there is nothing complicated. The main thing in repair is to imagine what this or that element of the system is responsible for. And then you can quickly give an accurate diagnosis based on the signs.
Sport fuel pressure regulator
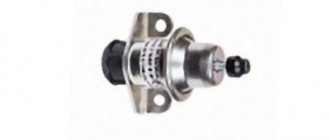
The fuel pressure regulator VAZ 2110 2114 2112 2115 is used to maintain a continuous pressure difference across the injectors. When the pressure in the intake pipe increases, the pressure regulator increases the fuel pressure, thereby compensating for changes in engine load, and when the pressure in the pipe decreases, it lowers the fuel pressure and drains the excess back into the tank through the valve.
Fuel pressure regulator VAZ 2110 2114 2112 2115
A faulty fuel pressure regulator VAZ 2110 2114 2112 2115 can lead to engine damage, so you should be very careful about this important component of the car. The following signs indicate that the fuel pressure regulator requires repair or replacement:
The following signs indicate that the fuel pressure regulator requires repair or replacement:
• the engine of VAZ 2114, VAZ 2115, VAZ 2110, VAZ 2112 began to run unsteadily and unevenly;
• idling also causes a lot of problems - the engine constantly stalls, in addition, the crankshaft also behaves strangely - it rotates at an increased or decreased frequency (also at idle);
• the engine power of these models of VAZ cars decreases sharply, it does not “pull” as before, but begins to “freak out” during acceleration, and warms up more slowly, the movement becomes uneven, dips, jerks and other inadequacies appear;
• fuel consumption for both the VAZ 2110 2112 and the VAZ 2114 2115 is growing every day, just like the amount of exhaust vapors and fuel combustion products emitted into the atmosphere.
Checking the fuel pressure regulator on a VAZ 2114 2115 2110 2112 is not difficult, provided that you have the necessary tools, even a beginner can do it on their own. To do this, you will need a pair of keys (a 5-point hex and a 24-point regular wrench), you also need a pressure gauge, you can take a tire gauge.
If the pressure check did not show any deviations from the norm, then the problem is not in the fuel pressure regulator, but in another component of the VAZ car. Note: normal pressure is considered to be 284–325 kPa when the engine is running and plus 20–70 kPa when the vacuum hose is disconnected from the pressure regulator.
Troubleshooting
No pressure in the fuel rail? Causes:
- Clogged fuel filter;
- Clogged fuel pump filter;
- Fuel pump malfunction;
- Malfunction of the fuel pressure regulator (FPR). And with high blood pressure too.
If the pressure in the fuel rail gradually drops, the cause may be:
- leaking fuel pump connections;
- leaking injectors;
- fuel pump malfunction.
Let's check it like this. We clamp the leading rubber hose of the fuel rail:
- the pressure has become stable - the fuel module is leaking or the pump is faulty;
- the pressure drops - the injector(s) are leaking.
Checking the RTD. Connect the pressure gauge hose to the outlet fitting of the fuel pump and turn on the ignition:
If the pressure in the fuel rail is within normal limits, we look for the causes of engine malfunctions elsewhere.
Modern cars are equipped with electronic fuel pumps; mechanical ones are found only in cars manufactured before 2000. The task of this component is to ensure an uninterrupted supply of fuel. Everything functions well at high engine speeds, but problems arise when moving to low and idle speeds. Increased pressure damages fuel supply hoses and other system components. The fuel pressure regulator protects against such consequences. If there are malfunctions in it, this can be determined by several signs.
Measuring process
Fuel pressure must be measured in 4 operating modes, that is, 4 different measurements will be required.
With the ignition on
When the ignition is turned on, the fuel pump must supply the system with the fuel needed to start the engine. Therefore, we simply turn on the ignition and look at the readings. The pressure must be above 3 atmospheres.
When the return line is turned off
Almost all modern cars have a fuel pressure regulator. It is aimed at preventing excessive pressure from being created in the system. When the limits are reached, it resets the pressure to normal. We clamp the return pipe and get the result on the pressure gauge.
It should be about 7 atmospheres
. If you have a 6 atmosphere pressure gauge, the needle should be “filled up”.
- Low pressure in the fuel system causes
Under loads
And one more stage of measurement is the measurement of pressure drops under loads. Just apply the throttle (you can just “tug” the throttle cable if you have a mechanical one) and observe the changes.
During recharging, the pressure should be about 3 atmospheres, and then drop to the idle value - that is, up to 2.5 atmospheres
.
see also
Comments 21
If the ramp is already 3 atm. then essentially yes.
this is a return line so that the pump does not overheat from the pressure of gasoline, there is no place to push it, so there is a return line, but on the old ones (gas) the return line was adjustable, there was a bolt and the chassis is configured as a thermostat; the excess goes into the tank
Certainly. the excess needs to be disposed of somewhere, and the pump won’t last long without fuel circulation
Right after you turn the key?
Of course, I turned on the ignition - the pump turned on and increased the pressure, the injectors are closed - the valve opened... If in doubt, connect a pressure gauge to the fuel rail and look at the pressure, it should be no more than 5 Bar, it seems
It’s just that initially the trouble is that the flow rate has increased very much. The bk shows the opening time as much as 5.2 and the flow rate l/h 2.5. As I understand it, this can be due to low pressure, and low pressure can be due to this very valve!
Replace the pressure regulator. The operating pressure in the rail should be within 2.7-3.2 points. I had the same problem...
And how much did it affect consumption? I began to eat 10.8 l/100 km, instead of the usual 9-9.5.
30 liters per 120 km with frequent warm-ups at -5
Yes, this is normal for frequent warm-ups, the further the minus, the greater the consumption.
frequent is about 6 times
What are the revolutions at a flow rate of 2.5 l/h? Which bookmaker? What is the idle speed?
If the engine dynamics have not dropped, it is unlikely that it is the pressure regulator. Check the flow rate calibration of the BC. Is the expense real or according to BC? In winter, my consumption almost doubles due to warming up and when it’s cold, it pours a lot of gasoline into the pots. But at such speeds 1.2 l/h does not seem more.
FakeHeader
Comments 28
Look in the rear left arch, there is a separator tank, there is a valve on top of it inserted through an elastic band. This valve flew out, and I washed the rust and sand fuel system three times until I accidentally discovered a valve dangling in the arch and a hole from it in the separator tank, everything that was on the road flew into it
Thanks, I'll take a look today
Look in the rear left arch, there is a separator tank, there is a valve on top of it inserted through an elastic band. This valve flew out, and I washed the rust and sand fuel system three times until I accidentally discovered a valve dangling in the arch and a hole from it in the separator tank, everything that was on the road flew into it
Do you have a photo? I don’t understand, we have an absorber under the hood and only the hose from it goes to the tank
Do not confuse the adsorber with the separator.
Look in the rear left arch, there is a separator tank, there is a valve on top of it inserted through an elastic band. This valve flew out, and I washed the rust and sand fuel system three times until I accidentally discovered a valve dangling in the arch and a hole from it in the separator tank, everything that was on the road flew into it
To prevent this from happening, you need to install fender liners!
:))))) God forbid, advise some grandfather. It must be assembled on the assembly line as expected and this will not happen
fender liners without screws novline, I installed these and everything is good! There seems to be information about them on the drive too, I advise you to look!
For some reason I am not a supporter of these mud collectors.
Rdt. When the gas is released, the pressure should not fall below 3.8 by 4 points. The RTD releases the pressure, and when the engine is stopped, the pressure in the fuel rail should not drop sharply to 0. It should remain at 2-2.5-3 bar (with the internal combustion engine not running)!
did you change the fuel filter?
Change the gas station, did you change the fuel too? check adsorber electromagnetic sensor
I changed the gas station, the same fuel (in the tank and fine cleaning)
Signs and Symptoms of a Malfunctioning Fuel Pressure Regulator
- the engine stalls at idle;
- engine power is greatly reduced;
- when accelerating, it is not possible to achieve normal dynamics;
- the car reacts poorly to pressing the gas pedal;
- fuel consumption suddenly increases greatly;
- the amount of carbon dioxide emissions increases;
- the crankshaft rotation speed changes.
All these problems arise due to the fact that the regulator becomes clogged or completely clogged over time. Another common cause of failure is weakening of the spring, leading to a strong decrease in pressure. In the absence of normal pressure, fuel supply decreases, power decreases and controllability deteriorates. Such problems are especially common on Ladas - Kalina and Priora, as well as on cars of the 2110, 2112, 2114, 2115 series.
How often should the Priora fuel filter be replaced and why?
A worn element has less capacity and can lead to engine failure and premature wear of fuel system components.
You can install a fuel filter on a Lada Priora within 15-20 minutes. The expenditure of time and money will be minimal, and transport will begin to operate as normal. Therefore, it is not recommended to neglect repairs.
Symptoms of element failure
During the operation of the car, a car owner may encounter two types of RTD failure:
- The pressure drop in the rail is below the permissible level - the regulator directs most of the fuel through the return line to the gas tank.
- Increase in pressure to maximum - the element does not allow fuel to flow into the return line.
Note. As a rule, the first malfunction is accompanied by a rapid drop in pressure in the system after the electric fuel pump is turned off.
It is quite simple to track the signs of the first malfunction - the power unit is sorely lacking fuel for normal operation in all modes. Symptoms appear as follows:
- cold starting is difficult, the engine runs extremely unstable until it warms up;
- “dips” during acceleration and jerks when moving uphill;
- the car often stalls at idle;
- Gasoline consumption per 100 km increases.
The increased fuel consumption is explained by the actions of the driver trying to compensate for the lack of fuel mixture by pressing the accelerator pedal.
Driving in this mode is quite difficult - it is better to immediately check the fuel pressure regulator for functionality. When the valve does not allow excess fuel to flow into the tank, the following consequences are observed:
- Due to too high pressure from the ramp side, the injectors begin to leak and fill the cylinders with pure gasoline, and not with the working air-fuel mixture.
- The engine is bad, it emits black smoke from the exhaust, and sometimes you can hear popping noises in the exhaust manifold. The reason is flashes of unburnt fuel.
- Consumption increases noticeably.
- Leaks may be observed at the joints of the fuel pipes, and a strong gasoline smell may be felt.
Practical experience shows that a lack of fuel mixture occurs more often than an excess. That is, the most common problem with an RTD is the draining of gasoline into the return pipe and tank.
How to check on VAZ and foreign cars
To determine a breakdown, the following procedures are performed:
- The fitting plug is unscrewed - the element that controls the fuel pressure.
- The O-ring is inspected - if it is damaged, this component must be replaced.
- The spool is removed from the fitting.
- The engine starts, the pressure in the regulator is measured with a pressure gauge.
- The information received is compared with that specified by the manufacturer.
You can check the performance of the RTD yourself, even without tools. To do this, just pinch or disconnect the valve and study the intensity of the stream. A pressure gauge will give a more accurate result. It should be connected between the fitting and the fuel hose, having first disconnected the vacuum hose. The measurement is taken at idle speed. The information obtained depends on the car model - for example, in a VAZ 2110, the pressure indicator should start at 0.3 and gradually increase to 0.7 Bar.
Fuel pressure regulator with connected pressure gauge
Has your blood pressure changed? You may have connected the pressure gauge incorrectly. Check the connection. If everything is correct, it means the regulator has become unusable.
Where is the fuel pressure regulator located and how does it work (video)
Design and operating principle
External view of the fuel pressure regulator
The regulator (RTD) consists of a housing, valve, membrane and spring, which are located on the fuel rail, in the fuel return hose of the power supply system or directly in the tank (if the car does not have a recirculation system). The purpose of the product is to send excess fuel back to the tank. When the engine speed increases, the resulting vacuum opens the valve slightly, and the excess returns to the tank.
Location of the fuel pressure regulator in the fuel supply system
Causes and Troubleshooting
If the above symptoms are detected, you should check the performance of the RTD using one of the suggested methods:
- measure the pressure in the fuel rail, its value should be at least 3 bar;
- find the return hose and carefully press it with pliers while the engine is running;
- disconnect the vacuum pipe leading from the manifold from the regulator.
The most reliable way is to measure with a pressure gauge. The device is connected to the fitting on the fuel rail, the test is performed with the engine running. If the pressure is below 3 Bar, additionally check the fuel pump - the unit may have lost performance. For diagnostics, you will need a tee with a pressure gauge embedded in the supply line. If the pump produces 3 Bar or more, change the RTD.
The reasons for valve failure look like this:
- the spring has lost its elasticity and allows the membrane to bypass fuel at low pressure;
- pollution with low-quality gasoline;
- rod jamming.
Due to the design features (the element body is rolled), repairing the fuel pressure regulator is impossible in most cases; the part will have to be replaced. The option of washing and blowing helps only with blockages inside the element.
Changing the RTD
- Those who are unsure of themselves can drive up to a service station with a new part, but believe me, nothing complicated will be required of you. Take a 24mm wrench and a five-point hexagon and begin the repair work;
- The fitting plug at the end is unscrewed. There is an o-ring there. If it is torn, cracked or stretched, replace the seal or the entire plug;
- The spool is unscrewed from the fitting. It is similar to the tire one, so you will recognize it;
- The vacuum pump is removed from the regulator;
- The nut is twisted - fastening the fuel drain pipe;
- The bolts are removed - 2 pieces - with which the RTD is fixed to the fuel rail;
- The regulator fitting is pulled out of the ramp hole, and the regulator itself is removed from the drain tube. It happens that the sealing ring gets stuck in the ramp. You need to carefully get it out of there; if intact, put it on a new RTD; if torn or cracked, replace it with a new one.
Installation of the purchased spare part is carried out in the reverse order. After finishing the installation, you should start it and listen to the engine to make sure that all problems are solved.
Finally, we note:
You shouldn’t raise the alarm and look for signs of a malfunction in the fuel pressure regulator as soon as the engine sneezes. RTD is a fairly reliable thing and does not “fly” very often. And if this happens, you will quickly understand what’s going on.
What are the consequences of malfunctions in the operation of RDTs?
Over time, the engine starts more and more poorly. Fuel begins to come out of the cracks, which leads to a strong increase in its consumption. When the pressure changes unevenly, the dynamics of movement are disrupted, surges occur, and the car jerks during acceleration.
Is it possible to repair a failed part? In most cases, no, you have to completely change it. Repair units are almost always non-separable. Some experts suggest repairing the component, but this is dangerous. It is better to buy a new regulator - fortunately, it is inexpensive.
Determining violations in the operation of RTDs is not a very difficult task, which can be handled independently. Remember that this part of the machine needs to be checked periodically. By detecting the problem in time, you will protect important car components from rapid wear.
Source of the article: https://garage-mo.ru/servis-i-remont/toplivnaya-sistema-priora-inzhektor-17.html