Hello everyone. Once, having examined the engine compartment, I noticed that the engine had a strong transverse stroke during operation, that day I was with a friend and asked him to sharply accelerate to 2-3 thousand. Oh, and I was looking at the engine. As a result, I noticed that the engine was trying very hard to “turn out” with a sharp increase in speed, it walked towards the windshield by about 5 centimeters visually, and it became clear that the end of the upper engine support (guitar) had come, although visually no special deformations were visible on rubber. I called the old owner and asked how long ago he changed this guitar and whether he changed it at all, the answer was: he changed it about 8 months ago. Considering that the old owner drove a car half the size of me, I decided to look for a more reliable option to replace this guitar, and then Google.
I didn’t want to install reinforced, steel, technomasters or auto products, because the vibration in the cabin is terrible, some wrote reviews that the fillings crumbled in the teeth, and this particular support is mainly responsible for damping vibration on the body, gear knob and steering wheel. I came across a guitar of a new model “new technologies”, at the moment these supports are being installed on new priors at the factory. decided to buy it.
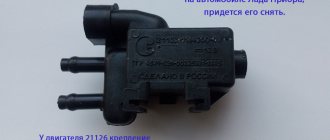
here is the original one with a round hole for a bolt (there is also one with an oval hole, so anyone who comes across one with an oval one is not a fake, it’s just that during production they decided to abandon the oval ones, because no matter how you tighten the nut, the support will still move relative to center of the hole), and the markings on the rubber.
and so, let’s summarize the signs of malfunction and “fatigue” of the upper engine mount:
- long engine stroke with a sharp increase in speed - an unpleasant jerk from the transition from accelerating to engine braking mode. — the gearshift knob shakes — difficult downshifting, especially noticeable from second to first. — when starting a cold engine, it jumps, vibrations on the body and even a slight rocking of the car as a whole.
It’s not just the engine mount that is responsible for these signs, there could be a lot of reasons for the above, but I had this whole list of problems and I really felt like the “not solidity” of the internal combustion engine and the body.
Steering columns from Kalina, Priora and Chevy Niva
Note. On the VAZ 2110 you can easily and simply install switches from Lada Kalina, Chevrolet Niva or some foreign cars.
Features you need to know about
Replacing the steering column switch for a VAZ 2110
Let's look at some features of steering column switches from other cars that we want to install in the VAZ 2110:
- The main thing is the connector, which must match the VAZ 2110 and then there will be no problems.
- It is also recommended to pay special attention to the shape of the switch. For example, the steering column shifters from the Priora become further from the steering wheel than the tenth shift paddles. In this case, you have to lengthen the steering shaft or install another one from the same Kalina.
Steering column switches VAZ 2110
Note. There is another way: bend the steering column switch and cut off the excess part, and then glue it at a different angle, but this is not entirely correct. We need to think about safety, but a glued-on steering column does not fit in with this. Therefore, if we change the steering columns from Priora, Kalina or Niva, we will have to put up with a large distance of levers.
Conventional DIY installation of steering column stalks
- Disconnect the positive wire from the battery.
- Now remove the lower steering column casing by unscrewing the 7 fastening screws.
- Lower the steering column down.
- Remove the upper steering column casing.
VAZ 2110 replacement of steering column switches
- We find two plastic clips and squeeze them to remove the windshield wiper switch (see Replacing windshield wipers on a VAZ 2110 on your own) from the base.
- Disconnect the block with wires.
- We now remove the turn signal and headlight switch, again, squeezing the two plastic clips.
We take a test lamp at 12 and connect it to the corresponding contacts:
Replacing steering column switches VAZ 2110
- If the lever is in the first position, then everything is turned off.
- If the lever is in the second or third position, then the numbers of closed contacts will be 49a-49aL and this is a left turn indicator.
- If the lever is in the fourth or fifth positions, then this is a right turn indicator and the numbers of closed contacts: 49a-49aR.
- If the lever is in the sixth position, then these are low beam headlights and the numbers of closed contacts: 56-56b.
- If in position seven, then this is a high beam alarm and the numbers of closed contacts are 30-56a.
- High beam is position eight and the contact numbers here are 56-56a.
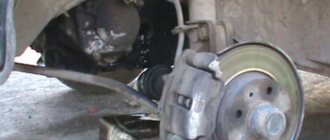
Removing the right support
Remove the generator drive belt (see “Replacing the generator drive belt”). We install an adjustable stop under the engine oil pan.
We put a “17” socket on the nut securing the right support to the engine bracket, and then...
...insert the extension into the head... ...and unscrew the nut.
Using a 15mm socket, unscrew the three bolts securing the support bracket to the body side member. Having lowered the bracket with the support down, we remove the threaded part of the support bolt from the hole in the engine bracket and, moving the assembly forward...
...take out the right support with the bracket. Use a Torx E-10 head to unscrew...
...two screws securing the support to the bracket... ...and remove the support from the bracket. To disassemble the support...
... use a 15mm wrench to unscrew the cushion coupling nut, holding the bolt head with a wrench of the same size.
Right support parts
: 1 - nut; 2 - upper limiter; 3 - pillow; 4 - lower limiter; 5 — bolt The cushions of the left and right supports are interchangeable. When assembling the right support, the flanging rings (see the left support) should be facing upward, and the flats of the upper and lower stops, as well as the cushion coupling nut, should be parallel to the axis of the support mounting holes. We assemble the support with the bracket by tightening two screws. We install the right support with the bracket in the reverse order, while...
...the coupling nut 2 of the cushion must be placed in the rectangular socket 1 of the engine bracket.
Modification of the steering columns on the VAZ 2110
If the driver is not interested in the replacement process itself, but only needs to eliminate the clicking of the steering column switches, then we can advise simply carrying out modifications.
Eliminating clicks
- We remove the switches from the VAZ 2110. Usually, no difficulties arise in this process.
- We disassemble the steering columns by snapping off the top cover with a screwdriver (small size).
- We find a small slide inside the switch (it is this that is responsible for the loud switching).
- Now you need to find a suitable rubber, for example, a car door seal (old and no longer needed). This very piece of rubber will need to be glued to the points of contact between the scenes.
Advice. To make the switching happen more smoothly, it is recommended to slightly file the plastic bump. We try to make the tip more rounded, otherwise it will jump. If this cannot be done, then you can use another method: weaken the spring.
- Let's put everything back together.
- We cover the switch body with some kind of vibration material. It is recommended to do the same with the steering shaft casing.
Closing the openings of the steering column switches
Openings can be closed easily and simply
Sitting behind the wheel of a VAZ 2110, you cannot help but notice the large gaps located near the steering column switches. This looks very unaesthetic and not at all practical. Let's try to close them:
- Take a piece of black carpet.
- We cover the steering column switch with Moment glue.
- We wait until the required time dries.
- We glue the carpet directly onto the steering column switch, closing the gap.
Note. It is not necessary to use only carpet. If you don’t have it, then you can take a piece of modelin or even an old felt boot.
You can easily replace the switch yourself, following the instructions. Thus, it will be possible to save the price of services in specialized workshops. During the work process, it is recommended to study photo and video materials.
Topic: Kalina steering wheel in VAZ 2110
I read an article on installing a Kalina steering wheel in a VAZ 2110, and some questions arose. Is there a special Kalinovsky steering wheel for tens or can you just remove the steering wheel from Kalina and put it on 2110?
Added: 2012-08-27 11:49:54
The thing is that I went to the market and was told that a steering wheel for Kalina costs 1,500 rubles. and a special one for 2110 - 2200 rubles. And what's the difference? Or this steering column cover costs 700 rubles.
parking lights
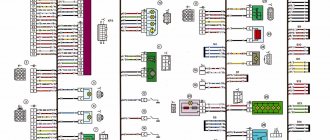
For example, the electrical circuit of a Lada Priora station wagon has the function of both automatic and manual activation of side lights. The activation itself occurs after turning the handle for the side lights and headlights on the dashboard. The contact is triggered and the lights turn on.
The circuit contains fuses that serve to protect against overvoltages and short circuits. Power is supplied to a lamp located on the dashboard. To adjust the brightness of the lights, a special regulator located on the lighting control module is used.
The headlight design of the Priora differs from other cars. The electrical circuit of the VAZ Priora contains a light sensor, as well as a lighting control unit. After turning on the ignition and the lighting control button, the electronic unit responsible for lighting control is activated.
Replacing the steering column switch in a VAZ 2110 yourself
How to replace the steering column switch on a VAZ 2110
Replacing the steering column switch in a VAZ 2110 is carried out for the following reason: this element of the car is not as beautiful and functional as on foreign cars. On a VAZ 2110, replacing the steering column switch can be easily done on your own. You just need to follow the instructions and do everything in accordance with it.
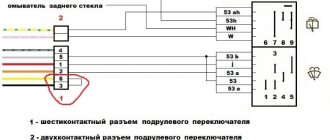
Causes of malfunctions in the operation of turn signals
Approximate procedure if the turn signals fail:
- Check the serviceability of the lamp (if it is burnt out, the indicator in the instrument cluster will blink twice as often). If necessary, replace the lamp with a new one;
- Check the “grounds” that are located next to the headlight unit and flashlight. Clean the terminals;
- Check the steering column switch (example: the contact is stuck and the turn signals do not turn off). Replace it with a known good one, or check it by closing the contacts of the block 49a and 49aL (for the left) or 49a and 49aR (for the right). If the turn signals work, there is a fault in the steering column switch;
- Check the hazard warning button in the same way;
- Check the wiring to the electrical accessories control unit (example: the rear wall of the radio tape recorder rests against the wires that come from the emergency lights and contact is lost);
- Check for the presence of a “plus” on the TsBKE block (X1-14 and X1-15);
- Check the wiring from the TsBKE to the lamps. Disconnect the block with wires X1 and apply power through a 5A fuse to pins 14 and 15 of connector X1. (example: if the left or right turn signals on a Priora do not work, then it is possible that when installing the wing, a self-tapping screw got into the wiring harness and caused a short circuit).
- The reason is the alarm (for example, the diodes are burned out or the relay is stuck). You should disconnect the alarm connection points to the electrical package control unit and check the operation of the turn signals;
- CBKE does not work. Check fuse F31. If there are malfunctions in the operation of the CBKE (example: the left turn signal is constantly on), then you should contact a service station to repair or replace it. In some cases, the reason for the failure of the turn signals was poor contact in the CBKE; the problem was solved by simply turning the unit upside down.
Steering columns from Kalina, Priora and Chevy Niva
Note. On the VAZ 2110 you can easily and simply install switches from Lada Kalina, Chevrolet Niva or some foreign cars.
Features you need to know about
Replacing the steering column switch for a VAZ 2110
Let's look at some features of steering column switches from other cars that we want to install in the VAZ 2110:
- The main thing is the connector, which must match the VAZ 2110 and then there will be no problems.
- It is also recommended to pay special attention to the shape of the switch. For example, the steering column shifters from the Priora become further from the steering wheel than the tenth shift paddles. In this case, you have to lengthen the steering shaft or install another one from the same Kalina.
Steering column switches VAZ 2110
Note. There is another way: bend the steering column switch and cut off the excess part, and then glue it at a different angle, but this is not entirely correct. We need to think about safety, but a glued-on steering column does not fit in with this. Therefore, if we change the steering columns from Priora, Kalina or Niva, we will have to put up with a large distance of levers.
Conventional DIY installation of steering column stalks
- Disconnect the positive wire from the battery.
- Now remove the lower steering column casing by unscrewing the 7 fastening screws.
- Lower the steering column down.
- Remove the upper steering column casing.
VAZ 2110 replacement of steering column switches
- We find two plastic clips and squeeze them to remove the windshield wiper switch (see Replacing windshield wipers on a VAZ 2110 on your own) from the base.
- Disconnect the block with wires.
- We now remove the turn signal and headlight switch, again, squeezing the two plastic clips.
Removing the left support
We install an adjustable stop under the gearbox.
Using a 15mm socket with an extension, loosen the tightening of the upper tension nut of the support cushion.
From the bottom of the car, using a 17" socket with an extension, unscrew the nut securing the left power unit support to the gearbox bracket (for clarity, the left mudguard of the engine compartment has been removed)... ...and remove the washer.
Using a 13mm socket with an extension, unscrew the two bolts securing the support to the body.
Remove the left support. To disassemble the support, finally unscrew the upper coupling nut of the support cushion.
Left support parts
: 1 - upper nut; 2 - upper limiter; 3 - pillow; 4 - lower limiter; 5 — hairpin; 6 — washer; 7 — lower nut The upper support stop has two flats. When installing the support...
...the flanges of the cushion clip should face up. We assemble the left support without fully tightening the upper coupling nut, after which we install the left support in the reverse order. In this case, the flats on the stud, preventing it from turning, should be located in the groove of the gearbox bracket. When final tightening the upper coupling nut, it is necessary to ensure that the flats of the upper stop are located parallel to the axis of the support mounting holes.
Modification of the steering columns on the VAZ 2110
If the driver is not interested in the replacement process itself, but only needs to eliminate the clicking of the steering column switches, then we can advise simply carrying out modifications.
Eliminating clicks
- We remove the switches from the VAZ 2110. Usually, no difficulties arise in this process.
- We disassemble the steering columns by snapping off the top cover with a screwdriver (small size).
- We find a small slide inside the switch (it is this that is responsible for the loud switching).
- Now you need to find a suitable rubber, for example, a car door seal (old and no longer needed). This very piece of rubber will need to be glued to the points of contact between the scenes.
Advice. To make the switching happen more smoothly, it is recommended to slightly file the plastic bump. We try to make the tip more rounded, otherwise it will jump. If this cannot be done, then you can use another method: weaken the spring.
- Let's put everything back together.
- We cover the switch body with some kind of vibration material. It is recommended to do the same with the steering shaft casing.
Closing the openings of the steering column switches
Openings can be closed easily and simply
Sitting behind the wheel of a VAZ 2110, you cannot help but notice the large gaps located near the steering column switches. This looks very unaesthetic and not at all practical. Let's try to close them:
- Take a piece of black carpet.
- We cover the steering column switch with Moment glue.
- We wait until the required time dries.
- We glue the carpet directly onto the steering column switch, closing the gap.
Note. It is not necessary to use only carpet. If you don’t have it, then you can take a piece of modelin or even an old felt boot.
You can easily replace the switch yourself, following the instructions. Thus, it will be possible to save the price of services in specialized workshops. During the work process, it is recommended to study photo and video materials.
Operation of the Priora turn signal relay circuit.
Let's take a closer look at how the circuit works and how the switches and lamps are connected. The main difference between the connection, like some other consumers, is the fact that the turn switch and the hazard warning button do not switch the circuit. That is, when switching, no power passes through the contacts of the turn switch to the lamps.
Let's look at the priors' turning pattern. We see that the electrical package control controller is connected to the switch with two wires, blue and blue with a black stripe, connected to pins 7 and 8 of connector X2 of the instrument panel harness. When you turn on the turns of one of the boards, the switch contacts connect the corresponding wire to the minus. In this case, the controller receives a signal to turn on the lamps of the corresponding side, that is, to work as a Priora turn relay. When you press the alarm button, the same thing happens, but both wires are connected to the minus at once.
When a signal is received from the switches at pins 14 or 15 of connector X1 of the front wiring harness, power appears, which is supplied to the direction indicator lamps of the rear lights and through the connecting connectors of the wiring harnesses to the indicator lamps on the instrument panel and warning lamps in the headlight unit. The hazard warning lamp on the instrument panel receives power from pin 6 of block X2 of the electrical package control controller, through the contacts of the hazard warning button.
Thorough examination of technical condition
To diagnose and eliminate the malfunction, you should visit a service station. If you have experience and the necessary equipment, you can do everything yourself. This will require 1-2 hours of free time. Among the most common causes, car mechanics identify a short circuit or physical wear of the mechanism. Regardless of this, the procedure is as follows:
Possible causes of the malfunction include damage to the wiring leading to the electrical package control unit. One of the most common examples: an incorrectly installed radio tape recorder pinches the wires, which leads to a short circuit. Do not lose sight of the wiring connecting the light bulbs and the CBKE. You can verify that the circuit is working properly as follows:
The window regulator does not work on the Lada Priora
On a VAZ-2170 Priora passenger car, depending on the configuration, electric windows can be installed only on the two front doors (then the rear ones will be manual) or electric windows can be installed on all four doors. Moreover, the window lifters on the front doors will be cable or rack and pinion, and on the rear doors, only cable ones.
Malfunctions leading to failure of power windows can be divided into two groups . The first group of faults is associated with electrical problems, and the second with purely mechanical ones.
There are significantly fewer failures associated with mechanical faults than with electrical faults.
These include: cutting off the teeth of the plastic gear of the gearbox and problems with the cable drive, which is stretched during operation, which sometimes leads to it jumping off the guide rollers.
all power windows fail to operate, you will have to check the integrity of the 30-amp fuse F31 of the central electrical package control unit, located in the mounting block.
If only the rear power windows do not want to open using the control buttons located on the doors, but they are activated from the central control unit, then the reason will need to be looked for in the locking switch for the rear windows.
It will have to be checked with a tester for current flow in the position when it is turned off.
If one window lifter , which they are trying to turn on from the central control unit, then it will be necessary to check its operation using the switch located on the door.
If it is triggered by this switch, then you will have to check the switch of the central unit for current flow, and if it does not trigger, then you will have to check the serviceability of the electric motor, first checking whether voltage is supplied to it.
If there is voltage, the electric motor is faulty, and if there is no voltage, then you will need to check the wires going to it.
In the electric window lifter motor, the most likely malfunctions may be wear or sticking of the commutator brushes. Hanging of the brushes occurs due to the fact that the brush holder is made of plastic and when heated it can melt slightly, and this leads to the fact that the brush loses its mobility and at the slightest wear it comes off the commutator.
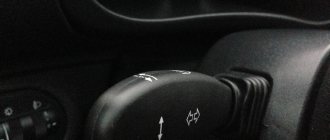
Removing and installing high beam, turn and wiper switches:
This does not require any tools, since everything is attached with latches and can be changed in just a few minutes. As an example, I will show everything on the right lever, which is responsible for the wipers and on-board computer.
The first thing you need to do is disconnect the small plug with the wires, just press the two plastic latches along the edges and pull it towards you:
Now you need to disconnect the large plug from the switch, it does not have any locks, just apply a little force and pull it to the side:
And now you can safely remove the steering column switch itself, for which you just need to press the latches on the sides and pull the lever towards you:
It is easily removed and the left one, which is responsible for high beams and turns, is removed in the same way, even easier, since there is only one plug. The removed lever is shown in the picture below:
After this, we install a new switch in place of the failed one, replacement is carried out in the reverse order of removal.
The steering column switch is a long-standing problem with front-wheel drive cars. Lada Kalina was no exception and therefore it is difficult to avoid breakdowns in this regard. Most often, the steering column switches on the Lada Kalina break down gradually, let’s put it this way.
When driving with the low beams on, the high beams will occasionally turn on and flash. If you find such a problem, you need to replace the switches. You can do this yourself. However, if the replacement did not help much, the best solution would be to turn to a professional.
Window lifter does not work - repair
If the window regulator on your car has stopped working, there could be many reasons for this. But, in general, all problems can be combined into two large groups: electrical failures and mechanical defects of the mechanism. In both cases, everything can be fixed with your own hands. In this article, we will analyze the main problems from both groups.
Replacing the AirBag steering cable on Kalina
Before proceeding with this repair, it is necessary to disconnect the negative terminal from the car battery. After at least 10 minutes have passed, you can start working. There are several steps you need to do first:
Below everything will be shown using the example of a Priora car, but there will be no difference in this procedure.
The casing of the cable is secured at the top and bottom using self-tapping screws - there are four of them in total. Of course, they are unscrewed using a Phillips screwdriver.
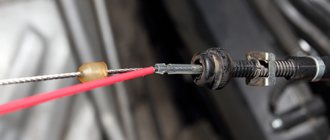
After that, you need to disconnect the power wires, having first freed their terminals from the latches in the case.
And now the cable can be removed without any problems:
Installation of this part occurs in the reverse order of removal. As for the cost of the ring, the price will be quite high - from 1600 to 2100 rubles, depending on the place of purchase and the type (old or new). When replacing, after installing a new cable, you should be careful when connecting the power wires, especially with the airbag power supply block - if it is damaged, it will be almost impossible to restore the connector.
Steering column switch (cable) Lada Priora, Kalina up to 2011 with airbag 1118-3709315-02
Article: 1118-3709351-02
Applicability: Lada Priora VAZ 2170, 2171, 2172 Lada Kalina VAZ 1117, 1118, 1119 until 2011, equipped with an airbag.
When ordering, in the “Order Comments” line, indicate the model and year of manufacture of your car.
For your convenience, we have various methods of delivery and payment for goods:
Order of shipment to regions of the Russian Federation.
- Place an order through the website or by phone.
- The manager contacts you by phone and clarifies the order details and payment method.
- You pay the bill through the bank, after the money arrives in our bank account (usually 1-3 days after payment for the goods), when paying through electronic money systems (funds are credited within a day), we deliver the goods to the transport company.
Manufacturers and prices of analogues
Analogs include frame, frameless, and hybrid brushes. There are several options on the market. Choose the one that suits you best - no matter whether it has a frame or not. The main thing is not to let the old windshield wiper start to scratch the windshield or rear window.
When replacing cleaning brushes, use the following dimensions in millimeters (driver - passenger side):
- 630 – 480;
- 530 – 510;
- 510 – 500.
Other layouts are considered by car owners to be not as effective. Among the well-known analogs of windshield wiper blades are:
- Bosch Aerotwin - frameless, made in Belgium. Full name: Bosch aerotwin retrofitar 532 s. Price – 1200-1300 rubles. The length of the driver's seat is 53 cm, the passenger's length is 50 cm. Sold as a set.
- Bosch Twin is a simpler model. They have the same dimensions, but despite the lower price they are famous for their reliability. The cost is about 800 rubles.
- Bosch Eco is the most economical option. They are inexpensive and sold individually. Price – 300 rubles for one brush. Length – 50 cm.
- Denso Hybrid is recognized as almost the best model on the market. Withstands cold and heat. Price per piece – 500 rubles. Length 50 cm.
- Alca - simple, 500 rubles apiece. The length is 50 cm, but on the passenger side an area of approximately 5 cm wide is left uncovered.
Read more: Which timing belt is better to choose from the manufacturer?
Stories from our readers
“Fucking basin. "
Hi all! My name is Mikhail, now I’ll tell you a story about how I managed to exchange my two-wheeler for a 2010 Camry. It all started with the fact that I began to be wildly irritated by the breakdowns of the two-wheeler, it seemed like nothing serious was broken, but damn it, there were so many little things that really started to irritate me. This is where the idea arose that it was time to change the car to a foreign car. The choice fell on the melting Camry of the tenth years.
Yes, I had matured morally, but financially I just couldn’t handle it. I’ll say right away that I am against loans and taking a car, especially not a new one, on credit is unreasonable. My salary is 24k a month, so collecting 600-700 thousand is almost impossible for me. I started looking for different ways to make money on the Internet. You can’t imagine how many scams there are, what I haven’t tried: sports betting, network marketing, and even the volcano casino, where I successfully lost about 10 thousand ((The only direction in which it seemed to me that I could make money was currency trading on the stock exchange, they call it Forex. But when I started delving into it, I realized that it was very difficult for me. I continued to dig further and came across binary options. The essence is the same as in Forex, but it’s much easier to understand. I started reading forums, studying trading strategies. I tried it on a demo account, then opened a real account. To be honest, I didn’t manage to start earning money right away, until I understood all the mechanics of options, I lost about 3,000 rubles, but as it turned out, it was a precious experience. Now I earn 5-7 thousand rubles a day. I managed to get the car buy after half a year, but in my opinion this is a good result, and it’s not about the car, my life has changed, I naturally quit my job, I have more free time for myself and my family. You’ll laugh, but I work directly on the phone)) If If you want to change your life like me, then here’s what I advise you to do right now: 1. Register on the site 2. Practice on a Demo account (it’s free). 3. As soon as you get something on the Demo account, top up your REAL ACCOUNT and go to REAL MONEY! I also advise you to download the application to your phone, it’s much more convenient to work from your phone. Download here.
The steering column switches from Priora, Kalina or Chevy Niva are the same, the only difference is that there is an additional button on the right switch to control the On-Board Computer (there is no button on the switches from Chevy Niva).
The connector for these switches is the same as the decimal one and there will be no problems with installation. But there is one big “but” here - the shape of the steering column switch from the Chevy Niva, Kalina, Priora differs in shape from the switches of the VAZ 2110.
That is, the paddle shifters from the Priora are further from the steering wheel than the ten-wheel ones, and this is not entirely convenient. See for yourself. To eliminate this misunderstanding with the remoteness of the levers, all possible discussions begin on the topic “how to make the steering column switches from a Chevy Niva closer to the steering wheel.” They try to replace the steering wheel, lengthen the steering shaft manually or install a steering shaft from Kalina. They try to bend the steering column switches, cut them off, glue them at a different angle, etc. (I’ll say right away that it’s impossible to bend the steering column switch under heat, and gluing it with glue is somehow not reliable, because we are talking about your safety on the road!)
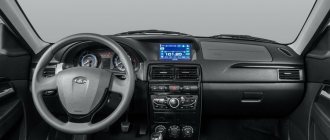
The top photo is a Virage steering wheel (the distance from the steering wheel is the same as a regular steering wheel) with ten paddle shifters. The distance to the levers is 8 cm.
The bottom photo shows a Kalinovsky steering wheel for tens with a casing (as in Option 2) and steering columns from a Chevy Niva. The distance to the levers is 11cm. It turns out that if you change the steering column switches to Priorovsky ones without changing the steering shaft, then the distance to the levers will be 3 cm further.
Reasons for the breakdown of the ICC
As it would seem, the failure of the light control module on a Priora depends on the number of times the headlights are turned on and off, but this is not the case. Most breakdowns occur not due to the physical impact of a person on a given electrical appliance, but precisely due to the load from constantly switched on headlights. How is this explained?! Driving for a long time with the headlights on provokes heating of the tracks in the MUS board, thereby, when the electrical wiring heats up, its resistance increases and these tracks break.
Priora with daytime running lights
This problem occurs quite often and most prior managers run to the store and buy a new module at a very expensive price. Never rush into buying an ICC as it can be repaired without spending a penny.
If the light control module fails on the road, then you can read how to turn on the lights when the MUS is not working on a Priora here.