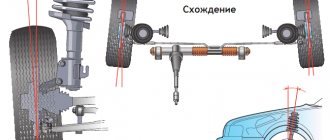
Incorrect adjustment of the VAZ 2172 pressure regulator drive can cause skidding or pulling to the side when braking, reducing braking efficiency.
You will need: a “13” key, wire with a diameter of 2.0–2.1 mm.
1. Place the car on the inspection ditch and press the rear part of the Priora fret several times with a force of about 400–500 N (40–50 kgf) to set the rear suspension to the middle position.
2. Loosen the front bolt securing the VAZ 2171 regulator to the bracket.
3. Using a wire as a feeler gauge, adjust the bracket so that the gap between the drive lever and the lever spring is 2.0–2.1 mm.
4. To do this, move the drive lever by the protrusion. In this position, tighten the bolt.
5. If the pressure regulator is correctly adjusted, when braking from a speed of about 40 km/h on a horizontal section of paved road, the front wheels should lock slightly earlier than the rear wheels (this can be determined by an observer outside the Lada Priora). Otherwise, increase the gap (if the rear wheels lock earlier than the front ones) or decrease it (if the rear wheels lock much later than the front ones). After this, check the adjustment again by braking and repeat if necessary.
Many people have heard that there is a “sorcerer” in the braking systems of VAZ cars, but not everyone knows about the importance of this device. We evaluate its impact on braking efficiency.
“The sorcerer”, or, according to the catalogue, the pressure regulator in the brake drive, it was not for nothing that people received such an apt nickname: no one really knows how it works, but, they say, being faulty, it can present an unpleasant surprise - make the car dance in an emergency. braking. This is where the insidiousness of the “sorcerer” lies: during normal operation, without braking to the floor, its work or inaction is practically not felt, but when its help is especially needed, it may not come. The pistons have soured, the rod or drive lever has broken off, or you installed a new one instead of a faulty regulator, but for the time being you do not know that the unit is defective or misadjusted. How dangerous is this?
Why do you need a brake force regulator?
The function of the regulator is to temporarily reduce the braking force during heavy braking. The fact is that force evenly distributed on the rear and front axles can lead to a skid of the car. If the rear brakes start working a little later and weaker than the front ones, this does not happen.
Based on the above, we can conclude that the sorcerer is an element of the car’s safety system, partly preserving its stability on the road when the brake pedal is pressed in an emergency. On modern models, this function is performed by ABS. That is why there is no need today to use a technically outdated device in production.
How to bleed the brake system on a VAZ 2113-VAZ 2115?
Note! Bleeding the brakes is carried out on a car with an assistant, although it is possible without one, but it will be more difficult, and the article itself is written on bleeding the system only with an assistant!
On cars of the Samara 2 family, the bleeding system must be replaced in sequence, namely first the rear right wheel, then the front left, then the rear left and only after that the front right, generally diagonally starting from the rear wheel first!
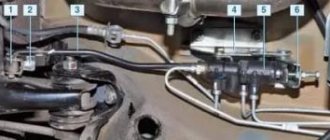
1) At the very beginning of the operation, open the hood of the car and then unscrew the cap of the reservoir containing the brake fluid by hand. (The location of this cover is indicated by an arrow in the photo below, but only it is turned out)
2) Then, if possible, take brake fluid of the same brand, and add it to the MAX mark in the same tank, and if you bought new fluid and decided to replace it, then for more detailed information on replacing brake fluid, see article: “Replacing brake fluid on a VAZ”
(By the way, in this article to which a link is given, at the very bottom there will be a section “Important!”, be sure to read it, a lot of interesting things are said there). 3) Next on the rear right wheel, find a small cap that covers the bleeder fitting, and after you find this cap, remove it and clean it of dirt
3) Next on the rear right wheel, find a small cap that covers the bleeder fitting, and after you find this cap, remove it and clean it of dirt.
4) After this cap is removed from the fitting, take the pre-prepared hose in your hands and put one end of it on the fitting, and lower the other end into a transparent plastic bottle, preferably. (If you don’t understand about the hose and the bottle, then for an example with a hose and this very bottle, see the photo below in paragraph “6”)
Note! The bottle into which you will lower the hose must be filled with brake fluid and the tip of the hose must be in this very fluid!
5) Then, when everything is done, tell your assistant to get behind the wheel of your car and then let him smoothly press the brake pedal 7-8 times and at the very end, that is, when he presses the last eighth time, let him press this pedal will remain pressed all the way.
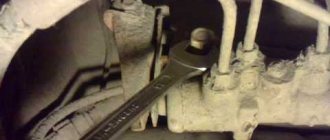
6) And at this time, start using a wrench to carefully unscrew the bleeder fitting, but in no case do you need to unscrew it completely, you just need to loosen it a little by 2-3 turns and after which you should see how the brake fluid goes into the bottle liquid.
Note! Wait and watch carefully how the brake fluid drains, by the way, you will see in it those same air bubbles that should not be present in the system under any circumstances, so continue to drain the fluid from the system until the release of bubbles into the bottles stops, and when the release of bubbles will stop, then screw the fitting all the way and only after that let your assistant take his foot off the pedal!
Be sure to keep an eye on the level in the tank while the fluid is draining; under no circumstances allow this level to drop to zero, otherwise air will get into the system and you will have to start pumping the brakes all over again, so always keep an eye on the fluid and top it up if possible !
7) After your rear right wheel has been bled, do exactly the same operation with the left front one, the same fitting on the front wheels is located slightly differently, see the photo below for more details:
Note! When this circuit is pumped, proceed to bleeding the next circuit, that is, the rear left wheel and then the front right!
Additional video clip: To make it more clear to you about how to bleed the brakes, we have prepared a video clip for you just below, it contains a bunch of excellent tips that will be useful to you in life, but this video, as you have already seen from the title, is aimed only at cars of the ninth family, but it also applies to cars of the Samara 2 family since the braking system of these two cars is almost identical!
One of the most mysterious, but no less important parts of the car is the brake force regulator (sorcerer VAZ 2114).
The importance of this part is that it regulates the behavior of the car under different braking conditions. When the regulator operates correctly, the braking distance is reduced, skidding and skidding are prevented
How does a sorcerer work?
The regulator itself consists of a cylinder, valve, spring and rod. The latter is connected to the rear beam, which ensures the operation of the VAZ-2109 sorcerer. Also, brake fluid circuits pass through the rear brake pressure regulator. For their mounting on the device there are 4 threaded entries. » alt=»»> How does the sorcerer regulator work on a VAZ? During emergency braking, the front of the car is pressed to the ground, and the rear is raised. This causes the regulator rod to move, which blocks the flow of fluid to the rear cylinders. A spring located under the valve prevents it from closing completely. Therefore, the rear mechanisms still work, but later and weaker than the front ones.
If the check light comes on when starting on a cold engine
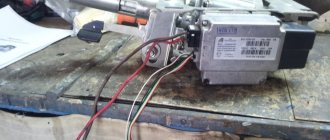
If, when you turn on the ignition, there is no characteristic sound of fuel pumping, and the engine icon lights up on the panel, then most likely the relay supplying power to the fuel pump is faulty.
The exact location of this device depends on the specific vehicle model and may be in the immediate vicinity of the fuel injection control unit or near the fuse box. The reasons why the relay does not operate can be either a malfunction of the device itself or a failure of the fuse protecting it.
A faulty fuel pump relay must be replaced with a new one, and if the fuse blows, it is imperative to determine and eliminate the cause of this problem, since possible short circuits in the electrical wiring can lead to a car fire.
If there are problems with starting, a cold engine runs unstably, then the fuel injectors are probably clogged or their electrical wiring is faulty. To fix the problem, you need to flush the injection device and eliminate damage to the electrical control circuits.
The reason that the check signal lights up after starting the engine may be a malfunction of the device for absorbing gasoline vapors - the adsorber.
This happens if the absorbing element (activated carbon) becomes unusable or the solenoid control valve fails.
Often the warning indicator lights up without any problems with the motor due to simple inattention. A fuel tank filler cap that is poorly tightened in a hurry reduces the pressure in the gas lines by allowing air to pass through. This leads to increased gasoline consumption, which the ECU evaluates as a malfunction and then the check lamp turns on on the panel.
Another reason could be a faulty air flow sensor. To ensure the optimal composition of the fuel mixture, the control unit controls air consumption using readings from the mass air flow sensor (MAF). If the air filter is not regularly replaced, the working element of the air flow control valve becomes clogged with dust particles, which leads to distortion of its readings.
In such a situation, the ECU switches to calculating the air consumed by the engine using indirect methods and warns the driver of a malfunction through the “Check” switched on. Also, if the mass air flow sensor fails, the engine does not start well at subzero ambient temperatures.
Replacing an air flow sensor is quite simple, but the cost of the part itself, depending on the make and model of the car, can reach 10 - 15 thousand rubles. Therefore, it is better not to skimp on routine maintenance of the machine and promptly purchase and install a high-quality air purification filter.
The occurrence of detonations during the combustion of gasoline in the cylinders is monitored using a knock sensor. If there is no information or a low signal level from the sensor, the ECU sends an error message to the dashboard.
Structurally, the sensor consists of a piezoelectric element and a resistor, so it cannot be repaired and can be replaced as an assembly.
The idle speed controller (IAC) is responsible for setting and maintaining the required speed in different engine operating modes. The regulator specially opens and closes the hole in the throttle body pipe for air dosing. As a result, the car can start moving immediately after starting the engine without a long warm-up.
Unstable operation of the engine at idle and an illuminated engine malfunction signal indicate a breakdown of the IAC and the need to replace it.
Setting the brake force regulator
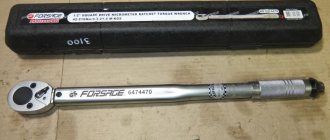
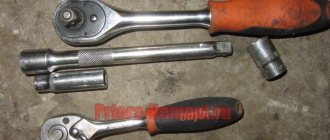
Adjustment of the sorcerer should be done on an overpass or inspection hole. At the same time, the car is unloaded and driven to the work site. To perform the manipulation you will need:
- Socket wrench 13 or corresponding socket;
- Drill diameter 2 mm.
To adjust the sorcerer, use a wrench to loosen the bolt securing it to the lever bracket. Next, use a screwdriver to move the bracket until the resulting gap allows you to insert a prepared two-millimeter drill into it. After this, the bolt is tightened.
Note: the brake pressure regulator of the VAZ-2110 and previous VAZ models turns sour during operation so that it is not possible to move its bracket. In such a situation, you should pour WD-40 liquid over the rusted area, wait 15-30 minutes, and then use a hammer to move the part to the side using a soft drift.
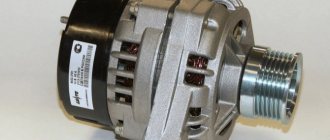
Normal generator voltage
Good afternoon Priora 2010 lux. The car is under warranty.
Problem: the voltage in the network when driving with consumers turned off is 13.4 V (measured according to the “State”). At idle, when parked with off. consumers, the voltage according to the “State” is 13.4V according to the multimeter, at the battery terminals, the same 13.4V, i.e. The “State” can be trusted.
Question. What should be the voltage at the battery terminals pr XX according to the standards (and what can you refer to, in which documents these standards are prescribed)?
Is the voltage measured only at idle with the consumers turned off, or are there still control measurements?
Can the guarantee providers send me away because they have installed an add-on that is not theirs? equipment if I change the voltage with the music turned off, etc. and so on.?
I watched it in motion - I was driving with the 13.5 consumers turned off, I turned on the headlights. light drops to 13.1. With ventilation, music and dimensions on - 13.4.
Question, is it normal that the headlights are bl. lights drop voltage by 0.4V?
Sorry for the possible off-topic, but in the “Electrical equipment” section I was asked a question: What should be the voltage at the terminals of a XX battery according to the standards (and what can you refer to, in which documents these standards are prescribed)? They don’t give you a manual for the battery when you sell a car, and there isn’t one on Akkom’s official website either. Therefore, a link to documents is needed, so as not to yell, but to convince the IPG that he is wrong.
| Alex357 user menu |
On September 19, I will go to replace the generator, the symptoms were as follows: 1) after the trip, when I parked I heard a short hum. 2) under the hood in the area of the generator there was smoke and the smell of burnt radio elements. 3) the light on the dashboard did not light up. 4) when measuring with the engine running, a decrease in voltage is observed as the speed increases.
After digging around on the forum, I measured the voltage, it was around 12 and a kopeck. I measured it directly on the generator, the same thing. Next was a trip to the IPG.
On my battery it says something like this: charge with voltage from 13.8 to 14.5
09.12.2011, 20:45#2User menu Seregich66I learned about the low voltage problem in Priora last year from my own experience. I was driving in the summer with air conditioning and stopped at the post office, when I returned five minutes later I couldn’t start, it turned out the battery was dead. I contacted the service center and they replaced the generator under warranty and apparently also recharged the battery. Summer is over and I forgot about the problem. However, this year I encountered this problem again and during the 3rd maintenance (at another service) I asked to check everything. And I was shocked
. Without loads, the voltage was about 13.4 - 13.7 Volts. And when the air conditioner was turned on, when the fans on the radiators started working, the voltage dropped to 12.3 Volts and this without turning on the lights, music or anything else. A local electrician actually killed me, he suggested turning off the lights in traffic jams. The IPGeshnik went to the OTKashniks, took out a tolmut and stated that their instructions say that the voltage in the Priora can be from 13.3 to 14-something volts and they say everything is fine with me, but when the air conditioner is turned on, it’s normal as much as 12 volts. In response to my objections that the battery can only be charged at a voltage of more than 12.6 volts, they told me that even at 12 volts the current strength should be greater (I almost fell over from this). Without hesitation, I wrote a complaint to the director just like that. They invited us to check it again, measured everything and again sent it only in writing and also offered to replace the battery (at our own expense, because by that time the density there had dropped very much). Well, everything really boiled over for me and I started looking in stores for the same battery as I had from the factory and I found it in the first battery store. There was a normal guy who sold it and gave me instructions for my battery (many thanks to him). And what do you think is written there, but it clearly says “operation of the battery is allowed with a working voltage regulator relay and an output voltage of 13.8-14.2 Volts”, while the voltage should remain in this range when the high beams and the heater fan are turned on. As a result, I wrote a total of 4 complaints and bought a new battery directly from the service (in order to receive instructions with their stamp), as well as several complaints to the AVTOVAZ hotline with a request to clarify this discrepancy with their technical specifications for the car. There is no result yet, AVTOVAZ is silent (although they promise to respond to any claim within 10 days), and I am waiting for an answer from the service to the 4th claim. He offered the service to reduce the cost of the car by 50 thousand rubles in a pre-trial manner. But I think they will refuse, so I’m preparing for trial.
I think our cause is just, victory will be ours!
Replacing the brake pressure regulator
The replacement of the sorcerer on VAZ-2110 cars and other vehicles equipped with an RTD is carried out on an overpass. You need a 13 mm spanner, a powerful screwdriver and a special 10 mm wrench designed for unscrewing brake pipes. Before starting work, the assembly must be cleaned of dirt and rust, doused with WD-40 or another penetrating compound, and then wait half an hour.
Work begins by unscrewing the bolt securing the bracket to the spring. Afterwards, the brake pipes are dismantled, the position of which is recommended to be pre-marked.
You can also unscrew the tube fittings with a regular wrench. However, using a special tool makes the job easier and reduces the likelihood of “licking” the edges. After the fittings, unscrew the two bolts securing the sorcerer to the body and remove the part. » alt=»»> It is necessary to install the new VAZ-2110 sorcerer in strict reverse order. After installing it and before adjusting the RTD, you should bleed the rear brake circuits. Next, the above-described procedure for setting up the sorcerer is performed.
How to choose a good quality fuel filter for Lada Priora?
When purchasing, you need to rely on the markings on the filter.
This will help eliminate the problem of purchasing an item that does not match the parameters and type of connection. Many motorists are interested in what kind of fuel filter is installed on the Priora and whether it is necessary to buy its analogue. The standard cleaner is Salut, but it can be replaced with another domestic or foreign consumable.
Most Priora drivers prefer products from BIG and SCT companies. They are distinguished by high cleaning quality and affordable cost.
The gasoline filter from Mann was well noted for the Lada Priora. But its price category is much higher and not every owner of domestic transport will be able to purchase the product. And, despite excellent reviews, the element will have to be changed according to the recommended mileage.
The Priora gasoline filter from MAHLE is distinguished by good quality lint-free inner paper. The price of the consumable is high, but it guarantees reliable operation of the car throughout the entire period of use. The domestic cleaner Nevsky attracted buyers with its low price. If worn-out elements were correctly replaced, there were no complaints about its operation.
After choosing a purifier, you need to take into account the specifics of its installation. First you need to find out how to change the fuel filter on a Priora carefully and quickly. Then you can begin repairs and restore your car. A mandatory step will be to check the correct installation.
Source
Examination
The operation of the VAZ-2109, 2110 and other AvtoVAZ models is checked on the move, in closed areas. To do this, accelerate the car to a speed of 40 km/h and sharply press the brake. The rear wheels should lock 1/2 second later than the front wheels.
The wheels are monitored by an assistant located outside the car. If wheel locking occurs noticeably later or does not occur at all, and also if the rear axle is locked simultaneously with the front, the sorcerer adjustment procedure is repeated.
To increase the response time of the rear brakes, the gap between the adjuster and the bracket is increased; to shorten it, it is reduced accordingly.
All the best! I was tormented by the wobbly brakes on the car, although everything is new in a circle, pads, drums, cylinders, springs... I decided to check what it was, the result is that the ass brakes sluggishly, and the rear left one is not at all clear how it is. no way. I thought the problem was in the tubes, but experimentally they determined that the problem was in the sorcerer. We begin to pump the second circuit (rear left, front right) and on the rear left the pedal goes a centimeter and stands as if dug out, although it should be pressed to the floor. My father and I scratched our heads for a long time, and in the end, after looking at the sorcerer’s device, it was decided to bleed the rear left with the valve not fully pressed (actually that
FakeHeader
Comments 28
Look in the rear left arch, there is a separator tank, there is a valve on top of it inserted through an elastic band. This valve flew out, and I washed the rust and sand fuel system three times until I accidentally discovered a valve dangling in the arch and a hole from it in the separator tank, everything that was on the road flew into it
Thanks, I'll take a look today
Look in the rear left arch, there is a separator tank, there is a valve on top of it inserted through an elastic band. This valve flew out, and I washed the rust and sand fuel system three times until I accidentally discovered a valve dangling in the arch and a hole from it in the separator tank, everything that was on the road flew into it
Do you have a photo? I don’t understand, we have an absorber under the hood and only the hose from it goes to the tank
Do not confuse the adsorber with the separator.
Look in the rear left arch, there is a separator tank, there is a valve on top of it inserted through an elastic band. This valve flew out, and I washed the rust and sand fuel system three times until I accidentally discovered a valve dangling in the arch and a hole from it in the separator tank, everything that was on the road flew into it
To prevent this from happening, you need to install fender liners!
:))))) God forbid, advise some grandfather. It must be assembled on the assembly line as expected and this will not happen
fender liners without screws novline, I installed these and everything is good! There seems to be information about them on the drive too, I advise you to look!
For some reason I am not a supporter of these mud collectors.
Rdt. When the gas is released, the pressure should not fall below 3.8 by 4 points. The RTD releases the pressure, and when the engine is stopped, the pressure in the fuel rail should not drop sharply to 0. It should remain at 2-2.5-3 bar (with the internal combustion engine not running)!
did you change the fuel filter?
Change the gas station, did you change the fuel too? check adsorber electromagnetic sensor
I changed the gas station, the same fuel (in the tank and fine cleaning)
it means the star is coming to the catalyst
Kats cut out, firmware for Euro2
DMRV means))) damn there are a lot of reasons for “being held by the ass”!
The pressure was restored, another pump was replaced, the reason “does not work” was the licked key of the kv star, the damper was loose and gave incorrect readings
Change the RTD... The pressure should be 3.8 But in general, before changing anything, you need to do diagnostics and not mindlessly change everything from one extreme to another
The RTD on the Priora releases pressure above 4 atm, right?
Change the RTD... The pressure should be 3.8 But in general, before changing anything, you need to do diagnostics and not mindlessly change everything from one extreme to another
It’s impossible to find a diagnostician during the day, they’ll charge 2k for checking (whether they’ll find it or not is unknown)
My friend lives in Surgut. Also a diagnostician. Has scanners and programs. If it is not very far from you, I recommend it. He won’t take extra, and he won’t take money for unresolved problems.
If I find anything here, in the rage I might roll it to Surgut
Change the RTD... The pressure should be 3.8 But in general, before changing anything, you need to do diagnostics and not mindlessly change everything from one extreme to another
Before changing the RTD, you should check the BN; it breaks 15 times more often than the RTD. You need to measure the fuel pressure head-on, directly. It should be at least 7-8 atm. If this is the case, the RTD is changed (if the corrugated hoses in the module are in good working order and there are no leaks) If the pressure is 1 11 m
Is the car jerking, loss of agility or the engine is difficult to start? One of the reasons for such malfunctions may be related to fuel pressure. Let's look at the instructions for measuring pressure in the fuel rail, as well as features that may arise during this activity.
Checking the fuel pressure is carried out similarly for all Lada cars (Granta, Kalina, Priora, Largus, Vesta, Niva 4x4 and XRAY), because All these models have the same type of engines.
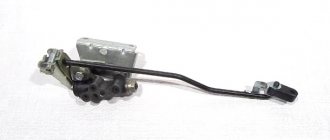
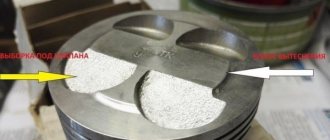
Checking the brake pressure regulator for souring:
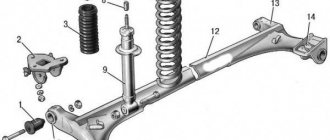
Have a helper press the brake pedal while you watch the pressure regulator rod (1), which should extend from the regulator body and act on the spring plate (2), pressing it against the drive lever (3). If the following sequence of operation occurs when you press the pedal, then all that remains is to adjust the “sorcerer”. It is advisable to check the adjustment of the sorcerer during each technical inspection, as well as during the replacement of springs and struts, and repair work on the rear beam.
What are the consequences of malfunctions in the operation of RDTs?
Over time, the engine starts more and more poorly. Fuel begins to come out of the cracks, which leads to a strong increase in its consumption. When the pressure changes unevenly, the dynamics of movement are disrupted, surges occur, and the car jerks during acceleration.
Is it possible to repair a failed part? In most cases, no, you have to completely change it. Repair units are almost always non-separable. Some experts suggest repairing the component, but this is dangerous. It is better to buy a new regulator - fortunately, it is inexpensive.
Determining violations in the operation of RTDs is not a very difficult task, which can be handled independently. Remember that this part of the machine needs to be checked periodically. By detecting the problem in time, you will protect important car components from rapid wear.
Source
Signs of a working brake pressure regulator
A working regulator (3) should show no signs of brake fluid leakage, the rod should be movable, and the gap between the drive lever and the plate should be 2 mm.
Malfunctioning Sorcerer
If you find that the gap between the lever and the plate (3) does not match or the sorcerer is immobile, you should replace or adjust it.
Product selection
AvtoVAZ offers an original fuel pump for 4,000 rubles. The original catalog number is 2112-1139009. But many car enthusiasts buy and install cheaper analogues instead of the original.
Analogs
Bosch fuel pump.
A non-original part is often no different in quality from the original. So, if the vehicle owner wants to save money, then you can install a non-original part. Let's consider the main offers of analogue companies:
- Fenox EFM33006O7 - the cost of such a part will be about 3,000 rubles.
- Bosch 0 560 454 035 - as they say, I took BOSCH, and ... (go ahead).
- Ween 192-0262 – the price on the spare parts market will be approximately 3,000 rubles.
- Pekar 2112-1139009 - will cost a little more than the previous two, the average price is 3,500 rubles.
- ATS 53453 - praised, but the price tag is good. We know they put one like this as a replacement for expensive originals on Peugeot.
ATS fuel pump.
Logbook VAZ 21713 (2012)
After installing the spacers under the struts, the car began to brake poorly because the sorcerer (distributor) needed to be adjusted.
The bolt on the distributor must be screwed in and tightened, 5 minutes. and the brakes are fine.
- More about this car:
- The battery in the key is dead.
- tore it off.
- Replacing the signal, installing fog lights and mesh.
- replacing rear struts.
- Light bulbs.
- Changed my shoes.
Here it is - the downside of spacers: you have to pay for everything).
I did the adjustment myself, but haven’t tested it yet, I’ll drive it tomorrow and maybe I still need to tighten it up.
and of course, any intervention entails something, but everything is done and reconfigured.
I'm slowly preparing for high tires.
yes))) like cross, I want a car higher up and on big wheels, but right now fortune has turned and in the near future there will be no normal income, but you have to drive a lot and far, and these tires are terribly uncomfortable, today I measured the wheels with a tape measure as if Volga 205*65*15, but they won’t fit, but 195*60*15 fits just fine, but you need a gearbox with a different gearbox, and most likely I’ll install a lock. Found a used one. Checkpoint for 1000 rubles. Now I’ll take my time looking for the GP and locking, I hope to assemble the gearbox by winter, but I’m just reluctant to buy winter tires, there are 14, and then I’ll also have to take summer ones. Most likely I’ll leave this winter one, and in the summer I’ll take the 60th. I’d like to drive with someone else’s blocking car, but we don’t have those.
To complete the picture, you can also change the row in the gearbox for an additional reduction.
But regarding the blocking, I got the impression that it makes sense to install it only in the fall-winter in really bad road conditions, since at speed without changing the driving style, these semi-makeshift blockings can cause an accident. If it gets really bad in winter, you can wear chains if you don’t mind the installation/removal procedure and don’t want to drive on the highways.
If you also select a row, then the golden gearbox will become, for me, not for racing.
I have many friends who are UAZ drivers, there are different locks, as they told me, it’s better to install one that will work when one of the wheels rotates almost halfway, then it won’t bite on the highway when turning and it will trample normally in the snow, but that’s all in theory it’s so good, I don’t want to experiment on myself, I found a gearbox, maybe I’ll be lucky in the disassembly and come across a gearbox from an old eight with a 1.1 engine, it has a good quality GP.
I won’t open my checkpoint, it’s better to let it lie))))
no no, I won’t wear chains, I’m not a car killer, I just want to ride on big wheels.
Yes, I looked at the prices for the main pairs and other rows at the checkpoint - high!
And regarding all these blockings, it really is written on the water when it will work and how long the adjustment will last.
Why all these troubles with the gearbox, are you going to drag the trailer over potholes?
and one more thing, I don’t live in the north, our roads are dry in winter, the blocking doesn’t do much good, I drive everywhere without problems, so for now the GP and 60 tires come first, and then maybe fortune will change face and change the car.
I won’t drag a trailer))) I have a truck))) right now I have a GP on 3.7 or 3.9, I don’t know exactly, but on 15*50*195 wheels it’s already a bit heavy, and if you put the 60s in, then you’ll start in the hill will not work, and the clutch will quickly end, and you can forget about 5th gear.