Features of the Grants thermostat
The factory installed thermostats on 14-series cars that were more similar in design and operating principle to those used on 9-series and 10-series cars. These are pump thermostats that operate only when the temperature reaches +90..95 degrees.
The main feature of the Granta thermostat is that it can be installed on a VAZ-2114 without major design changes. But engine performance will be much better, cooling efficiency will be higher. The thermostat's response temperature is approximately 60 degrees, which allows for normal movement in any traffic jams. Even standing for many hours in heavy traffic with the engine running will not cause the antifreeze to boil.
Dependence of thermostat response temperature and engine operating mode
Experienced owners of domestically produced cars and old foreign cars install different thermostats for summer and winter, which differ in response temperature. In summer, the temperature of all fluids in a cold engine is sufficient to lubricate rubbing parts and more or less effectively ignite the fuel, so long warm-up is not required. In winter, the engine has to warm up for a long time until the temperature of normal ignition of the fuel-air mixture and at least some effective lubrication. Therefore, in winter, the opening temperature of the thermostat valve should be noticeably higher than in summer.
The movement of the coolant in a small circle, especially if the interior heater is not turned on, leads to an extremely small loss of thermal energy, which means rapid heating of the engine, which reduces the warm-up time, which means it allows you to start moving a little earlier and reduces fuel consumption. The latter occurs because the flammability of the stoichiometric mixture (the ratio of fuel and air ensures maximum combustion of the latter) at low temperatures is very poor. Therefore, the carburetor or electronic control unit (ECU) of the injector increases the amount of gasoline supplied to the cylinders, thereby increasing the flammability of the mixture.
As the engine warms up, the ECU automatically and the carburetor manually or automatically (depending on its type) reduce the amount of gasoline entering the chambers to a stoichiometric mixture at a coolant temperature of 90–95 degrees. Accordingly, the faster the internal combustion engine warms up, the lower the fuel consumption will be and the sooner you can start driving, this is the operation of the thermostat in a VAZ 2110 or any other car.
Inexperienced car owners cannot always distinguish the malfunction of this part from other defects in the cooling system, for example, a clogged radiator. Therefore, an attempt to check the thermostat of a VAZ 2114 without removing it from the car does not always allow them to accurately determine the reason why the engine does not heat up well or overheats. To eliminate the influence of the thermostat, it is checked in the removed state; if it is in working order and turns on at the optimal temperature, then the problem is in other elements of the cooling system, including a thick layer of scale on the walls of the channels in the block and cylinder head.
Replacing the thermostat on a VAZ 2114 (2110, 2109, Kalina) 8 valves
Replacing the thermostat on VAZ 2114, Kalina, etc. cars, in my opinion, is an average, difficult job and can be done at home with your own hands. To make it easier for you to cope with it, I decided to fully describe the whole process using my own example with pictures.
When and in what cases should you change the thermostat?
Basically, the thermostat needs to be changed when it stops performing its function (this is logical) - namely, it jams or just starts to jam in one of the positions. It has only 2 positions - open and closed. Initially, while the engine is still cold, the thermostat is in the closed position, i.e. The coolant circulates only in a small circle (cooling jacket of the engine block). Upon reaching a certain temperature (80-90 degrees), the thermostat opens and allows antifreeze (antifreeze) to circulate in a large circle (through the cooling radiator).
If the thermostat is stuck in the closed position, hot fluid will not enter the radiator and the engine will overheat. If it is open, on the contrary, the liquid will constantly circulate in a large circle and the engine will be very strong! It takes a long time to warm up, which is also not very good.
Based on this, we can conclude that a stuck thermostat needs to be replaced.
How to change the thermostat on a VAZ 2114
As you already understood, I will show replacing the thermostat using the example of a VAZ 2114, 2110, Kalina, etc. with 8 valve engines.
To make the work easier, you will need to remove the air filter and its corrugation.
The first thing to do is drain the antifreeze (antifreeze) from the engine block. To do this, there is a good way to quickly drain antifreeze (antifreeze). You need to remove one of the throttle valve heating pipes and direct its end into some container.
Next, you need to remove the overflow hose from the expansion tank and plug the holes on the hose itself and the tank fitting with something.
Now, in order to force the liquid to flow into the substituted container, you also need to clog the fitting of the removed hose from the throttle valve with something, for example, with your finger, and blow into the expansion tank with your mouth (you can use a compressor, but for this you need another tank cap with an embedded fitting for the compressor).
If everything is done correctly, the liquid will begin to flow. You need to drain until it stops leaking (in my case it came out to about 3.5 liters).
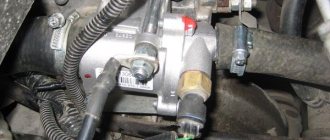
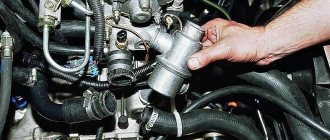
After draining the liquid, you can begin to remove the thermostat itself. The first thing you need to do is remove all the incoming and outgoing pipes and hoses (5 pieces in total). Also remove the terminal from the coolant temperature sensor.
The thermostat on the VAZ is secured with 2 nuts diagonally. It's time to unscrew them. The mass from the battery is also screwed to the top stud.
The thermostat installation site must be cleaned of dirt and adhered parts of the old gasket.
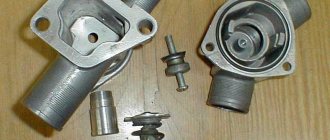
The VAZ 2114 (Kalina) thermostat itself consists of 2 parts. We will change the upper part, since this is where the valve is installed. It is secured with 3 hex bolts.
Please note that PRAMO thermostats cannot be installed instead of thermostats from AvtoVAZ, since the PRAMO thermostats have a crescent-shaped side that will prevent this from happening. But the side can be cut down and then everything is installed as expected
Before replacing the thermostat, do not forget to install a new rubber O-ring, it should be included in the kit.
We connect the two halves of the thermostat together and tighten the bolts well. You need to connect in the same way (same side) as it was, since otherwise you will not be able to connect the pipes (the fittings will “look” in other directions).
Instead of the old gasket, naturally, you need to install a new one; it is better to choose a paranite gasket rather than a paper one. In my case, there will only be sealant, since I did not buy a gasket :( Therefore, I cleaned the surface of the thermostat and the surface of the thermostat mounting on the engine, applied a thin layer of white sealant - the gasket, waited 20 minutes (following the instructions) and installed the thermostat in place.
Lada 2114 (16valve wells filled) › Logbook › THERMOSTATS. Quality of spare parts
Hi all!
This post will focus on thermostats. My car has covered 53,000 km in such a short mileage. I replaced a sufficient number of them.
At first, the new machine worked properly as expected. It warmed up quickly, the temperature remained stable in all modes, 87-88 degrees. The thermostat was factory THOMSON-AUTO 21082. But gradually the operating temperature decreased, the warm-up time increased, my feet froze in winter, I inserted all sorts of cardboard under the radiator. etc. It got to the point where the car didn’t reach more than 78 degrees. And at 24,000 km. I changed it for a new one. I installed PRAMO 21082 Lid and thermoelement. The body remains factory.
After replacement, everything was restored. Temperature 90, warming up quickly. Both in winter and in summer. The stove heated well. He left me for a year and a half, and last winter, the situation began to repeat itself. The warm-up time increased, the operating temperature decreased slightly. Up to 84 - 85 degrees. In winter this is not enough and it is noticeably cold in the cabin. A 16 valve engine should not operate at this temperature. Fuel consumption increases, wear increases. You wait a long time for it to warm up. But if you turn on the heater fan at first speed, the car takes forever to warm up, and the operating temperature drops another 2 degrees.
Well, I think it needs to be changed. I went to the market, bought a new one, the seller said, SALUTE is good, there will be no problems. I quickly installed it and added antifreeze. I started monitoring my temperature. As it turned out, it only gains 83 degrees even worse than the old one. It's also cold in the cabin. I drove with it for two weeks and threw it away.
Yeah. I no longer like this picture. Who knows what to put here. I went to Bibi and looked at what was there. Phenox, Luzar, finord. I bought Luzar 21082. I didn’t install it right away, I cooked it in a saucepan with a thermometer to check the opening temperature and, if anything, return it to the store.
Opened at about 85 degrees. As it is written. I installed it. I went for a ride. It keeps the temperature at 85-86. With the engine on 84. I skated on it this winter. But again with cardboard and a closed grille. And with the onset of warmer weather, I began to dislike the fact that in the heat of the city, in traffic jams, the cooling fan often began to turn on and slowly drop the temperature. It’s easier to say this: It’s fine on the highway, it holds 84 degrees. But as soon as the temperature exceeds 90-92 degrees in the city, a different picture begins. The machine starts working at 95-99 degrees. The fan cools the motor slowly. I do not like it. How to say then. In cold weather it is cold, and in hot weather it is hot. Poorly configured and misses. Doesn't work exactly.
This whole story with the cooling system is starting to piss me off. I’m already tired of draining, filling, unscrewing. I wanted to put back Pramo, which I removed. For summer it is normal, but when winter comes it will start to become underheated again.
In short, I went to LIPETSK-LADA. I took the factory thermostat, which is installed on the assembly line. THOMSON-AUTO 21082, which was on my car from the very beginning. Now I decided to change it together, with the body. I thought maybe there was something wrong in the housing itself, why the thermostats were working so unstable and letting everything go in a big circle.
When replacing the thermostat, you do not need to drain all the fluid from the engine. I did the following. I took a canister from the washer fluid, cut it and put it on the box, of course it’s a bit cramped in there, we do everything carefully so as not to spill the antifreeze. Afterwards, using a syringe, I poured all the antifreeze that had drained into a canister. While I was unscrewing it, it settled and if there were any specks, they settled to the bottom. After installation, fill everything back in.
Well, I've done everything and installed it. I started the car and started watching. And I understood right away. That everything is fine. Warming up is quick and the temperature stays the same. In all modes. And for the fan to work, you need to stand idle for a very long time. In short, it works as it should. But after such a f*ck with these thermostats, the question still worries me. How long will this one last?
The next day I went to Lipetsk to the university for an exam. On the way, I monitored the temperature and drove in different modes. The temperature remains constantly at 90 degrees. Its limits do not go beyond the permissible limits. 89,90,91,92. Everything is stable. The fan on valve motors turns on at 102 degrees. From this temperature it quickly drops to 94. And not like Luzar worked for me. The fan was spinning every now and then.
The temperature under load also does not change.
At a speed close to maximum, in 4th gear, the temperature is the same. The wind does not cool the engine.
I hope this thermostat will come in handy. By the way, during operations to remove pipes and unscrew clamps, change the factory clamps to NORMA clamps. factory ones, cutting pipes. Unscrew and tighten it a couple of times, the third time you will have to change the pipe.
Well, that’s all, the quality of the spare parts is of course crap, it’s hard to believe that the same thing happens on foreign cars.
Check and replacement
If the thermostat fails, it should be replaced immediately. It is impossible to say that the device has failed only on the basis of an initial check.
If the engine overheats during operation or does not warm up to operating temperatures quickly enough, the condition of the unit is checked. Based on the results obtained, replacement or repair is carried out.
The most effective way to check the thermostat is to remove it. The procedure is performed as follows:
- Unscrew the crankcase protection mounting bolts, after which the protection must be removed and placed aside for a while.
- Remove the cap from the expansion tank where the coolant is located.
- Place a clean container under the drain hole (if you plan to pour the same coolant back into the system), unscrew the drain plug from the cylinder block and remove all coolant from the cylinder block.
- Place a container under the drain hole of the cooling radiator, unscrew the plug and drain the antifreeze or antifreeze.
- Loosen the clamps holding the hoses.
- Disconnect the three hoses that are connected to your thermostat housing.
- Loosen the tension on the clamps and remove the thermostat along with the hose. The short hose is disconnected from the thermostat.
- Place the dismantled device in a container of water, which must be preheated to 78-80 degrees Celsius.
- Start heating the water, stirring the liquid occasionally. The water needs to be heated to approximately 87 degrees Celsius.
- If the thermostat is working properly, when the temperature reaches 87 degrees with an error of plus or minus 2 degrees, the main valve should open. If this does not happen, the device is faulty and requires replacement.
Replacement process To replace the thermostat, it is enough to remove the old one in accordance with the specified dismantling instructions, and reassemble the unit with an already working device in the reverse order.
What to choose?
Many owners of a VAZ 2109 with a carburetor complain that the factory thermostat is insufficiently efficient. Because of this, especially in winter, you have to suffer from slow heating, when it is difficult to achieve even 60 degrees.
To solve this problem, it is recommended to install a thermostat from an injection VAZ 2110 with 8 valves for the winter and for the entire period of operation of the nine. This is an improved element that has obvious advantages compared to the original thermostat for the carburetor VAZ 2109.
- You should install an injection thermostat starting from tens, taking into account the fact that we are not talking about the first versions of the VAZ 2110, but later, modernized ones.
- On 8-valve engines, dozens of thermostats have become dismountable, unlike the 16-valve VAZ 2110 and those devices that were initially installed from the factory on the VAZ 2109. This allows, in the event of a unit breakdown, to disassemble it and partially repair it without completely replacing the device.
- To repair a new thermostat, borrowed from a VAZ 2110 with an injector and 8 valves, it is often enough to disassemble the device and replace the thermoelement there.
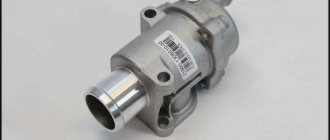
- The new unit turned out to be 50 millimeters shorter, which allows for more free space.
- The new element has lost many of the clamps that are relevant for thermostats from the VAZ 2109.
- The component has undergone quite a serious modification, which allows it to effectively maintain a stable temperature inside the engine cooling system.
Device from tens When replacing the thermostat on a VAZ 21099, make sure that you choose the device from the 8-valve “tens”. Cars with 16 valve engines use different devices in which the circulation system does not work the same way. Therefore, the elements will simply be incompatible.
Removal, repair and installation
If there is a suspicion that this part does not work or is not functioning correctly, then remove it and check it “on the table”. The method for removing the device from a carburetor and injection engine is different; this is caused both by the design of the part itself and by additional equipment that makes access to the drain plug difficult.
Removal from a carburetor engine
To remove the thermostat on a 2108–2115 with a carburetor engine, follow these steps:
- Drain the coolant from the block and radiator into a container, then, if it is in good condition, the liquid can be filtered and poured into the cooling system.
- Unscrew the clamps of all hoses suitable for the thermostat pipes.
- Remove all heating hoses from this part.
- Pull the thermostat out of the rubber hose through which it is connected to the engine block.
- Remove the part from the engine compartment.
This procedure is suitable for all thermostats, except those equipped with a flange for mounting to the engine. To disconnect the device from the motor, unscrew the fixing bolts and remove it.
Removal from injection engine
On cars with an injection engine, proceed as follows:
- Disconnect the wiring harness that goes to the mass air flow sensor (MAF).
- Loosen the clamps of the air duct connecting the air filter and throttle body, as well as the crankcase ventilation hoses.
- Disconnect the throttle cable from the throttle.
- Disconnect the air filter mounts.
- Pull out the air filter and place it on the engine.
- Unscrew and remove the ignition module.
- Drain the antifreeze.
- Loosen the clamps and remove all hoses from the thermostat.
- Disconnect the wire connectors from the sensors installed in this part.
- Unscrew the bolts securing the device body to the engine block.
- Disconnect the part from the engine block and remove it from the engine compartment.
Injection motor
This procedure applies to all injection VAZ 2108–2115 cars. Some technicians recommend removing the expansion tank; in their opinion, this will improve access to the device. If the thermostat is not equipped with a flange for mounting to the engine, then remove all clamps and hoses from the adapter hose through which it is connected to the flange.
Examination
You can only check a part with a collapsible housing; a non-demountable thermostat is replaced in case of any malfunctions, fortunately, this part is inexpensive. Remember: you can check the thermostat without removing the 16-valve injector from the VAZ 2112 car only in terms of its performance and approximate (±10 degrees) response temperature; a more accurate check is only possible with the device removed from the body.
To check the device's response temperature, use:
- stove with power control mode.
- a saucepan with water.
- thermometer with an upper limit of 110–130 degrees.
When working, exercise maximum caution, because water with a temperature of even 80 degrees, if it gets on the body, leads to second-degree burns. Remember, the thermostat in a VAZ 2114 operates at a coolant temperature of 85–105 degrees, so it must be checked under the same conditions.
To check the response temperature, proceed as follows:
- Pour water into a saucepan and place it on the stove. Inspect the valve to see if the valve is tightly closed; if it is not completely closed, the part is faulty.
- Place a thermostat in it. Place the thermometer in the water.
- Heat the water to a temperature of 70–80 degrees, then check whether the valve opens (visually assess the position of its parts). If the valve opens, the part is faulty.
- Slowly heat the water to a temperature of 95 degrees, the heating rate is no more than 1 degree/min.
- Monitor the thermometer and the condition of the valve, as soon as it begins to open, note the readings of the thermometer, this is the opening temperature.
- Evaluate how much the valve will open when operating temperature is reached; if not enough, then the part is faulty.
You can check the VAZ 2115 thermostat without removing it from the car, but this method will more accurately show the response temperature, which means you can choose a part that is more suitable for the temperature regime.
Replacing the thermostat thermostat
This operation can only be performed on vehicles equipped with a split-body device. If you want to replace a valve on a carburetor car, do the following:
- drain the coolant from the block and radiator;
- unscrew the clamps of the tubes approaching the front (farthest from the cylinder block) part of the device body;
- remove the corresponding hoses;
- Unscrew the 2 bolts connecting the parts of the device body to each other;
- remove the front part of the body (if it is seated on sealant, then pry it off with a knife);
- remove the old thermostat;
- clean its seat with a clean, lint-free cloth;
- remove traces of sealant from the mating areas;
- install a new gasket or apply sealant;
- insert a new valve;
- put on the front part of the housing and secure with bolts;
- put on the hoses and tighten the clamps;
- refill with new antifreeze.
Replacing the thermostat thermostat
If you fill in old coolant, filter it through several layers of gauze.
To replace the thermostat on a car with an injector, follow steps 1–7 of the list from the previous section, then follow the algorithm for a carburetor engine, and when assembling, follow the reverse sequence. After installing the new part, do not forget to check the VAZ 2114 thermostat without removing it from the car; if, after reaching the switch-on temperature of the device, both pipes of the main radiator began to heat up, then you did everything correctly.
Reasons to install a thermostat from “ten”
The 6-hole unit has been modified, when compared with the device installed in the “nine”, its advantages over the 5-hole version from 2109 are as follows:
- The device from the “ten” is 5 cm shorter than the standard version of the “nine”, so there will be more space under the hood.
- A more modern 6-hole thermostat works more stably, as a result, the temperature remains unchanged.
- In the event of a breakdown, you do not have to change the entire device, since it is dismountable, and if necessary, you can only change the thermoelement.
- When servicing, you won’t have to struggle with a large number of clamps, since the 6-hole version is secured with a rubber tube.
- It should be noted that until 2003, VAZ 2110s were also equipped with a device with five holes, so you need to buy a version from later releases.
No. 4 BAUTLER BTL0008T China 215 rub.
bautler
Sometimes it happens that Chinese spare parts are better than domestic ones. But the miracle did not happen. This one turned out to be complete x. and g...m. Above 85 gr. t of the engine never rose when driving. Only in traffic jams did it reach 91 degrees. Result: Either it’s a defect, or it’s set up for a complete opening. I don't recommend it.
Although if you put it on in the summer and take it off for the winter, then that’s it. Summer option so to speak. In my case, winter was approaching, and it was decided to send him after the others.
Installing a thermostat on a VAZ 2109
Installing a thermostat is not a complicated process that even a beginner can do.
But there are some nuances that are important to know
- Before installing a working device, you should clean the place where the device will be located from dirt and rust.
- A thin, uniform layer of neutral sealant must be applied to the surface that has been degreased. The main condition is that no chemical reaction occurs with the coolant.
- After applying the sealant, you must wait a period of time equal to 10 minutes for the sealant to dry.
- After this procedure, you can install a new node.
- When the thermostat is installed, pour the required amount of coolant into the system, making sure that no air lock occurs.
- To check the functioning of the normal mode, start the engine and inspect all places for fluid leaks.
- If liquid leaks are detected, liquidation work is carried out by tightening the fastening clamps.
- In most situations, after replacing the old thermostat with a new one, all unpleasant symptoms associated with a malfunction of the thermostat unit go away for a short period of time.
What is a thermostat?
As the name of the device suggests, it does something with temperature. More specifically, it helps switch fluid flows in the cooling system. Moreover, the thermostat, carburetor or injector are at the heart of the gasoline injection system and have the same composition and housing design. When operating any engine, it is necessary to ensure heating of the throttle assembly. And it is present in any injection system: both in the carburetor and in the injector.
The basis of any thermostat is a special plate, which is made of a material called bimetal. It reacts to temperature changes and is capable of deformation because of this. The switching of air flows is based on this effect: the plate moves the valve, which is fixed by springs. Having overcome their force, the plate moves the valve, opening the path for liquid flow to the main radiator to ensure effective cooling.
New and old VAZ-2110 thermostats: installation features and differences
The type of thermostat used on the VAZ-2110 depends on the year of manufacture of the vehicle.
Initially, the same devices were installed as on the “eights” and “nines”, but due to low efficiency and frequent breakdowns they had to be replaced.
The main differences of the new design (5-hole thermostat) are the ability to disassemble and replace only the starting (heat-sensitive) element.
On older machines, the device was connected to the motor block using a short pipe.
In new models, fixation is carried out using a pair of studs. In this case, between the thermostat and the power unit there is a paronite gasket, which can be treated with silicone-based sealant (this procedure is not always necessary).
After 2003, 5-hole thermostats gradually changed to 6-hole ones.
According to the manufacturers, they are stable and provide better performance in extreme cold.
Advantages of the new device:
- Stable coolant temperature;
- No malfunctions in the heater operation;
- Greater work resource.
After installing a 6-hole thermostat, the engine easily reaches operating temperature at 20-30 degrees below zero, even with the heater on.
You also need to know that the bypass channels in 5 and 6 hole thermostats are different. In the first it is 16 mm, and in the six hole it is 11 mm.
This affects the fact that the circulating antifreeze through the bypass channel of 11 mm in a small circle flows faster than through the channel of 16 mm, which means that the flow (volume) of coolant through the stove increases, so it will be warmer inside the car.
The device is installed in two ways:
- Classic;
- Alternative.
In the first and second cases, to complete the work you will need three liters of antifreeze, a gasket for the thermostat, filler and supply hoses, as well as a new thermostat.
In addition, stock up on 15-28 mm clamps (5-6 pieces will be required).
To avoid spilling coolant during installation, remove the pipe from the throttle assembly (going to the saxophone) and gradually drain the antifreeze until the leak stops. After that, continue working.
Dismantling
First, remove the old thermostat, exhaust pipe (part 2108-1303014-10) and 2 short intermediate hoses - all this will no longer be needed. Next you need to deal with the pump supply pipe. The 2108 has a pipe “with a hook”, and the 21082 thermostat requires a shorter pipe, “without a hook”. You can replace the standard pipe with a pipe from either a VAZ-2110 or a VAZ-2112 (part 1303055). It was not possible to find out exactly which model the pipe was needed from - there is a fair amount of confusion in stores. When purchasing, you should carefully look at the correspondence of the fasteners and pipes on the pipe, incl. long heater pipe on the right - their presence and direction may differ.
This completes the dismantling. You can clean the connections and check the hoses.
Now you can install the thermostat itself. It is installed on standard studs. Despite what some authors write, the length of the top stud is quite sufficient if you use narrow nuts. You can try to find a longer pin, but I couldn’t find a suitable one in the nearest spare parts stores - I only came across ones that were too long. We install the thermostat by first placing an angle hose on it. The hose fits a little askew, but that's not a big deal.
* - “fit” means fully consistent without tension, adjustments, cutting, filing, etc.
The warm-up duration is approximately the same, no significant difference was noticed. At 60 degrees, warm air is already subjectively felt.
After modernization, a constant stream of coolant appears, flowing through the steam removal hose into the expansion tank (in the standard version it is only present when the speed increases). This jet appears due to the fact that the diameter of the bypass hole in the new thermostat is smaller than in the old one. With increasing speed, as before, the jet increases. Closing the heater tap has almost no effect on the coolant pressure. There are no problems with pressure or leakage.
** — soon after installing the thermostat, the thermoelement was replaced, because the first one failed, see below.
Checking the thermostat VAZ 2109 | Repair VAZ 2108 2109 21099
Saturday, November 22nd, 2014
The thermostat of the VAZ 2109 car is designed to maintain the coolant temperature at an operating temperature of 90 degrees. The thermostat contains a thermoelement that operates at a temperature of 87 degrees. The VAZ 2109 thermostat regulates the circulation of coolant in the cooling system; As you know, the cooling system consists of two circuits: a small cooling circle and a large cooling circle. Small circle - coolant circulation bypasses the radiator of the cooling system: the pump drives coolant only through the cylinder head. A large circle is when, in addition to circulation through the engine cylinder block, fluid circulates through the radiator of the cooling system.
The principle of operation of the VAZ 2109 thermostat
In other words, the task of the VAZ 2109 thermostat is that the antifreeze temperature is less than 87 degrees, the large cooling circle is closed; the antifreeze temperature is 87 degrees or more, a large cooling circle opens. A large cooling circle is designed to prevent engine overheating; when the thermostat is open, antifreeze circulates through the radiator and cools.
Cooling system VAZ 2109
How can you check if the thermostat is working properly? If the VAZ 2109 overheats, or, on the contrary, takes too long to warm up, then checking the thermostat is mandatory. The main malfunctions of the VAZ 2109 thermostat are as follows: 1) Antifreeze circulates only in a small circle. That is, the thermostat does not open and does not release antifreeze into a large cooling circle. As a result, the engine overheats. 2) Antifreeze circulates constantly in a large cooling circle. That is, the thermostat is constantly open and antifreeze always circulates in both large and small circles at the same time. In this case, the VAZ 2109 engine takes a long time to warm up and does not warm up to operating temperature. 1) If the VAZ 2109 engine overheats, then the thermostat is checked as follows. We warm up the VAZ 2109 engine to a temperature of 90 degrees and open the hood. We touch the radiator hoses of the cooling system: the hose from the engine to the radiator should be hot, the hose from the radiator to the thermostat should also be hot.
Touching the radiator hoses of the VAZ 2109
Moreover, they must be the same temperature, since at an antifreeze temperature of 90 degrees, a working thermostat is open and the antifreeze circulates through it. If the hose from the engine is hot, and the hose to the thermostat is cold or slightly warm, then the thermostat is faulty, its thermocouple does not open and does not circulate antifreeze through the radiator of the VAZ 2109 cooling system. If both hoses to the radiator are hot, and the engine still overheats, then it is necessary check the fan switch sensor on the radiator and the pump. The fact that the hoses are hot means that the thermostat has opened, but the engine is overheating because there is no antifreeze circulation in the cooling system (the pump is faulty). If the pump is normal, but the fan does not turn on, or the fan on the radiator is faulty, then the engine may also overheat. 2) If the VAZ 2109 engine takes too long to warm up, then check the thermostat as follows. Warm up the engine, it is of course unlikely to heat up to 90 degrees, so that any temperature from 50 to 70 degrees is suitable for testing. Open the hood and touch the hoses to the radiator.
Touching the radiator hoses
The hose to the radiator from the engine should be hot, the hose from the radiator to the thermostat should be cold. The fact that the hose to the thermostat is cold indicates that the thermostat is closed and working. If both hoses are hot, or the hose to the thermostat is warm, it means that the thermostat is faulty: it always releases antifreeze into a large cooling circle, preventing the engine from warming up to operating temperature. As you can see, checking the VAZ 2109 thermostat is very simple; you don’t need it for this take it off and take it home, and then put it in hot water. Therefore, checking the VAZ 2109 thermostat without removing it is simple and very fast. Home
No. 5 thermostat PRAMO with Polish thermoelement Russia, Vladimir 300 rub.
pramovlad
I use it to this day, the flight is normal. Regulates temperature well. Even in traffic jams and in courtyards, the ventel is silent, only after a whole day of driving it occasionally reminds itself of itself. The engine warms up quite quickly. Bottom line: Good thermostat, for the money. I recommend.
I'm adding
The PRAMO thermostat bent at the end of winter. After the positive feedback, it started not working so well. Probably jinxed it. What was it? In winter, it warmed for a long time, and when the temperature reached operating temperature, I kept the fan at the limit of turning on the fan. But in the end it jammed into a small circle. Plus it was still leaking along the flaring. Bottom line: don’t take X and G!
How did these thermostats get me, maybe I’m the only one unlucky?
Preparing for replacement
In order for the car to be completely ready to replace the thermostat, you need to wait until the engine cools down to at least 40-50 degrees. It is extremely dangerous to work while it is hot; you can get burned. It is performed quite quickly on the VAZ-2109; the most difficult and tedious procedure is emptying the system. To do this, you need to use two drain holes, which are located in the lower part of the radiator (the plug is unscrewed by hand) and in the engine block (head bolt 13).
But what should you do if the system is filled with antifreeze, which is quite expensive? We must try to preserve it so that it is not expensive to repair the car. To do this, first of all, by opening the stove tap, unscrew the clamp on the pipe that goes to the throttle valve. It is necessary to drain the maximum possible amount of antifreeze through it. Yes, this procedure is slow, but it will save almost all the liquid. Only after this can you unscrew the plug on the radiator and on the engine block. And don’t forget to unscrew the cap on the expansion tank to increase the pressure.
The feasibility of installing a VAZ 2110 thermostat on a VAZ 2109
With the onset of cold weather and a corresponding drop in temperature, it becomes cold in the car. In addition, much more time is spent on warming up the engine and coolant to turn on the heater and heat the interior. In this regard, many drivers in the cooling system of the “nine” (VAZ 2109) replace the standard thermostat with a six-hole thermostat from the “ten” (VAZ 2110).
Thanks to the modernization compared to the factory one, this thermostat has many advantages, and the main ones include the following.
First of all, it ensures more stable temperature maintenance.
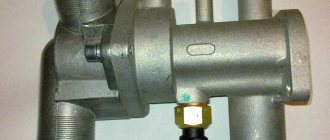
In addition, there are much fewer connections on the clamps. Moreover, the thermostat is attached to the outlet pipe using a rubber connecting tube.
Please note that this thermostat is collapsible, so replacement of thermoelements is carried out separately from the body, and due to the shorter (5 cm compared to the factory) new thermostat, there is much more space. To remove the thermostat without spilling antifreeze, first the pipe on the throttle assembly is released and everything that can spill out is poured into a container prepared in advance.
Then you need to very carefully and carefully disconnect the hoses from the stove without spilling the antifreeze. The six hole thermostat is connected as follows:
First you need to install a tube through which the antifreeze will be redirected back to the pump, the so-called “saxophone”
This tube is shorter than (VAZ 2109). Although newer cars are equipped with such a tube at the factory. In addition, you need to stock up on: clamps, hoses and gaskets for a new thermostat
First, you need to install a tube through which the antifreeze will be redirected back to the pump, the so-called “saxophone”. This tube is shorter than (VAZ 2109). Although newer cars are equipped with such a tube at the factory. In addition, you need to stock up on: clamps, hoses and gaskets for the new thermostat.
It is also advisable to try on the thermostat at the installation site to make sure that the pipes need to be replaced and, if necessary, to determine their exact length. Usually this is how a six-hole thermostat is connected according to the standard circuit, and there is also another modernized circuit.
The peculiarity of this connection is that after the heat is transferred, the coolant is directed back to the heat-sensitive element, cooling it, preventing the large circle from opening until the antifreeze supplied from the stove heats up.
As a result, the thermostat also takes into account the temperature of the antifreeze from the stove radiator, making the car warmer, and the temperature regime is much more stable, and a special tee is required for connection.
Finding high-quality traction batteries is quite difficult. therefore, the best option is to order them from a reliable and trusted seller at affordable prices. (Don't forget to vote) Loading ...
Operating principle
By design, a thermostat is a fairly simple device that serves to redistribute the circulation of liquid over small or large cooling circles depending on its temperature.
The standard 2114 thermostat, installed from the factory, includes the following parts:
- frame;
- bypass valve spring;
- bypass valve;
- main valve spring;
- main valve;
- pipes;
- piston with holder;
- temperature sensitive element.
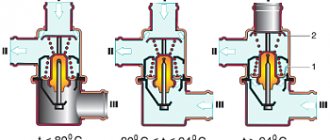
The latter, in fact, is the key to the entire operation of the thermostat. So, after starting the engine, the coolant in the system heats up and, with the main valve closed, begins to circulate in a small circle, passing through the thermostat and heating the sensitive element (which, in turn, begins to expand and put pressure on the valve).
At the moment when the coolant reaches a temperature of 87 C, the valve opens slightly and coolant begins to flow into a large circle. And when the liquid reaches a temperature of 102 C, the valve opens completely and all circulation begins to flow in a large circle (through the radiator).
Thermostat circuit
In turn, after the engine of the machine is turned off and the liquid in the system begins to cool, the thermoelement will begin to compress and the valve will return to its original position under the action of the return spring.
But, sometimes it happens that for one reason or another (wear, damage, manufacturing defects) the VAZ 2114 thermostat becomes stuck in one position or another. In this situation, either the engine warms up for an extremely long time or, conversely, it can overheat very quickly.
The latter is especially dangerous because it can cause serious damage and even destruction to the engine, resulting in the need for major repairs.
Replacing the thermostat VAZ-2110
It is necessary to be able to dismantle the main element of the cooling system not only for its replacement, but also for periodic inspection. So prepare your tools:
- two canisters (clean, plastic, 5 liters);
- thoroughly washed plastic bottle;
- a medium-sized Phillips screwdriver;
- paint cone;
- wrenches (sizes 8 and 12).
Repair work is carried out according to the instructions:
- Disassembly should begin with the air filter housing. Using a size 8 wrench, unscrew the bolts holding it in place. There are only two of them.
- Carefully inspect the housing and remove the sensor located on it.
- After these procedures, the protective shell can be removed from the filter. Remove the filter itself.
- Immediately after carrying out the procedures described above, you will be able to see the thermostat. Loosen the clamp that was hidden under the body.
- Cut one plastic canister - remove one of its side walls so that the drain hole is located at the bottom. This way you will get a convenient container into which you can collect antifreeze from the pipes. Using a hole with a lid, you can easily transfer the liquid into a whole canister.
- Separate the neck from the plastic bottle.
- Place the cut canister under the pipes at the moments when you disconnect them. Do this in the following sequence:
- separate from the expansion tank;
- from the radiator;
- from the stove;
- from the motor.
- During this repair, you can immediately replace the pipes. Inspect them for wear and, if necessary, install new ones immediately.
- After removing the thermostat, a little more coolant will fall into the prepared canister, so do not remove the container ahead of time.
- Using a filter from a painting paper cone, strain the antifreeze into a clean canister.
- Install the new part and tighten all clamps. Pour coolant into the expansion tank. Assemble the air filter.
During the repair process, it is best to replace the antifreeze and air filter. Immediately after assembly, start the engine to remove any air pockets from the cooling system. You should not move away immediately; to do this, you will need to warm up the engine at idle speed.
Finally, check the fluid level in the expansion tank. If it falls, check the build quality. If necessary, add antifreeze.
Scheme and design
In order to promptly determine the malfunction, check or replace the thermostat, you must first understand its circuit and design elements.
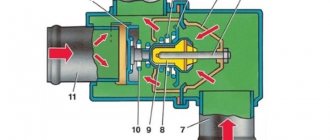
The scheme presented above is deciphered as follows.
| Item number | What is this? |
| 1. | Inlet pipe coming from the radiator |
| 2. | Rubber insert |
| 3. | Heat sensitive solid filler |
| 4. | Bypass valve spring |
| 5. | Inlet pipe coming from the engine |
| 6. | Bypass valve |
| 7. | Outlet pipe going to the pump |
| 8. | Main valve spring |
| 9. | Main valve |
| 10. | Pipe coming from the expansion tank |
| 11. | Piston |
Installing a thermostat on a VAZ 2109
Installing a thermostat is not a complicated process that even a beginner can do.
But there are some nuances that are important to know
- Before installing a working device, you should clean the place where the device will be located from dirt and rust.
- A thin, uniform layer of neutral sealant must be applied to the surface that has been degreased. The main condition is that no chemical reaction occurs with the coolant.
- After applying the sealant, you must wait a period of time equal to 10 minutes for the sealant to dry.
- After this procedure, you can install a new node.
- When the thermostat is installed, pour the required amount of coolant into the system, making sure that no air lock occurs.
- To check the functioning of the normal mode, start the engine and inspect all places for fluid leaks.
- If liquid leaks are detected, liquidation work is carried out by tightening the fastening clamps.
- In most situations, after replacing the old thermostat with a new one, all unpleasant symptoms associated with a malfunction of the thermostat unit go away for a short period of time.
Checking the Thermostat
In order to check the functionality of the Lada Granta part on VAZ 2114, 2109, etc. it is necessary to pour coolant into the system and wait until it warms up to operating temperature - 90 - 95 degrees.
Make sure there are no coolant leaks
First of all, pay attention to the thermostat. At the junction of the pipes, there should be no noticeable drips or the appearance of wet spots
If after 5 minutes of engine operation these symptoms are not detected, then the installation was completed correctly.
Further, if the stove is VAZ 2114, 2109, etc. turned off, you need to turn it on and wait until the liquid heats up. After this, you should feel a flow of warm air in the cabin, as the Granta thermostat helps the stove work better. If heat does not flow, then the part is defective and the valve inside it does not work.
How to make a replacement
In order to install a thermostat from ten to 14, you will need to prepare a nominal set of tools - keys, screwdrivers, pliers, and also turn off the car engine (if it is running) and wait for it to cool completely.
After the coolant in the system is no longer hot, you can begin the replacement itself, which is performed as follows:
- Unscrew the plug and drain the coolant from the radiator.
- Open the expansion tank cap.
- Unscrew the drain plug located behind the ignition module, and then drain the remaining antifreeze from the system (if access to the plug turns out to be difficult and inconvenient, remove the engine protection).
- Remove the air filter housing.
- After loosening the fasteners, remove the clamps from the pipes suitable for the thermostat.
- Remove the pipes themselves.
- Unscrew the nuts securing the thermostat housing and remove the device.
Before installing a new thermostat, its contact surface should be cleaned, covered with a layer of sealant and equipped with a new gasket (which should be purchased along with the new 6-hole thermostat).
Installing a VAZ 2110 thermostat on a VAZ 2114
Installing a new thermostat is performed in exactly the same order as dismantling the old one, but in reverse order. In this case, you will first need to select a plug and plug the outlet hole provided for connecting the throttle heating pipe (you can learn more about the principle of connecting a thermostat from 2110 using the diagram below).
After the device is installed, you should wait for the sealant to harden on the connections (about 1 hour), then pour new coolant into the system and start the engine, allowing it to warm up completely.
Simultaneously with its warming up, you will be able to verify the effectiveness of the tuning performed.
Thermostat 2110 to 2114
At the end of the conversation, it should be added that when replacing a thermostat, you should fill in new coolant (necessarily of high quality), and not use the old one - this will extend the life of the device. In addition, it is necessary to inspect the surface of all pipes for cracks or damage and, if any are found, replace them immediately.
This will protect you from possible leaks, frequent replenishment of the coolant level and engine overheating during long trips.