The thermostat is an integral element of the cooling system of the VAZ-2110, requiring careful care, performance monitoring and timely replacement.
In this article we will consider the following questions:
- What is a thermostat, and what are the features of its operation?
- What engines are installed on various modifications of the VAZ-2110?
- How to recognize a device malfunction?
- How to replace on injection and carburetor cars?
- How to check performance, and what pitfalls are possible?
- Should you do the work yourself or trust the professionals?
The information provided is sufficient to promptly identify the malfunction, decide on further actions and replace the failed device.
Purpose of the VAZ-2110 thermostat, design and principle of operation
Thermostat is a unit installed in the car’s cooling system that regulates the direction of coolant in a large and small circle (depending on the engine temperature).
The node performs two tasks:
- Helps the engine warm up faster in cold weather;
- Eliminates the risk of overheating.
Both functions are realized thanks to temperature control and the ability of the main valve to change its position (open or close under the action of the trigger element).
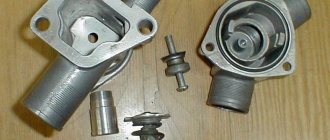
Structurally, the VAZ 2110 thermostat is a unit with a cylindrical cross-section and three, five or six outputs, depending on the design.
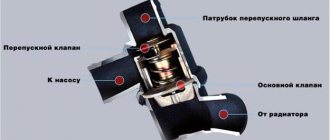
Main exits:
- To the pump;
- From the radiator;
- From the engine.
The functionality of the device is ensured by the following elements:
- Bypass valve;
- Main valve and its spring;
- Piston and its holder;
- Heat sensitive composition;
- Bypass valve spring.
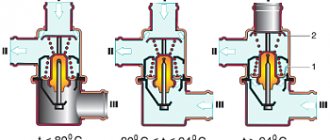
Operating principle:
- Inside the device there is a valve with a special substance inside, which expands (contracts) as the temperature increases (decreases).
- When a certain temperature level is reached (80.6-81.5 degrees Celsius), the mentioned substance presses on the valve, gradually opens it and directs the flow of coolant through the outlet pipe to the radiator (large circle).
When 94 degrees Celsius is reached, the main valve opens to its maximum (about six millimeters), and the bypass valve closes. - At low temperatures, the thermostat bypass valve is in the open position (the main one is closed), and the coolant flows in a small circle (without the participation of the radiator). This ensures quick warm-up of the engine.
Read more about the principle of operation of the thermostat here.
A stuck or other valve malfunction can cause the following problems:
- Overheating of the motor with the ensuing consequences;
- Inability of the power unit to reach the required temperature (relevant in winter).
Replacement
Before you begin replacing the thermostat, you must purchase the necessary consumables. To work you will need:
- Thermostat from Lada Granta. The kit should include a gasket. Models with a plastic body are not suitable for replacement.
- A pipe for connecting to the lower “bathtub” of the radiator, also from Granta.
- Steel studs “M8”, at least 9 cm long. If possible, it is better to purchase stainless steel fasteners.
- Steel washer. Required for installation under a temperature sensor.
- Connecting clamps.
- Metal tee.
- Silicone-based sealant with a temperature threshold of at least 300 degrees.
Below is a step-by-step process for replacing a thermostat from Granta.
- Allow the power unit to cool.
- Drain some of the antifreeze into a container.
- Remove all drain pipes from the standard thermostat. The connections between the pipes should be checked for cracks. The inside of the pipes must be cleaned of dirt and oxidation.
- Unscrew the fastening studs. Before dismantling, it is necessary to clean the area where the pin enters the block. Aluminum often oxidizes the metal. The pin may break when unscrewed.
- Clean the seat from old gasket and sealant. It is better to clean it with a wooden strip so as not to deform the joint.
- Screw in the prepared studs. It is very important to lubricate the threads with grease. This way the fasteners will not oxidize in contact with aluminum. Reinstall the gasket. The factory gasket does not need to be lubricated with a sealant.
- Install the new circulation regulator in place.
- Install a pipe from the lower “bath” of the radiator to the engine drain.
- Plug the pipe from the throttle valve. For this, two steel clamps and an M10 bolt are used.
- Install all pipes. When installing, shorten the heating pipe by 5 centimeters and secure it. An uncut hose will stick out and will be difficult to install and then secure.
- Connect the drains from the heating system and expansion tank through a tee.
- Reinstall the temperature sensor.
- Pour the missing amount of antifreeze into the system.
- Start the power unit.
It is very important to coat all connections with sealant. This will prevent depressurization and protect the inner surface of the thermostat pipes and outlets.
For the VAZ-2110, the best choice would be a thermostat with a temperature threshold of 92 degrees. Such a regulator will more effectively warm up the car interior. When installing, you should carefully select antifreeze for such a thermocouple.
What engines does the VAZ 2110 come with?
The VAZ-2110 car has been produced since 1996. At the same time, the power part gradually underwent changes:
- 21100 - base model produced in 1996-2000. The car was equipped with an engine with 8 valves and a volume of 1.5 liters (power 69 hp);
- 21101 is a model produced since 2004. Engine - injection, 1.6 liters, 8 valves;
- 21102 - 8-valve engine, 1.5 liters, injector;
- 21103 - 16-valve unit, 1.5 liters, injector.
- 21103 M - 16-valve engine, 1.5 liters, injector (produced since 2002);
- 21104 - 16-valve engine, 1.6 liters, injector;
- 21104M -16-valve engine, 1.6 liters, produced since 2004;
- 21106 GTI - 16-valve engine, 2.0 liters, 150 hp;
- 2110 “Premier” - 16-valve power unit, volume -1.5 liters;
- 2110 “Consul” - limousine, volume - 1.5 liters;
- 2110-91 - rotary piston engine, 1.3 liters.
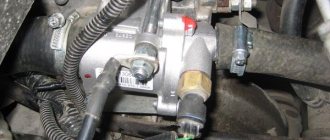
Where is the thermostat installed on the VAZ-2110?
Regardless of the type of power unit, the thermostat is located in one place - below the air filter housing. There you can see the cover of the device, under which the required element is installed.
This simplifies the search and replacement of the thermostat on a VAZ 2110 of any modification.
Signs of thermostat malfunctions and diagnostics
During operation, the thermostat valve is subject to operational and temperature loads, that is, it can fail for many reasons. Among the main ones:
- low-quality or used coolant (antifreeze);
- mechanical or corrosive wear of the valve drive, etc.
A thermostat malfunction can be determined by the following symptoms:
- The internal combustion engine of the car, without being subjected to special loads, overheats - the thermostat thermocouple has ceased to perform its functions.
If everything is normal with the cooling fan, to check, dismantle the thermostat and check the functionality of the valve; The car’s internal combustion engine does not warm up to the required temperature (especially in the cold season) - the thermostat thermocouple is stuck in the open position and has stopped performing its functions (the coolant does not warm up to the required temperature), the cooling radiator fan does not turn on. In this case, you also need to dismantle the thermostat and check the functionality of the valve. - The internal combustion engine boils or takes a long time to heat up - jamming in an intermediate position between open and closed channels or unstable valve operation. Similar to the symptoms described above, the thermostat and all its components must be dismantled and checked for functionality.
To check the thermostat on a VAZ 2110, you can use several methods, since there are several methods for diagnosing the thermostat for failure:
- Start the car and warm up the engine to the desired temperature, first opening the hood. Find the lower pipe coming from the thermostat and feel it for heat. If the thermostat is in good condition, the pipe will heat up quickly;
- Dismantle the thermostat and remove from it the thermoelement responsible for starting the coolant circulation. Place the thermocouple in water heated to a temperature of 75 degrees and keep it until the water warms up further (up to 90 degrees). In good condition, when the water is heated to 90 degrees, the rod from the thermoelement should extend.
If problems are found with the operation of the thermostat, it needs to be replaced. By the way, when buying a new thermostat, you need to check it by blowing into the fitting (no air should escape). Also, some owners, before installation, immerse the new device in hot water for insurance, as described above. This eliminates the risk of installing a faulty device.
How to recognize a malfunction?
The device changes in two cases:
- The main valve does not open and does not allow coolant to circulate in a large circle. In such a situation, the engine quickly overheats, which can cause its failure. If nothing is done, the cylinder head gasket burns out, and due to the rise in temperature and expansion of the metal, the friction of the pistons against the cylinder walls increases.
- The valve jammed and remained open all the time. With such a malfunction, the engine practically stops heating or gains operating temperature slowly. If this happens in winter, then replacing the thermostat is mandatory.
Thus, the signs of a broken thermostat valve are as follows:
- Overheating of the power unit;
- Slow increase in temperature, and when operating in difficult conditions - boiling of the coolant;
- Increased fuel consumption.
As a rule, all these signs appear simultaneously.
READ ON THE TOPIC: Malfunctions of the VAZ 2110 and other cars of the series.
Tips before starting the procedure
- Before you begin removing the thermostat on a VAZ 2112, be sure to ensure that it has completely cooled down after operation.
- The thermostat is removed when it is replaced due to unstable engine temperature conditions (overheating, insufficient heating). To carry out this procedure, completely draining the coolant is not necessary.
- To check the condition of the thermostat, start the car engine and touch the lower radiator hose, at first it should remain cold, and only after the coolant temperature reaches about 90 degrees, the hose will begin to gradually heat up. If there is no such reaction to the manipulations performed, remove the thermostat from the car and check its functionality; if defects are detected, it must be replaced with a new one.
This is interesting: Definition - what is an actuator: types, do-it-yourself repairs, modernization, installation and removal
Replacing the thermostat on a VAZ-2110 with an injection 8-valve engine
To replace thermostats on an 8-valve VAZ-2110 engine (injector), proceed as follows:
- Prepare your instrument. You will need a tee with tubes with a cross-section of 1.9 cm (not necessary to redo the connection diagram), a half-meter hose, a container (a plastic bottle will do), several clamps 2.5 cm in diameter (two or three pieces), a key to “ eight", screwdriver, hex wrench 5.
- Purchase the necessary materials - gasket for the case, silicone-based sealant, thermostat, rags, antifreeze.
- Unscrew the bolts holding the filter shell.
- Loosen the clamps on the throttle pipe and crankcase ventilation hoses, and then tighten the throttle cable fixing bolt.
- Separate the electrical connector.
- Remove the rubber cushion from the hole in the housing bracket, and then remove the air filter.
- Tighten the bolts on the clutch housing and cylinder block, and then remove the ignition module. The described action is necessary to gain access to the coolant drain plug.
- Unscrew the drain plug on the radiator and cooling system block, and then drain the coolant.
- Loosen the clamps on the thermostat pipes, remove the device and twist the temperature control sensor. Here, remove the controller connector.
- If the design allows you to replace the main valve, then use a hex wrench to disassemble the thermostat and replace it.
- Install the new device and connect the pipes to the same places. If possible, replace the hose with a longer one.
Wipe the pipes and housing terminals with a rag, change the gasket between the housing and the motor and tighten the clamps. Add antifreeze and check the system for leaks. After 10-20 kilometers, inspect the joints again.
Removing the thermostat
To remove the device, you need to completely or partially drain the coolant. After this, it is necessary to dismantle the air filter housing and disconnect the hoses from the thermostat pipes. Next, you should unscrew the three bolts that secure the device body to the cylinder head.
When the unit is dismantled, unscrew the screws securing the thermostat cover and remove the thermocouple.
How to change the thermostat on a VAZ-2110 with an injection 16-valve engine?
When replacing a faulty device with a 2110 with a 16-valve engine, the required tool and algorithm of actions remain virtually unchanged:
- Drain the coolant from the system;
- Remove the air filter;
- Loosen the fixation of the water pipes (inlet and outlet) connected to the thermostat;
- Tighten the bolts holding the device to the block.
- Remove the cover (if necessary);
- Remove the main valve from the casing;
- Return everything to its place in reverse order. Be sure to change the rubber used to seal the case.
Thermostat design
Structurally, the “tens” thermostat consists of an aluminum housing with pipes for connecting hoses and a working mechanism (thermoelement) located inside. The latter is a brass or copper cylinder filled with wax with a built-in pusher - a pin, at the end of which there is a valve.
When the coolant is heated to a certain temperature (80-82 °C), the wax melts and expands, pushing this pin, which, in turn, moves the valve, opening it. As the wax cools, it hardens and shrinks in size, and the valve spring forces it back into the closed position.
How to change the thermostat on a VAZ-2110 with a carburetor 8-valve engine?
If the thermostat fails on a “ten” with a carburetor and an 8-valve power unit, the algorithm remains unchanged:
- Prepare the tool (described above);
- Drain the coolant (optional), if you drain it, do not forget to open the expansion tank cap;
- Discard the three pipes that fit the device body (first loosen the broach using a hexagon);
- Loosen the clamp and remove the thermostat with the hose.
Otherwise, the actions remain similar to those described for the injection 8-valve engine.
How to check if the thermostat on a VAZ-2110 is working or not?
Before replacing the device, make sure it is faulty.
We highlight the following options:
By heating (without removal).
Let the car cool down after the trip, grab the lower pipe and ask an assistant to start the engine.
The temperature of the pipe should gradually increase (after 2-3 minutes it becomes warm). If this happens, then the thermostat is intact.
Read more about how to check the thermostat without removing it from the car on this page.
According to the condition of the thermoelement (with dismantling).
The algorithm of actions is as follows:
- Dismantle the thermostat and remove the starting element from it;
- Take water into a metal container, install a thermometer in it (the one for measuring water temperature), and heat the liquid to 94 degrees Celsius. If the thermostat is working properly, then a special rod extends from the starting unit (it should begin to move already at 82-84 degrees Celsius). If there is no reaction, there is no need to change the entire device - just purchase a new heat-sensitive element and replace it. New thermostats are checked in the same way.
- By appearance. Inspect the condition of the device. If there are chips or cracks on the case, then do not save money on the purchase. Such a device is likely to fail soon.
Be careful when purchasing a new thermostat.
Do the following:
- Carry out the experiment with it described in point 2. If, when reaching 80-85 degrees Celsius, the rod does not begin to extend, then the device is faulty.
- Inspect the condition of the unit for mechanical damage.
Check and replacement
If the thermostat fails, it should be replaced immediately. It is impossible to say that the device has failed only on the basis of an initial check.
If the engine overheats during operation or does not warm up to operating temperatures quickly enough, the condition of the unit is checked. Based on the results obtained, replacement or repair is carried out.
The most effective way to check the thermostat is to remove it. The procedure is performed as follows:
- Unscrew the crankcase protection mounting bolts, after which the protection must be removed and placed aside for a while.
- Remove the cap from the expansion tank where the coolant is located.
- Place a clean container under the drain hole (if you plan to pour the same coolant back into the system), unscrew the drain plug from the cylinder block and remove all coolant from the cylinder block.
- Place a container under the drain hole of the cooling radiator, unscrew the plug and drain the antifreeze or antifreeze.
- Loosen the clamps holding the hoses.
- Disconnect the three hoses that are connected to your thermostat housing.
- Loosen the tension on the clamps and remove the thermostat along with the hose. The short hose is disconnected from the thermostat.
- Place the dismantled device in a container of water, which must be preheated to 78-80 degrees Celsius.
- Start heating the water, stirring the liquid occasionally. The water needs to be heated to approximately 87 degrees Celsius.
- If the thermostat is working properly, when the temperature reaches 87 degrees with an error of plus or minus 2 degrees, the main valve should open. If this does not happen, the device is faulty and requires replacement.
Replacement process To replace the thermostat, it is enough to remove the old one in accordance with the specified dismantling instructions, and reassemble the unit with an already working device in the reverse order.
What to choose?
Many owners of a VAZ 2109 with a carburetor complain that the factory thermostat is insufficiently efficient. Because of this, especially in winter, you have to suffer from slow heating, when it is difficult to achieve even 60 degrees.
To solve this problem, it is recommended to install a thermostat from an injection VAZ 2110 with 8 valves for the winter and for the entire period of operation of the nine. This is an improved element that has obvious advantages compared to the original thermostat for the carburetor VAZ 2109.
- You should install an injection thermostat starting from tens, taking into account the fact that we are not talking about the first versions of the VAZ 2110, but later, modernized ones.
- On 8-valve engines, dozens of thermostats have become dismountable, unlike the 16-valve VAZ 2110 and those devices that were initially installed from the factory on the VAZ 2109. This allows, in the event of a unit breakdown, to disassemble it and partially repair it without completely replacing the device.
- To repair a new thermostat, borrowed from a VAZ 2110 with an injector and 8 valves, it is often enough to disassemble the device and replace the thermoelement there.
- The new unit turned out to be 50 millimeters shorter, which allows for more free space.
- The new element has lost many of the clamps that are relevant for thermostats from the VAZ 2109.
- The component has undergone quite a serious modification, which allows it to effectively maintain a stable temperature inside the engine cooling system.
Device from tens When replacing the thermostat on a VAZ 21099, make sure that you choose the device from the 8-valve “tens”. Cars with 16 valve engines use different devices in which the circulation system does not work the same way. Therefore, the elements will simply be incompatible.
What pitfalls are possible during the installation process?
- To avoid problems during the part replacement process, consider the following:
- Allow the engine to cool before starting work;
- It is not necessary to completely drain the coolant (but it is better to do so);
- Before replacing, make sure that the problem is in the thermostat (use the recommendations above);
- During the assembly process, change the clamps, since the old ones are unlikely to withstand repeated broaching;
- Install a new gasket between the body and body (even if it looks fine);
- The old pipe between the expansion tank and the thermostat may be short, so buy a new one. The best option is to buy a pipe for 2211 (it fits perfectly).
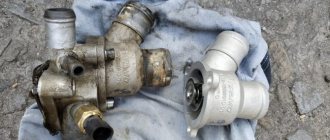
New and old VAZ-2110 thermostats: installation features and differences
The type of thermostat used on the VAZ-2110 depends on the year of manufacture of the vehicle.
Initially, the same devices were installed as on the “eights” and “nines”, but due to low efficiency and frequent breakdowns they had to be replaced.
The main differences of the new design (5-hole thermostat) are the ability to disassemble and replace only the starting (heat-sensitive) element.
On older machines, the device was connected to the motor block using a short pipe.
In new models, fixation is carried out using a pair of studs. In this case, between the thermostat and the power unit there is a paronite gasket, which can be treated with silicone-based sealant (this procedure is not always necessary).
After 2003, 5-hole thermostats gradually changed to 6-hole ones.
According to the manufacturers, they are stable and provide better performance in extreme cold.
Advantages of the new device:
- Stable coolant temperature;
- No malfunctions in the heater operation;
- Greater work resource.
After installing a 6-hole thermostat, the engine easily reaches operating temperature at 20-30 degrees below zero, even with the heater on.
You also need to know that the bypass channels in 5 and 6 hole thermostats are different. In the first it is 16 mm, and in the six hole it is 11 mm.
This affects the fact that the circulating antifreeze through the bypass channel of 11 mm in a small circle flows faster than through the channel of 16 mm, which means that the flow (volume) of coolant through the stove increases, so it will be warmer inside the car.
The device is installed in two ways:
- Classic;
- Alternative.
In the first and second cases, to complete the work you will need three liters of antifreeze, a gasket for the thermostat, filler and supply hoses, as well as a new thermostat.
In addition, stock up on 15-28 mm clamps (5-6 pieces will be required).
To avoid spilling coolant during installation, remove the pipe from the throttle assembly (going to the saxophone) and gradually drain the antifreeze until the leak stops. After that, continue working.
Selection of the necessary thermostat parameters
The choice of this spare part must be approached wisely, since the temperature, as described above, should depend on the operating conditions. Try to take into account conditions such as where the vehicle is used and the loads under which the vehicle is used. Choose a part so that your car's engine does not overheat, but at the same time, so that it does not operate in low temperature ranges - the second case can lead to increased wear of engine components.
In addition to benefiting the engine, the thermostat affects the comfort of the driver and passengers. The temperature in the cabin directly depends on what parameters the new valve has. If you operate the car mainly in winter, then choose a part with a higher valve opening temperature. Otherwise, the antifreeze temperature will not be sufficient to heat the interior to a comfortable temperature.
What are the features of the classic and alternative connection options?
In the first case:
- The main thermostat valve is flushed with coolant from the main radiator and engine;
- The thermostat opens for additional cooling - in this case, there is control not only over the entire coolant temperature in the system, but also over the temperature of the coolant leaving directly from the engine, and this, as is known, is the hottest place in the cooling system.
The standard connection diagram for a six-hole thermostat will look like this.
Connection example.
In the second case:
- The thermostat is additionally washed with coolant from the heater and bypass.
- The device controls the temperature, which is lower than the motor temperature (from the thermostat output or from the bypass). It turns out that in winter such a thermostat will work later than according to the classic connection scheme. The functioning of the stove also improves, which works more actively the lower the temperature outside.
The alternative connection diagram has two options.
As for the speed of warming up the engine, it remains unchanged, because the path of coolant flow until it reaches 82 degrees Celsius has not changed, as has the heat capacity of the system.
How to choose a thermostat: recommendations
All thermostats installed on the VAZ 2110 before 2003 were of an old design (catalog number 2110-1306010). A little later, after 2003, changes were made to the cooling system of the VAZ 2110.
Accordingly, the thermostat was also replaced (catalog numbers 21082-1306010-14 and 21082-1306010-11). The new thermostats differed from the old ones by increasing the thermoelement response level.
We also recommend reading the article about why the engine does not warm up to operating temperature. From this article you will learn why the engine may not reach operating temperature, the engine takes a long time to warm up, etc.
The choice of non-original assembled thermostats for the VAZ 2110 today is quite large, but, according to many experts, it is necessary to use only those that are directly developed and manufactured by AvtoVAZ for the VAZ 2110.
Let us also add that on the VAZ 2110 you can install a thermostat from the VAZ 2111, since it is smaller in size, structurally compact, and the use of only one hose and two clamps reduces the likelihood of leakage.