If, when you turn the key in the ignition switch, you cannot hear the starter on a VAZ-2107, then you need to check the condition of the battery and make sure that the electrical circuit of its motor is working properly. The car owner can independently diagnose the device. Repair almost does not require the use of special equipment and tools.
Removing the VAZ 2107 starter
In the "seven", as in most cars, the starter is located at the bottom of the engine near the gearbox. Work to replace the starter must be carried out on a pit or a lift in order to have free access to the mounting bolts and power supply terminals. Actually, the only problem when dismantling/installing the starter is its inconvenient location. The work does not require special tools or training.
It is necessary to remove the VAZ 2107 starter (injector, carburetor) with the battery disconnected. Otherwise, the “positive” wire running from the battery to the traction relay contact may cause a short circuit. Dismantling work is carried out in the following order:
Disconnect the battery terminals (you can remove the battery, it will be easier to work without it).
Remove the dirt shield if it is installed at the bottom of the engine compartment.
Unscrew the fastenings of the wiring harness that go to the starter.
Unscrew the nuts and disconnect the control and power wires from the traction relay.
Unscrew the two upper and one lower fastening bolts (One of the upper ones is located extremely inconveniently, so some “masters” do not put it in place after unscrewing it. This weakens the fastening and can lead to breakage under conditions of dynamic loads and vibrations on the unit) .
Remove the starter by lifting it down under the car.
After this, you can check the functionality of the starter and, if necessary, repair or replace it.
Dismantling without a pit
All work in this case is carried out from above, under the hood. This method is suitable in situations where an electrical device suddenly fails, on the road, and there is no garage or overpass nearby. Be sure to use a jack. What should be done:
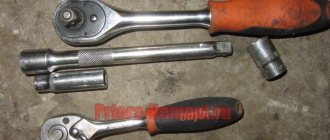
- provide access to all fastening bolts, including the bottom one - as a rule, a long wrench with a head is used;
- remove the wiring from the solenoid relay by touch.
If you have insufficient experience and lack of technical skills, it is advisable to trust the operation of removing the starter to qualified specialists at a service station. The car service not only dismantles the device, but also checks it competently.
Starter performance check and repair
First of all, you should clean the starter housing from dirt, which inevitably accumulates on it during the operation of the car. Then connect the mechanism to the battery: the “negative” wire to the starter housing, the “positive” wire to the contact of the traction relay. A characteristic click should follow, and a drive gear will appear in the front “cutout” of the casing. Now use an ohmmeter and check the armature windings for opens and shorts. To do this, you need to open the cover at the back of the starter and remove the brush holders with brushes.
Then connect the ohmmeter with one end to the armature body, and the other - alternately to the sectors of the winding. If there are no short circuits or breaks, the instrument needle will fluctuate from a minimum value of 10 kOhm and above.
Now comes the integrity check of the stator winding (in other words, located inside the housing, along the walls of the cylinder). Here you simply connect the ohmmeter contacts to the copper wire terminals. The arrow of the measuring device should “lie” in the area of the highest value if there are no problems. If there are breaks or short circuits in the windings of the starter or solenoid relay, there is no point in bothering with repairs if you have never dealt with electromechanics and have not encountered the technology of manufacturing electric coils. It is best (and easier) to purchase a complete starter and install a new starter.
Checking the integrity of the stator winding
An operation that can really be called a repair is replacing brushes. You can easily find out that they are erased during diagnostics. It is enough to turn the starter on its side when it is connected to the battery and turns properly. If the unit immediately stalls, brush wear is to blame. Replacing parts is simple and accessible even to a beginner. It was already mentioned above that it is enough to remove the cover at the rear of the starter. When the brush holder is removed, the springs in it will themselves push out the brushes, which will hang on the wires. Replacement is a matter of minutes.
The main thing is to never allow oil or fuel to come into contact with brushes or wire windings. Electrics do not tolerate moisture or grease. Therefore, during any operations with starter parts, especially when assembling it, act carefully and, if possible, stay away from liquids and fuels and lubricants.
Connecting wires to the starter
Connecting a starter to a VAZ - instructions. Attach the relay in a convenient place (for example, a washer reservoir). Connect the wires to the starter. Then remove the red wire located on the flat terminal of the relay, and you need to make a connection with the connector of the male wire and the wire from the new relay.
Place the wire with a ring terminal for 8 mm on the positive side of the starter and tighten it with a nut. Place the wire of the new “female” type relay onto the contact that was released at the traction relay. This wire will transmit the positive to the coil. Using a clamp, tighten the new wire and the stock one together. Screw a small length of wire from the coil. Now you can turn on the new relay.
Video
Details about the features of replacing the starter:
Hello, dear car enthusiasts! Especially hello, all owners of the VAZ “Seven”! Because this is exactly what we will be talking about – the VAZ 2107.
Although, the domestic auto industry has nothing special to boast about, given the model line and quality of cars produced, but still, there are examples of cars that should be paid attention to.
VAZ 2107 is a car that can deservedly be called a people's car. Thanks to its somewhat unusual design, this car stands out noticeably from the series of “classic” VAZ cars.
This fact, supplemented by minor design differences, was the reason why the model lasted quite a long time on the assembly line. At times it seemed that the “seven” would be produced forever, but time takes its toll.
Nevertheless, hundreds of thousands of cars of the seventh model are moving on the country’s roads, which will lead the popularity ratings among the “classics” for a very long time.
The design of the VAZ 2107 car is not fundamentally different from previous models. The biggest innovation in recent years has been the installation of an injection power system instead of the usual carburetor.
The rest is classic. This also applies to the starting system. That is why for every car enthusiast who bought a VAZ 2107, how to remove the starter remains a pressing question.
Removing the VAZ 2107 starter in the garage, do it yourself
As in most other cars, in the “seven” the starter is located at the bottom of the engine. In order to get to it, you need to have an inspection hole or overpass, since it cannot be removed through the top.
The inconvenient location is the only difficulty when dismantling the starter. Otherwise, everything is extremely simple; no special tools or special knowledge are required.
Removing the VAZ 2107 starter occurs only with the ignition off as follows:
- First, remove the battery cover and disconnect the ground terminal;
- the mudguard is removed, if one was installed in the lower part of the engine compartment;
- For convenience, the battery and support can be removed;
- the clamp of the wiring harness leading to the starter is unscrewed;
- unscrew and remove the wires from the starter traction relay;
- the three starter mounting bolts are unscrewed (two at the top and one at the bottom), after which the starter is removed under the car.
At this stage, the starter is completely ready for repair or maintenance.
Self-replacement of VAZ 2107 starter
If you can find a good, knowledgeable assistant to repair the starter, then you will have to install it back into the car yourself. This activity is not at all inconvenient, but quite responsible, so it should be carried out very carefully in compliance with the order indicated below.
In order to replace the VAZ 2107 starter, or rather, install it in its original place, you must do the following:
- Before installation, carefully inspect the starter, its equipment, build quality, and the presence of a centering sleeve;
- the starter is installed in its regular place at the bottom of the car and screwed with the longest bolt, after which the other two mounting bolts are screwed in and tightened;
- the wire terminals are installed and the nuts are tightened;
- wire harness supports are installed and secured;
- the battery support is screwed on, the battery is put in place;
- the battery terminals are connected, the protective cover is closed;
- The functionality of the electrical system is checked and a dirt shield is installed.
Replacement
Work order
- We place the car on a viewing hole or overpass and secure it with the parking brake.
- Open the hood and disconnect the ground wire from the battery.
- Using a 10mm socket, unscrew the bolt of the lower fastening of the starter heat shield.
- We dismantle the air filter housing and the warm air supply hose (for injection units, remove the fastenings of the intake pipeline).
- Using a socket wrench with a 13 mm extension, unscrew the 3 bolts securing the starter housing. It is better to unscrew the bottom bolt from the inspection hole.
- Using a 13mm wrench, unscrew the nut (on the injection engine there are two nuts) securing the starter shield. Let's take it out.
- Using a socket wrench with a 13 mm extension, unscrew the 3 bolts securing the starter housing. It is better to unscrew the bottom bolt from the inspection hole.
- Using the same tool, unscrew the nut securing the tip of the wire going to the “+” battery.
- Disconnect the start relay wire.
- We remove the starter from the rear wall of the engine compartment.
- We install a new starter in its place.
- We carry out installation work in reverse order.
Conclusion
Every driver is interested in how much a regular and gear starter costs. In fact, the price is almost identical. The price of a regular one fluctuates around 3,500 rubles, and a geared one – 4,000 rubles. Considering this fact, it is of course more profitable to purchase a device that can breathe new life into the car. Considering that the installation and dismantling process will be carried out with your own hands, you will be able to save a lot.
A car starter is the main element of the engine starting system, and is designed to start it by cranking the crankshaft.
Essentially, it is a direct current electric motor driven by closing an electrical circuit by turning the ignition key. The autostarter consists of a stator, an armature (rotor), a brush holder with brushes, as well as a traction relay and a drive.
In all VAZ classic models, incl. and in the “seven”, it is located at the bottom of the engine, and is attached to the clutch housing.
Preliminary work
We install wheel chocks
Performing a few simple steps related to preparing the VAZ 2107 for repair work will significantly save your time, improve the quality of maintenance and will guarantee the safety of your health.
- The place where the machine will be serviced must have good and uniform lighting. In some cases, this can only be achieved through the use of additional lighting.
- Due to the fact that the starter in the VAZ 2107 is located in the lower part of the engine, work on its dismantling should be carried out on an overpass or inspection hole. It is not possible to remove the starter from the top.
The machine must be securely secured using the parking brake or wheel chocks. Otherwise, there is a possibility that the vehicle will start moving spontaneously.
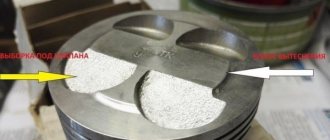
What if the flywheel crown is worn out?
If the crown has been ordered to live for a long time, then this can be felt in the literal sense of the word after removing the starter. Run your hand over the teeth and assess the degree of wear. If you need to change the crown, this is done after removing the gearbox. Carefully knock off the old crown from the flywheel. If it is being removed for the first time, then you can cheat a little and put it on the other side. The teeth are only half worn, so you can reuse the part to save money. This will save you 300-400 rubles, but if you want to install a new crown, do it. The new one is still stronger than the old one.
But you will have to warm it up on gas for several minutes; there are no other ways to install it on the flywheel. Carefully put the crown on, press it and wait a few seconds for the metal to cool and press the flywheel tightly. There is no point in removing the latter; everything can be done quickly enough if you have an inspection hole or overpass. After the work has been completed, check the operation of the starting mechanism; the starter should not feel any obstacles when rotating the rotor.
VAZ-2107 starter: device, repair and replacement on News4Auto.ru.
Our life consists of everyday little things that in one way or another affect our well-being, mood and productivity. I didn’t get enough sleep - my head hurts; I drank coffee to improve the situation and cheer myself up - I became irritable. I really want to foresee everything, but I just can’t. Moreover, everyone around, as usual, gives advice: gluten in bread - don’t go near it, it will kill you; A chocolate bar in your pocket is a direct path to tooth loss. We collect the most popular questions about health, nutrition, diseases and give answers to them that will allow you to better understand what is good for your health.
Detailed installation process
In order to correctly install the starter, you must adhere to the following points:
1. Conduct a visual inspection of the device. 2. Installation of the device in its original place. First fasten with a long bolt, and then with two short ones. 3. Install the wire terminals and tighten the nuts. 4. Replace the battery. 5. Connect the terminals on the battery. 6. Install the braces coming from the intake pipe or air duct and air filter. 7. Replace the mudguard (if equipped).
After everything is done, you should start the engine. If everything works as expected, then the starter connection is made correctly. If the engine does not start, you should look for where the error was made.
Explanation of symbols
The wiring diagram contains the following symbols:
- 1 – radiator fan drive motor;
- 2 – mounting block block;
- 3 — idle speed sensor;
- 4 – engine ECU;
- 5 – potentiometer;
- 6 – set of spark plugs;
- 7 – ignition control unit;
- 8 – electronic crankshaft position sensor;
- 9 – electric fuel pump;
- 10 – indicator of the number of revolutions;
- 11 – lamp for monitoring the health of electronic systems and the brake system;
- 12 – ignition system control relay;
- 13 – speedometer sensor;
- 14 – special factory connector for reading errors using the BC;
- 15 – injector harness;
- 16 – adsorber solenoid valve;
- 17, 18, 19,20 – fuse box for repairing the mounting block that protects the injection system circuits;
- 21 – electronic fuel pump control relay;
- 22 – electronic relay for controlling the exhaust manifold heating system;
- 23 – exhaust manifold heating system;
- 24 – fuse protecting the heater circuit;
- 25 – electronic air sensor;
- 26 – coolant temperature control sensor;
- 27 – electronic air damper sensor;
- 28 – air temperature sensor;
- 29 – pressure control sensor and low oil pressure lamp.
Causes of malfunction
Any part can fail. But it’s not enough to just do it. We also need to find out what caused the malfunction and prevent it from happening again. After all, the reason may not be in the part itself, but for example, the fault may be hidden in a circuit that is located even before it. Let's think about the reasons for the malfunction. There may be several of them:
- One of the reasons may be wear on the commutator brushes and their loose fit. In this case, check how freely they move in the brush holder. The price of a new brush is low; drivers often prefer to simply replace them.
- Often the cause of a starter malfunction lies in the relay : the winding burns out or the contacts burn out. Sometimes corrosion of the anchor causes it to jam. In the case when, when starting the engine, the starter rotates along with the flywheel, the relay is also at fault. These malfunctions are most typical for the starter solenoid relay - repairing a VAZ 2107 is rarely complete without replacing it.
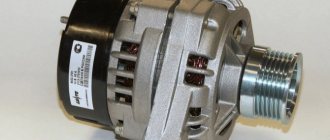
- If the starter turns the engine, but very slowly, the generator is most likely to blame. Its diagnostics are carried out on a stand, where the voltage, which should not exceed 14.5V, and the generator turn-on current are determined. Be sure to check the tension of the drive belt. If it slips, the generator cannot develop full power, which inevitably drains the battery.
- The most common breakdown occurs: there is a break in the circuit supplying power to the relay winding. Then you need to check the connection of the wires, tighten the bolts that secure the wire going to ground and check the starter control connector, the so-called 50 pin. The connector may need to be replaced.
Advice! In case of a problem with the contact, crimp the wire with a round copper tip and, together with the fastener, screw the ground to the relay. This will be the simplest solution to this problem.
After making sure that both the relay and the ignition switch are in order, when repairing the VAZ 2107, the starter is carefully examined. To do this, you need to remove it and perform a visual inspection of the contacts on the solenoid relay. Sometimes the cause of poor contact is loosely tightened nuts. In this case, the terminals heat up and burn. How to determine the working capacity of the solenoid relay?
Advice! It’s easier to do this this way: take a piece of wire with a cross-section of 8-10mm2 and connect it to the positive terminal. Place the starter on the battery, resting its body against the negative terminal. Touch the other end of the wire to the terminal on the solenoid relay.
Attention: If after such manipulation the starter starts working, then the cause of the problem is in the relay. If there is no reaction, we can assume that the problem lies in the brushes.
There is one more problem for all cars, not just the VAZ 2107: the starter, which needs to be repaired, has excessive energy consumption. This may be indicated by a strong decrease in instrument panel lighting and lamp brightness. There are three possible problems that may arise here:
- Insufficient wire contact
- Increased mechanical resistance
- Low resistance.
Advice! If cleaning the external contacts of the electrical circuit does not help eliminate the breakdown, you need to check the contacts inside the starter, as well as the brush units.
There are also mechanical reasons that prevent the smooth operation of the starter:
Wear of the bushings promotes short circuits between the windings and jams the moving elements.
Fuse box VAZ-21074 injector
- 1-Rear window heating relay
- 2-Relay for headlight cleaners and washers (if equipped)
- 3-relay or signal jumper (if there is no external relay)
- 4-relay or jumper for cooling fan
- 5-high beam relay
- 6-low beam relay
- F1-F17-Fuses
- 1 (8A) Rear lights (reversing light). Heater electric motor. Warning lamp and rear window heating relay.
- 2 (8A) Electric motors for windshield wiper and washer. Electric motors for headlight cleaners and washers. Windshield wiper relay. Wiper relay and
- headlight washer (contacts).
- 3 (8A) Reserve.
- 4 (8A) Reserve.
- 5 (16A) Rear window heating element and heating relay (contacts)
- 6 (8A) Cigarette lighter. Portable lamp socket. Watch. Front door open warning lamps
- 7 (16A) Sound signals and relay for turning on sound signals. Engine cooling fan electric motor and motor activation relay.
- 8 (8A) Direction indicators in hazard warning mode. Switch and relay-interrupter for direction indicators and hazard warning lights in emergency mode.
- 9 (8A) Generator voltage regulator.
- 10 (8A) Direction indicators in turn indication mode and the corresponding warning lamp. Fan motor activation relay (winding). Control devices. Battery charge indicator lamp. Indicator lamps for fuel reserve, oil pressure, parking brake and brake fluid level. Parking brake warning light relay. Carburetor pneumatic valve control system
- 11 (8A) Rear lights (brake lamps). Body interior lighting lamp.
- 12 (8A) Right headlight. Coil of the relay for turning on the headlight cleaners (with the high beams on)
- 13 (8A) Left headlight. Indicator lamp for turning on the high beam headlights.
- 14 (8A) Left headlight (side light). Right rear light (side light). License plate lights. Engine compartment lamp. Indicator lamp for turning on the side light.
- 15 (8A) Right headlight (side light). Left rear light (side light). Cigarette lighter lamp. Instrument lighting lamps. Glove compartment lamp
- 16 (8A) Right headlight (low beam). Coil of the relay for turning on the headlight cleaners.
- 17 (8A) Left headlight (low beam).