Good day. Due to a family trip to the sea this summer and the lack of a normal-sized trunk, I decided to install a car box on the roof. I’ve been looking for options for roof racks for a long time, but they really spoil the look of the car, and I didn’t really want to remove and install them when needed. Therefore, I started looking for roof rails for a hatchback, because they can be installed permanently and they look pretty good. But it turned out that finding them in the city here and now is not easy. In the car market, everyone has it to order with an average price of 3 thousand rubles. At one kiosk I found it in stock but in silver, but I wanted completely black. I found black ones on the BBC website for 2600, but when I arrived and asked the seller about them, I was surprised by the answer that they didn’t have such a thing and never had one. In front of the seller, I go to the BBC website and show it to the seller. So he was surprised. Okay, I went to the warehouse to look, brings the roof rails without packaging and the fasteners from it in a box from a phone holder in a car. Upon inspection, I found scratches and characteristic marks from installation. Here are the ones... They are trying to sell used ones under the guise of new ones. I was upset, I already thought that I wouldn’t find such roof rails here and now, I would have to order and the installation would be postponed for a week until next weekend. And now I’m on my way to the market to order roof rails and from the road I see an inconspicuous spare parts store, let me think I’ll stop by. And lo and behold! Available, NEW, black as I wanted, with cross members included and for 2600 rubles.
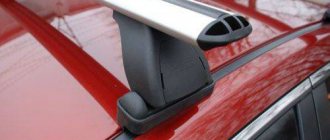
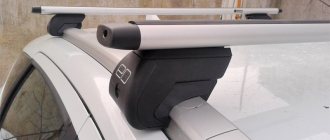
As a result, everything is installed extremely simply, the rubber seal is removed, behind it there are already threaded holes from the factory for installing luggage racks.
Decorative plastic parts of the roof rail are attached to the roof with double-sided tape.
The places on the roof that come into contact with the plastic part of the roof rail were taped with transparent film. I bought a piece of 1.5 x 0.2 cm at the car market for 120 rubles. This was quite enough, there was still half left.
The entire installation process took about 30 minutes including smoke breaks.
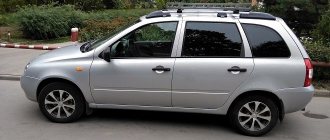
Without crossbars, the appearance is quite good, I like it.
Well, naturally, I needed all this in order to get it in the end
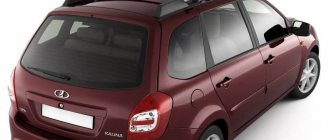
I wanted a smaller box, I thought that the viburnum was small and wouldn’t fit, but in the end the 440-liter box confidently fit and does not interfere with opening the trunk. The only thing is that the antenna has to be tucked under the box; it’s too long. This box has a double-sided opening, which is very convenient. But I will tell you about the actual use of this box only in August after a trip to the sea. So far I have nothing good or bad to say about him. That's all, good luck to everyone on the roads.
Advantages of installing roof rails:
- expansion of luggage space;
- possibility of transporting large cargo;
- rubber and plastic linings protect the body from abrasion and scratches;
- Installing a covered luggage compartment will provide additional luggage space, hiding the cargo from wind and rain.
Before choosing and purchasing, you should consult with the manager about the compatibility of the method of fastening the roof rails with the brand of the vehicle (in this case, Lada Kalina).
Those owners who are pursuing the goal of increasing the load-carrying capacity of their car are inclined to install roof rails on top of the Lada Kalina station wagon. This is a pretty good way to increase the load-bearing capacity of a car, especially when you travel, taking a lot of things and objects with you on the road, the main thing is to know how to install them.
After installing the roof rails, the appearance of the Lada Kalina station wagon changes, becoming more like a car with off-road potential. To install these accessories, it is not at all necessary to resort to the services of a service station. The procedure is quite feasible in independent mode. The latter method will help avoid additional costs when it is necessary to install roof rails.
We act according to the instructions
The kit with metal roof rails intended for installation on the Kalina/Kalina-2 hatchback may contain M6 screws, as well as external plastic linings. The number of certain elements depends on the design of the railing. The manual supplied with the equipment lists the basic installation steps:
- Before installation, it is necessary to remove the upper door seal, which prevents access to the mounting holes;
- All fastening elements are initially covered with tape, which also needs to be removed;
- Under the tape there are holes with M6 threads. Each rail is installed and secured with screws;
- Finally, all decorative elements are mounted, then the mounting screws are finally tightened.
Features of roof rails for Lada Kalina
Automotive retail chains today provide owners of practical Lada Kalina station wagons with the opportunity to choose a set of suitable roof rails. This includes arches, which are special longitudinal strips that are mounted directly on the roof.
Any roof rails have a load capacity limit, and therefore the owner is prohibited from overloading the structure. Regarding the Lada Kalina station wagon, we note that on such a trunk it is allowed to transport cargo with a total weight of no more than 50 kg.
To install the product, Kalina's roof initially has factory railings. They are made of aluminum profile. Arches can also be made of special plastic with high strength values.
After purchasing roof rails, you should install them on the roof, having first studied the attached instructions. Usually, for trained owners, the procedure will take no more than half an hour.
In terms of trunk volume, the sedan is located between a hatchback and a station wagon.
Let us remind you that this family is presented on the market in three different bodies:
- sedan;
- hatchback;
- station wagon
Now let's look at the numbers. According to the manufacturer, the trunk of a Priora with a sedan body can be placed between a hatchback and a station wagon in terms of volume. Its volume is 430 liters. This is a very good indicator for cars of this class.
The hatchback's trunk is the least spacious. Its volume, according to the manufacturer, is inferior to the sedan and is only 306 liters. However, there are two very important points here. Firstly, the large rear door allows you to load much more cargo into the car than can be placed in the trunk of a sedan.
In addition, with the rear seats folded down, the luggage space of the Priora with a hatchback body increases to a very respectable 705 liters. Agree, it is quite possible to place here, for example, a washing machine, which, even if you wanted to, cannot be stuffed into a sedan. The rear seat folds down quite simply, but the designers have not been able to come up with a solution that allows it to be laid flush with the floor. In addition, the wheel arches take up some luggage space. Nevertheless, the numbers, compared to other classmates, are quite decent.
Well, the most spacious in the Priora family is, of course, the station wagon model. The trunk volume here is 444 liters. Naturally, the rear seats can also be folded down. In this case, the volume of the luggage compartment increases to 777 liters. Add here a large rear door - and you will get the most optimal option for transporting various cargo, including quite large ones, among all Priora cars.
As you can see, the sedan, all other things being equal, is practically not inferior to the station wagon in terms of trunk volume in liters. At the same time, it is also significantly ahead of the hatchback. But as soon as you fold down the rear seats, the picture completely changes. The station wagon continues to confidently hold the lead, while the hatchback is already ahead of the sedan.
When choosing a Priora, this point is also worth taking into account. If you are not going to often transport bulky cargo, then a sedan is quite suitable for you.
If you plan on relatively regular transportation, for example, delivery of goods to shops, then you should pay attention to a more spacious station wagon. Cars of the Priora family have proven themselves to be a very good option for their price. They have good dynamics, while being quite economical, hold the road confidently, and the ride here is more comfortable than on the VAZ “tenth” series
They have good dynamics, while being quite economical, hold the road confidently, and the ride here is more comfortable than on the VAZ “tenth” series.
Don’t also forget that the Priora was restyled in 2013. The designers added a number of new options to all cars in the family, further increasing their competitiveness in the automotive market. In particular, the updated Priors received more modern optics controlled by a light sensor. Many people liked the slightly changed bumper, and the LEDs built into the lights and foglights made the car less “gluttonous” in terms of electricity consumption.
The interior of the car has also undergone changes for the better. The designers included finishing materials in the restyled version that cannot be called typical for VAZ products. In particular, soft-look was used here - a type of plastic that looks very much like expensive leather.
In addition to its excellent aesthetics, the undoubted advantage of this material is also its fairly high resistance to various types of influences. Also, owners of the restyled version will be pleased with the new shape of the steering wheel, a beautiful instrument panel and a touch screen. Well, thanks to higher seats with armrests, the designers were able to increase the level of comfort for both driver and passenger.
Installing roof rails on Kalina
Let's figure out how to install roof rails. Please note that the installation process is in no way affected by the body type of your car, that is, standardization and unification of products takes place.
You can install accessories using two methods:
- Using special double-sided mounting film.
- Using self-tapping screws. This method is positioned as the most reliable.
Let's take a closer look at the installation.
First, we purchase fastening components and a set of hexagonal keys. In addition, we stock up on the following things:
- a marker that allows you to apply visible markings;
- alcohol to clean the surface;
- double-sided tape (self-adhesive).
- We open the doors and slowly remove the rubber seal. We remember that we begin the procedure from one of the rear doors, gradually moving to the front of the Lada Kalina station wagon.
- After dismantling the seal, remove the protective film. It is designed to cover the mounting holes and is located directly under the rubber.
- We take brackets and plastic fairings. We apply the railings evenly, avoiding distortion.
- Now we mark the mounting points with a marker.
- To secure accessories more tightly, we use double-sided tape. It allows you to increase the reliability of fastening the roof rails.
- Upon completion of the specified fixation of the products, we secure them finally using self-tapping screws.
- Finally, we mount the plastic fairings along with the slats and return the door seal to its place.
Important! Do not exceed the required tightening torque!
If all manipulations are carried out well, then there should be no unnecessary sounds when moving.
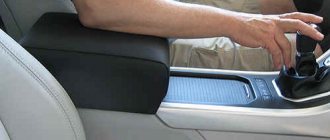
Installation of the locking device drive
Removing the fifth door opening button is the easiest thing. It is more difficult to seal the remaining hole. This can be done using a special putty. One of the tricks is to process the hole cavity so that the surface becomes as rough as possible. This will create optimal adhesion to the putty. Next comes sanding, priming and painting. The work can be done independently without special training and practical skills. After that, you don't have to worry about aesthetics.
Of course, all dismantling work can be carried out only after the installation of the electric drive is completed, as well as the installation of the trunk opening button in the cabin. The trunk lock drive and how to install it are all relatively clear. Both the location and the connector of the wires in Kalina are determined in advance for this.
But where to install the button will have to be decided by the owner himself. The two most popular places are the dashboard in front of the gear shift and the driver's door. The first method is convenient because the button can be reached from almost anywhere in the cabin. The button on the driver's door is primarily a convenience for him.
Once the location for installing the button has been selected, it is time to install the electrical wiring. About 4 m of wire will be required. The connection point is located under the rear seat. The connection is made to connector 13, it is signed, so searching will not cause any difficulties. The work can easily be done independently. Thus, it became clear how to make a trunk lock drive.
Body protection when installing roof rails
Sometimes situations occur in which, after the installation procedure, paint scratches appear on the roof surface of the Lada Kalina sedan. To avoid this, it is recommended to use flexible plastic to help. To do this, we purchase a couple of sheets of transparent film and make a template in the shape of arc supports. Then we glue the resulting template to the body element.
Experts also advise resorting to protecting the metal around the mounting holes on the Lada Kalina sedan. Double-sided tape is useful for this purpose.
Please pay attention! Before directly applying the film with tape, thoroughly degrease the surface. The best choice here is White Spirit.
Backseat
You will need: a 13mm socket.
Procedure for the Lada Granta sedan:
- Remove the rear sofa (in Fig. No. 3) by lifting it by the hinge and remove the cushion brackets from the stops. Tilt the back of the rear seat by pressing the latches (in Fig. No. 4).
- Remove the rear seat backrest by unscrewing 2 bolts (no. 2 in Fig.).
Rear seat catalog number: 21900-6820210 and 21900-6820200.
Instructions for station wagon/hatchback Kalina 2:
- pull loop No. 3.
- fold back cushion No. 4 of the rear seat, right or left.
- remove the pillow brackets No. 1 from the stops No. 2, remove the pillow.
- press handle No. 3, locking the right or left back of the rear seat.
- tilt the backrest No. 1.
- Unscrew nut No. 1, right and left fastening the right or left rear seat backrest to the bracket.
- remove the backrest (replaceable head 13, knob).
- if it is necessary to dismantle the rear seat back brackets: unscrew bolts No. 2 securing the brackets to the body, remove the brackets (replaceable head 13, knob).
Let us remind you that on the website you can read reviews about the sound insulation of the Lada Grant.
Keywords: Lada Granta seats | Lada Kalina seats
3
Found an error? Select it and press Ctrl Enter..