Lada Kalina thermostat from grants
The maximum coolant temperature of Lada Kalina FL and Lada Granta cars after 1.5-2 years of operation is 78-80 ° C. It is slightly lower than that achieved in previous AvtoVAZ models.
Therefore, some drivers consider this temperature regime of engine operation to be “non-optimal”. This, in their opinion, leads to increased fuel consumption and rapid wear of internal combustion engine parts. But plant specialists are not inclined to connect these indicators with each other, since no direct relationship between them has been noticed. The fact is that the Lada Granta-2190 has a more efficient single-circuit engine cooling system, therefore the coolant temperature is lower while maintaining other characteristics of the car. This modernization made it possible, for example, to increase the ignition timing, and therefore save some fuel. The inertia of the thermostat has also decreased. However, if you are not satisfied with the climate inside your car in winter, you should try upgrading the standard thermostat.
How can you modify the heater?
The new models LADA Kalina 2 and LADA Granta use a cooling system operating scheme with parallel connection of the heater radiator. Because of this, the operating temperature is reduced to 85 degrees, which is slightly lower than on previous models of the VAZ family. Many car owners seriously believe that this temperature cannot be normal - there is increased fuel consumption, as well as a decrease in the service life of moving engine parts due to premature wear. But according to experts, there is no connection between the reduced operating temperature and engine life.
The cooling system of the Lada Kalina works more efficiently thanks to a single-circuit design. Such a modernization only benefited the engine; it made it possible to change the ignition timing, resulting in fuel savings. The inertia of the thermostat is also reduced. The downside was the mediocre heating of the cabin at sub-zero temperatures. The way out of the situation is to independently modify the thermostat. Modification involves two main methods:
- shorten the rod of the solid-state temperature-sensitive element;
- replace the thermocouple.
For cars with a cable gas pedal, a heated throttle assembly from the cooling system is used. In this case, an additional circulation circle is added.
Adjusting the stroke of the thermoelement
Trimming the heel of the thermoelement rod allows you to increase the temperature of the coolant to 85-90° C. We shorten the rod sequentially, 1 mm at a time. This should be done carefully, as its metal is quite soft. Each time after trimming, you need to install a thermostat in the car and monitor the temperature of the fluid while driving. If it does not satisfy you, the rod is shortened by another 1 mm. And so on until the temperature in the cooling system reaches 90-92° C, and the air in the cabin warms up to the required temperatures.
thermostat for engines 11183 and 21116, 21126
On grants with engines 11183 and 11186 (21116), 21126, a BEHR thermostat is used.
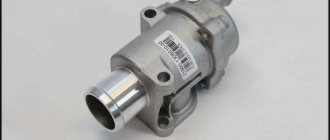
Thermostat elements:
1 – body; 2 – sealing ring; 3 – balloon; 4 – spring; 5 – fixing plate; 6 – cover
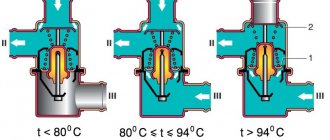
The thermostat consists of a metal cylinder with a heat-sensitive filler, a spring and its fixing plate. The cylinder rod fits into the socket of the thermostat housing. In the closed position of the thermostat (on a cold engine), its spring, resting on the fixing plate, presses the cylinder plate to the seat of the hole in the housing, closing the channel between the housing and the thermostat cover. As a result, the flow of coolant through the radiator of the cooling system is blocked. In this case, all the liquid circulates through a small circle of the cooling system: pump, cooling jackets of the cylinder block and cylinder head, thermostat housing and cover, heater radiator, steam exhaust hose of the cooling system radiator, expansion tank, pump supply pipe. When the coolant temperature reaches (85±2) °C, the thermostat bottle filler begins to melt and increases its volume, pushing the rod out of the thermostat bottle. In this case, the cylinder plate moves away from the seat, and the liquid begins to circulate in a large circle, which includes the pump, cooling jackets of the cylinder block and cylinder head, thermostat housing and cover, radiator of the cooling system, steam exhaust hose of the radiator of the cooling system, expansion tank, heater radiator, pump supply pipe. When the coolant reaches a temperature of (100±2) °C, the thermostat valve opens completely.
Coolant temperature sensor
The coolant temperature sensor installed in the thermostat cover provides information to the engine management system controller
Changing the thermal insert
You can replace the entire thermal insert. Wahler inserts are ideal for the standard Grant thermostat: 3017.87 D (at 87° C) and 3091.92 B (at 90° C). The insert changes along with the spring. This modernization is carried out using thermostats manufactured by BEHR (which is equipped with the new BAZ-2190 car). There is no need to make any modifications or fit new parts. The BEHR thermostat is dismountable, and the Wahler “thermos” will have to be cut with a hacksaw in order to remove the thermocouple.
Alternatively, you can use a Daewoo Nexia, Renault Logan or Vernet 4898.92 part as a “donor”, but the diameter of the latter’s thermoelement is slightly larger than necessary and requires adjustment. For Luzar models such a replacement is not possible.
Some car enthusiasts who have made this modification claim that fuel consumption, although slightly, has decreased.
Throttle valve heating
Another modification of the “thermos” on the VAZ-2190 is the installation of a heating circuit for the throttle assembly. This is how some car enthusiasts insure themselves against freezing of the throttle valve. To do this, an additional threaded hole is made in the cover of the part, where a fitting is welded through a copper washer to drain the heated liquid. The studs for attaching the “thermos” will also have to be enlarged.
In the end, I would like to note that the engine temperature also depends on the brand of antifreeze used and the viscosity-temperature properties of the oil. Low temperatures in the cabin may be caused by problems in various vehicle systems.
In the engine cooling system in a Lada Kalina car with an engine of 8 valves, as well as 16 valves, the thermostat plays a significant role, because it is a regulating link, thanks to which the operating temperature necessary for the normal implementation of the combustion process is maintained in the circuit. The main signs of failure of this part are:
- unit overheating;
- inability of the motor to reach its operating temperature.
Let's look at how to replace such an important component as a thermostat using the example of a Lada Kalina 8-valve engine; similar work is performed on a 16-valve engine. Doing this work yourself will allow you to gain enviable experience and save a lot of money.
Differences in thermostat design.
The design of the thermostat uses a valve of a different design in contrast to valve 21082. The valve disc has an outer diameter of 29 mm, and valve 21082 has a disc diameter of 32 mm. Replacing one valve with another is possible thanks to a recess in the thermostat housing for valve 21082. If you install valve 21082, it is better to rub the seat with valve grinding paste. The rubber-coated valve Luzar 21082 does not require lapping. For those who like temperatures of 90-92 degrees, thermoelement TN 4898.92(J) It also needs to be removed from the body and rubbed in with lapping paste for 5-10 minutes (preferably). The best option for replacing the original thermoelement would be WAHLER 3091.92D. it has one bore diameter, but is rubberized and does not require lapping.
The thermostat is an indispensable part in every vehicle, be it a heavy truck or a passenger car like the Lada Kalina. If the thermostat device fails, it requires immediate replacement. Why might this happen? How to correctly perform the procedure for replacing the thermostat on a Lada Kalina? Car enthusiasts share their experiences in this article.
Features of replacing the thermostat on Kalina
How to replace a thermostat? To successfully implement the indicated procedure, the owner will need to adhere to the steps below.
- First, disconnect the connector of the sensor connected to the intake air tract filter element unit.
- To ensure better convenience, we recommend that you completely remove the air filter housing from the engine compartment. It is held in place by three fastening points, 2 of which are based on elastic bands, and the third is located in the battery area.
- Before draining the antifreeze from the cooling circuit, we determine how to carry out this manipulation. Here we highlight two of the most convenient methods.
- The first method is a procedure that allows you to perform a drain using a conventional air compressor used to inflate tires. This option eliminates the need for a pit or lift, and the work itself can be done in any suitable location. Now you know how to change it, but let’s add that the undeniable advantage of this method is that there is no need to remove the pipes and unscrew the plugs located on the engine block and radiator.
- Before the procedure, we stock up on an empty container, the capacity of which is equivalent to 4-6 liters of liquid, as well as directly on the compressor with the device.
- Open the cap on the expansion tank, from which we also remove a small diameter hose. We seal the “bare” tank fitting with adhesive tape.
- We place this hose in a pre-prepared container and hold it securely inside the container.
- The hose leading from the discharge pipe of the compressor unit is inserted into the hole in the expansion tank (sealed).
- By briefly turning on the compressor, we force compressed air to penetrate into the system. Air displaces liquid from the circuit, and it flows into the container.
- We carry out the procedure until the antifreeze is completely removed from the LADA Kalina system.
- The second common method is to drain through open plugs on the radiator and engine block.
- For this purpose, we also prepare a suitable container and, using the indicated manipulations, completely drain the liquid. Don't forget to screw the plugs back in.
- Now, using a convenient screwdriver, we loosen the fasteners of all pipes suitable for the thermostat and then remove them.
- To dismantle the thermostat itself, we arm ourselves with a hex key, size “5”, and unscrew the 3 screws.
- If, after unscrewing, the unit does not “want” to be disconnected from the lines, then using the same screwdriver, we loosen it, running the tip between the adjacent surfaces.
- We clean the mating sections of the main pipes with the LADA Kalina thermostat from scale formations and at the same time replace the sealing gaskets.
- We install the new product in its original place, tightening the bolts securely.
- After this, we connect all the dismantled pipes to their original places, not forgetting to tighten the fastening clamps.
- We check the reliability of the screwed plugs and fill the system with antifreeze. We do this through the neck in the expansion tank of LADA Kalina.
- In some cases, it will be convenient to replace the thermostat along the way if its service life suggests this action or is approaching such a need.
- Upon completion of filling, install the housing with the air filter and connect the previously disconnected sensor. Now you know how to change the thermostat in your car, so replacing the thermostat will not be too difficult for you.
Do-it-yourself replacement of the VAZ 1118 thermostat - detailed guide
1. Before starting disassembly, you need to drain some of the coolant.
2. Then remove the air filter, this is done as follows. You can read how to do this in the article:.
A
. Unscrew the top two screws and the nut from the engine compartment side. So that you don’t have to look for anything later, I recommend putting all the parts in one place.
V
. Pull the valve up, then move it and the tubes to the side.
G
. Remove the connector from the air sensor, loosen the clamp and remove the air hose.
d
. Slightly loosen and slightly turn the air filter housing and pull it out.
3. Using a screwdriver and a socket on “8”, you need to loosen the clamps, then remove the four hoses. A well-bled system will not leak much coolant.
6. Next, you need to clean the seat from dirt. Remove any remaining old gasket and wipe the area with a clean cloth. Apply the sealant in a thin layer of 1–1.5 mm or use a special paper gasket.
7. It is now possible to replace the Lada Kalina thermostat
. If you used sealant, allow it to crystallize; this requires waiting 5 to 10 minutes.
8. Install the new thermostat, do it in the reverse order of removal, and do not forget to move the temperature sensor from the old thermostat and screw the ground wire onto the upper mounting stud.
9. Connect all hoses and add the required amount of coolant to the cooling system using the air lock removal technique.
10. Start the engine and carefully inspect all connections for leaks. If you find a leak, be sure to tighten the clamps.
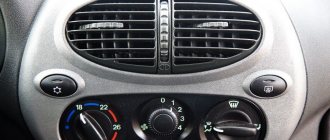
When completed, all of the above problems with engine heating should disappear. Check the operation of the thermostat; to do this, while driving, pay attention to the temperature, it should be around 90 ° C.
Important points when replacing a thermostat
When replacing the thermostat, eliminate the risk of antifreeze getting onto the sensor connectors and into the air path of the Lada Kalina. To prevent such situations, we recommend wrapping electrical connectors and components in plastic bags. Due to the low cost of the thermostat, a more rational action would be to replace the entire thermostat. It is better to purchase original products, since analogues may not match their fastening characteristics (hole diameters, etc.). This will avoid difficult moments during installation.
Checking for correct installation
It is very easy to check the correct installation and operation of the thermostat in the Lada Kalina. Here you will need to warm up the engine and then immediately turn it off. Next, open the hood and feel for the lower pipe that goes from the radiator to the cooling jacket of the engine block. If it is heated, the thermostat opens, and there is no risk of the Lada Kalina engine overheating. When this phenomenon does not occur, the system components require careful diagnosis. Therefore, it would be a good idea to check the functionality of the new thermostat before installation.
Ambient temperature 0 degrees. There is no (strong) wind. The warming up speed of a car with Granta SOD is shown in the photo. It is approximately 10 degrees per minute. Started in mode. We wait for 3 minutes and then drive slowly.
For Lada Kalina 1 with naturally Kalinovskaya SOD... a similar experiment was carried out. But since the temperature indicator there is a pointer, I didn’t take a photo. However, after 6 minutes at an ambient temperature of -1, it showed the same slightly more than +50. (Similarly, there was no strong wind. Sorry, there is no anemometer to measure specific speeds.)
There is an opinion on entornets that supposedly converting the SOD to Grant will allow the engine to warm up faster - Bullshit. This gives nothing but hemorrhoids.
In both cases, approximately 10 degrees per minute were recorded. If there is a difference, then you need to catch it using a stopwatch and in any case it will take no more than 1 minute to heat up to +70.
Is it worth converting the car to Grant's SOD? If you have any problems with the heater or the engine cooling system, fix/flush the standard system, and don’t get creative.
Engine cooling system
The internal combustion engine must be intensively cooled. Without this, the unit will overheat and jam. The bulk of the “cooling energy” is required by the cylinder head and block. While small power engines can be cooled using an air flow, more powerful, multi-cylinder power plants cannot be brought to an optimal temperature without using a liquid cooling system.
- a cooling jacket through which liquid flows, taking away excessive heat from the cylinders;
- a pump that forces antifreeze to move through the cooling system;
- a thermostat that regulates the temperature by adjusting the flow of coolant in a small or large circle;
- fan and radiator, causing the liquid to cool faster as it moves around a large cooling circle;
- heater radiator that heats the interior of the car;
- connecting hoses and pipes connecting all devices into a single cooling system.
As mentioned above, the thermostat is responsible for movement in a large or small circle. This device is a spring-loaded valve with a thermocouple placed in a housing with several pipes. Under the influence of high temperature, from +85 °C to +90 °C, the technical paraffin contained in the thermoelement expands and opens the valve. Antifreeze begins to flow through the opened hole in a large circle, cooling in the radiator. When the liquid cools, the valve falls into place and the coolant stops flowing into the large circle.
And the story will be about replacing the thermostat of a Lada Kalina car with a thermostat from a Lada Granta.
Briefly about these machines. Both models represent a small class of domestic passenger cars. Kalina was produced from 2004 to 2022, and then it was replaced by Granta. The article will discuss replacing the thermostat that is installed in Kalina with an 8-valve engine with a Lada Grant thermostat.
Reviews
| № | Positive |
| 1. | Vasily: I’ve been actively using the car for a year and a half, there are no complaints, the cooling system works stably. I added antifreeze several times because the level was below average, but this is not so critical. |
| 2. | Gennady: after buying the car, I immediately drained the original antifreeze from the interior and filled it with imported antifreeze. The heater operates at full power, the cabin is always warm, and the engine does not overheat. |
| 3. | Vladlen: at 45,000 km the rubber fluid supply pipe burst, replaced it with a new one. I didn’t contact the service center, I handled it myself. |
| 4. | Kirill: in two years of using the car there were no major breakdowns, and minor ones were fixed on my own without the help of a service station. |
| 5. | Dmitry: at 50,000 km, I replaced all the original clamps on the cooling system pipes, since the old ones had lost their tightness and the liquid began to leak. There are no comments regarding the stove heater. |
| 6. | Denis: mileage 85,000 km, just now replaced the thermostat with a new one. I think that the resource is more than sufficient, as for a domestic car. |
| 7. | Ivan: in three years, I replaced the antifreeze once with a new one, and changed the rubber seal on the body. I am satisfied with the quality of workmanship, there are no particular complaints. |
| Negative | |
| 1. | Victor: low-quality parts, at 45,000 km I replaced the thermostat with a new one, the old one jammed. The antifreeze did not circulate in a large circle due to a malfunction. |
| 2. | Ivan: My regulator lasted for a year and a half, after which the spring jammed. I think that the resource is too small, even for a domestic car. |
| 3. | Vladimir: A year has passed since I bought the car, and I already regret the purchase. Crude assembly, many defects that the manufacturer does not eliminate. |
Adjusting the new thermostat
Why change the Kalina thermostat to a Grantovsky device?
There can be only two reasons why the original thermostat installed on the Kalina is replaced with a device from Grant:
- Firstly, this is engine overheating when the power plant temperature needle is around +100 °C. This mode of operation can lead to jamming of the pistons.
- Secondly, there is insufficient heating of the interior in winter. In addition to the fact that it is uncomfortable to be in a cold car interior, this also causes the windows to freeze and you have to drive blindly. And this is a real danger to life.
This is due to the fact that the standard cooling system of the LADA Kalina does not know how to “de-air” itself. That is, if air gets into the small cooling circle, it will no longer be removed from the system. The process grows like an avalanche, air will continue to be sucked in constantly. This leads to the fact that the coolant does not flow to the radiator, the engine overheats, and cold air blows from the stove. The problem is solved by installing a thermostat from LADA Granta. As the owners of Kalina, who decided to take such a step, say, after reinstalling the thermostat, all problems were solved: the cabin became warm, and the engine temperature did not rise above +90 ° C.
LADA Kalina thermostat installation from Granta
Experienced car enthusiasts understand the principle of operation of the thermostat. Beginners have only heard about this part, but do not know what it is used for. Everyone encounters a thermostat sooner or later, since the unit changes with the same frequency as any other consumable. It lasts no more than three years, and its breakdown is difficult not to notice.
Adjusting the thermocouple rod
Shortening the end of the thermosensitive element rod will allow you to adjust the operating temperature to 90-95 degrees. Trimming is carried out sequentially in increments of no more than one millimeter. The metal is soft, so the procedure must be carried out carefully. the thermostat after each millimeter cut and check how much the operating temperature rises while driving.
Converting Kalina's SOD to a Granta thermostat
If the result does not meet expectations, you can adjust the rod further until the arrow on the instrument panel shows 95 degrees and the air in the cabin begins to warm up faster. The method is simple but effective. Among the disadvantages, there is a slight increase in wear of SOD parts due to operation at high temperatures. If you overdo it with shortening, you can ruin the device.
What is needed to reinstall the thermostat from Grant to Kalina
To bring the Kalina engine cooling system to optimal condition you will need:
- Thermostat. You can easily pick it up at a car dealership with the help of consultants. However, please note that some models have a fitting for heating the throttle device, while others do not. It is better to take it with a fitting, otherwise you will have to perform additional operations to connect the heating hose to the stove pipe.
- Some experts recommend changing the thermal insert on the Grant device. Supposedly this improves the operation of the thermostat. Others say it's a waste of time and money. If you wish, you can buy a thermocouple, for example, from. The fact that the device will be of this particular brand is not important. You can use thermal inserts from other manufacturers. The main thing here is characteristics and quality. Since the thermal insert assembly will not fit the thermostat from the Grant, you will need to remove the thermoelement from it. This can be done using a hacksaw for metal.
- In addition to the above, to rearrange the thermostat you will need two studs from the camshaft bed of the “classic”: from VAZ-2101 to VAZ-2107. These fasteners will be needed to secure the Grant thermostat to the Kalina engine. Standard studs will not fit, since the size of the element being installed differs from that installed at the factory.
- Stove pipes. In principle, their replacement may not be necessary. But practice shows that a long service life leads to the fact that it is better to replace them once work has begun on the cooling and heating system. You will also need a tee, which will need to be cut into the lower pipe of the stove.
- Lower radiator pipe from LADA Granta.
- Expansion tank pipe. It fits both Grant and the “ten”.
- Sealant, clamps and gaskets.
Once everything is prepared, you can proceed to installing the new thermostat. But for this it is still necessary to carry out preparatory measures.
Sequencing
- We place the car within the perimeter of the repair area.
- Loosen the clamp of the air supply pipe (Phillips screwdriver).
- Remove the mass air flow sensor (MAF).
- We unscrew the expansion tank cap and remove the vacuum.
- We unscrew the three clamps on the cooling system distributor and pour the waste into a plastic container (about 3 liters).
Preparatory processes before installation
Note to the driver! If the drained antifreeze is free of sediment, it can be reused later. Otherwise, replace the entire cooling system fluid.
- We press the block with wires from the engine control unit, disconnect the temperature sensor terminal.
- Using a key set to “13”, unscrew the negative terminal and remove it from the regulator body.
- Using the “8” head, we loosen the clamps of the supply pipe – the antifreeze return to the radiator.
Supply pipe clamps
- Remove the rubber pipes from the regulator.
Disconnect the rubber pipes
- Using the “13” socket, unscrew the two nuts that secure the thermostat to the wall of the cylinder block.
Two nuts - clamps to the block
- We remove the mechanism from its normal place and clamp it in a vice for preventive maintenance.
Clamp in a vice
- Using a Torx T-30 wrench, unscrew the three screws of the cover and remove it.
Removing the cover
- The connection between the cover and the body is sealed with a rubber gasket. We inspect it, if there is mechanical damage or deformation, we replace it with a new one.
- We grab the spring with pliers, press it, and release the metal plate.
Metal plate
- Release the regulator bottle.
Regulator bottle
- To check the functionality of the distributor, lower it into a container of water, gradually heat it up, bring it to a temperature of 85 - 90°C. We observe the movement of the rod. In good condition, it will move closer to the top.
Temperature adjustment
- We assemble the parts in the reverse order and install them in their original place.
Note to the driver!
At a water temperature of 96 – 98°C, the cylinder rod should fully extend to a distance of at least 8.0 mm. We replace the sealing ring with a new one. Before installation, clean the surface of the cylinder head from possible deposits.
Preparing to install the thermostat
First you need to remove the standard Kalina thermostat. Before this, the battery, air filter and pipe leading to the gas throttle are removed. Having finished with the air filter, begin to drain the antifreeze from the cooling system. It is better to place a basin under the engine, so the coolant will not spill.
After loosening the clamps, remove all pipes from the thermostat. Then they begin to unscrew the nuts on the studs. Unscrew the nuts and remove the thermostat. This completes the procedure for dismantling the old device. Preparations begin for installing the thermostat from the Granta car. To do this, you need to unscrew the old studs. This is easy to do with a hairpin driver, but if you don’t have such a wrench, you just need to screw a nut onto the hairpin, and then another one. Pull them tightly and unscrew them using a regular wrench. After removing the old studs, clean the thermostat installation site from old sealant and gasket residues. This is where the preparation ends.
Replacing the thermostat
On the automotive spare parts market you can find a large number of thermostats from various manufacturers; their cost varies from 400 to 700 rubles. When choosing, it is better to stick to original AvtoVAZ spare parts. The catalog number for the standard thermostat on Kalina is 1118-1306010. Of the analogues, “Luzar” and “Pramo” have proven themselves well, but the first is often counterfeited, and the second has poor quality - the service life is on average about a year. The original device, which is installed from the factory, can last more than three years. Replacing a thermostat on Kalina with 8 valves or 16 is estimated at no more than 800 rubles, including removing air from the system. To avoid paying twice, you can change the part yourself. Just before this, you should check the device for functionality using the described methods.
What tools will you need?
To operate, you will need a working thermostat and a suitable container for draining the coolant from the SOD - a regular five-liter plastic bottle. The differences between replacements on an 8- and 16-valve engine are insignificant. On the latter, you will need to additionally remove the starter so as not to accidentally fill it with antifreeze. The rest of the procedure is similar.
To remove the assembly, you will need two socket wrenches, 13 mm and 12 mm, since Kalina uses nuts of different sizes.
To seal the seat, you will need a silicone sealant gasket. To remove the clamps, use a shaped screwdriver. The procedure lasts on average an hour and a half.
Replacement instructions
The replacement process is not complicated and can be done independently if you follow the instructions. First you need to disconnect the wire plug from the sensor on the air filter and remove it. It will take a few minutes to properly dismantle the filter:
- the two upper screws are completely unscrewed together with the nut from the power unit side;
- there is a recirculation valve on the filter housing; it must also be removed;
- lift the valve up and, without disconnecting the hoses, move it to the side;
- unplug the terminal from the air sensor and, loosening the clamps, disconnect the air pipe;
- After shaking the filter from side to side, turn its housing and try to pull it out.
Installation of a thermostat from Grant
Before installing a new temperature-maintaining device, the studs from the camshaft of “classic” VAZ models are screwed in. All heels have triangular cutouts at one end. This is how manufacturers mark the end that screws into the engine block. Sealant is applied to the junction of the thermostat and the engine and a gasket is installed. The following installation steps:
- The thermostat is mounted on studs and screwed with nuts.
- A pipe is removed from the lower outlet of the stove in order to insert a tee into it, another outlet of which will be connected by a pipe to the expansion tank.
- After completing this procedure, the pipe is put in place, connecting the thermostat and the stove. A pipe leading to the expansion tank is put on the outlet of the tee and secured with a clamp. Air will be removed from the cooling system through it.
- A Grant hose is installed, running from the lower radiator pipe to the thermostat. It fits almost perfectly, so there is no need to lengthen or shorten anything.
- All that remains is to secure all the pipes with clamps, install the air filter, battery and add antifreeze.
If everything is done correctly, the engine will stop heating and will not raise the temperature needle close to critical values. And the car interior will be warm, even in the coldest weather.
Thermostat malfunctions
The thermostat is a consumable item, which means it cannot be repaired. You can carry out the replacement yourself or contact a car service center with this question. In the first case, only the cost of the device itself will be included in the costs. When contacting specialists, about 400 rubles will be added to this amount for the work of a car mechanic. The part is changed because there is nothing to repair in it. The most common malfunction is the failure of a solid-state temperature-sensitive element.
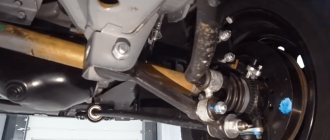
The thermostat on the Lada Kalina is located in the cooling system circuit between the radiator and the engine block - immediately below the air filter. It is enough to move it aside to see the device.
Before changing the thermostat or checking its performance, you need to know what malfunctions are typical for it. There are three signs that indicate a breakdown:
- The valve is stuck open. In this case, the coolant always circulates in a large circle, even when starting a cold engine. It takes much longer for the engine to warm up to operating temperature. In the summer, such a breakdown does not bring any inconvenience to the car owner, but with the onset of cold weather the engine may not warm up at all. The stove will not work as expected and fuel consumption will increase.
- The valve is stuck in the closed position. If the device cannot open, then the coolant circulates only in a small circle. The engine will constantly overheat, and there will be a risk of complete failure. Long-term operation of the vehicle with such a malfunction is prohibited. To prevent overheating, you can turn on the heater fan at maximum blowing speed and constantly monitor the engine temperature gauge.
- The valve opens earlier than it should. When the valve opens at a temperature of 70-75 degrees, the engine does not have time to warm up to operating temperature and spends more time and fuel on this.