The model of the domestic manufacturer is extremely in demand among car enthusiasts in Russia and the CIS countries. This is due to its moderate cost and ease of maintenance. However, a characteristic disadvantage of the car is unreliable wiring. The standard Kalina pinout is made in the form of 4 separate zones, united into a single whole by connecting harnesses.
- The front part is a “web” that combines the battery, dashboard, generator and optics.
- The instrument panel bundle is arranged to connect the front and rear compartments with the ECM, fuses and the instrument itself.
- The aft branch contains outputs from consumers in the doors, aft dimensions, license plate lighting, and trunk lid.
- The fourth section is responsible for powering the engine management system. This is where the ECU meets the relays and fuses. Sensors with instruments and indicators are also connected.
It should be noted that some design elements are interchangeable with other VAZ models. If any component fails, it is allowed to use components from other modifications of the automaker to repair the car.
Checking the fuel pump Lada Kalina/Granta
If after turning the ignition key there is no buzzing sound from the fuel pump, then the first thing to check is the fuel pump fuse and relay. In the Lada Kalina and Lada Granta mounting block, the fuel pump fuse is F21 (15A), and the fuel pump relay is K12. If the fuse is good, do the following:
- Turn on the ignition
- Remove the fuel pump relay
- Apply +12V to pin No. 11 of the diagnostic block, or place a jumper between 87 and 30 relay pins
- Check by ear that the fuel pump is turned on
If the fuel pump does not turn off, then check:
- Wiring and contacts between the fuel pump and the diagnostic block/fuel pump relay. To do this, check the voltage at the fuel pump chip using a test lamp or multimeter.
- There is no connection between the fuel pump and the vehicle ground. Apply the mixture to the fuel pump (located under the rear seat).
- The fuel pump is faulty. To check it, apply +12V directly to the contacts of the fuel pump (Attention! Remaining gasoline may ignite from a spark!).
In rare cases, the fuel pump does not work due to:
- ECU (controller) malfunction
- alarm malfunctions
Checking the fuel pump Lada Priora
On the Lada Priora, the fuel pump relay and its fuse are located in an additional mounting block near the left foot of the front passenger. The fuse is marked F3 (15A), and the relay is K2.
First of all, we check the fuel pump fuse, and if necessary, replace it with a similar new one. We check the wiring and the fuel pump itself in the same way as on Lada Kalina and Lada Granta cars (see above).
As a reminder, don't forget to change your fuel filter regularly.
- Why the fuel pump on the VAZ-2114 does not pump, and what to do
Keywords: power system Lada Granta | power supply system for Lada Kalina | Lada Priora power supply system
Share on social networks:
Found an error? Select it and press Ctrl+Enter..
Detailed electrical diagrams of car components
Instrument panel wiring harness wiring diagram
Electrical connection diagram for the wiring harness of the ignition system Lada Kalina 11174, 11184, 11194
Electrical connection diagram of the front VAZ-11184 wiring harness
Electrical connection diagram for rear wiring harness VAZ-11184
Useful: Connection diagram and pinout of the VAZ power window button
Diagram of electrical connections of the additional rear wiring harness (tailgate wiring harness) and the wiring harness of the license plate lights of the LADA KALINA 11174 car.
Electrical connection diagram for rear wiring harness VAZ-11174
Electrical connection diagram of the front VAZ-11174 wiring harness
Electrical connection diagram for rear wiring harness VAZ-11194
Wiring diagram for fog lights
1 - fuse in the assembly block; 2 — immobilizer output; 4 — rear fog lights; 4— external optics control unit; 5 — ignition switch; A - to power supplies.
Kalina fuel pump connector pinout
Hello to all subscribers! One of the common situations that happens, usually unexpectedly, is that the usual buzzing of the electric fuel pump in the rear of the car is absent when the ignition is turned on. As a result, the car engine refuses to start. I present an algorithm of actions if such a disaster suddenly happens. To begin with: photo 1 shows a fragment of the electrical circuit of the fuel pump.
Attention, working with electrical equipment is dangerous. If you are unsure, seek the help of a qualified professional.
First of all, the driver should first remove the side console on the passenger side (there are 3 relays with fuses there). Our electric fuel pump relay is the lower one. (Some cars from 2007 have 2 relays, but the fuel pump relay is the top one - see the repair manual). Directly above the bottom relay is our fuse. The first step is to make sure that this fuse is working properly (photo stage 1).
If the fuse is working and its contacts and its connector are not oxidized, then you need to make sure that the relay is working properly. You can immediately install a known-good relay and turn on the ignition. If the situation is corrected, then install the side console and have a good trip. If nothing has changed, then it is necessary to determine where the problem arose. To do this, you need to have a voltmeter or multimeter or a probe. But we will not determine the voltage value with a probe, and in this situation you need to know the voltage value - I’ll tell you why later. The second step (photo step 2) is to determine whether there is control voltage at the fuel pump relay. We connect the multimeter, turn on the ignition and determine the voltage value. If there is no voltage, then there is an open circuit coming from the main relay or from the ECU. If there is tension, then move on.
Stage 3 (photo stage 3) is to determine whether the power goes further directly to the fuel pump itself. If the power does not come out, the culprit is most likely the relay due to possibly burnt contacts. If the voltage goes away, but its value is 10 volts, then most likely the relay contacts are also burnt. At this voltage, the pump motor will not start. We change the relay and check. If the power goes further and its value is 12 Volts, then the culprit is the wires going to the electric motor of the pump or the pump itself.
Stories from our readers
“Fucking basin. "
Hi all! My name is Mikhail, now I’ll tell you a story about how I managed to exchange my two-wheeler for a 2010 Camry. It all started with the fact that I began to be wildly irritated by the breakdowns of the two-wheeler, it seemed like nothing serious was broken, but damn it, there were so many little things that really started to irritate me. This is where the idea arose that it was time to change the car to a foreign car. The choice fell on the melting Camry of the tenth years.
Yes, I had matured morally, but financially I just couldn’t handle it. I’ll say right away that I am against loans and taking a car, especially not a new one, on credit is unreasonable. My salary is 24k a month, so collecting 600-700 thousand is almost impossible for me. I started looking for different ways to make money on the Internet. You can’t imagine how many scams there are, what I haven’t tried: sports betting, network marketing, and even the volcano casino, where I successfully lost about 10 thousand ((The only direction in which it seemed to me that I could make money was currency trading on the stock exchange, they call it Forex. But when I started delving into it, I realized that it was very difficult for me. I continued to dig further and came across binary options. The essence is the same as in Forex, but it’s much easier to understand. I started reading forums, studying trading strategies. I tried it on a demo account, then opened a real account. To be honest, I didn’t manage to start earning money right away, until I understood all the mechanics of options, I lost about 3,000 rubles, but as it turned out, it was a precious experience. Now I earn 5-7 thousand rubles a day. I managed to get the car buy after half a year, but in my opinion this is a good result, and it’s not about the car, my life has changed, I naturally quit my job, I have more free time for myself and my family. You’ll laugh, but I work directly on the phone)) If If you want to change your life like me, then here’s what I advise you to do right now: 1. Register on the site 2. Practice on a Demo account (it’s free). 3. As soon as you get something on the Demo account, top up your REAL ACCOUNT and go to REAL MONEY! I also advise you to download the application to your phone, it’s much more convenient to work from your phone. Download here.
Second cigarette lighter in the car
The easiest way, perhaps, is to install a cigarette lighter instead of a socket for a portable lamp . For those who don’t know, it’s located a little below the immobilizer. It already has a permanent “plus”, you just need to remove the socket (don’t forget to disconnect the battery), slightly increase the diameter from 25mm to 26mm and install an additional cigarette lighter in the socket.
Another method demonstrates how you can install
a cigarette lighter in a VAZ 2110 tunnel . In stores you can find a cigarette lighter kit with a hinged cover, wiring and fuse. Secure it to the tunnel using the self-tapping screws that also come with it. If there is a need to install several cigarette lighter sockets at once , then you can use Chinese tees with wiring.
For example, cut off the connector and simply solder it to the wire of the standard cigarette lighter. Route the wiring into the glove compartment, where you can place the tee socket. Placing a second cigarette lighter next to the standard one or under the immobilizer is also not a problem:
Additional cigarette lighter in the trunk
Those who read the configurations of foreign cars may have noticed the item: a second cigarette lighter in the trunk of the car . It acts as an outlet into which you can connect various devices that may be useful on the road.
Why do you need a cigarette lighter in the trunk of a car ? Many people use a car vacuum cleaner, compressor, refrigerator, inverter, flashlight, etc.
The connection of the cigarette lighter in the trunk is similar (in parallel with the standard one or separate wiring from the battery through a fuse).
Either a regular cigarette lighter or a tee, which was discussed above, can act as a socket in the trunk.
Comments
Guests cannot leave comments on the site, please log in.
Products for LADA at the best price
A selection of accessories for LADA from AliExpress
Car : Lada Kalina. Asks : Igor MMM. The essence of the question : the fuel pump is not buzzing, what should I do?
Good afternoon. When I turn the key in the ignition, the fuel pump stops humming . The starter turns. But the car won't start. I raised the backrest, reached to the pump wires, there is no voltage there when turned on. Where to start diagnostics?
General diagram of VAZ-1117, VAZ-1118, VAZ-1119
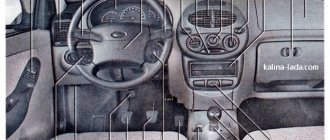
Elements of the instrument panel harness connection diagram
1, 3, 4, 5 — blocks of the tidy wire bundle to the front harness; 2, 8 - the same for the rear “pigtail” of wires; 6, 7, 9, 10 - continuation of the direction to the assembly unit; 11 — power supply for the lighting control device; 12 — set of instruments; 13 — toggle switch for the electric motor of the stove; 14 — power supply to the air supply box; 15 — ignition switch Lada Kalina; 16 — immobilizer block; 17 — block of the dashboard wiring harness to the ignition system wire bundle; 18 — cigarette lighter power supply; 19 — alarm switch; 20 — rear window heating switch; 21 — brake light switch; 22 — alarm light breaker; 23 — adjustment of computer modes ; 24 — windshield wiper control; 25 — VAZ horn switch ; 26, 27 — heating and ventilation control lighting lamps; 28 — glove box lighting; 29 — power supply to the on/off button in the glove compartment; 30, 31 — pinout for the standard radio; 32 — power supply to the electric motor of the stove; 33 — heater resistor network; 34 - electric amplifier control unit.
Why is there no power to the fuel pump?
A gasoline pump is necessary to supply fuel from the gas tank to the fuel rail, creating the necessary pressure.
Electrical circuit for controlling a fuel pump.
The fuel pump is an electromechanical device, so its breakdown can be due to both insufficient power supply and mechanical damage. It is not difficult to detect a lack of tension.
- To do this, turn on the ignition and listen.
- When you turn the key, the fuel pump starts, which creates a slight hum . If you don’t hear a buzz, then most likely the device is de-energized . You have already found out that there is no voltage supplied to it.
Diagnostics
To check the amplifier in a car, you need to remove the plastic trim on the steering column; to do this, unscrew the bolts securing it from the bottom.
Then you will need to get to the 8-pin plug, its pinout is as follows:
More accurate results will be obtained by checking the amplifier using a scanner. But since such equipment can usually only be found at service stations, you can try to check the operation of the system with a paper clip.
To check you need to do the following:
How to understand where to look for the cause by the blinking indicator icons:
Error codes
c1044 - incorrect sequence of the rotor position sensor (RPS)
c1621 - incorrect voltage 5V
c1622 - speed signal circuit failure
c1011 - car engine speed signal circuit, no signal - the signal from the idle sensor (or the standard tachometer through a voltage limiter) is divided by 4 and applied to the tachometer input,
c1022 - error, voltage of the main output of the torque sensor - it is possible that the shaft cover has rubbed the insulation and the middle, green wire shorts to ground
How to check the functionality of the pump?
If the engine is absolutely “dead”, follow this algorithm:
- Turn on the ignition without turning the starter. A working electric fuel pump should respond with a quiet but distinct buzzing sound coming from the rear row of seats. If there is no sound, go to the next step.
- Using the car's operating instructions, find the number of the fuse that protects the pump's power circuit. Try replacing it; if unsuccessful, check the wiring and clean the contacts from oxides.
- If previous manipulations did not produce results, you need to measure the fuel pressure in the fuel rail.
Algorithm for checking a fuel pump using a tester:
Stage 1 – checking the fuse and relay. Stage 2 – checking the voltage at the relay input. Stage 3 – checking the voltage at the relay output. Stage 4 – checking the voltage on the fuel pump block.
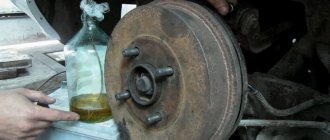
The Lada-Kalina submersible fuel pump, as in other cars, is necessary to supply gasoline to the combustion chamber of the internal combustion engine. The pump is activated immediately when the ignition is turned on and maintains operating pressure until the car is turned off or the fuel runs out. The fuel pump is part of a module that includes a fuel pressure regulator, which changes the supply parameters when the driver operates the accelerator pedal. The module also contains a sensor that sends data to the dashboard, to the fuel level indicator. In addition, the design of the fuel filter includes a fine-mesh mesh for coarse fuel cleaning.
The manufacturer declared the resource of the fuel pump on Lada Kalina to be 160 thousand kilometers. The most common model of the unit is a Bosch submersible rotary fuel pump. This is available in online stores for approximately 2,500 rubles.
Features of electrical equipment
Innovations concerned not only the spelling of the car name, but also the modern “stuffing” of the vehicle. In particular, the car received:
- Three power units of different power (from 87 hp to 108 hp);
- Manual and automatic transmission;
- Driver airbag;
- Electric power steering.
ECM of the 1.4 liter Lada Kalina engine
These innovations were already available in the basic configuration of the car. In addition, the wiring in Kalina made it possible to connect additional devices (see also the Gazelle Business wiring diagram).
Buyers could also choose options offered by the automaker, most of which were new products for the domestic auto industry:
- ABS and ESP systems;
- Heated front seats;
- Airbag for front passenger;
- Audio system with touch screen;
- Air conditioner;
- Navigation system;
- Rain and light sensors, etc.
Design and operation of fuel supply
The system that provides the engine with the required amount of gasoline operates according to the following algorithm:
- After turning on the ignition, the electric fuel pump starts, raising the pressure in the line after itself to a certain level. The electrical power supply circuit of the unit is protected by a fuse.
- The fuel pressure regulator (common abbreviation - RDT) is located on the line after the pump and limits the upper pressure threshold, dumping excess fuel back into the tank through a separate pipeline.
- When the crankshaft is rotated by the starter and the engine continues to operate, fuel enters the fuel rail, mixes with air and is directed to the injectors built into each cylinder. The amount of mixture supplied to the combustion chambers is controlled by an electronic unit.
- On the way to the fuel rail, gasoline goes through 2 stages of filtration. The first is a mesh installed in the tank on the suction pipe of the pump, the second is a fine filter on the gas supply line.
Reference. In various car models, 2 schemes are used for installing the RTD and laying the return pipeline - in the engine compartment or directly in the gas tank. In the first case, the standard fuel pressure in the system is 2.7...3.0 Bar, in the second - 3.8...4 Bar.
A common mistake made by ignorant car enthusiasts: if the combustible mixture does not enter the cylinders, then the fuel pump is definitely not working. Knowing the design of the fuel supply, we can assume other problems:
- the protective fuse in the electrical circuit has blown, the pump is in good working order, but does not receive power;
- the primary or secondary filter is clogged (sometimes both at once), fuel flows in small quantities or does not flow at all;
- the pressure regulator has become unusable, dumping the lion's share of the fuel back into the tank, the engine gets nothing;
- One or more injectors have failed.
To accurately determine the source of the problem, you need to check the operation of the electric fuel pump and other elements. It is not necessary to go to a service station - diagnostic work can be carried out in your own garage.
Signs of trouble
There are several signs by which you can determine that the Kalina fuel pump is not working:
- the car does not start or stalls almost immediately;
- “Kalina” twitches when moving;
- the car does not develop maximum speed;
- extraneous noise or grinding noise coming from the fuel tank.
Similar symptoms are also observed when the fuel filter is clogged. Therefore, before removing the fuel pump on the viburnum, first replace the filter element. If the “symptoms” do not disappear, repair or replace the fuel module.
Replacing the fuel pump Kalina
Before replacement, read the operating manual to learn the location of the fuel system element, the specifics of the adjacent fuel lines and the types of fasteners. When working, it is important to follow the outlined algorithm so as not to disrupt the functioning of the fuel supply system. Damage to the fuel line or improper assembly of the fuel module can lead to engine damage and even a car fire.
To carry out the work, the car owner will need:
- pliers;
- hammer;
- screwdrivers for flat and Phillips slots.
Sequence of replacing the fuel pump Lada Kalina
Before starting work, you need to “de-energize” the Kalina by disconnecting the battery terminals. Repair procedures should be carried out away from fire and places where sparks could be generated.
- We dismantle the rear seat and floor trim;
- Under the seat there is a fuel tank cap secured with 4 “cross” bolts. Unscrew;
- Now the car owner has access to the top cover of the fuel pump;
- Now you need to “unhook” all the plugs and fittings from the pump. To remove the power plug, press the latch upward and pull the plug to the side. The power plug itself is located on the left side of the fuel pump cover;
- To remove the fittings, you must use pliers. The locking clamp is pressed out by hand, after which the fitting itself is removed using pliers. The main thing is not to confuse the fittings: the lock on the top is green, the lock on the bottom is metal;
- After dismantling the fittings, clean the fuel pump cover as much as possible - dirt will not get into the gas tank;
- Removing the fuel pump cover retaining ring: take a flat-head screwdriver, place it against the outline of the ring and lightly tap it with a hammer so that the ring moves clockwise. The latch should pop out and the cover will be accessible;
- Open the cover and carefully pull the pump up so as not to damage the adjacent elements. Additionally, make sure that no sand gets into the tank;
- We take the new pump and carefully immerse it in the technological hole. We attach the lid. Next, assembly is carried out in reverse order.
After the repair, you need to start the Kalina and drive for a few minutes. During operation, it is necessary to check the operation of the internal combustion engine in different speed ranges, at idle speed; You also need to be attentive to various noises in the fuel tank.
The Kalina fuel pump relay is an important element for ensuring stable operation of the car. The internal combustion engine is the main unit for the movement of road transport. With the advent of electric vehicles, the share of cars with internal combustion engines is decreasing, but the vast majority will be provided with cars powered by hydrocarbon raw materials for the coming decades.
For stable operation of the flaming engine of any car, including the Lada Kalina, a stable supply of a sufficient amount of fuel is necessary.
The main element of the fuel system on Kalina is the fuel pump. The fuel tank on the Lada Kalina is located in the rear of the body, therefore, the delivery of gasoline through the supply pipes to the injector sprinklers must be constant and forced.
Other elements of the car's fuel system, in addition to the tank and fuel pump, are a fine filter and fuel supply pipes.
The module has been removed, what next?
Having disengaged the four latches, the module cover is disconnected from the “glass”. Then, the “glass” can be cleaned, the pump screen can be replaced, and so on. Details are illustrated in the photo:
The mesh will be fixed in front of the intake hole
The module is assembled in the reverse order. And when installing it in place, you need to make sure that the plastic protrusion coincides with the slot on the tank:
Here are a couple more tips:
- Do not turn on the pump motor “in the air” (the windings overheat);
- The module is replaced together with the sealing ring, which must be included in the kit.
Replacing the fuel pump on Kalina
Welcome! Fuel pump - is responsible for supplying fuel from the tank to the car engine; if it fails, fuel stops being supplied to the engine and therefore the car will not start, or over time it may simply start to work worse and in this case the car will twitch when driving and it will lose dynamics (the fuel pump in such a situation will still pump fuel into the engine, but it will do it very much), besides this, the fuel pump no longer serves anything, although if you think about it, it goes first together with the Fuel Level Sensor , secondly, there is still a mesh on it that cleans gasoline from dirt, so we can say, thanks to the gas pump, we also find out how much fuel is left in the tank and even before this fuel goes into the engine, it is cleared of small particles of dirt, by the way, we will give advice, If you don’t want to change the fuel pump very often, then try never to bring the gasoline in the tank to the very minimum and especially do not drive the car until it runs out of gas (Only do this in rare cases or because of the situation), otherwise such trains will not lead to anything good and soon the fuel pump (this is its second name) will become unusable.
Note! To replace this pump on a car, you will need a set of tools in which: Screwdrivers will be lying around, a hammer and a drift, but in principle, the help of screwdrivers will be enough (But this is only if you don’t have a hammer with a drift, if you do, be sure to take them)!
- Replacing the fuel pump
- Additional video clip
Where is the fuel pump located? It is installed inside the tank and through fuel pipes it pumps fuel from the tank to the car's engine, but not all people know where the tank is located on front-wheel drive cars, let's explain briefly, on classics many people even saw it when the trunk was opened (It's just that on classics it's in installed in the most visible place and if the trunk is not covered with a trim, as for example on a VAZ 2101 car this is done, there is no trim unlike the same 2107, for example, then the gas tank can be easily seen), but with regards to front-wheel drive, the gas tank is located under the bottom , and the fuel pump is inserted into it from above, so in order to get to the pump it will be enough to remove the rear seat cushion and then, by folding back the standard carpet and unscrewing the fuel pump flap (Indicated by a red arrow), you will immediately see the pump itself, for clarity it is indicated by a blue arrow in the photo below:
#1 11.10.2011 20:41:53
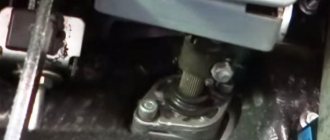
INSTALLING EUR (ELECTRIC POWER STEERING) ON KALINA The amplifier itself was purchased in Cherepovets today (special thanks to SASHA BEARD). True, with some disappointment, but it’s no one’s fault
At first I waited for the EUR to be delivered to another store, today I called and asked if there was an amplifier? -there is.. -whose? Kaluga how fast? -11500 (good) -IT IS WITHOUT GEARBOX. (I ASKED THREE TIMES) - yes, without a gearbox (they answered three times) - okay, I’ll arrive in three hours, typed the address into the nafigator and went
in general, the nafigator is a different story, he’s lying shamelessly, it’s good that there is a connection and Sasha sorted it out on the spot
well there was a spare option in another store but there the price is 16250 (almost five pieces) but without a gearbox
I looked in the general one, I’m asking about the connectors and there is NO schematic, okay, I bought it as is, in the general one, I’ll have to look for something for a schematic, then I’ll somehow dig it up, but with the connector it will be more difficult, can anyone help me dig up a connector with wires from the shops, of course there’s no disassembly, there was only one at work but they sold it a week ago along with the amplifier
Added 10/12/2011 12:32:59: the amplifier could not be installed, many parts are missing
car disassembly before disassembly
We carefully disassemble everything and get this
We are trying to install another one, of course it doesn’t fit, we need an adapter plate and a different cardan according to the photo, numbers 3, 6, and 8
you still need connectors like these
and so at this stage everything has been put back together and we are waiting for spare parts to either order or look for a donor, I’ll probably order
Possible causes of fuel supply system failure
The fuel pump on Kalina is electric. The use of this design and operating principle is justified by a number of advantages. These are simplicity and reliability, compliance with the required characteristics in terms of fuel supply volumes and a high level of safety ensured by turning off the system when the engine stops running.
On the other hand, for high-quality work you need excellent gasoline and cooling of the fuel pump, and the process is also accompanied by an increased noise level.
- As a rule, poor quality gasoline and dirty filters lead to incorrect operation of the gasoline pump or its failure.
- If there is no response from the engine when you turn the ignition key, the problem may be due to a broken fuel pump.
- Since the main unit of the fuel system is powered by current, to troubleshoot it is necessary to check the electrical circuit going to the fuel pump.
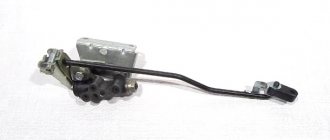
Replacing the fuel pump relay
The Kalina fuel pump relay is located in the cabin just below the dashboard near the air duct grille. To access the fuel pump relay, you need to remove the cover by prying it off with a regular flat-head screwdriver.
How to remove the fuel pump relay? Before replacing the relay, you should check the fuse box, which is located next to the gear lever and the ashtray. By opening the cover, you can visually evaluate the fuel pump fuse based on the integrity of the jumper. To remove parts, it is convenient to use tweezers, which can firmly and accurately fix the fuse.
While maintaining the integrity of the jumper, for final confirmation of operability, the part must be tested with an ohmmeter, since the point of contact of the wire with the legs may be open. If the fuel pump fuse is good, then the relay is not working. There are some nuances here. The fuel pump relay is removed using a socket wrench.
Having verified the integrity and operability of the electrical network and made the necessary replacements of parts, the Kalina fuel pump should start working again. If the fuel system still does not work, then the car owner will have to become more familiar with the components of the Kalina fuel supply system.
Video
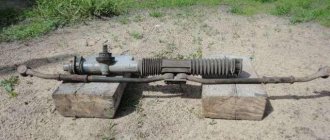
This video shows how to repair the steering mechanism on Kalina.
Knock in Kalina steering rack. How to remove.
Installation of Kalina steering rack.
Repair of the steering column gearbox and the RR itself on Priora, Kalina, Grant.
How to install a steering rack from Kalina 2 to Kalina 1.
Steering rack for Lada Kalina Sport with a gear ratio of 3.1 instead of 4.02.
Do-it-yourself repair of the steering rack, but not Kalina, but Daevoo Sens / Daewoo Sens.
Kalina control rack - VAZ 11183 Kalina rack repair
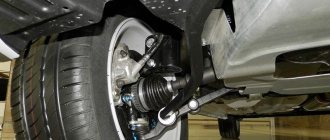
Have you ever had a chance to monitor knocks and noises from the side? Probably it happened. They changed the control tips, changed the ball tips, even changed the springs with support bearings, but does the knocking continue? It's time to tug, make sure there is free play and start sorting out the rack. In this article I will talk about repairing the VAZ 11183 rack , but the development is identical to all other VAZ front-wheel drive racks.
The most interesting thing is that these motherfuckers from AvtoVAZ do not fundamentally change anything except the gearbox housing, I bought a repair kit 2110-2112, the rack is listed in catalogs as 2110, but the splined part is longer than 2110, and the gearbox is slightly different, so just change Unfortunately, 11183 for 2110 will not work, although 2110 costs 2500 in my town, and 11183 5500 costs 6000 rubles. The difference per pocket is very noticeable.
Well, it doesn’t fit and doesn’t fit, so we give the engineers a hard time and start disassembling it. Unfortunately, there won’t be a photo for the article, because I was up to my elbows in mud and didn’t want to wash myself for the sake of pictures, but I’ll try to describe everything carefully.
Removing the steering mechanism.
1. For convenience of work in the future, and so as not to climb into the interior with stains, unscrew the bolt securing the splined connection from inside the cabin (you will see it near the floor of the control shaft).
2. We lift the car on a lift, throw it down, and knock out the control tips from the steering knuckles.