We will talk about installing an air conditioner in Largus due to the fact that it has become necessary. I’ll write right away at the very beginning in order to avoid the stupidest question in my opinion: - Is it possible to sell and buy at the maximum? I answer right away: No, nooooooooooooooooooooooooooooooooooooooooooooooooooooooooooooooooooooooooooooooooooooooooooooooooooooooooooooooooooooooooooooooooooooooooooooooooooooooooo Firstly, I already know this car right down to the bolt. All parts were replaced in accordance with mileage and regulations. I know when the next replacement is and then. I know what, where, how and when. Secondly, I rolled it all up with seams. Thirdly, I completely coated it with cannon fat. And sell it for the sake of the Conder? I think I answered. Question: - why did you start putting it? I’ll answer: - I have two small children and it’s hot for them in the cabin. We started driving a lot to parks and children’s attractions, and when we open the windows, they can get blown in from behind. Now the condenser is at the very minimum and there is a buzz in the cabin. Further in the article, I will not describe the process itself much, although I will touch on some aspects, but I will describe the most important aspects in my opinion. During the selection and purchase of parts, I made a number of mistakes. I thought Largus was the same Logan. But, I was wrong. This AvtoVAZ has changed a lot (((.
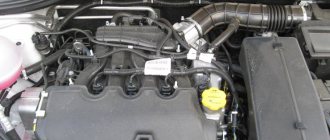
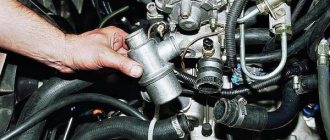
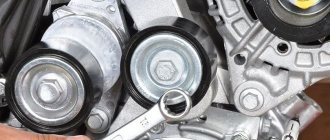
Well ? Enough of the pretense and let's go? I always do it right away in my conscience and my purely personal opinion, so that there are no problems later with the purchase of non-standard parts. Although there is a lot of choice on the Largus air conditioning equipment market. Here is an example After searching for information on the Internet, I realized that installing an air conditioner without installing power steering is not possible. My hands fell, but my spirit did not. The fact is that the air conditioning pump, generator and power steering pump sit on the same bracket and they are turned by one belt passing through a parasitic roller to the power steering pump and then to the tensioner roller.
I don’t have a gyroscope and I don’t need it under any circumstances. But you need air conditioning. In this picture, I have crossed out in red what can be removed, and with a yellow line I have shown how the “BOSCH” 6PK 1145 belt will fit. It fits like original and the roller tensions it perfectly.
In general, I went to the guys for disassembly and they assembled for me from Logan (-08): 1. The stove body assembled with the evaporator. 2. Air conditioning pipes. (later one did not fit) 3. Compressor 4. Compressor bracket. (later did not fit) 5. Heater switch for the air conditioner. 6. Rubber under the stove body to drain condensate. For all this, I gave 2000 rubles. But all this costs many times more. From other disassemblies, I took: 1. All wiring from Largus of the maximum configuration for 4000 rubles.
2. 8200765566 — Radiator fan with casing from 16 cl. Largus for Conder - 1500 rub. 3. 215010073R — Upper radiator hose from 16 cl. Largus for Conder 4. ACB35X55X20 NTN-SNR — I immediately changed the bearing in the compressor. — 450 rub. I bought radiators at the store. 5. 8200735039-Basic from Logan 8th grade - 3000 rub. 6. 921007794R - air conditioner from Logan 8 class - 3500 rub. . 7. 6PK 1145 — Belt “BOSCH” (6 streams) — 700 rub. 8. Pistons, electrical tape and nylon clamps. — 300 rub. 9. Refilling the Conder with oil - 1200 rubles.
Further along the way, I will describe the details, rakes and work on mistakes, so that your path would not be so thorny. I’ll write right away that I have an 8 cl engine. Renault k7m. I took the entire list of spare parts (except for radiators and a cooling fan) from a 2008 Logan. Take all brackets and parts with bolts at once! You'll be tired of picking them up later! Choose immediately from which machine you will install the equipment. If it's from Logan, then everything is from Logan. Everything except the compressor bracket. Largus has it. If from Largus, then take everything from Largus, because the Largus’ air conditioning tubes and the air conditioning radiator are different.
I decided to immediately install the wiring from the maximum speed and then ran into the fact that it was from Logan, Sandero, etc. Renoshek, the wiring is fundamentally different from Largus. It looks like the same base, but the wiring is different. In general, Largus is Largus and thank God the man explained this to me and he was right. Replacing the wiring under the hood and in the cabin was not difficult for me. I removed the dashboard and completely disassembled the interior with doors. I removed the wiring and installed a new one. Everything clings normally. Moreover, I already had all the windows, locks and mirrors for free. There were also heated seats. It's the same under the hood. I removed the wiring and installed a new one under the air conditioner. To replace the heater housing, you need to remove the under-torpedo amplifier (pipe) and the steering column from this pipe in order to pull out the pipe. Attention ! An elastic band is installed under the stove body in polycrystal for condensate drainage. It needs to be installed correctly, otherwise condensation will pour into the cabin. It is better to look for the stove housing with a cabin filter. Otherwise, the evaporator will become clogged. Yes, and it is better to take the housing with the evaporator assembled than to put the evaporator in the stove body, half of it for this purpose. All the dampers will fly apart and you won’t be able to put them back in place. In short, hemorrhoids. It's better to take it assembled. Next are the air conditioner pipes. Only 2 of the three tubes fit - this is a thick bypass tube and a tube from the radiator to the compressor. The thin bypass line from the evaporator to the air conditioner radiator did not fit. Or rather, the tube fitting itself, which is inserted into the air conditioner radiator, did not fit.
So. All the pipes from the cabin evaporator to the compressor and into the compressor itself fit. But the ends of the tubes that are inserted into the air conditioner radiator did not fit, because... radiator, I bought from Largus 8200741257, and tubes from Logan for the radiator 921007794R. Be careful !
If the air conditioner radiator 8200741257 is from Largus, then the tubes need to be from Largus. If the air conditioner radiator is from Logan, then the pipes are from Logan. They look identical, but the fittings in the A/C radiators are different. Well, now to the main thing. When installing the bracket for additional equipment (steering wheel, generator, compressor), I realized that it did not fit. You won't believe it, but they all look the same. But during installation one hole does not line up. These brackets have several numbers. They were installed on both Renault and Nissan Almera. Well, during the disassembly at UFA, the bracket I needed turned out to be the one I needed, and within a day the guy arranged for me to hitch a ride for 1000 rubles + 500 for the driver. I will explain the essence and number. Here is the one that did not fit with the number 688304373R from Renault.
It looks exactly the same, but the holes do not align with the engine block. They sent it from Ufa specifically from Largus with the number 8200941114 and stood up like a native
Lada Largus diagram
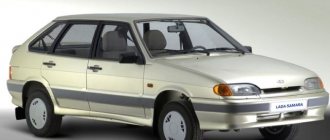
Here is the largest collection of diagrams and other useful literature on the Lada Largus, intended for self-repair and maintenance of the car. The first generation of LADA Largus was produced from 2012 to 2022. In 2022, LADA Largus underwent restyling, and in 2022 another one. In total, there are now such models as Largus station wagon, Largus Cross and Largus van. Please note that this is no longer a pure VAZ, so it does not have the number 21xx, and is called R90.
Air conditioning system design
The air conditioning system consists of the following main elements: compressor, condenser, evaporator and piping.
Air conditioning system design:
- capacitor;
- pipeline connecting the compressor to the evaporator (long part);
- pipeline connecting the condenser to the evaporator;
- pipeline connecting the compressor to the evaporator (short part);
- thermostatic valve;
- evaporator;
- compressor;
- pipeline connecting the compressor to the condenser;
- pressure meter.
Piston type compressor. The compressor creates the pressure necessary for the operation of the air conditioning system and circulates the refrigerant. The compressor is installed on the engine under the generator. Torque is transmitted to the compressor shaft from the crankshaft by a poly-V-belt through an electromagnetic clutch.
The condenser, due to heat exchange with the surrounding air, cools the gaseous refrigerant, at high temperature and under high pressure, condenses it into a liquid refrigerant. The condenser is installed on the radiator frame in front of the radiator of the cooling system.
The evaporator cools and dehumidifies the air inside the car through heat exchange with the refrigerant. The evaporator unit is installed in the heater housing in front of the heater core.
The receiver-dryer is designed to accumulate refrigerant in a liquid state, separating moisture and possible mechanical particles from it. The receiver-dryer is mounted on the condenser. The receiver has a built-in removable filter-drier.
Pipelines connect the elements of the climate control system with each other using flange connections.
To regulate the supply of refrigerant from the condenser to the evaporator, a thermostatic expansion valve (TEV) is installed in front of the evaporator.
A pressure sensor (PS) is installed in the pipeline connecting the compressor and condenser. The DD gives a signal to the ECM to turn off/on the compressor when the pressure deviates (increases or decreases) from the operating value.
Heating, air conditioning and ventilation control unit
The air conditioning system is controlled using the heating, air conditioning and ventilation control unit (CU), located in the lower part of the center console of the instrument panel. The location and purpose of the BU controls is shown in the figure.
Purpose of the controls of the heating, air conditioning and ventilation control unit:
Guys, many will be faced with the choice of buying a car with or without air conditioning. The difference between a car and an air conditioner is about 20,000 kopecks. Of course, it’s easier and cheaper to rent a car with air conditioning. For those who are thinking of renting a car now and delivering the condo later, I am posting the following calculation and price order. Taken from the site: https://www.autoklimatplus.ru/page8.html Clients often ask the question - “Is it possible to install air conditioning on my car?”
Answer - Possibly.
Accordingly, the next question is “How much will it cost?” And after the initial answer to this question, the client is no longer very willing to install it.
And if there is a question, there must be an answer - Why so many?
Let's start from the very beginning: 1 Installing an air conditioner involves the following costs:
— purchase of a compressor, the price varies from 4,500 rubles used (working or not, and how long it worked is unknown) to 60,000 rubles. for a new one, or even higher.
— buying a condenser (the so-called air conditioner radiator), it is advisable to refuse used ones; the price of a new one sometimes repeats the price of used ones. From 4,000 to 15,000 rubles.
— filter drier, depending on the brand of the car, it can come complete with a condenser, or can be purchased separately, the price is from 500 to 2,500 rubles. and only a new one is installed. More expensive options are also possible. For example, NISSAN PATFINDER the cost of a dryer is from 6,500 rubles and above, plus a delivery time of up to a month.
— evaporator, the part that costs from 1,500 to 6,000 rubles in the car’s air duct. Here questions may initially arise as to whether there is room for it in the air duct installed on your car. If not, then you will have to change the entire air duct and we are not ready to answer how much it will cost.
— thermostatic valve, can be installed separately, can come as an insert into a tube, variations from 500 to 2000 rubles.
- now all this must be connected into a single circuit, the connectors are tubes and hoses. The cost from disassembly is approximately, if not in season, 1500 rubles. for 1 tube and above. In total, in the simplest version, 4 tubes are needed. If we take new ones as a basis, they can be 2-3 times more expensive.
— To mount the compressor and condenser, you will need additional brackets; it is possible to find used ones.
— compressor drive, it’s good if you just replace the belt with a longer one. If not, you will have to purchase a crankshaft pulley, a belt tensioner pulley with a bracket.
That’s almost everything with the mechanical part, you just need to secure it all, lay it out, install it and connect it, the average price for this is from 8,000 rubles.
Now the electrical part: - low/high pressure sensor, evaporator temperature sensor, external temperature sensor, on button. off air conditioner This all needs to be connected into a single circuit and coordinated with the car’s electrical system. Lay additional wiring with a separate fuse (it happens that some of the wiring from the factory is already present). Cost for electrical work from 5,000 rubles.
In addition to everything, it will be necessary to install a condenser cooling fan and adapt it to the engine cooling system. This is another 2,000-4,000 and more rubles.
Here is the approximate amount: from 40,000 rubles. It's not with new parts.
Now, if you still want to install an air conditioner, call us, we are always happy to help improve the comfort of your car.
Here is the largest collection of diagrams and other useful literature on the Lada Largus, intended for self-repair and maintenance of the car. The first generation of LADA Largus was produced from 2012 to 2022. In 2022, LADA Largus underwent restyling, and in 2022 another one. In total, there are now such models as Largus station wagon, Largus Cross and Largus van. Please note that this is no longer a pure VAZ, so it does not have the number 21xx, and is called R90.
Wiring diagram LADA Largus
All units, including the K4M and K7M engine control circuit, battery charging circuit, low beam headlights and fog lights, turn signals and hazard warning lights, fuel pump and fuel level sensor, horn and sound system speaker connections, windshield cleaners and washers glass and rear door glass, electric front and rear door lifts, central door locking system and interior heating and ventilation system, other modules.
Wire harness connection diagrams
The following shows in more detail various fragments of the electrical circuits of this car.
1.6 (8V) engine wiring harness connection diagram
1 – generator Lada Largus; 2 – air conditioning compressor; 3 – cooling system fan; 4 – additional resistor; 5 – starter R90; 6 – battery; 7 – absolute air pressure sensor; 8 – vehicle speed sensor; 9 – crankshaft position sensor; 10 – intake air temperature sensor; 11 – adsorber purge valve; 12 – control oxygen concentration sensor; 13 – connection block with the wiring harness of the control oxygen concentration sensor; 14 – diagnostic oxygen concentration sensor; 15 – connection block with the wiring harness of the diagnostic oxygen concentration sensor; 16 – ignition coil; 17 – spark plugs; 18 – nozzles;
19 – throttle position sensor; 20 – idle speed regulator; 21 – coolant temperature sensor; 22 – knock sensor; 23 – refrigerant pressure sensor; 24 – pressure sensor in the power steering system; 25 – low oil pressure indicator sensor; 26 – reverse light switch; 27 – electronic engine control unit; 28 – fuse and relay block in the engine compartment; 29 – high speed cooling fan relay; 30 – low speed cooling fan relay; 31 – air conditioning compressor relay; 32 – fuel pump and ignition coil relay; 33 – main relay Lada Largus; 34, 35 – fuses in the relay and fuse box in the engine compartment; 37 – connection block with the front body wiring harness.
1.6 (16V) engine wiring harness connection diagram
1 – generator; 2 – air conditioning compressor; 3 – cooling system fan; 4 – additional resistor; 5 – starter; 6 – battery; 7 – absolute air pressure sensor; 8 – vehicle speed sensor; 9 – coolant temperature sensor; 10 – crankshaft position sensor; 11 – intake air temperature sensor; 12 – adsorber purge valve; 13 – control oxygen concentration sensor; 14 – connection block with the wiring harness of the control oxygen concentration sensor; 15 – diagnostic oxygen concentration sensor; 16 – connection block with the wiring harness of the diagnostic oxygen concentration sensor; 17 – ignition coils; 18 – spark plugs; 19 – R90 injectors;
20 – throttle position sensor; 21 – idle speed regulator; 22 – knock sensor; 23 – refrigerant pressure sensor; 24 – pressure sensor in the power steering system; 25 – low oil pressure indicator sensor; 26 – reverse light switch; 28 – electronic engine control unit; 29 – fuse and relay box in the engine compartment; 30 – high speed cooling fan relay; 31 – low speed cooling fan relay; 32 – air conditioning compressor relay; 33 – fuel pump and ignition coil relay; 34 – main relay; 35, 36 – fuses in the relay and fuse box in the engine compartment; 37 – connection block with the front body wiring harness.
Front Wire Harness Connection Diagram
1 – right headlight; 2 – right fog lamp; 3 – connection block with the wiring harness of the fog lights; 4 – left fog lamp; 5 – right high-pitched sound signal; 6 – left low-tone sound signal; 7 – left headlight; 8 – right side turn signal; 9 – windshield wiper; 10 – glass washer R90; 11 – ABS control unit Lada Largus; 12 – brake fluid level sensor; 13 – left side direction indicator; 14 – right front wheel speed sensor; 15 – relay and fuse box in the engine compartment; 16 – heater fan relay; 17 – fog lamp relay; 18, 19 – fuses in the relay and fuse box in the engine compartment; 20 – left front wheel speed sensor; 21 – connection block with engine wiring harness; A – the place where the wiring harness passes from the engine compartment to the passenger compartment.
22 – right steering column switch; 23 – driver airbag; 24 – spiral cable; 25 – left steering column switch; 26 – connectors for connecting to the audio system; 29 – brake signal switch; 30 – relay for heating the glass of the luggage compartment door; 31 – immobilizer coil; 32 – connection block with the wiring harness of the ignition switch; 33 – ignition switch;
34 – electric drive of the right front door lock; 35 – window regulator of the right front door; 36 – right front speaker; 37 – right outside mirror; 38 – connection block with the right outside mirror; 39 – left outside mirror; 40 – connection block with the left exterior mirror; 41 – left front speaker; 42 – window regulator of the left front door; 43 – electric drive of the left front door lock; 44 – diagnostic block; 45 – diagnostic block cover with jumper; 46 – airbag control unit; 47 – connection block with the heater fan wiring harness; 48 – heater fan; 50 – block of additional heater fan resistors; 51 – control unit for ventilation, heating and air conditioning; 52 – connection block with the wiring harness of the front passenger airbag and glove compartment lighting; 53 – right front door power window switch; 54 – central locking switch; 55 – alarm switch; 56 – switch for heating the glass of the luggage compartment door; 57 – power window switch of the left front door;
58 – switching block; 59 – connection block with the heater harness of the right front seat; 60 – heating element of the right front seat; 61 – right front seat heating switch; 62 – instrument cluster; 63 – connection block with the left front seat heater harness; 64 – left front seat heating element; 65 – left front seat heating switch;
66 – cigarette lighter; 67 – fuse box in the passenger compartment; 68 – right rear door power window switch; 69 – switch for indicator of parking brake activation and brake system malfunction; 70 – interior lamp; 71 – regulator for controlling electric drives of external mirrors; 72 – rear window lock switch; 73 – left rear door power window switch; 74, 75 – connection blocks with the rear body wiring harness.
Rear Wiring Harness Connection Diagram
1, 2 – connection blocks with the front body harness; 3 – electric drive of the right rear door lock; 4 – window regulator of the right rear door; 5 – limit switch for the interior lighting lamp at the right front door; 6 – limit switch for the interior lamp at the right rear door; 7 – right rear speaker; 8 – left rear speaker of Lada Largus; 9 – limit switch for the interior lamp at the left rear door; 10 – limit switch for the interior lamp at the left front door; 11 – window regulator of the left rear door; 12 – electric drive of the left rear door lock; 13 – right rear wheel speed sensor; 14 – fuel module R90; 15 – tailgate glass cleaner; 16 – element for heating the glass of the luggage compartment door; 17 – electric drive for the trunk door lock; 18 – left rear wheel speed sensor; 19 – right rear light; 20 – license plate light; 21 – additional brake signal; 22 – limit switch for the trunk light; 23 – trunk light; 24 – left rear light.
Electrical equipment
There are two types of electrical devices in the electrical circuit of a passenger car: sources and consumers. The former produce current, the latter consume it. They are all connected to each other by wires.
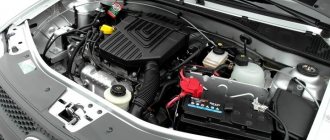
battery, generator
There are only two power sources in the car - the battery and the generator. The electrical circuit of the Lada Lagrus operates at a voltage of 12 volts. Accordingly, the same voltage is provided by the battery. Each current consumer is connected to a battery so that if the generator fails, the car continues to move. It is the battery that guarantees the engine starts. Maintenance-free lead batteries are installed in Largus; electrolyte cannot be added to them. When the battery is discharged, it is replaced with a new one.
The generator is powered by an engine drive. It generates current while driving and distributes it to all consumers. It also charges the battery.
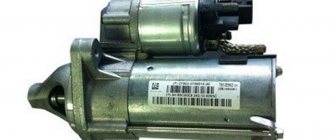
Ignition system
The starter is the main element of the engine starting system. It is powered by the battery and causes the crankshaft to rotate. This happens after the driver closes the electrical circuit of the Lada Largus with the ignition key. After the flywheel has started, the starter's function is completed and it turns off.
After the starter, the ignition coil turns on. It supplies current to the spark plugs, which ignite the spark in the cylinders. To ignite the fuel mixture, a constant voltage of 30,000 V is required. It is the coil in the electrical circuit that converts 12 V to 30,000 V and maintains this value constant.
Lighting
The lighting system is responsible for the operation of headlights and side lights. Every driver needs it to drive in the dark and during difficult weather conditions. Turn signals allow you to inform other road users that a maneuver is being made. They are controlled by a driver. There are signals that light up automatically: brake lights, reverse lights.
Additional consumers
The Lada Largus electrical circuit also includes:
- electric windows;
- interior and dashboard lighting;
- heated mirrors;
- windscreen wipers;
- radio;
- air conditioner;
- cigarette lighter
These devices are optional and do not affect engine performance. They are needed to ensure the comfort of the driver and passengers. The operation of these devices has little effect on fuel consumption, as they create additional load on the engine and generator.
Car fuses and relays
Fuse and relay box in the passenger compartment
The fuse box in the passenger compartment is located on the left side of the instrument panel, under a plastic cover. Remove the cover using the notch on the bottom.
| № | Current, A | Color | Protected target |
| F1 | 20 | Yellow | Windshield wiper, windshield wiper switch, heated tailgate relay |
| F2 | 5 | Beige | Instrument cluster, fuel pump relay, engine control unit (ECU) |
| F3 | 10 | Red | Brake light switch |
| F4 | 10 | Red | Diagnostic connector, immobilizer antenna unit, body electrical control unit |
| F5 | — | — | Reserve |
| F6 | — | — | Reserve |
| F7 | — | — | Reserve |
| F8 | — | — | Reserve |
| F9 | 10 | Red | Instrument cluster, left low beam |
| F10 | 10 | Red | Low beam right headlight |
| F11 | 10 | Red | Instrument cluster, left high beam |
| F12 | 10 | Red | High beam right headlight |
| F13 | 30 | Green | Rear door window motors |
| F14 | 30 | Green | Front door power window motors |
| F15 | 10 | Red | ABS electronic control unit, acceleration sensors, steering angle sensor |
| F16 | 15 | Blue | Electrically heated front seats |
| F17 | 15 | Blue | Sound signal Lada Largus |
| F18 | 10 | Red | Left front and rear parking lights |
| F19 F20 | 10 7,5 | Red Brown | Right front and rear parking lights, glove compartment lighting, instrument cluster lighting, hazard warning switch, HVAC control unit, audio system, cigarette lighter, central locking switch, front door power window switches, license plate lights, right lights front and rear position lights Rear fog light |
| F21 | 5 | Beige | Electrically heated exterior mirrors |
| F22 | — | Reserve | |
| F23 | — | — | Reserve |
| F24 | Reserve | ||
| F25 | — | Reserve | |
| F26 | 5 | Beige | SRS system |
| F27 | 20 | Yellow | Tailgate wiper motor, horn, TDC sensor, reverse light switch |
| F28 | 15 | Blue | Interior electrical control unit (energy saving mode) |
| F29 | 15 | Blue | Interior electrical control unit, diagnostic connector |
| F30 | 20 | Yellow | Interior electrical control unit |
| F31 | 15 | Blue | Fog lights, fog light relay |
| F32 | 30 | Green | Heated tailgate glass |
| F33 | — | Reserve | |
| F34 | — | Reserve | |
| F35 | — | Reserve | |
| F36 | 30 | Green | Electric motor for heating, air conditioning and ventilation systems |
| F37 | 5 | Beige | Electric exterior mirrors |
| F38 | 15 | Blue | Audio system, cigarette lighter |
| F39 | 10 | Red | HVAC Motor Relay |
Fuse and relay box in the engine compartment
Other relays and fuses for the engine management system are installed in the mounting block, which is located in the engine compartment to the left of the battery. To open the box, press the latches on the side, back and front of the lid.
| № | A | Name |
| 43 | 25 | Gas control system (LPG) |
| 44 | 25 | Anti-lock braking system (ABS) control unit |
| 45 | 50 | Anti-lock braking system (ABS) control unit |
| 46 | 60 | Ignition switch, on-board network protection (fuses (F28-F32, F36) located in the passenger compartment), light switch circuits |
| 47 | 60 | On-board power supply protection, passenger compartment fuse box (fuses located after the ignition switch), light switch circuits |
| 51 | 25 | Fuel pump, engine control system controller, engine cooling fan relay, engine control unit relay, air conditioning compressor clutch relay, ignition coils 1-4 cylinders (VAZ 21129), ignition coil 2×2 (VAZ 11189), oxygen sensors, purge valve adsorber, intake pipe length control valve (VAZ 21129), injectors, phase sensor (VAZ 21129) |
| 52 | 40 | Engine cooling fan, air conditioning compressor clutch |
| Relay | ||
| R1 | Gas control system (LPG) | |
| R2 | Heater Lada Largus | |
| R3 | Front fog lights | |
| R4 | Fuel pump | |
| R5 | The engine control unit | |
| R6 | Engine Cooling Fan (High Speed) | |
| R7 | A/C compressor clutch | |
| R8 | Engine cooling fan (low speed) | |
| Relay panel number/prev. | Relay number/prev. | Relay/fuse assignment |
| 299-1 | 231(A). | Fog light relay |
| 753(B) | Headlight washer pump relay | |
| 299-2 | 233 | Heater Fan Relay |
| 597-1 | F1 (60 A), F2 (60 A) | Electronic control unit for ABS and ESP systems |
| 597-3 | F1 (50 A). F2 (25 A) | Exterior light switch, interior fuse box |
| 784 | 700(A), | Cooling fan relay |
| 474(B) | Air conditioning compressor relay | |
| 1047 | F1 (30 A), | Power supply for Lada Largus relay unit |
| F2 (25 A) | Injection relay power supply | |
| F3 (5 A), | Power supply for injection system relay, ECU | |
| F4 (15 A) | Not used | |
| 238(A). | Injection blocking relay | |
| 236(B) | Fuel pump relay |
Please note that the relay and fuse diagram may differ depending on the configuration and production date of the car. Current diagrams of the mounting block are presented in the instruction manual depending on the release date of the Lada Largus.