This device is rarely used in a car for its intended purpose, for lighting cigarettes. However, it is popular even among non-smoking drivers. Other devices can be operated from the cigarette lighter socket. Most often they connect to the socket:
- video recorder for recording movement;
- fan;
- additional power bank for powering a phone, tablet or laptop, charger for these devices;
- navigation system;
- compressor for inflating tires.
Therefore, failure of a part or fuse can lead to a lot of inconvenience for the car owner. Read the article about why the cigarette lighter in the VAZ 2110 model does not work, how to check it, find out the cause of the breakdown and carry out repairs.
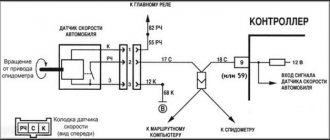
VAZ 2110 cigarette lighter diagram
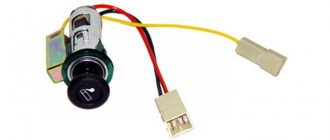
The device is powered through car wiring. The VAZ 2110 cigarette lighter connection diagram is shown in the photo. The pinout of the device is as follows: three wires come to the device - two positive and one negative.
- Red, positive – connected to the cigarette lighter battery through fuse F18. The circuit current is 25 amperes, and if this parameter is exceeded, the protective element burns out.
- Yellow. The positive wire is responsible for the cigarette lighter lamp.
- Black, minus. It comes to the cigarette lighter body, and the other end is a mass powered through the car body.
Troubleshooting the cigarette lighter and radio
The main list of factors that can immediately damage the radio and cigarette lighter on this Lada model is as follows:
- wire short circuit;
- loss of contact on the safety block;
- blown backlight bulb or fuse;
- oxidation or disconnection of contacts from long-term use.
In principle, any of the listed problems can be solved on your own, without resorting to the help of services or specialists. A number of simple manipulations that take no more than 15 minutes are sufficient in the vast majority of cases.
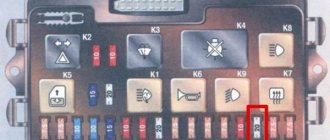
So, first you need to take care of checking the safety block, for which you need to remove it from the cavity under the hatch to the left of the steering wheel. On this block, you need to find the fuse numbered F4 and evaluate its external condition - at this stage, sometimes you can already see the malfunction.
If the fuse for the VAZ 2114 radio looks intact, you will have to remove it from the block and test it for functionality with any multimeter, tester or simple test screwdriver.
If a malfunction is detected, the part should be replaced with a new one - they are inexpensive and are sold everywhere.
In addition to the described operation, you need to be prepared to carry out the following procedures with the electrical network if the VAZ 2114 radio does not work:
- Assess the conductivity of the contacts with a tester.
- Tighten loose terminals.
- Re-clean or resolder faulty contacts.
- Make sure that the control lamp in the contact network is in working condition.
Returning to the analysis of common causes of breakdown, we can also advise checking the condition of the cigarette lighter socket itself, which could become loose due to vibrations, and its heating coil could become disconnected from the contact. Usually this unit is also replaced as an assembly due to its low cost.
VAZ 2110 cigarette lighter does not work: reasons
Over time, any part can fail. Before you replace it with a new one or repair it yourself, you should understand the reasons why the VAZ 2110 cigarette lighter or its backlight does not work. A list of the most common faults and methods for solving them is presented below.
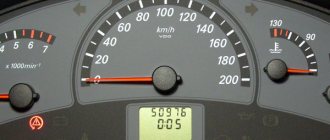
Fuse burned out
One of the most common cigarette lighter malfunctions is a worn-out protective element.
The circuit current for normal operation of the fuse should not exceed the parameter 25 amperes. This fuse is located in the mounting block. When connecting one or more powerful devices to the cigarette lighter socket, this parameter may exceed the specified value and burn out. At the same time, along with the fuse, the glove box illumination lamp and the heater fan will stop working. To make repairs, you need to open the hood where the mounting block is located, check the serviceability of the fuse and replace the element with number F18.
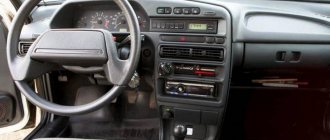
We climb into the center console
Another reason why the VAZ cigarette lighter does not work is bad wiring contacts or a running short circuit.
If the fuse begins to blow out frequently and has to be replaced, this is also an indirect sign of such a breakdown. You will need to remove the facing panel and inspect the integrity of the cigarette lighter contacts and wires. Here you need to check the three-pin connection connector. Make sure the connection is tight. Then you need to check the safety of the wires. There should be no burnt windings or creases or open circuits that will cause the fuse to trip.
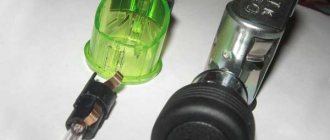
Let's inspect the wiring and contacts of the cigarette lighter
The reason why the device stopped working is the appearance of oxides or rust. There are contacts inside the cigarette lighter that can oxidize or corrode over time. Due to loose contact, the device will not work correctly. In this case, replacing the cigarette lighter is not required. It is enough to pull out the device, clean and bend the metal antennae of the contacts.
Possible burnout of the spiral
Inside the VAZ 2110 cigarette lighter there is a metal element that can fail with age or due to increased load. If the spiral burns out and the fuse trips, repairs can only be made by installing a new part.
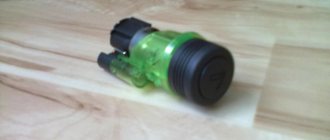
What is a cigarette lighter
Structurally, the cigarette lighter consists of two main parts: a glass and an insert. The first element is made of metal and has a cylindrical shape. In its lower part there is a contact to which voltage is supplied from the positive terminal of the battery. The body of the glass is connected to the “ground” of the car.
The insert is also made of metal and has a cylindrical shape. There is a special spiral placed inside it, which heats up when current passes through it. The upper part of the insert is equipped with a plastic cap.
To ensure that the cigarette lighter can be easily found at night, the glass is equipped with a transparent plastic rim, under which there is a backlight. It lights up when the side lights are turned on.
Replacing the cigarette lighter VAZ 2110
To carry out the work you will need to stock up on suitable tools. You will need:
- Screwdriver Set;
- blowtorch with solder;
- protective gloves;
- multitester or 12 volt lamp;
- insulating tape.
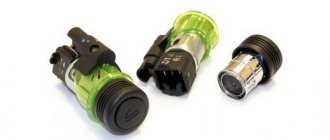
Before replacing a non-working VAZ 2110 cigarette lighter, you need to buy a working part. There are different options for the car. A standard long device has a number of disadvantages: poor contacts, unpresentable appearance.
Therefore, drivers prefer short Euro models. Their price ranges between 400-800 rubles, depending on the manufacturer. It is advisable to choose an original part. Installing such a car cigarette lighter yourself is not difficult - detailed instructions are shown in the video.
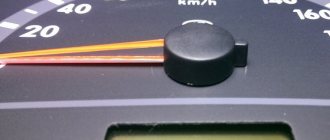
Check and replacement
Replacing the cigarette lighter in a VAZ 2110
Simple check:
- Turn on the ignition.
- Insert the cigarette lighter into the socket.
- Wait 10-15 seconds.
- Take it out.
Note: if it has not warmed up during this time, then it really does not work.
Replacing the cigarette lighter for VAZ 2110
Of course, you can go to a dealership to have it replaced by a qualified automotive technician, but you can also replace and install it yourself to save money. Replacement Instructions:
First you need to find a fuse (see VAZ 2110: how to replace fuses) that protects the cigarette lighter from spontaneous combustion. To easily remove it, you need to break the chain.
Note: Removing the fuse is important because if the wiring located at the top is tangled, it can cause damage to other electrical things in the car. The wiring will simply burn out and will need to be replaced. Before you start replacing the fuse that protects against spontaneous combustion, you need to read the user manual of the machine
Now you have to remove the faulty device. To do this, you need to take a flat screwdriver and insert it into the slot (the cigarette is placed there). The screwdriver needs to be turned several times.
Note: this should be done extremely carefully so as not to tear out the socket, since in this case the other cigarette lighter is unlikely to function normally.
The process of replacing the cigarette lighter of a VAZ 2110
If this method does not work, you will have to try to release the metal clips that hold it in place.
Note: these clamps are very easy to unfold, but there is no need to rush. It is better to do the work longer, but with better quality.
VAZ 2110 how to remove the cigarette lighter
After removing it, you will have access to two wires with spade connectors. You need to remove both wires so that they are completely disconnected.
Note: if they are not turned off, they may short out and catch fire during operation.
Now it will be much easier to replace this device. It is necessary to connect the spade-shaped connectors to the peaks located on the back of the device. You need to insert the black into black and white into white wires accordingly.
Note: otherwise the circuit will not be closed and the device will not work.
After connecting the wires, you can install it in place by pushing it into the hole provided for this.
Note: Press it lightly and then twist it clockwise until it is secured by the two metal clips. He must be motionless.
Now all that's left is to replace the fuse in the fuse box (if it doesn't work) or install the old one.
Note: this is a prerequisite, since without it a short circuit is possible.
How to properly remove the cigarette lighter on a VAZ 2110
The disassembly process is as follows:
- Open the hood and remove the negative terminal from the car battery. This will de-energize the system and eliminate the possibility of a short circuit during repairs.
- It is necessary to remove the plastic trim on the center console. To do this, unscrew the fastening bolts.
- Afterwards we get access to the wiring blocks. Disconnect the three-pin cigarette lighter connector.
- We dismantle the facing lining under the parking brake, gaining access to the tunnel mounting bolts.
- We unscrew them and then remove the plastic casing.
- Pull out the car cigarette lighter socket to disassemble it. To do this, you will need to tighten the latches and carefully remove the metal cartridge.
Video about cigarette lighter malfunctions
I installed a Chevy Niva cigarette lighter in my car a long time ago. It’s just that half of my electronic devices, like a navigator, a phone charger, and a video recorder (before connecting it via a button) could not work. Due to the fact that they simply did not have enough size to connect, our standard cigarette lighter is too long, which is very stressful for new types of chargers. Since I made myself a cigarette lighter a long time ago, I couldn’t prepare a photo report =( But I bring to your attention the process itself.
And so, in order to install the Euro cigarette lighter.
We need to remove the old one to do this: 1. Before carrying out work, disconnect the wire from the negative terminal of the battery and have a screwdriver ready. After this, remove the interior floor tunnel lining. To do this, unscrew the fastening bolts and disconnect the left edge of the cladding. Do a similar procedure with the right side. This will give you access to the cigarette lighter from the inside.
2. Carefully remove the cigarette lighter socket, then push the connectors with the wires of the cigarette lighter itself and its backlight through the hole in the interior tunnel lining. Gently squeeze the lamp shield and remove it. At the same time, carefully ensure that its latches come out of the slots in the light guide, otherwise you will not be able to remove this part.
3.Pick up a screwdriver and use it to press the latch of the cigarette lighter socket. Disengage it from the light guide. After this, push the socket out of the cladding and remove the socket. To do this, pass the block with wires through the hole.
4.The last thing to remove from the cladding is the light guide. To do this, squeeze its latches and pull outward.
To install a new cigarette lighter, make the hole for the old cigarette lighter a little smaller.
But this is easy to fix - with a file, or a soldering iron, or a drill.
Before doing this, mark the new outline of the Euro cigarette lighter with a marker, attaching the rim of the new light guide. Pinout of contacts, new euro cigarette lighter:
Standard connectors are not suitable for connecting a new cigarette lighter, but you can easily buy new connectors with wires at any auto store to assemble the adapter. Three blocks are required for connection: 1. Standard block with wires for the VAZ2123 cigarette lighter
2.Standard block with wires for 2 wires VAZ 2105
3.Standard block with a wire for 1 wire VAZ 2105
Or you can not buy the pads from the VAZ 2105, but simply cut them off from the old cigarette lighter and use a twist or soldering iron and solder (solder) to the pads for the Niva Chevrolet.
Install everything in place in the Auto and enjoy the new bright cigarette lighter =) good luck on the road!
Removing the cigarette lighter socket
The process of dismantling the seat is carried out in the same way.
- We de-energize the system by removing the negative terminal from the battery.
- It is necessary to disassemble the side cover to disconnect the wiring plug.
- Dismantle the gearbox casing and parking brake tunnel.
- We bend the plastic screen so as to pry off the fixing tabs.
- We remove the cigarette lighter socket through the opening with the wiring block.
- We inspect the device and proceed to replacement.
Diagram of the VAZ engine management system with BOSCH controller - ECM 21104 1.6 16V
1 – block of the ignition coil wiring harness to the ignition system harness; 2 – block of the ignition system harness to the ignition coil wiring harness; 3 – ignition coils; 4 – immobilizer warning sensor; 5 – immobilizer control unit; 6 – spark plugs; 7 – nozzles; 8 – diagnostic block; 9 – block of the ignition system harness to the ABS cabin group harness; 10 – controller; 11 – electric fuel pump; 12 – block of the ignition system harness to the fuel level sensor harness; 13 – fuel level sensor harness connector to the ignition system harness; 14 – block of the ignition system harness to the injector harness; 15 – injector harness block to the ignition system harness; 16 – block of the ignition system harness to the side door harness; 17 – speed sensor; 18 – idle speed regulator; 19 – throttle position sensor; 20 – coolant temperature sensor; 21 – mass air flow sensor; 22 – oil pressure warning lamp sensor; 23 – phase sensor; 24 – oxygen sensor; 25 – crankshaft position sensor; 26 – knock sensor; 27 – solenoid valve for purge of the adsorber; 28 – oil level sensor; 29 – coolant temperature indicator sensor; 30 – block of the ignition system harness to the instrument panel harness; 31 – instrument panel harness connector to the ignition system harness; 32 – ignition relay; 33 – ignition relay fuse; 34 – fuse for the electric fuel pump power supply circuit; 35 – electric fuel pump relay; 36 – electric fan relay; 37 – controller power supply fuse; 38 – ignition system harness block to the air conditioner connector; 39 – instrument cluster; 40 – ignition switch; 41 – electric fan of the cooling system; 42 – on-board control system unit; 43 – starter relay; 44 – contacts of the 8-terminal blocks of the instrument panel harness and the front harness; 45 – contacts of the 21-terminal blocks of the instrument panel harness and the rear harness; 46 – trip computer; 47 – diagnostic connector.
Repairing a broken cigarette lighter
Sometimes replacement is not necessary. In some situations, you can carry out repairs yourself. Inside the car cigarette lighter itself is a small mica plate. This is a semiconductor that often fails. It needs to be removed. After this, it is worth assembling the device and then checking that it is working correctly.
Often you just need to treat oxidized contacts or solder fallen wires.
Instructions for replacing the backlight lamp
If you need to carry out this procedure, then you should act according to a certain scheme.
- Turn off the ignition, and then remove the wires from the battery.
- To get to the lamp, we dismantle the plastic lining inside the cabin.
- Disconnect the gearbox and parking brake housing.
- We take out the car cigarette lighter along with the backlight.
- Squeeze the screen to remove the metal tendrils.
- We rotate them 90 degrees, and then remove the lamp from its seat.
- We install the new element, and then carry out the assembly. When connecting, you should use A 12-4 lamps.
A detailed video on how to remove a VAZ 2110 model device with your own hands is presented above.
Checking the condition of the wiring and contacts
Having removed the center console panel, the first thing you need to do is inspect the contacts of the blocks connecting the power wires of the cigarette lighter and its backlight. If everything is in order with them, put the terminal on the battery, turn on the ignition and check if there is voltage on them. Its absence may indicate an open circuit in the cigarette lighter circuit. In this case, you will have to check the wiring from the blocks to the mounting block. This can be done by ringing the conductors.
If you find that the contacts in the pads are oxidized or burnt, clean them with fine sandpaper, and then check the functionality of the cigarette lighter. If everything is fine with them, inspect the connectors on the device itself. It has three contacts: two “pluses” (for the lamp and glass) and one common “minus”. If necessary, clean the contacts with sandpaper.
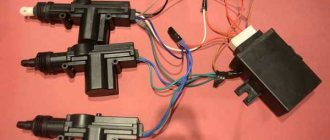
Is it worth making an additional cigarette lighter?
Many drivers install a second socket on their car. This will increase the number of potentially connected devices. But we must remember that the electrical system will experience heavy loads and the fuse may trip. Therefore, it is important to connect all wires correctly.
It is necessary to connect the new connector through a fuse to avoid melting the wires. You will need to cut a separate hole in the interior or trunk. An alternative to this method is to purchase a splitter that plugs into a standard socket.
Important points
- Replacing the cigarette lighter is good, but the new device is unlikely to last long if the car owner does not follow a simple rule: do not allow the current consumption to exceed 25 amperes. As soon as the current exceeds this limit, the entire above procedure will have to be carried out again, because the cigarette lighter (or fuse) will inevitably be damaged. Most often this happens when the driver uses various tees, that is, connects several devices to the cigarette lighter socket at once. This should be avoided at all costs.
- If the cigarette lighter remains intact, but only the fuse had to be replaced, it must be replaced with a device of the same brand. Auto parts stores today have a lot of fuses from various companies. Despite the fact that their passport characteristics are the same, in practice this is often not the case. And in the case of a cigarette lighter, an error of even half an ampere can be critical, and it will very quickly fail.
This is interesting: Car and hydrogen – what can they have in common?
As can be seen from the above article, to replace the cigarette lighter you do not need to take the car to a car service center and even a novice car enthusiast can perform this operation
But it is important to remember that even the highest quality cigarette lighter is unlikely to last long if the owner has the habit of connecting everything to it at once. The best option here is to know exactly how much current a particular device connected to the cigarette lighter consumes
This knowledge will significantly extend the life of both the fuses and the device itself.
Copywriter with five years of experience. (3 votes, average: 4.3 out of 5)
Fuse
To ensure the safe operation of the cigarette lighter and devices connected to it, its electrical circuit is protected by a fuse. It is located in the mounting block located in the car interior under the dashboard. In the diagrams it is marked F-13, and is designed for a maximum current of 15 A. Its body is usually blue.
Why does a fuse blow?
The cigarette lighter fuse in a Priora may blow out due to:
- connecting to the socket of devices whose plug is structurally smaller than the socket;
- discrepancies between the calculated current values of the cigarette lighter circuit and the connected device;
- malfunctions of connected devices.
The diameter of the Priora cigarette lighter socket is 21 mm, and the diameter of the plugs of some electronic or electrical devices powered from the cigarette lighter is 18-20 mm. In other words, such a plug will dangle in the socket, and loosely pressed contacts will spark.
Sparking leads to charring of contacts and increased load on the circuit. As a result, the least that awaits us is replacing the blown fuse. The same thing will happen if you insert the plug into the socket incorrectly (at the wrong angle). This, by the way, is the most common reason why the cigarette lighter fuse blows.
Another “popular” reason is the difference in calculated currents. As already mentioned, the maximum fuse current is 15 A, and if you connect, for example, a compressor that consumes a current of 20 A to the cigarette lighter, it is no wonder that the fuse will burn out. Long-term operation of the same compressor, vacuum cleaner, refrigerator, or electric kettle can also lead to this.
Most modern electronic devices designed to operate from a cigarette lighter have their own fuse located in the plug. It allows you to protect the device itself from possible interruptions in the machine’s network, as well as the network from gadget malfunctions. But, if the device is faulty (for example, there is a short circuit) and is not equipped with a fuse, there is a reverse risk for the on-board circuit.
How to replace
- Open the cover of the mounting block by turning the 3 plastic latches half a turn and remove it.
- We find the fuse in the socket marked F-13 and pull it out of the socket. At the same time, we verify that it is not working visually or using a tester.
- We install a new fuse in its place.
- Install the lid and close it.
- We check the results of our work.
To prevent problems with fuses from catching you by surprise, it is advisable to have a spare set of them in the glove compartment. This applies not only to the cigarette lighter, but also to other devices that are most susceptible to overload. Buying spare fuses won't impact your budget at all, but will give you confidence on the road. The cost of one fuse is about 5-7 rubles, and a set of 10 pieces is 40-60 rubles. And, of course, in no case should you use various kinds of “bugs” instead of a fuse, be it a coin, a piece of wire, or your wife’s hairpin. Their use changes the parameters of the electrical circuit, and its overload may adversely affect the operation of any system that uses electricity.
In addition, the use of a jumper is fraught with the occurrence of a short circuit not in the cigarette lighter circuit, but in the car circuit. The result of this can be anything, including fire.
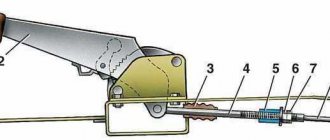
Order of Operations
Before removing the cigarette lighter of a VAZ 2110, 2111 or 2112, you need to de-energize the circuit; to do this, remove the negative terminal from the battery. Now you can start working directly:
- It is necessary to remove the plates on each side of the instrument tunnel; to do this, unscrew two bolts from each. On the right side, disconnect the backlight and cigarette lighter connector.
- The housing of the unit is fixed to the casing of the instrument tunnel; it must be removed. The trim is located under the handbrake lever. It can be easily removed with a flat screwdriver.
- Also, using a flat-head screwdriver, you now need to pry and remove the housing from the gearbox shift lever.
- There is a screw under the cover; you need to unscrew it with a Phillips screwdriver.
- Now the driver and front passenger seats need to be moved back and the gearbox screws unscrewed. There are five of them.
- You need to remove the top cover of the instrument tunnel. Now the cigarette lighter is accessible. You can remove its cartridge. Then the screen is removed so that the tabs come out of the grooves on the light guide.
- Use a flat-head screwdriver to press the latch next to the cigarette lighter socket, so it is released from the light guide.
- Now you can remove the assembly along with all the elements.
- Then you need to tighten the latches on the light guide, so it is immediately disconnected from the assembly.
- If you need to change the LED itself, it can be easily removed by pressing the tabs on the housing. When installing a new device, make sure that the slot in the casing aligns with the protrusion on the housing.
- Now you can begin installing the new cigarette lighter. First, it is connected to the light guide, the following operations are performed in the reverse order.
To replace the cigarette lighter of a VAZ 2110, 2111, 2112 with your own hands without disassembling the tunnel, watch the video:
On a note! If, when checking the fuses, it turns out that they are the ones that have failed, they need to be replaced with elements of the same brand. Units from various brands are on sale, and despite the fact that manufacturers claim the same technical characteristics, in reality everything turns out to be different.
The standard cigarette lighter of the VAZ 2110, 2111, 2112 does not allow the use of all devices existing on the market, so owners often replace it with a European-style unit. How to do this, watch the video: