- February 16, 2016
Repair
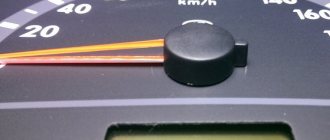
Fines, conversations with a traffic inspector, unwanted accidents and other troubles are inevitable if the speedometer on a Priora does not work. Motorists noted that a temporary breakdown, rather than a complete breakdown, is possible. Initially, the speedometer needle drops to zero, the electric booster turns off and the “!” alert appears on the instrument panel. The malfunction is considered temporary, because after 3-5 minutes everything returns to normal and the speedometer continues to function normally.
The speedometer on the VAZ does not work solely because of its design features. The thing is that the engineers made it electronic - these are periodic failures in the operation of the microprocessor that will appear during operation.
Troubleshooting the speedometer is the time when you can make adjustments to the car's mileage. The Priora has an electronic speedometer, and mileage readings are recorded in memory, sometimes this data is copied to several places, so in order to adjust the speedometer on a car correctly and without unpleasant consequences, it is best to entrust this to professionals. They are the ones who have the tools and software necessary for this procedure.
Why the speedometer on the Lada Priora may not work
The stable operation of injection power units depends on the synchronous functionality of all electronic components.
One of these important components is the electronic speedometer. The article will answer the question why the speedometer on a Lada Priora car does not work. Symptoms, causes of failure, and methods for checking damaged elements of the entire system will also be described.
Layout and operating principle
The Lada Priora model is equipped with a fully electronic speed calculation system. It consists of the following elements:
- Speed sensor (EMF). Its function is to create electrical impulses.
- Electrical wiring. Powers the speedometer system with electric current.
- Fuse. Protects the system from voltage surges.
- On-board computer. Monitors work and analyzes incoming data.
- The speedometer itself. Necessary for visual speed control.
There are not many components in the system. The system works as follows:
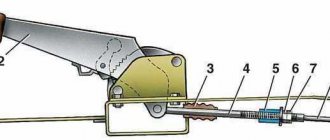
- The speed sensor produces electrical impulses. It is installed on the gearbox housing. On power units with 16 valves, the EMF is located on the side of the expansion tank. The EMF is installed opposite the flywheel. This gear has teeth along its entire diameter. There is only one tooth missing in one place. It is to this place that the magnetic speedometer sensor reacts. During the passage of an empty space, the EMF opens, thereby creating an electrical impulse.
- The pulses generated by the opening are sent through wires to the ECU. The computer calculates the speed at which the signals arrive and converts them into an electrical voltage of a certain strength.
- Voltage is supplied to the instrument panel, activating the speedometer drive motor.
- The electric motor deflects the speedometer needle by a certain degree.
In addition to needle deflection, electrical impulses from the speed sensor are necessary to calculate the fuel supply to the engine. Based on the data received, the on-board computer determines the required amount of combustible mixture and its filling with air. In this way, the required, stable engine speed is maintained for the current speed limit.
The speedometer on the Priora does not work for several reasons. But this is always preceded by the appearance of a number of symptoms of a malfunction. They will be described below.
Complete failure of the speedometer
The easiest way to check the condition of the electrical circuit is to disconnect the battery for a short time. As a result of this action, the on-board computer settings will be reset and restored to their original settings. If after the operation the fault has not been eliminated, then one of the components of the circuit responsible for the operation of the speedometer has failed. Therefore, it will be necessary to find the cause of the current situation and eliminate it. As with any electrical circuit, troubleshooting should start from the simplest.
Often this problem occurs after the car has been parked in the rain, which has led to water flowing into the contacts, which causes interruptions in the operation of the circuit.
Car speed sensor
| № | Examination | Description |
| 1 | Fuse | You need to check the condition of the fuse responsible for the operation of the instrument panel in the fuse box. This fuse is designated “IG/METER” in the circuit. There are often cases when this fuse blows. If it is damaged, it needs to be replaced and then checked to see if the original problem has gone away. If after replacing the fuse the problem does not disappear, you should look further for the cause. |
| 2 | Wires | The next step will be to check the condition of the wires running from the speed sensor to the dashboard. Driving on poorly paved roads may cause one of the wires to break. A tester can quickly check the condition of this wiring. If one of the wires breaks, it should be replaced. |
| 3 | Contacts | It is also worth checking the contact in the block through which the wires are connected to the speed sensor. Very often they oxidize, thereby disrupting the connection between the sensor and the wiring. If plaque is noticed on the contacts, it should be cleaned off. After the operations, you need to check whether these procedures gave a positive result. |
| 4 | Motion Sensor | This can be done by connecting a scanner to it. If, after diagnostics, malfunctions in the operation of the sensor are identified, it is replaced. If it is not possible to connect the scanner to the network, you can determine its performance using the kilometers traveled counter, which is located on the instrument panel. When the speedometer does not work, and the counter counts kilometers while driving, the motion sensor is working properly and the reason needs to be looked for further. |
If all the above work has been completed and it does not bring a positive result, you should look for the cause of the problem in the dashboard.
First you need to check the condition of the instrument panel circuit board. To do this, you need to remove it from the car and carry out a visual inspection. If melting areas on the board or broken tracks are detected, the board should be replaced. If no signs of damage were noticed during inspection of the printed circuit board, it is worth “ringing” it. To do this, it is better to contact a qualified radio electronics specialist. If faults are detected during the “ringing” of the board, you can try to restore its functionality or simply replace it.
If no faults are found in the printed circuit board, it is worth checking the speedometer itself. It is quite possible that the pointer drive has failed. In this case, the speedometer is replaced.
There are cases when on a Lada Priora, checking the entire circuit responsible for the operation of the speedometer indicates that it is working properly. This means that the reason lies much deeper, namely in the gearbox. To fix this problem, it is better to contact the service. The speed sensor operates on the Hall principle, and if there is a malfunction in the operation of the gearbox, it will also be reflected in the operation of the speed sensor.
Symptoms
Drivers accustomed to carburetor engines often do not react to the appearance of symptoms of speedometer failure. On injection engines, you need to pay attention to the behavior of this device. Symptoms of failure are as follows:
- The instrument needle does not work completely or partially. It can periodically turn on, tremble, freeze at a certain level.
- Complete failure of the instrument panel.
- The speedometer determines the speed limit with a large error.
- The engine is losing power.
- Fuel consumption increases noticeably.
- The stability of the power unit at idle speed is lost.
All these signs are the result of a breakdown or malfunction of the components of the speed calculation system. A detailed analysis of the reasons will be given below.
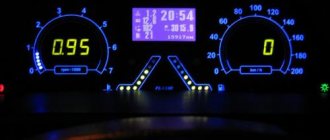
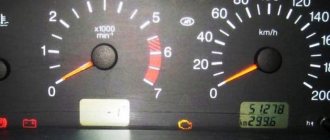
Purpose of the tachometer
The tachometer on the VAZ 2109 is a device installed on cars to measure engine speed. Thanks to this device, the driver can find out what crankshaft speed is currently supported by the power unit. This device also allows you to prevent exceeding the possible permissible engine speed.
Dashboard with installed digital device
The main purpose of the tachometer on the VAZ 21099 carburetor is to facilitate the selection of the required gear, and this, in turn, makes it possible to increase the service life of the engine. At the moment when the instrument needle begins to approach the red zone, it is recommended to switch to a higher gear. This device can also be used for adjustment work while driving or when the internal combustion engine is idling.
Malfunctions
If the speedometer on a Priora stops working, then you need to check each of its components step by step. It's better to start with the device itself.
Drive unit
The drive is checked by simply disconnecting the negative terminal of the battery. After reconnecting the terminal, the on-board computer reboots the system. Next, you need to reset the odometer, hold down the reset button and turn on the ignition. The tachometer and speedometer needles should deflect to the maximum. If this does not happen, then electrical voltage is not passing through these devices.
You can conduct an additional test of the speedometer's performance. On a Priora, the speedometer may not work due to a failure of the signal receiver drive. To check you need:
- From the “+” terminal of the battery, run a wire to terminal “26” of the red connector.
- With short touches you need to simulate the arrival of signals from the EMF.
- The arrow should deflect each time terminal “26” is touched.
If there is no response to the incoming voltage, you will have to dismantle the panel and remove the instrument printed circuit board. It needs to be inspected for breaks or oxidation of soldering and tracks. The oxidation needs to be cleaned, and the broken tracks need to be soldered with jumpers. Next, perform the following test:
- Set the tester to resistance measurement mode.
- Connect the red measuring probe to terminal “26”.
- Apply the black test lead to ground.
- The pulse input should show an operating resistance of up to 3 ohms.
If these readings are not present, then the fault lies in the radio components of the drive or its motor has burned out. Without special knowledge, such breakdowns cannot be repaired on your own. You'll have to change the drive.
Fuse
The speedometer is protected by fuse “F1”. It is located in the safety block under the dashboard, on the driver's side. It is necessary to remove the element and check the condition of the internal jumper.
If it is broken, you need to replace the element with a 10 Ampere analogue. Before replacing, it is important to clean the fuse contacts from oxidation and possible carbon deposits.
After replacement, you need to check the operation of the speedometer again.
Wiring
It's just that fuses don't blow. This was preceded by a short circuit or high voltage.
It is necessary to carefully check the wiring for breaks, deformation, and lack of insulation. All defects found must be eliminated.
If the Priora's speedometer does not work, the cause may be the speed sensor. Its verification is carried out sequentially. First you need to check the condition of the connecting plug. It is necessary to open it and inspect the contacts of both parts of the socket. If dirt, moisture, or oxidation is detected, clean with a solvent. Next, you need to check whether the electrical voltage reaches the sensor itself. Necessary:
- Set the multimeter to voltmeter mode to measure DC voltage.
- Connect the red test probe to terminal “1” of the wiring cable.
- Connect the black probe to terminal “3”.
- Turn on the ignition.
The voltmeter should show a result equal to the battery voltage. If voltage is supplied, then the sensor’s ability to generate electrical impulses is checked. This test requires:
- Raise the drive wheel of the vehicle on a jack.
- Connect one end of the control wire to terminal “2” of the sensor.
- Connect the red probe of the multimeter to the second end of the control wire.
- Connect the black test lead to ground.
- Insert the plug into the EMF socket.
- Turn on the ignition.
- Rotate the drive wheel of the machine.
As electrical voltage is applied to the sensor, it must produce electrical signals. The tester defines them as a pulse voltage from 0.6 to 12 volts. If there is no response from the tester, then you will have to dismantle the EMF to check.
The main reasons for speedometer failure
First, you need to make sure that the source of the trouble is not bugs in the chip itself, on which the vehicle operates. While the machine is in use, the so-called cache in these chips is filled with information. This is why failures occur, including temporary ones. The “mass” from the battery is simply reset in this case. Otherwise, you will not be able to reset your data. In this case, the on-board network in the vehicle is completely de-energized.
What should you do if your car smells like burnt oil? You will find the answer in our material.
How to remove the bumper on a Priora and how difficult it is to replace it - find out here.
If resetting does not help get rid of the problems, conduct a full system check:
- Check the fuse plate installed on the board in the power circuit. The required part will have the designation “IGMETER”.
- After this, it is necessary to diagnose the serviceability of the wiring located in the area, starting with the speed registration sensor and ending with the instrument panel. It is in this section that the wires begin to break. Clinching may occur and other types of defects may appear. This usually occurs due to heavy use of the vehicle.
- The contacts located in the connectors require special attention. And they can become unsuitable for use due to the formation of rust and high acidity. In this case, the contacts of the sensor and connectors can be easily cleaned to get rid of defects.
- The next step is to check the monitoring sensor based on the distance traveled by the vehicle. If you contact a service center, special equipment is used to check this part. If it is missing, then the check is performed when the car drives several kilometers. As the countdown continues, we can say for sure that the system is working properly.
What to do if the speedometer on a Priora does not work due to the dashboard
If this is where the malfunction lies, then you will need to get to the mechanism that rotates the arrows. And conduct a thorough inspection. It is recommended to drive the car into a garage box and set the vehicle's parking brake. After this, open the hood of the car and disconnect the terminal marked with a minus from the battery. Thanks to this action, you will not be afraid of a short circuit in the on-board network.
Almost anyone can remove the dashboard on a Lada Priora. Photo: tuningtaza.ru
The next stage is careful dismantling of the torpedo. And here we need to perform several actions.
- First, remove all the pads completely.
- Then carefully unscrew the steering wheel.
- Remove the switches located under the steering wheel.
The next stage is detection and unscrewing of self-tapping bolts. They allow the torpedo to gain a foothold in its place. Only when all these steps have been completed can you begin dismantling the torpedo itself. To do this, just grab the part, pulling it slightly towards you. Then the wires are disconnected. But before that they are marked so as not to be confused later. The torpedo is pulled out and carried through the passenger door.
Other causes of malfunction
It is not yet known how problems with the speedometer will persist in the new generation of Priora. Photo: smolmotor.ru
Deflection of the arrow axis is another reason why the device may fail ahead of time.
In this case, several recommendations are also given:
- First, remove the arrow itself, very carefully.
- To do this, place a small fork made of plastic under the arrow.
- The device must be lifted up, carefully, without haste.
- If the arrow was indeed bent, then it is enough to simply replace it.
The rotation of the speedometer is ensured by special gears located on the back of the dashboard, at the rear. Each gear requires inspection if there are any problems with the speedometer. If necessary, parts are replaced, there should be no problems with this.
No power supply to Priora speed sensor
- To the beginning of the forum
- Forum Rules
- Old design
- FAQ
- Search
- Users
1 brown, 2 gray, 3 pink with black stripe
I don’t have a Priora, but in all schemes, including e-gas, it’s the other way around: 1 - pink (+12V) 2 - gray (signal) 3 - brown (ground)
Change pink with brown, you have confused the sensor's power supply with ground. How can you randomly connect wires in the engine control system on a new car? Do you want to kill the ECU?
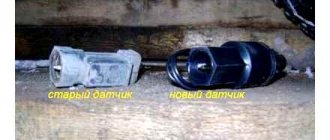
IMHO Genady you are wrong, but thanks for your participation. Today I reviewed the diagram again, I assembled everything correctly. Why didn't it work? I guess I just didn't tighten something up. I would also like to note that mainly sensors 2170-3843010-04 are available for sale. I have 2170-3843010-02 and it turned out to be very difficult to find one in the rather large Chelyabinsk. which 04 stupidly does not reach the end 3-4mm, it is a little thicker and has a slightly different shape. It’s hard to say why they did such crap at VAZ, but I didn’t think that I would experience problems with the spare part with the Priora.
Why is the old guy fucked up, he ordered me to live long.
No, it works, but every trip it cuts out for 5-10 minutes, this is very annoying, because... The EUR is cut off, the engine becomes very jerky without any speed readings, you drive in some jerks. Apparently water gets into the sensor through the gap and the board in it oxidizes. On the new one, I covered this gap with super glue. This is the kind of laboratory work I did, although I could have just rolled it out under warranty
Source
Featured Posts
DimadriLL
- Advanced
- Advanced Members
- 8
- 219 publications
- Car make:PRIORA hatch
- From: Naberezhnye Chelny
Good afternoon everyone.
I recently became the OWNER of a 2008 Priora Hatch.
There is a tachometer glitch (which the previous owner warned about right away).
The fact is that the tachometer needle always points to 1000 rpm. more. Those. at idle approximately 1800, etc.
What could be the reason?
AnDmitrAl
- DimaZZZ
- Moderators
- 1 843
- 7,296 publications
- Car make: HYUNDAI CRETA + LADA 21102
- From: g. Orsk, Orenburg region
Good afternoon everyone.
I recently became the OWNER of a 2008 Priora Hatch.There is a tachometer glitch (which the previous owner warned about right away).
The fact is that the tachometer needle always points to 1000 rpm. more. Those. at idle approximately 1800, etc.
What could be the reason?
does the needle return to zero?
DimadriLL
- Advanced
- Advanced Members
- 8
- 219 publications
- Car make:PRIORA hatch
- From: Naberezhnye Chelny
does the needle return to zero?
No, the shooter always stands at a little over 1000. Even with the ignition off.
AnDmitrAl
- DimaZZZ
- Moderators
- 1 843
- 7,296 publications
- Car make: HYUNDAI CRETA + LADA 21102
- From: g. Orsk, Orenburg region
No, the shooter always stands at a little over 1000. Even with the ignition off.
what is there to think? return the needle to zero with your hands…..(I did it at ten) and that’s it)…
I didn’t remove the tidy....I only took off the visor and put a wire into the gap between the tidy and the glass...and used it to push the needle to zero...but this is on the ten...and on the Priora the tidy may need to be removed...I don’t know
Didn't you do a tidy test?
turn on the ignition with the odometer reset button pressed on the dashboard
DimadriLL
- Advanced
- Advanced Members
- 8
- 219 publications
- Car make:PRIORA hatch
- From: Naberezhnye Chelny
what is there to think?
return the needle to zero with your hands.....(I did it at ten) and that’s it)... I didn’t remove the tidy.... I only took off the visor and put a wire into the gap between the tidy and the glass... and used it to push the needle to zero... but that’s at ten... but on a Priorika, maybe the tidy needs to be removed... I don’t knowDidn't you do a tidy test?
turn on the ignition with the odometer reset button pressed on the dashboard
I also thought about manually setting the arrow.
The test didn’t work, but I’ll go out during lunch and try. I'll let you know about the results.
DimadriLL
- Advanced
- Advanced Members
- 8
- 219 publications
- Car make:PRIORA hatch
- From: Naberezhnye Chelny
what is there to think?
return the needle to zero with your hands.....(I did it at ten) and that’s it)... I didn’t remove the tidy.... I only took off the visor and put a wire into the gap between the tidy and the glass... and used it to push the needle to zero... but that’s at ten... but on a Priorika, maybe the tidy needs to be removed... I don’t knowDidn't you do a tidy test?
turn on the ignition with the odometer reset button pressed on the dashboard
Did a tidy test. All arrows move within their limits from minimum to maximum. And the tachometer needle runs beyond the maximum.
In short, I think that the needle somehow stupidly jumped to 1000 and now it stays that way. If, for example, it has a gear drive, then the teeth may have skipped.
AnDmitrAl
- DimaZZZ
- Moderators
- 1 843
- 7,296 publications
- Car make: HYUNDAI CRETA + LADA 21102
- From: g. Orsk, Orenburg region
Did a tidy test.
All arrows move within their limits from minimum to maximum. And the tachometer needle runs beyond the maximum. In short, I think that the needle somehow stupidly jumped to 1000 and now it stays that way. If, for example, it has a gear drive, then the teeth may have skipped.
it stupidly jammed once.....turn it back to zero with your hands.....
DimadriLL
- Advanced
- Advanced Members
- 8
- 219 publications
- Car make:PRIORA hatch
- From: Naberezhnye Chelny
it stupidly jammed once.....turn it back to zero with your hands.....
I'll try.
davidd
- Newbie
- Users
- 0
- 1 publication
- Car make: lada priora
- From:Irkutsk region
I also thought about manually setting the arrow. I removed the battery, charged it, put the arrow back into place.
Bormann
- Newbie
- Users
- 0
- 9 publications
- Car make:2115
- From:Vaz 2115
do a simple sensor replacement and that's it
Speed sensor on Priora: purpose and principle of operation
A speed sensor or DSA is needed to measure the speed of a vehicle. Such devices are also called speed detectors, which on Priora and other modern cars are presented in the form of electrical devices operating through a control unit.
Many drivers know that it is through the speed sensor that the speedometer on a car functions, but how the readings are recorded, few even think about it. If your DS fails, replacing it will eliminate the problem. However, knowing the operating principle of such a device will be useful for all car owners in order to be able to determine the reasons why the device failed and how to prevent such consequences in the future.
It’s worth noting right away that there are two types of speed sensors: contact and non-contact. The Prioras use non-contact speed detectors (and the VAZ-2110 uses contact speed detectors), the operating principle of which we will consider in detail.
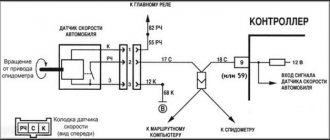
The operation of the speed sensor on the Priora is based on the Hall effect. The sensor itself is a semiconductor Hall element (located inside the working part of the “bevel”), which is designed to record pulses. These impulses are created by a rotating disk with teeth. This disc is also called the master disc, which is installed on the differential box, and it rotates at the same speed of the car wheels. When the car moves, the plates induce pulses in the semiconductor element (pulse magnitude from 1 to 5V), which are transmitted to the ECU. The rate of change of these pulses per unit time allows us to obtain information about the frequency of rotation of the disk. Below is a diagram of the design of the speed sensor on a Priora car.
VAZ-2114 - searching for the cause of tachometer failure
To find out why the device in question does not work, diagnostics should be carried out. For this you will need a multimeter. With its help, first of all, ring the wire that supplies power to the VAZ-2114 tachometer, and then ground. This way you can easily detect a break in the electrical network. The tester should be set to ohms.
Before testing the circuit, make sure the multimeter is operating at up to 20 volts direct current.
Please note that the minus is always present in the circuit, but the plus appears only when the ignition is started. In this case, the tester will show pulses (regular voltage surges) if the crankshaft is spinning
During this process, be sure to inspect all connectors and make sure that the wires attached to them are held properly.
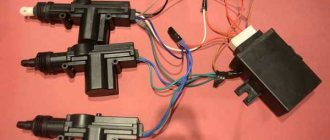
A blown fuse is the most obvious reason when the tachometer suddenly fails, and along with it they “die”:
- odometer;
- speedometer;
- sensor that monitors coolant temperature;
- fuel level indicator.
In this case, they function normally:
- panel lighting;
- indicators;
- multimedia center;
- optics;
- ignition.
With such symptoms, you should first look at the fuse, indicated in the diagram as F3. Its location is the mounting block. Keep in mind that installing a new one without finding out the reason for the burnout of its predecessor is pointless. Most often the culprit is a short circuit. Experts have noticed that old VAZ model 2114 very often puzzles its owners with this breakdown after washing.
Even if you do not find a short circuit, do not rush to forget about the fuse. Check the condition of its connector. It may burn, oxidize, or become dirty. All this creates a high contact resistance, which overheats the fuse-link and contributes to its destruction.
Diagram and pinout of DS Priora
Three wires are connected to the DS Priora plug. One of them is positive 12V, the second or central one is the signal wire that supplies impulses to the control unit, and the third is ground.
The speed sensor power supply circuit is shown in the photo below.
The DS pinout diagram on a Priora may be needed when replacing a plug or checking the incoming power.
What is the effect of a DS malfunction on a Priora?
All Priora car owners are familiar with the situation when the speedometer begins to act up. The arrow either shows the wrong speed value, freezes at some position or shows no signs of life at all. The reasons for this behavior are often related to the speed sensor. Such a device affects not only the operation of the speedometer, but also the engine.
If the speed sensor on the Priora is faulty, the engine will function, but the possibility of it going into emergency mode is possible when the fuel-air mixture is prepared at average values. Even on a Priora with electric power steering, if the speed sensor malfunctions, the power will not work (or work intermittently).
Let's immediately look at how the speed sensor affects engine operation. When the vehicle speed increases, the ECU understands that frequent fuel supply through the injectors is required. Naturally, the rapid movement of the car is also recorded by the level of throttle opening, for which the throttle position sensor is responsible.
If the car is coasting (downhill), then approximately the following picture occurs:
- the speed of the car increases, as evidenced by the DS readings;
- however, intensive fuel supply to the manifold is not necessary, since the ECU records the closed position of the throttle valve;
- Thus, the ECU understands that the car is coasting, which means that fuel consumption at such a moment is minimal.
In modern cars, DS play a very important role, and if you could drive a carburetor car with a broken cable as much as you like, then on injection cars, where the DS is presented in the form of an electrical element, such a breakdown will entail an increase in fuel consumption, as well as interrupted operation of the engine . That is why it is very important, if such a malfunction occurs, to eliminate it as quickly as possible.
Device malfunctions on the VAZ 2110 injector
The speedometer of the VAZ 2110 is a pointer device; accordingly, any signs of its breakdown will be determined in accordance with the deviations of the needle.
If the speedometer on a VAZ 2110 does not work or its operation is incorrect, this may manifest itself as follows:
- the arrow does not move away from position 0, that is, it does not demonstrate the speed of movement at all;
- it is stuck in a certain position and does not move in any direction;
- jumps, the AC indicators will be incorrect.
If the speedometer stops working, other symptoms may indicate this. For example, when the engine is not warmed up, the device operates in normal mode, but when the power unit warms up, the AC needle freezes and no longer moves. The main reason why the device may stop working on an injection engine is contamination of the speed sensor. This element often fails as a result of engine or transmission fluid getting into its structure.
So, if the speaker does not work, this may be due to the following reasons:
- the speed controller has failed;
- The speaker itself broke down;
- the speed controller is not securely fixed, there is poor contact with the connector, or the wiring has broken;
- there was a breakdown of the AC drive gears, which are located in the gearbox;
- Most often this is oxidation of the contacts on the sensor.
How to check the device for functionality?
Before you begin repairing or replacing a device, you must determine exactly what is causing it to malfunction. First, you should diagnose the speed controller, since AC malfunctions are usually associated with it. Visually inspect the device for dirt and make sure there are no broken wiring. As a rule, if the electrical part of the controller fails, a Check indicator appears on the control panel. If you decide to check your “ten” using a computer, then the diagnostics may show errors P0501-P0503.
Failure of the sensor can be determined by some symptoms:
- at idle speed the engine is unstable, and the internal combustion engine may stall for no reason;
- fuel consumption has increased.
Diagnosing the regulator board itself on injection engines is not so easy; this procedure is best carried out with the help of specialists. However, you can check the condition of the device’s drive gears with your own hands; to do this, you will need to unscrew the two screws securing the controller with a 10mm wrench. If you notice that there are broken teeth on the plastic gear, this may indicate that there are also defects in the transmission gear. To replace the gear that is in the box, the unit will have to be dismantled and disassembled (the author of the video is the Avtoelektika HF channel).
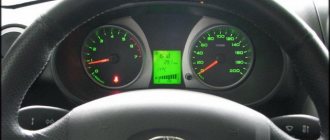
As you know, devices installed in a car allow you to monitor the situation while driving on the streets and monitor the operation of the engine and all other systems. Among others, the speedometer occupies a special place. It is located on the dashboard directly above the steering wheel. With its help, the driver finds out at what speed the car is moving.
In a situation when the speedometer and the injector installed on the VAZ-2110 do not work properly, the person behind the wheel puts both his own health and the lives of passengers at risk. At the same time, he can easily “earn” a fine from a traffic police officer for speeding too high. Thus, a working speedometer allows you to avoid a considerable amount of trouble.
Reasons for failure of the speed sensor on a Priora
As mentioned above, on a Priora the speed sensor is a pain. Moreover, its malfunctions do not appear after 100 thousand kilometers, but literally from the first days of operation of the new car. The reason for this is various factors:
- Oxidation of contacts - this phenomenon occurs due to a violation of the seal of the plug.
- Liquids getting inside - and although the sensor’s power supply chip (plug) is sealed, the possibility of oil and other aggressive substances (antifreeze, water) getting inside the connection cannot be ruled out.
- Damage to contacts - oxidized contacts simply fall off over time, breaking the electrical connection. Moreover, this happens even if the chip was not disconnected from the sensor.
- Violation of the integrity of the plastic housing - if the sensor housing is damaged, the product will not function.
- Damage to power cords. On Prioras, this phenomenon is very common, and if you determine that the sensor is working, then you should check the quality of the wires in the area where they enter the chip.
- The presence of dirt on the sensor body, which is a common cause of interruptions in the speed indicator. Small metal particles act as contaminants (production of gearbox gears). The particles are magnetized to the DS body.
Although the speed sensor on the Priora is relatively inexpensive (500-800 rubles), you should not rush to buy a new element. After all, the reason can only be contamination of this device or damage to the supply wires. That is why you first need to identify the cause of the breakdown, and only after that resort to eliminating it.
Checking fuses
Checking the condition of the wires
When operating the car on not very good roads, one of the wires that goes to the dashboard from the speed sensor may break, which leads to damage to the speedometer. A special tester will help determine the integrity of the wires; if the wires are not damaged, the device will notify you of this with a signal, but if the signal does not arrive, the wire must be replaced with a new one.
Experts recommend not only checking the integrity of the wires, but also analyzing the functionality of the following elements:
Signs of a malfunctioning speed sensor on a Priora
The main consequence of problems with the DSA is interruptions with the speed indicator, or more precisely, with the arrow. It can not only be motionless, but also “act up”, namely:
- indicate an incorrect speed value;
- “freeze” at one value (not just zero);
- twitch periodically.
The following types of manifestations may indicate a malfunction of the DS on the Priora:
- The electric power steering does not work (on Priors with electric power steering);
- The fuel level indicator in the tank does not work;
- unstable engine operation, which is especially evident at idle;
- loss of engine power and increase in consumption;
- jerks when changing gears;
- when coasting, the car may stall;
- motor vibrations.
If the speed sensor is faulty, the Check Engine light may light up on the dash. However, the indicator lights up only when the pulses (signal) completely stop arriving at the ECU. This is why the indicator often does not light up, although there is a sensor malfunction. The following error codes may indicate that the DS on the Priora has failed:
- 0500 - no speed sensor signal. When such an error occurs, the “CHECK” light comes on.
- 0501 - DS error.
- 0503 - if the signal from the DS is interrupted.
The speedometer needle jumps and twitches
In this situation, the diagnostic adapter will once again help us. It costs a penny, but with the right approach it often helps out.
The bottom line is that on cars with an engine management system, the signal from the speed sensor is supplied in parallel to the instrument panel and to the engine control unit (ECU). And in some cases, to the ECU, and from the ECU to the instrument panel.
Here I drew it in red for clarity
And as I always say, when we connect the adapter to the diagnostic connector, we begin to see everything “through the eyes of the computer.”
Therefore, it is no longer difficult to guess how to determine the direction of searching for the cause of the jumping speedometer needle.
A man is driving and watching the speedometer. I sit next to you and monitor the speed readings in the diagnostic program.
If the speedometer needle jumps, but the speed graph in the program is smooth, then the problem is in the direction of the instrument panel.
And if the arrow twitches, and the graph also has “dips,” then the problem is in the direction of the speed sensor and its drive.
This is exactly what happened in our case. These dips mean an unstable signal from the speed sensor.
This means that there is no point in going into the instrument panel. You need to move towards the speed sensor.
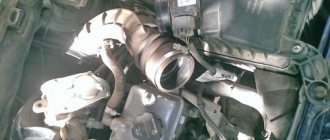
Where is the speed sensor on Priora?
An element such as a speed sensor is located on the gearbox housing, or more precisely, on the clutch housing under the housing of the internal joint of the right wheel drive. It is installed in this place on almost all car models. The photo below shows the place on the gearbox where the DSA is located on a Priora.
The photo below shows the place where the speed sensor is located on a Priora in the engine compartment.
No previous dismantling is required to access it for removal, inspection or replacement. It is better to get to it from the engine compartment (not from the pit), although this is not entirely convenient.
Characteristics of the control and measuring device
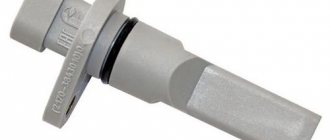
The Lada Priora has an electronic speed sensor (DS). Its design consists of a plastic housing, inside of which there is a sensitive element.
Location
In order to perform diagnostics, you need to know where the speed sensor is located. On the Lada Priora it is located in the upper part of the gearbox to the right of the exhaust manifold.
Functions and principle of operation
The main function of the DS is to determine the speed of rotation of the front wheels and transmit this data to the controller. Based on the information received, the controller regulates the quantity and quality of the fuel-air mixture that enters the cylinders. This data is reflected on the speedometer and odometer, which are located on the dashboard.
The operating principle of the device is based on the Hall effect. The DS transmits pulse signals of a certain frequency to the controller.
Errors and symptoms
You should know the main signs of malfunctions:
- increased fuel consumption;
- incorrect readings on the speedometer and odometer or their absence;
- the engine is unstable at idle;
- power decreases.
If the Priora speed sensor is faulty, it must be replaced immediately.
Which speed sensor to buy on Priora: types of products
Priora is equipped with three types of speed sensors from the factory. This is important to consider before purchasing a new product. To avoid mistakes, you should first remove the product and, having copied the serial number (you can take a photo), buy a similar option. This approach will ensure that you do not make a mistake with your purchase and buy the right type of sensor.
The second note when buying a DSA for Priora is to choose only original products. Chinese devices may cost 100-200 rubles cheaper, but they may not only not be suitable for installation, as evidenced by the photo below, but also not work correctly (or not work at all).
If you bought a DS, but during installation it fits tightly into the hole, it means that the product was chosen incorrectly. Compare the diameters of the standard and new products, and only then install the part.
In order not to make a mistake with your choice and buy an original DSA for Priora, you should pay attention to the presence of the serial number:
- 2170-3843010-04;
- 2170-3843010-02;
- 2170-3843010.
The main difference between them is in the calibration (the type of signal perceived by the controller) and the shape of the working part where the semiconductor element is located. Choose the products correctly, as the correctness of their operation depends on this.
Connecting a tachometer on a VAZ-2109 car
So, let's figure out how you can install this device on the “nine”. It should be noted right away that the fuel supply system - injector or carburetor - does not play a special role here. If we talk about tachometers, then they really matter
other points. As you know, currently the most common are cars with the following engine types:
- gasoline;
- diesel
Depending on this, the tachometer is selected, unless, of course, it comes in the stock version. The thing is that on gasoline engines the tachometer reads data from the ignition coil, or rather, the impulses that arise here. However, the design of diesel power plants does not provide for this unit.
Accordingly, here the tachometer reads pulses not from the ignition coil (for lack of one), but from the generator.
In addition, the number of cylinders in the engine also matters. Therefore, when choosing a tachometer, you need to pay attention to the moment. However, you can simply tell the seller that you need a device for the “nine”, and he will select the right option himself.
The most radical option for installing a tachometer on a VAZ-2109 is to install a Europanel. However, do not forget that this is quite a troublesome matter. Although, on the other hand, the interior of the car will change for the better, especially in the evening. If you don’t want to bother with replacing the panel, you can install the tachometer separately.
In this case, you will first need to decide on the type of device. If finances allow, then you can purchase modern instruments that will show not only crankshaft speed, but also, for example, instantaneous fuel consumption, temperature, voltage in the on-board network, and so on. Yes, the price for such devices is quite high, but they are very informative, and they are also very attractive in appearance, especially at night, when the backlight turns on. Models that are too cheap are not worth taking. After all, they, as a rule, do not provide entirely accurate information. That is, you will continue to switch gears virtually by ear.
After choosing a model, you should decide on the location of the tachometer. It should be positioned in such a way that the readings can be easily read. In addition, the tachometer should not obstruct visibility or block other instruments that also provide important information. It is desirable that the device fits into the interior of the car and does not look like a foreign body.
However, installing the tachometer itself inside the car is only half the battle. The device also needs to be connected correctly. There is nothing particularly complicated here, and you can easily cope with this task yourself. By and large, here you need to connect only 3 wires correctly. Agree that it is very difficult to confuse something here.
First of all, we need to bring the wires from the device into the engine compartment. This is best done through the hole already existing in the body of the “nine” for the speedometer cable. Here we need stiff wire. The main requirement is that it not be too thick. Now we take electrical tape and attach the wires to the wire with it. You don't need to wrap too much. Just make sure the connection is strong. Next, insert it into the hole for the cable
speedometer, the second end of the wire and carefully push it into the engine compartment. Now all that remains is to pull out the wires. This work will not take much of your time, so it is recommended that you do everything slowly.
Now we proceed to the main stage, that is, connecting the wires. As mentioned above, in this case there are 3 of them. The first two (12-volt and Signal) are to contacts “B” and “K” of the ignition coil, respectively. Now all that remains is to secure the mass. This is done in any place convenient for you. To make contact more reliable, it is recommended to select an area where the wire can be secured with a nut. That's all - all that remains is to check the device in operation.
Features of replacing DSA on Priora: what is important and need to know
To replace the speed sensor on a Priora, you will need to arm yourself with a “10” key. It is recommended to use a ratchet or L-shaped wrench. You must first disconnect the power supply by pressing the latch and pulling it up.
After this, the nut is unscrewed to “10” and the DS is removed. You may need to pry it off with a screwdriver to remove it, as it has a sealing collar to keep the transmission sealed. The video below describes the detailed process of removing and replacing the speed sensor on a Priora.
It is important to note one point - when installing, it is recommended to treat the upper part of the device, namely the sealing element, with oil. This will simplify the process of not only installing the product in the hole, but also removing it back in the future.
It is worth noting once again that on Priors this is a sore when the DC power wires fray. If there is damage to the insulation, you should buy a new chip for the sensor and replace it. Do not try to wrap it with electrical tape, as this will not help. When replacing the chip, be sure to make sure not to mix up the wires. It is recommended to tin the junction of the wires with tin, and then insulate them with heat shrink, which will ensure a high level of tightness. Finally, you can carefully insulate the wires with electrical tape.
Having done it once and well, you will definitely not encounter a malfunction in the near future in the form of a failure of the speed sensor on the Priora. Take the DS replacement procedure responsibly to prevent such breakdowns in the future.
Source
Partial interruptions in work
This is where the speed sensor is located.
But it happens when the speedometer periodically refuses to perform its functions, and this is often accompanied by a failure of the electric booster, the fuel quantity sensor, and warning lights on the dashboard light up.
In most cases, this malfunction indicates a failure of the speed sensor. But before checking it, you should first check the pad contacts for oxidation.
Then you should remove the speed sensor itself. If severe contamination is noticed, then you should try to clean it and check its functionality again. If these actions do not bring positive results, the sensor should be replaced.
In most cases, carrying out the described operations leads to eliminating the speedometer malfunction.