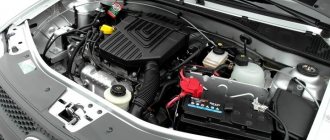
A starter or starting device (PU), as it is sometimes called among motorists, is designed to start a car engine. After turning the key in the ignition switch, current is transferred from the battery to the control unit. The latter is activated, driving the motor.
Violation of the rules for using the mechanism leads to its rapid wear and damage. For example, keeping it in an active state for more than 15 seconds wears out the bendix teeth and increases the operating temperature on the rubbing surfaces.
The design of the starting device is quite complex, despite the intuitive operating principle. We do not recommend carrying out repairs without experience in servicing equipment.
How to remove the starter of a Lada Largus car
Place the car on a lift or inspection hole.
Disconnect the negative terminal of the battery.
Using a flat-head screwdriver, press the fasteners and remove the casing (if installed) of the electronic control unit (ECM).
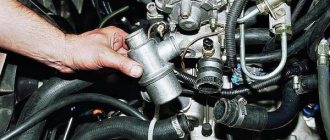
Using a 10mm wrench, unscrew the two nuts 1 securing the expansion tank 2.
We remove and move the expansion tank to the side without disconnecting the hoses.
If a JR5 gearbox is installed, use a flat screwdriver to disconnect joints 1, selector and shift cables from the gearbox.
We press the clamps and disconnect the stoppers of the sheaths of the gear selection and shift cables from the gearbox bracket.
If JH3 gearbox is installed:
Remove the cover 1 of the gearshift drive rod joint. Using a 10mm wrench, unscrew bolt 2 securing the gearshift drive rod, remove the spacer bushing and disconnect the rod.
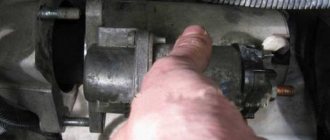
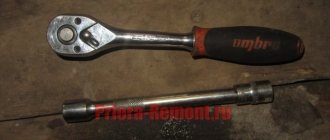
Using a 13mm head, unscrew the three bolts 1 securing the starter
If the car is installed on a lift, then we lift the car to perform work from below.
Using a 13mm socket, unscrew nut 2 securing bracket 4 to intake manifold 3.
Using a 17mm head, unscrew bolt 6 securing bracket 4 to cylinder block 5.
Remove bracket 4 for fastening intake manifold 3.
Use a 10mm socket to unscrew nut 2
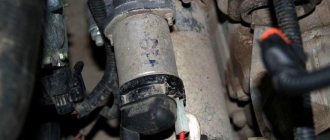
Disconnect harness 1 of the ignition system wires from starter 3
Using a 10mm socket, unscrew nut 4 securing the starter wires 5.
Disconnect the starter wire.
Using a socket 8, unscrew nut 3 securing the starter electromagnetic relay wire 5
Starter installation
Install the starter in the reverse order of removal.
In this case, the tightening torques of threaded connections:
— starter mounting bolt — 44 Nm (4.4 kgf.m);
— starter wire fastening nut — 8 Nm (0.8 kgf.m);
— nut securing the starter electromagnetic relay wire — 5 Nm (0.5 kgf.m);
— bolt for fastening the gearshift drive rod — 27.5 Nm (2.75 kgf.m).
We connect the terminals to the battery.
Source
Problems when paying with bank cards
Sometimes difficulties may arise when paying with Visa/MasterCard bank cards. The most common of them:
- There is a restriction on the card for paying for online purchases
- A plastic card is not intended for making payments online.
- The plastic card is not activated for making payments online.
- There are not enough funds on the plastic card.
In order to solve these problems, you need to call or write to the technical support of the bank where you are served. Bank specialists will help you resolve them and make payments.
That's basically it. The entire process of paying for a book in PDF format on car repair on our website takes 1-2 minutes.
If you still have any questions, you can ask them using the feedback form, or write us an email at
Removing and checking the Lada Largus starter
We remove the starter to repair or replace it, as well as when dismantling the engine and gearbox.
We carry out the work on an inspection ditch or overpass.
We show the operations for removing the starter on a car with an engine
1.6 (16V). By car with engine
1.6 (8V) starter is removed in the same way. Disconnect the wire terminal from the negative terminal of the battery.
We remove the power unit protection (see “Removing the power unit protection”, p. 235).
Using a high “8” socket, unscrew the nut (the nut is attached to the tip of the wire).
Use a 13mm socket (without an extension) to unscrew the lower starter mounting bolt.
Use a screwdriver to move the drive gear along the shaft.
The gear should move easily along the shaft without jamming. If the gear sticks on the shaft, the drive must be replaced.
To check the starter, we connect the “positive” terminal of the battery to the upper contact bolt of the traction relay with wires for “lighting”, and the “negative” terminal to the starter housing.
Starter Renault Logan Sandero (renault sandero logan)
The engine starting system includes:
- battery,
- starter,
- egnition lock.
TECHNICAL CHARACTERISTICS OF STARTERS
| Engine | Starter |
| K7J and K7M | MITSUBISHI M000T45171ZT |
| K4M | VALEO 192502A |
The starter is a DC motor that can produce quite a lot of power for its size. One of the things that allows this engine to produce more power is that it has a higher rotation speed. It drives the engine through a small gear included in the starter hardware, which turns a large gear (flywheel) at a greatly reduced speed. Another factor that allows it to achieve more power is that it operates in intermittent mode, i.e. only at startup. This way the starter has little need for air circulation and the windings can be contained in a small space.
Starter solenoid
The starter solenoid is a magnetic device that uses a small current supplied to the starter energizing circuit from the ignition switch. This magnet, when in operation, moves a plunger that mechanically engages with the starter and electrically shorts the thick wire that connects the starter to the battery. The starter activation circuit consists of the starter switch, located in the ignition switch, and wires to connect them to the starter solenoid or relay.
The gear, which serves to transmit rotation, is mounted on a one-way clutch. This coupling is mounted on splines on the starter armature shaft. When the ignition key is turned to the start position, the solenoid plunger drives the gear to the flywheel ring gear through the ring and spring. If the teeth of the gear and flywheel match exactly, the gear will immediately engage the flywheel. If a tooth engages another, the spring will be compressed and act on the teeth to keep them engaged while the starter turns. As the solenoid reaches the end of its stroke, it closes the contact between the battery and the starter, and then the engine is cranked by the starter.
As soon as the engine starts, the flywheel wheel begins to spin faster than the gear spins at its highest rotation speed. In this case, the one-way clutch (Bendix) begins to allow the gear to rotate faster than the starter shaft, so the starter will not operate at increased speed. When the ignition key is removed from the “start” position, the solenoid is de-energized and the spring located inside the solenoid forces the gear out of mesh, and the current supply to the starter is stopped.
There is a spring between the gear and the drive arm from the start relay so that if the teeth are misaligned and the gear is encouraged to engage the flywheel ring, the solenoid continues to operate and provides voltage. The gear will immediately engage as soon as the starter shaft begins to rotate.
How to remove the starter on LADA cars with your own hands
The starter is removed in connection with its replacement, inspection or repair. On LADA cars, the starter is installed on the clutch housing at the front in the direction of travel. Before starting work, you should disconnect the negative terminal of the battery, drive the car onto an inspection ditch (overpass) and remove the engine protection.
On all modern LADA cars (Lada XRAY, Vesta, Largus, Granta, Kalina, Priora and Niva 4x4), removing the starter is performed in the same way. Installation is carried out in reverse order. Distinctive features of the process are presented below.
Lost my car keys
Therefore, you can apply for high-quality and complete repairs of your Lada in case of any malfunction. We will carry out competent car diagnostics and offer you really necessary and effective repairs, including coding and programming of the BSI unit.
So, if you have lost the keys to the Lada Largus (or Lada Kalina, Lada Priora, Lada Granta, Lada Vesta, Lada X Ray), then do not rush to buy a lot of spare parts and turn car repairs into a huge waste. We offer you Lada repairs at the most reasonable prices, as we do not ask you to buy new control units. Our technicians will be able to recode the original electronics on the car and configure all systems to work 100%. Such car repairs will cost you much less!
Accordingly, if you have lost your car keys, or your key has stopped starting the car, or the buttons on the key do not work, then come to us! The Hephaestus car service technicians will repair the chip key or cut and program a new chip key for your car inexpensively!
Frame
Lada XRAY and Vesta
Remove the engine splash guard (instructions for Lada Vesta, XRAY).
For configurations with manual transmission: Unscrew 2 bolts (No. 1) and remove the clutch hydraulic cylinder (No. 2), without disconnecting it from the hydraulic actuator tube (No. 3). Hang the cylinder on the technological hook (head “13”).
For all configurations: Unscrew the nut (No. 1) and disconnect the terminal (No. 2) and the block with wires (No. 3) from the starter traction (retractor) relay (No. 4) (head “13”).
Remove 3 bolts (No. 1), remove the clutch hydraulic cylinder mounting bracket (No. 2) (for vehicles with manual transmission) and the starter (No. 3) (Torx E10).
Lada Largus
Remove the cover (if equipped) of the electronic control unit (ECM) by releasing the two fasteners (flat-head screwdriver). Unscrew the 2 nuts (No. 1) securing the expansion tank (No. 2) (10mm wrench). Remove and move the expansion tank to the side without disconnecting the hoses.
For configurations with JR5 gearbox:
- disconnect the hinges (No. 1) of the gear selection and shift cables from the gearbox (flat-head screwdriver);
- press the clamps on both sides and disconnect the stoppers of the sheaths of the selection and shift cables from the gearbox bracket.
For configurations with JH3 gearbox:
- remove the cover (No. 1) of the gearshift drive rod joint;
- Unscrew the bolt (No. 2) securing the gear shift rod, remove the spacer sleeve and disconnect the rod (10mm wrench).
Unscrew the 3 bolts (No. 1) securing the starter (head “13”).
Raise the car and unscrew the nut (No. 2) securing the bracket (No. 4) to the intake manifold (No. 3) (head “13”). Unscrew the bolt (No. 6) securing the bracket (No. 4) to the cylinder block (No. 5) (head “17”). Remove the bracket (No. 4) that mounts the intake manifold (No. 3).
Purpose of fuses in the block installed in the passenger compartment
Note: On various vehicle modifications, some of the fuses shown in the images may be missing.
more details:
| Protected circuit | |||
| F1 | 20 | Yellow | Windshield wiper, windshield wiper switch, heated tailgate relay |
| F2 | 5 | Beige | Instrument cluster, fuel pump relay, engine control unit (ECU) |
| F3 | 10 | Red | Brake light switch |
| F4 | 10 | Red | Diagnostic connector, immobilizer antenna unit, body electrical control unit |
| F5 | — | — | Reserve |
| F6 | — | — | Reserve |
| F7 | — | — | Reserve |
| F8 | — | — | Reserve |
| F9 | 10 | Red | Instrument cluster, left low beam |
| F10 | 10 | Red | Middle sows right headlight |
| F11 | 10 | Red | Instrument cluster, left high beam |
| F12 | 10 | Red | High beam right headlight |
| F13 | 30 | Green | Rear door window motors |
| F14 | 30 | Green | Front door power window motors |
| F15 | 10 | Red | ABS electronic control unit, acceleration sensors, steering angle sensor |
| F16 | 15 | Blue | Electrically heated front seats |
| F17 | 15 | Blue | Sound signal |
| F18 | 10 | Red | Left front and rear parking lights |
| F19 | 10 | Red | Right front and rear parking lights, glove compartment lighting, instrument cluster lighting, hazard warning switch, HVAC control unit, audio system, cigarette lighter, central locking switch, front door power window switches, license plate lights, right lights front and rear position lights |
| F20 | 7,5 | Brown | Rear fog light |
| F21 | 5 | Beige | Electrically heated exterior mirrors |
| F22 | — | Reserve | |
| F23 | — | — | Reserve |
| F24 | Reserve | ||
| F25 | — | Reserve | |
| F26 | 5 | Beige | SRS system |
| F27 | 20 | Yellow | Tailgate wiper motor, horn, TDC sensor, reverse light switch |
| F28 | 15 | Blue | Interior electrical control unit (energy saving mode) |
| F29 | 15 | Blue | Interior electrical control unit, diagnostic connector |
| F30 | 20 | Yellow | Interior electrical control unit |
| F31 | 15 | Blue | Fog lights, fog light relay |
| F32 | 30 | Green | Heated tailgate glass |
| F33 | — | Reserve | |
| F34 | — | Reserve | |
| F35 | — | Reserve | |
| F36 | 30 | Green | Electric motor for heating, air conditioning and ventilation systems |
| F37 | 5 | Beige | Electric exterior mirrors |
| F38 | 15 | Blue | Audio system, cigarette lighter |
| F39 | 10 | Red | HVAC Motor Relay |
Heated rear window relay (interior)
Relay view (dashboard removed for clarity)
The rear window heating relay (40A) is located in the passenger compartment, under the instrument panel. (to the left of the steering column, above the interior mounting block). To replace it you need to remove the instrument cluster.
Press the latch and disconnect the relay from the holder.
Lada Granta, Kalina, Priora
Remove the protective cap (No. 3), unscrew the nut securing the wire to the starter solenoid relay (No. 4) and disconnect the wire from the relay (head “13”). Disconnect the block with wires (No. 2) from the starter solenoid relay.
For cars with a manual transmission with a traction drive: unscrew the 3 nuts securing the starter (No. 5) and remove it (head “13”).
For cars with automatic transmission and manual transmission with cable drive: unscrew three bolts (No. 5) and remove the starter (No. 3) (head “13” or Torx E14).
Lada 4×4
Remove the rear support bracket for the intake pipe by unscrewing the two bolts with a 13mm wrench.
We remove the starter protective shield by unscrewing its fastening nuts with a “13” wrench.
From the bottom of the car, unscrew the two bolts securing the starter. From the engine compartment side, move the starter forward and disconnect the block with wires.
We unscrew the nut and disconnect the wire tip from the contact bolt of the traction relay. Remove the starter from the engine compartment.
By the way, do you know that the ignition system of LADA cars can be improved, for example, by abandoning the ignition key in favor of a start/stop button.
Share on social networks:
Found an error? Select it and press Ctrl+Enter..
Source