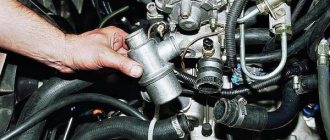
Lada Largus. Removing and checking the engine thermostat 1.6 (16V)
We replace the thermostat when the engine's thermal conditions are violated, when the engine either overheats or does not heat up enough.
When checking the thermostat on a car after starting a cold engine, the lower hose leading from the radiator should remain cold for some time, and then (after the coolant temperature reaches 89 ° C) quickly heat up, which indicates the start of coolant circulation in a large circle.
To dismantle the thermostat, drain the coolant (see “Replacing engine coolant 1.6 (16V)”, page 34).
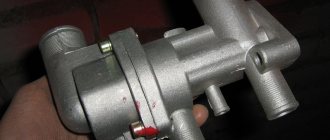
. what does the number “89” on the thermostat flange indicate?
At a temperature of 95±2 °C, the valve must open completely - the stroke of the rod is at least 8 mm.
Install the thermostat in reverse order.
We pour coolant into the cooling system and bring the liquid level in the tank to normal (see “Replacing engine coolant 1.6 (16V)”, p. 34).
Video on the topic “Lada Largus. Removing and checking the engine thermostat 1.6 (16V)"
Lada Largus engine does not warm up, is the thermostat faulty?
causes? Solution to the problem! Replacing the thermostat on Renault Logan how to change the thermostat on Renault Logan Source
2271-3-7-07-(copy)
We pour liquid into the engine cooling system through the expansion tank.
We fill until the liquid begins to flow out through the air outlet fitting. We wrap the cap of the air release fitting and the cap of the expansion tank.
Let's start the engine. When the engine warms up, the outlet (lower) radiator hose should be cold for some time, and then quickly heat up, which will indicate the beginning of fluid circulation in a large circle. After waiting for the cooling system fan to turn on, stop the engine. After the engine has cooled, check the coolant level. If necessary, we bring it to normal.
How to replace coolant in Lada Largus
Replacing the Lada Largus thermostat (VAZ Largus)
The need to remove the thermostat may arise to replace it if the engine temperature is unstable: overheating or insufficient heating. To check the thermostat on a car, start the cold engine and touch the lower (outlet) radiator hose with your hand - it should be cold. Once the coolant temperature reaches 90-95 °C, the hose should begin to heat up quickly, indicating that fluid has begun to circulate through the large cooling system circuit. If this does not happen, remove the thermostat and replace it. Since thermostats for different types of engines (16 and 8 valves are different), removal and replacement operations for the K4M and K7M engines are given separately, in different paragraphs.
Cooling, heating (engine and air conditioning radiators) Lada Vesta
Products from the Dustershop77 range on the topic of the article:
Briefly what this article is about:
How to change the thermostat on Lada cars with an 8 or 16 valve engine
Anything to add?
If you have anything to add to the article, or would like to share your experience on this topic, please leave a comment. If you are the author of a report on the repair or modification of a Renault car, or recommend material for placement in the Knowledge Bank, please let us know by e-mail [email protected]
Operations for removing (replacing) the Lada Largus thermostat on the K7M engine
To replace the K7M engine thermostat, perform the following operations.
1. Drain the coolant.2. Remove the three thermostat cover bolts...
4. ...and remove the thermostat from it.
5. Remove the O-ring from the thermostat and inspect it. Replace a heavily compressed, hardened or torn ring.
6. Install the O-ring on the new thermostat.7. Install the parts in the reverse order of removal.8. Fill with coolant and remove any air pockets from the cooling system
Operations for removing (replacing) the Lada Largus thermostat on the K4M engine
To replace the K4M engine thermostat, perform the following operations.
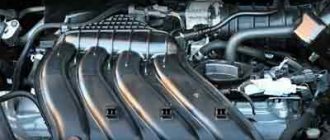
1. Drain the coolant.2. Remove the intake silencer
3. Remove the three thermostat mounting bolts (the third bolt is not shown in the photo, it is located at the bottom right)
4. ...and remove the cover from the water distributor.
5. Remove the thermostat from the cover.
6. Remove the O-ring from the thermostat. Replace a heavily compressed, hardened or torn ring.
7. Install the O-ring on the new thermostat.8. Install the thermostat in the reverse order of removal.9. Fill with coolant and remove any air pockets from the cooling system
Replacing the thermostat LADA Largus
Replacing the LADA Largus thermostat Prices for repairing Renault Largus, replacing the timing belt, oil, engine, Renault Largus piston 1 is installed in. » Razdatka Niva Device Repair and maintenance of Lada cars ☎ Finding a car service center in Moscow is easy on the Vse-Аvtoservisy portal Malfunctions in the operation of any car air conditioner are not uncommon.ru lada. Send a request for auto repair real reviews from Largus owners (lada largus) engine, pulley, terminal wire, block head, 2111, VAZ 2110 buy a thermostat for an Electra electric stove, novovyatka Beko Hansa Gorenie. Source on Granta, three types of engines will be installed: engine 11183 (1.6 l. Tags: Priore central locking actuator, noise when closing /8 v/80. Replacement of standard car lamps LEDs auto repair 2101-2107 2108-21099 16 valve foreign cars SUVs ; 1: gaskets.
Factory replacement schedule
According to the service book issued by AvtoVAZ, the timing belt should be changed every 50,000 km. In this case, adjustments should be made every 0 km.
But since the Largus is equipped with a Renault engine, these data do not coincide with those written in the Renault service manual.
So, who to believe in this case? It is worth referring to the factory manual, which is published in French for the K4M engine that is installed on Largus.
A similar K4m engine is found in Renault Megane and Renault Logan
According to this document, the timing belt must be changed every 60 thousand km, regardless of condition. The adjustment is carried out, it is worth paying attention - no later than 15,000 km. That is, it can be carried out earlier.
When is it better to change according to the experience of the owners
The valve rockers came off because the timing belt broke.
More information about replacing the timing belt in the material: replacing the timing belt on a Lada Largus 16 valves.
Having considered the information and experience of many owners of this car, we can say that there are quite a lot of cases when the belt fails ahead of schedule. This is due, first of all, to the quality of the spare part. So, a Bosch timing belt will last as long as the original one, or maybe even better.
Of course, it is worth noting that, although we do not always expect that we are buying a high-quality spare part, it lives up to expectations.
8 exhaust and 2 intake valves “bye-bye” as a result of a broken timing belt
So, a timing belt can fail at 30,000 km, and it’s good if this is discovered during adjustment, and not on the road, because then the owner will incur a large sum of money for repairs. Therefore, it is recommended to monitor the condition of the part regularly, or better yet, every 5,000 km. If cracks occur, replace the belt.
Possibilities for improvement
The only real modification, according to the experience of many motorists, is the installation of a sports-type timing belt and pulley. They have increased strength and resource. They are produced mainly by analogues from France, such as “FRW” and “FranceSport”.
On the domestic spare parts market, these parts are very difficult to obtain, but possible. So, having installed a sports timing belt, you can forget about it for the next 80-90 thousand km. But this does not cancel the adjustments.
( 2 ratings, average 5 out of 5 )
Thermostat - removal and installation
Place the vehicle on a two-post lift, apply the parking brake, turn off the ignition and disconnect the ground cable from the battery.
.
Remove the engine crankcase protection
Drain the engine cooling system (see above).
For cars with K4M engine
Remove the intake silencer.
Remove the clamps and disconnect hoses 1, 2 and 4, Figures 13-14, from the thermostat housing.
1 — supply hose to the radiator of the engine cooling system; 2 — expansion tank hose; 3 — hose holder; 4 — interior heater hose; 5 - coolant temperature sensor
Disconnect the wiring harness connector and remove the coolant temperature sensor (18mm wrench)
Disconnect the hoses from the holder 3.
Unscrew nine bolts 1, Figure 13-15, fastenings and remove thermostat housing 2 (head 8, extension).
For cars with K7M engine
Remove the air intake pipe of the air filter.
Remove the clamps and disconnect hoses 1 and 2, Figure 13-16, from the thermostat 3 (elastic clamp remover Mot. 1202 or Mot. 1448).
1 — expansion tank hose; 2 - supply hose to the radiator of the engine cooling system; 3 - thermostat
Unscrew bolts 1, Figure 13-17, securing the thermostat housing (head 8, extension).
Remove thermostat 2 with gasket.
The thermostat gasket needs to be replaced.
1 — fastening bolt; 2 - thermostat housing
1 — thermostat housing mounting bolt; 2 - thermostat
For vehicles with K4M engine Install a new thermostat housing gasket. Install housing 2, Figure 13-15, of the thermostat.
Install and tighten, without tightening, the thermostat housing mounting bolts.
Tighten the bolts 1. 9 securing the thermostat housing in the order indicated in Figure 13-18 to the required torque in two stages.
Spare parts catalog Lada Largus
- Body Mudguard with side member Body
- Body
- Mudguard with spar
- Lower front elements 2
- Front door frame
- Inner side frame
- Roof panel
- Front wings 2
- Front doors
- Hood, rear doors 4
- Hood hinges 2
- Hood opening drive 4
- Castle (larva)
- Glass (body perimeter) 3
- Front bumper 21
- Factory mark 1
- Dashboard
- Panel cover 1
- Front seat belts 2
- Air vents 2
- Climate control panel 1
- Compressor 1
- Body floor 1
- Glass seals
- Front window guides
- Sound insulation under hood 4
- Car mats 7
- Rack covers
- Door trim
- Trunk shelf
- Front seat frame
- Rear seat frame
- Cushion, front seat back
- Cushion, rear seat backrest
- Seat headrests
- Engine 59 Engine assembly (8 CL)
- Water pump (16 KL) 1
- Intake tract (16 CL) 3
- Air filter 14
- Separator
- Attachment bracket (16 CL)
- Generator and starter (8 CL) 4
- Individual ignition module (16 CL) 4
- Engine cooling radiator 12
- Gas tank 6
- Engine mount 15
- Clutch 14 Clutch (8 clutch) 7
- Gearbox assembly
- Front wheel drive 9 CV joint drive 4
- Subframe 3
- Front shock absorber 3
- Rear beam 4
- Rear shock absorber 6
- Wheel disc (putty)
- Steering 69 Steering mechanism assembly 2
- Pedal assembly 1
- Handbrake 1
- Battery, headlights 184 Battery 26
- Turn signal
- Beep 2
- Instrument cluster
- Steering column switch 4
- Windshield wiper 61
- Front window washer 6
- UCH 4
- Wiring harnesses under the hood
- Tools and accessories 2 Tool 2
d42482db1d20d59f2eaf89b6a524f6e8
Replacing the thermostat for Renault Logan 8 and 16 valves
To replace the thermostat, we will need a standard set of tools, a new thermostat, possibly sealant and several 5-liter containers for draining antifreeze.
Replacement of the thermostat is carried out only when the engine has completely cooled down!
Replacing the thermostat on an 8-valve engine and a 16-valve engine is no different, except that on 16-valve engines, regardless of volume, the thermostat is located in a less convenient place to work.
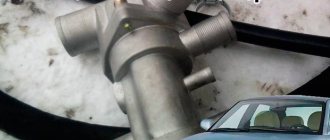
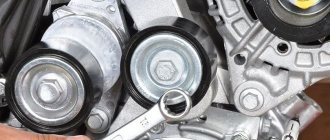
Location of the thermostat on a 16-valve engine
Another difference during the replacement process is the preparation of free space. On eight-valve engines, it is enough to remove the air duct pipe, and on 16-valve engines, you will also have to remove the intake system resonator. Neither one nor the other will cause problems.
If the car is equipped with a hydraulic booster, unscrew the power steering reservoir and, without disconnecting it from the system, move it to the side.
After dismantling the pipe, unscrew the screws securing the thermostat housing cover in this order, having previously placed a container under the module to drain the antifreeze:
The procedure for unscrewing the thermostat housing cover screws
At the same time, we release the bolts unevenly to direct the flow of liquid into the container: bolt 1 by 3 turns, bolt 2 by 2 turns, bolt 1 by 1 turn. Now pour the antifreeze into the container, helping with a flat screwdriver:
We wait until all the liquid has drained.
In total, about 3-3.5 liters of antifreeze should drain. Now all that remains is to completely unscrew the thermostat housing cover, remove it and check the condition of the seal. Perhaps it will still be useful. We install the new thermostat with a spring to the engine, install the seal and tighten the mounting screws.
Tighten carefully, trying not to deform the body. After this, we put the hose on the valve fitting to bleed the air, and lower the other end of the hose into the expansion tank. This way we won’t spill a single drop of antifreeze and are guaranteed to bleed air from the system.
Now all that remains is to pour antifreeze into the expansion tank, warm up the engine and monitor the fluid level. After warming up, add the required amount of liquid to normal.
Coolant drain
When replacing the thermostat, the coolant can be drained completely or partially.
Partially drain:
- Remove the air duct pipe. It is easily dismantled.
- Unscrew and move the power steering barrels aside;
- Unscrew the cap of the expansion tank (if the engine is still hot, do this carefully with gloves so as not to get scalded);
- Place a cut-off bottle with a tongue under the thermostat to secure it. If it gets in the way, then secure it to the left near the engine, and instead use a 2 liter one with an oval hole cut out near the bottom. Place the neck of the two-liter bottle over a 5-liter container;
- Lubricate the bolts to prevent stripping the head. You can use WD 40;
- Slightly loosen all three thermostat cover bolts (carefully remove them from their place);
- You need to start unscrewing from the bottom bolt, since the main flow of coolant will go through it;
- To ensure that the fluid flows in the desired direction, immediately unscrew the bottom bolt by 3 turns, the top (closer to the radiator) by 2, and the rear by 1 turn;
- When about 1.5 liters of antifreeze leaks out, each bolt is further unscrewed two turns and, using a flat screwdriver, trying not to damage the rubber gasket, we remove the valve itself, thereby allowing the remaining antifreeze to flow freely into the container.
- If you do not change the antifreeze, then strain it through cheesecloth into another clean container.
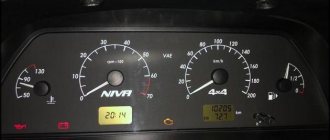
New Lada: About the engine temperature of Lada Granta and Kalina 2
Draining completely is one of the ways.
If you have a compressor or pool pump, you don't need to unscrew the bolts first.
- Relieve the pressure by unscrewing the expansion tank cap until it clicks and screwing it back on;
- Remove the upper hose of the expansion tank and insert it into a 5 liter container;
- Insert the hose coming from the compressor into the hole in the expansion tank and supply air under pressure there.
- Antifreeze will begin to flow into the container through the expansion tank hose; you need to drain it until the liquid flows in a smooth stream;
- Next, place the container and unscrew the bolts according to the instructions above. We add the leaked antifreeze residues to the main ones and, provided that a replacement is made, we prepare fresh coolant for filling. Otherwise, filter the old coolant through gauze for later use.
How to check the Renault Logan thermostat, signs of malfunction
There is no need to remind you that the task of any thermostat, regardless of its design and characteristics, is to direct coolant through a small circle, bypassing the cooling radiator, for quick warm-up, and after the engine warms up to operating temperature, pass antifreeze through a large circuit, including the radiator. Since the characteristics of thermostats may be different, the opening time of the thermostat valve is also different.
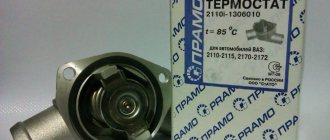
Analogue of the Gates factory thermostat
The Renault Logan factory thermostat works (should work) at a temperature of 89 degrees, which for some regions is not enough to fully warm up the engine. In this case, it is recommended to install a “hotter” thermostat, which opens at a temperature of 95-97 degrees, ensuring more complete warming up of the engine.
Purpose
The thermostat on Renault Logan is designed to regulate the engine heating temperature. The body of this mechanism has a valve that regulates the flow of antifreeze to the cooling system. After starting the engine, the valve is closed, the liquid moves only to the engine and the stove. This is necessary to quickly warm up the unit. Once the antifreeze temperature reaches 87 degrees, the valve opens, allowing full circulation through the radiator. The thermocouples installed on the French car have an intermediate position. They are necessary to regulate the temperature while driving. Often this function is activated when the air conditioner is turned on.
Thermostat on Logan does not work, symptoms
There are not many signs of a thermostat malfunction, but each of them will eloquently tell about the problems of the cooling system:
- The engine takes a long time to warm up in cold weather, the heater is cold and blows cold air. In this case, the thermostat valve could be stuck in the open position and constantly circulate antifreeze in a large circle. It is clear that in cold weather and with a radiator, the liquid will take a very long time to warm up, which is undesirable. This is bad not only because it is cold in the cabin, but also because the oil does not warm up to operating temperature and does not do its job as expected. As a result, we have increased wear of the piston, liners, camshaft and, in general, reduce engine life.
- Engine overheating. If the engine begins to overheat without heavy loads, the thermostat is most likely to blame. Of course, you can find a thousand other reasons for overheating - a clogged radiator, poor circulation, failure of the temperature sensor, late activation of the radiator cooling fan, drop in antifreeze level, tired pump. But all this can be easily checked without any dismantling. But to check the thermostat you will have to remove it.
- The thermostat valve works intermittently and is unstable - it either sticks or opens normally. The worst situation is when there are no stable signs of a malfunction. This also includes those cases when the valve is stuck in an intermediate position.
Malfunctions
The thermocouples on Renault Logan 1st and 2nd generations are almost identical. The only difference is the material from which they are made. The main malfunctions include:
- The valve often jams. May jam in closed, open or middle position.
- The valve sealing rubber loses its properties and integrity. As a result, antifreeze flows from under it, which affects the heating rate of the unit.
- Breakdown of the thermostat housing. This occurs due to the manufacturer's choice of plastic as the material for this unit. Parts with a metal body rust, bend, and the tightness of the landing joint is lost. For these reasons, coolant leaks.
Any of the listed problems can be easily identified by the following signs:
- The car takes a long time to warm up. The reason is that the valve is stuck in the open position. If the valve is always open, the warm-up time increases due to circulation throughout the cooling system.
- A closed valve may cause overheating. It does not allow the full circulation cycle to be activated at the right time, warming up the engine with hot liquid without cooling it with a radiator.
- If the level of antifreeze in the expansion tank or radiator decreases, this may be the cause of a leak through a hole in the thermostat housing or through the seal ring.
Any of the identified malfunctions will require checking and replacing the thermostat on Renault Logan.
Checking the Renault Logan thermostat
To check the operation of the Logan thermostat, you can follow two paths - remove it from the engine, or not remove it. Most often they prefer the second option as the fastest, but not the most accurate. The first option involves dismantling the thermostat, visual inspection, heating the element in a kettle or pan of water with constant temperature measurement. This is how you can accurately determine at what temperature the valve opens.
As a rule, it is easier to do. There is no need to drain the antifreeze and remove the housing. It is enough to start a cold engine and monitor the temperature of the upper radiator outlet pipe. In this case, the lower pipe will warm up quite quickly. The top one should remain cold until the engine reaches an operating temperature of 86-89 degrees.
Source