The parking brake (hand brake) is also popularly called the “handbrake”. It is a permanent brake, which is used when parking on a slope, when parking a car, and is also used by masters to perform complex stunts. The hand brake blocks any spontaneous movement of the vehicle. The parking brake is activated using a special lever mounted on the dashboard with the gearbox. The handbrake is a fairly important and irreplaceable thing, but not all drivers use it. The fact is that if the car is put in gear, it will not roll away. However, if the slope is quite steep, then the box will no longer help. In general, most novice drivers cannot imagine driving normally without a handbrake. More on this later in the article.
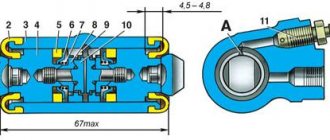
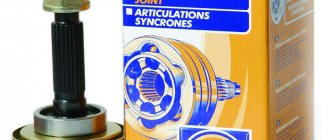
Handbrake device
Drive lever (1), lever pawl rod (2), rod spring (3), lever button (4), front cable axle (5), M6x14 bolt (6), spring washer 6 (7), drive rod (8) , lock washer 6 (9), protective cover (10), cable equalizer (11), washer 8 (12), M8 nut (13), low M8 nut (14), lever axis (15), washer 10 (16) , cotter pin 2x20 (17), right lever (18), left lever (19), right expansion bar (20), left expansion bar (21), M6 nut (22), lock washer 6 (23), cable bracket (24 ).
Where do the door switches come from?
The general diagram of the VAZ 2114 door limit switches is shown in the diagram below:
In practice, it looks like this: a black and white wire goes to the limit switches, since they are responsible for opening the circuit, the white wire is responsible for the plus, and the black wire for the minus. So, for example, there are three wires going to the light bulb responsible for interior lighting: black and white, responsible for powering the light bulb itself, and black and white from the end switch.
As can be seen from the diagram, they are all connected in parallel, which means that the alarm system, the light bulb and the instrument panel are included in this network separately for each door.
Causes of handbrake malfunction
Breakage of the handbrake is not such a rare occurrence, where cable stretching is not an exceptional problem. It happens that the handbrake on a VAZ 2114, 2115, 2113 does not hold even after tightening. We will examine the most common causes of this phenomenon in more detail.
The handbrake has an unpretentious device, but it also sometimes breaks down. There are several reasons for this:
- Drum wear.
- Deformation or rupture of the cable.
- Worn brake pads.
Any elements of the parking brake system may also be subject to mechanical damage or wear. The problem in such cases is diagnosed by eye or at a service station. In addition, the handbrake will not work if the cable falls off the lever. In this case, you can use any high-quality sealant that can prevent slipping, or simply tighten the parking brake cable.
Correct exit procedure, example
If, when putting Kalina on the handbrake, the red indicator lamp (P) does not light up on the dashboard, most likely the handbrake limit switch is faulty and needs to be replaced. Although this problem does not happen often, it does occur for some owners. So let’s look at the procedure for replacing this part below, in detail with photographs.
First, we raise the lever up so that it does not interfere with us. Then unscrew the three screws with a Phillips screwdriver that secure the plastic cover:
After that, we remove this cover by simply moving it back, and now we have access to all the necessary construction:
Now you can directly begin removing the “frog” or the so-called Kalina handbrake limit switch; here you will need to unscrew just one small screw, again with a Phillips screwdriver, only with a slightly smaller blade:
After the bolt has been unscrewed, you can remove the end switch from its seat, turning it a little, since it is curved. Now we bend the plastic latch and disconnect the plug with the power wires, as shown in the photo below:
That's all the work is, we buy a new limit switch and put it in place in the reverse order, as you can see for yourself, all this is done quite simply and will take no more than 10 minutes at most. If you have any questions, I will be happy to answer in the comments, write and discuss!
Do-it-yourself handbrake tensioning (step-by-step work)
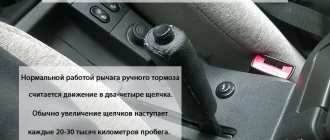
- First of all, you should put the gear lever in first gear.
- Next, you need to count the number of clicks of the handbrake. If less than two, loosen the cable tension; if more than five, on the contrary, increase the tension.
- Then release the handbrake completely.
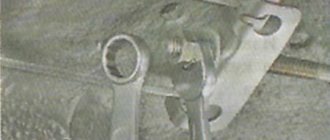
- Now we take two keys for 13 and climb under the car.
- To lengthen the cable, it is necessary to unscrew the lock nut; accordingly, to reduce it, the lock nut should be tightened.
- We find the muffler and remove the muffler and manifold mounts, which will greatly simplify the process.
- Next we find the cable equalizer, as well as the nut and locknut.
- Using the first wrench, we loosen the locknut, and using the second, we hold it to prevent twisting.
- We adjust and systematically check the progress. An acceptable number of clicks is from two to five.
- When the required result is obtained, it is necessary to jack up the rear of the vehicle so that the wheels hang. Next, we check whether the brake pads are interfering with rotation.
- Now we raise the lever, after which the wheels should be firmly in place.
- Tighten the locknut.
Some craftsmen manage to tighten the parking brake without loosening the muffler mounts. At the same time, they use the notorious homemade keys. As a result of the fact that tensioning is carried out quite often, such devices are very relevant.
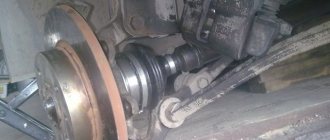
Dismantling and replacement
It is difficult to confuse the cable from the handbrake with anything else under the bottom of your VAZ 2114, which greatly simplifies the repair and replacement procedure.
Dismantling works
We provide detailed instructions for replacement, and additionally recommend watching the video.
- We advise you to get the car in order in terms of cleanliness in advance. This will make it easier for you to find all the nuts and fasteners.
- Additionally, treat the nuts with the almighty WD40. This will make it much easier for you to unscrew the sometimes sticking and rusting nuts.
- Place the handbrake lever all the way down.
- Start with the adjusting nut and locknut that you used recently to try to tighten a loose cable. In this situation, you should loosen the nuts and remove them from the handbrake rod.
- Remove the washers and cable equalizer. Although this can be done after you jack up the car. But be sure to do it before removing the wheels.
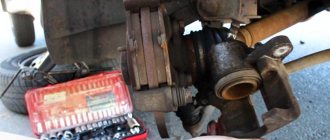
- Raise the rear of the car with a jack, unscrew the wheel bolts and remove them.
- Tap the brake drum locking pins. This will allow them to be removed from the brake pads.
- Remove the block.
- You now need to disconnect the ends of the two cables from the equalizer. The fasteners can be removed from their places with the simplest pliers, so don’t bother.
- The shifted spacer lever has hooks from which the cable loop can be removed.
- The cable sheath must be removed from the entire suspension of the rear of the car. To do this, the mounting bolts are first unscrewed.
- Pull the cable out of the holes through the brake flaps.
- We got rid of the old cable, so all that remains is to replace the old one with a new element. The procedure is performed exactly in reverse order.
- Thread the new cables through the washers and hook the loops. You can additionally make bosses - this is a special clamp that allows you to fix the cable even more tightly.
- Reassemble the entire disassembled wheel structure.
- Route the cable along the suspension through the sheath and secure the bolts.
- Pull the handbrake in the cabin.
- Check the correct tension and operation of the new hand brake, or rather the cable.
It is not uncommon for the parking brake to cause an unpleasant squeaking noise from the rear. By changing the cable, you can get rid of this problem at the same time. To do this, rubber seals are installed under the cable fasteners on the body frames.
Pro Tips
If you do not want to waste your time and energy on mastering a fairly simple handbrake design and tightening the handbrake yourself, you can contact a car service center. The price of the issue is at least 400 rubles, depending on the region of the country, but the event is not a one-time event. After a certain time, you will need to adjust the handbrake cable again, for which you will have to go to a car service center again. It is worth noting that the cost of the procedure will increase with each new visit.
After a tightening, it often happens that a strong cracking sound appears. It is possible that a cable or two cables were not installed correctly during tightening. Make sure that the cable does not catch on the fasteners or anything else. You can unscrew the bolts that hold the cable and see what condition they are in. If there are signs of rubbing, it is necessary to lay the cable correctly. In addition, the cable may crack because it is overtightened (even when the parking brake clicks fall within the required interval).
You have to tighten the handbrake quite often. This is due to the design of the parking brake. In addition, you will have to adjust the parking brake when replacing brake pads, repairing the handbrake, repairing the cable, and replacing the rear brake cylinder.
The cost of this work in a car service
Not every car owner wants to do car repairs themselves. Therefore, let's look at approximate prices for the cost of work in car services:
- Adjusting the hand brake will cost about 500 rubles;
- If, in addition to adjustment, replacement of the mechanism cables is required, the price will be about 900 rubles.
01.08.2012
Handbrake tension
The handbrake is an important and irreplaceable thing, but still not all drivers use it. The fact is that the car can be put in gear, and then it will not roll away anywhere. But if the slope is very steep, then the gearbox is no longer able to help, and in general, many novice drivers cannot imagine normal driving without a handbrake.
Design
Many people mistakenly believe that the handbrake is a simple lever located near the gearbox, on the right hand of the driver. In fact, it is a whole system of elements that are connected to each other.
When the hand brake fails, in 90% of cases the culprit is a cable or a pair of cables that go to the rear brake pads from the equalizer.
To determine the reasons for the failure of the handbrake, it is necessary to understand the circuit diagram of the device and its components.
The device includes a number of structural elements. Namely:
- Lever arm;
- Traction;
- Springs;
- Lever button;
- Main cable axis;
- Bolts;
- Washers;
- Drive unit;
- Equalizer;
- Case;
- Locknuts;
- Cotter pins;
- Right and left lever;
- Expansion left and right strip;
- Lock washer, etc.
REPAIR METHODS
A quick but costly way to get rid of handbrake problems is, of course, to go to a service station. The cost of such a service is about 400 rubles. However, is it worth spending money on something that you can do yourself, especially without much effort? Applying the parking brake yourself is not that difficult, and the savings are not small.
If you practice enough, tensioning the cable or replacing the pads will take no more than half an hour. Experienced car enthusiasts can handle this faster. Some operations require welding, so having the appropriate equipment and skills will not hurt. But this usually only applies to those who do not want to replace old parts with new ones, and prefer to repair worn-out elements with their own hands.
Posts 6
1 Topic by Druksa 2009-06-25 13:17:03 (2009-06-25 18:41:21 edited)
- Druksa
- User
- Offline
- Registered: 2008-11-22
- Messages: 49
- Reputation: [ 0 | 0 ]
Subject: Parking Brake Indicator Lamp
There is not a big problem with the parking brake. The brake indicator light in the instrument panel does not work. But as soon as you drive in wet weather or rain, everything starts to work. Does anyone know where the wires, switches, etc. are located? on the parking brake?
2 Reply from Kirey 2009-06-25 13:27:59
- Kirey
- User
- Offline
- Registered: 2009-02-03
- Messages: 376
- Reputation: [ 0 | 0 ]
Re: Parking Brake Indicator Lamp
Under the handle of Art. The brake limit switch is on.
3 Reply from Leha-97 2009-06-25 17:20:24
- Leha-97
- User
- Offline
- Registered: 2008-11-27
- Messages: 622
- Reputation: [ 6 | 1 ]
Re: Parking Brake Indicator Lamp
But for me it doesn’t always work. The limit switch is tricky there. Raise the handbrake, press the button with your finger and quickly release.
4 Reply from Evil 2009-06-25 17:21:55
- Evil
- User
- Offline
- Registered: 2008-11-08
- Messages: 2,119
- Reputation: [ 6 | 0 ]
Re: Parking Brake Indicator Lamp
The limit switch, the wire itself, or a light bulb in the panel, or rather, its contact. But if the car is old, there may be a dashboard itself.
5 Reply from Rus-yaz 2009-06-26 06:34:10
- Rus-yaz
- User
- Offline
- Registered: 2008-11-08
- Messages: 447
- Reputation: [ 0 | 0 ]
Re: Parking Brake Indicator Lamp
1. Check the limit switch under the handbrake
2. The indicator light may have burned out. (disassemble the panel and change the light bulb.)
6 Reply from FRANZ 2009-06-26 07:38:02 (2009-06-26 07:39:08 edited by FRANZ)
- FRANZ
- User
- Offline
- Registered: 2009-05-04
- Messages: 786
- Reputation: [ 0 | 0 ]