Thanks to the camshaft of the VAZ 2114, the intake and exhaust strokes of the internal combustion engine are synchronized. The camshaft is driven by rotation of the crankshaft, which, in turn, rotates through the movement of the crankshaft. The most important structural part of the camshaft is the so-called “cams”. The cams are directly responsible for the process of opening/closing valves.
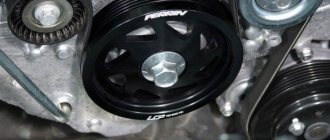
Thanks to the cams, the valve timing of the engine is regulated. On all cars, the camshaft is located in the RBC (cylinder block camber). The VAZ 2114 is equipped with a cast iron camshaft, the design of which can be seen in the screenshot below. The standard eight-valve engines of the Samara-2 family have one camshaft installed.
"VAZ" camshafts have an average resource potential: 90 - 100 tkm. At this point, a major overhaul of the internal combustion engine is usually carried out.
Replacement
Having prepared the necessary tools, you can get to work.
- First of all, disconnect the negative terminal from the battery on your VAZ 2114.
- Move the piston of the first cylinder to top dead center.
- Remove the pulley from the camshaft.
- The key is then removed from the camshaft.
- The seal is easy enough to install. You just need to pry it off with a flat screwdriver.
- Before installing the new device, pay attention to the inner edges on both sides. They should be free of all kinds of damage, dents, rubber sagging, etc.
- The working edge must be lubricated with simple motor oil. This will allow the element to easily settle into a new place and also protect it from premature wear.
- If problems arise with the reverse pressing of the oil seal, its seating edge can be processed with a file or fine sandpaper.
- Inside the block head, the element is installed with its working edge. A regular wooden stick will help you carefully place the element in its place on the camshaft. Just do not use metal elements for pressing.
- It should be pressed in until it stops.
- Perform the assembly reassembly procedure.
- The camshaft pulley is installed as a protruding element of the hub in relation to the power unit. Be sure to adjust the camshaft belt tension level.
At this point, the installation procedure for the camshaft oil seal can be considered complete. The most difficult stage is rightly considered to be the disassembly stage. Replacement is quite simple. Every VAZ 2114 owner is able to cope with such a task with his own hands.
Source
Installation procedure
- Lubricate the working surface of the new oil seal with clean engine oil and carefully place the oil seal on the shaft.
We press in a new oil seal using a 30 mm tool head as a mandrel.- We install the timing belt in place.
- Further assembly is carried out in the reverse order of disassembly. Then we adjust the tension of the generator drive belt
Video on replacing the camshaft oil seal:
Add a comment Cancel reply
You must be logged in to post a comment.
Source
Step-by-step instructions for replacing the camshaft oil seal
To change the camshaft oil seal on a VAZ-2114 with an 8-valve engine, you must:
- Remove the old front element.
- Install a new part.
Attention! Treat the new seal with a lubricant before use.
Required Tools
- Screwdriver Set;
- knob;
- socket wrench 17 and open-end wrench 10;
- new part.
Removal
After the tool is prepared:
- Disconnect the battery by removing the negative sign from the battery.
- Move the piston of the 1st cylinder to the upper extreme position.
Installation
- Treat the working surface of the spare part with engine oil.
- Press the part (all the way) into its original location. The work must be done carefully so as not to damage the edge. For this it is better to use a wooden stick.
Advice. Visually inspect the new part. The working surface must be in perfect condition, without damage; and the spring should be stiff and unstretched.
Any driver can change the gasket on his own, even without sufficient experience. The main thing is to follow the instructions and use high-quality components.
Source
Causes and symptoms of malfunction
It is believed that the planned replacement of the crankshaft sealing rings on the VAZ 2114 should be carried out after three years. But you can change it earlier if an oil leak appears, for example, after the engine overheats. Causes of oil seal destruction:
- natural wear and tear during operation;
- improper installation may cause cracks to appear on the surface of the ring;
- mechanical damage;
- low-quality consumables - fake.
If oil consumption has increased due to the fact that it comes out and at the same time traces of oil are observed on the front part of the engine, then the front crankshaft seal needs to be changed. The need to replace the rear one can be determined by clutch slipping, which is caused by oil getting on the basket and clutch release plate.
Replacing the camshaft oil seal on a VAZ 2113, VAZ 2114, VAZ 2115
Welcome! Seals - not a single car with a gasoline engine can do without them, because they are one of the main protections thanks to which dirt does not get into the engine and oil, coolant, etc. do not leak from it, oil seals are used in many components car, for example, they are in the steering gearbox, they are also located at both ends of the crankshaft and are also present on the camshaft, due to them oil does not leak out when the engine is running and when it is stopped, as well as various kinds of dirt into the inside of the engine does not penetrate and the engine remains protected from this, but over time, any seals deteriorate and a number of problems begin, one of which is increased oil or coolant consumption in the car.
Note! In order to replace this oil seal, you will have to take with you: A screwdriver, also socket heads, as well as a wrench for them, and a set of wrenches will come in handy for all this!
When repairs are needed
Replacing the camshaft oil seal is necessary if it is squeezed out or begins to leak. This part is not very expensive and cannot be repaired, so it is recommended to simply replace it.
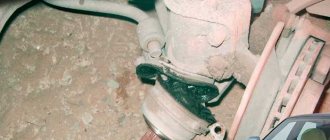
You can find out about the malfunction during repair/replacement of the camshaft or technical inspection. A leak will be indicated by traces of oil on the belt, under the pulley.
Replacing the oil seal in a timely manner will save you from expensive repairs to the camshaft and even the engine, which can seriously hit the car owner’s budget.
Changing the front oil seal is easy to do directly on the unit, but changing the rear oil seal is much more difficult. In this case, you will need a lift/pit as you will have to carry out some manipulations with the gearbox.
Before repairs, you must make sure that the oil is leaking due to a malfunction of the oil seal, and not due to other failures. Otherwise, replacing the element will not lead to the desired result and will aggravate a more serious problem that was not noticed in time.
How to replace the camshaft oil seal on a VAZ 2113-VAZ 2115?
Removal: 1) At the very beginning of the operation, you will need to remove the timing mechanism cover and then set everything according to the marks; how to do both of these actions, read the article: “Setting the valve timing according to the marks”, in which we explained and described everything in detail.
2) Now remove the Gas Distribution Mechanism belt from the tension roller and from the pulley, again we described in detail how to do this in another article which is located on our website, and it is called: “Replacing the tension roller on a VAZ”, study point 2 in it .
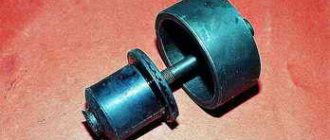
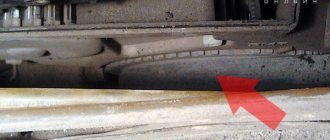
3) Next, we move on to removing the camshaft pulley, we will warn you right away that it is not advisable to turn it (Especially if you have an engine that bends the valves, then with the timing belt removed, turning this pulley is generally prohibited, because the valves will definitely meet with the piston group and if If you turn this pulley too much, there will be an impact due to which the valve will bend slightly, but still bend), but if you need to turn it, do everything very carefully and think with your head while doing this (If your engine does not bend the valves, then they are piston the group will not meet in this case with the timing belt removed from the car), by the way, still try to remove the pulley (this is mandatory) in such a way that it is directed according to the marks at this moment, well, let’s get started, the first thing you need to do is So, use your hand or something else to stop the pulley so that it does not rotate, after stopping, unscrew the central bolt that secures it (see photo 1, at this time still hold the pulley with your hand) and then remove the pulley from the camshaft (see photo). photo 2), as soon as the pulley is removed, remove the key using a screwdriver by simply sliding it longitudinally (see photo 3, the key is indicated by an arrow), and then remove the oil seal itself by prying it with the same screwdriver or something else similar to her (see photo 4).
Note! When the oil seal is removed, inspect it all; the working edge, which is indicated by the letter A, must be in good condition and not damaged, there should be no dents of any kind on it, and the oil seal spring, which is indicated by the letter B, must be intact and unstretched, otherwise the oil seal must be repaired. replacement, by the way, check the new oil seal in the same way and if there is anything on it from the above, then do not install such an oil seal, but find a new one, in addition, when installing a new oil seal, the working edge of which is in contact with the shaft (It is also the letter A indicated) lubricate with engine oil (Preferably the same one you fill in the engine)!
Special camshafts
As was said at the beginning of the article, not all drivers are satisfied with the “native” camshafts installed on VAZ cars. They do not provide sufficient torque (and, as a result, “throttle response”) at low speeds. This problem can be solved in two ways - by regrinding the cams of the existing camshaft or by installing a new, special one.
It is highly not recommended to grind a camshaft from a VAZ car due to the low efficiency of such an operation and the large number of special shafts that can be easily purchased at car dealerships.
Among such shafts, two directly opposite options can be distinguished - sports and tuning, as well as a large number of intermediate modifications between them.
The sports camshaft delivers an increased volume of mixture into the cylinder during operation due to higher valve lift, and its cams have a rounded, smooth profile. This ensures “wider” operating phases and good throttle response at all speeds.
In turn, tuning camshafts are distinguished by an increased base diameter and a “sharper” cam profile. They provide the vehicle with quiet, uninterrupted engine operation at all, even critically low, speeds. In addition, the use of such a shaft makes it possible to “push back” the limit of the onset of detonation at low rotational speeds.
It is also worth noting that the use of tuning camshafts can reduce fuel consumption, exhaust toxicity, and also slightly increase the overall service life of the engine before major repairs.
To summarize, it is worth noting that replacing a camshaft is not the most difficult operation and can be performed by any experienced motorist. But when to carry it out - in case of severe wear of the “native” shaft or when replacing it with a special camshaft - everyone decides for themselves.
Replacing the camshaft oil seal VAZ 2114 8 valves
The oil seal leaked, I decided that I would change it myself, because I was tired of leaving money for a hundred. and so there have been a lot of expenses lately - replacing the pump, thermostat, in addition, I spent 6 thousand to restore the car after it fell into an open hatch (2700 for the rear beam and 3300 for replacement work).
therefore, what I can do, I’ll do it myself, especially since all this is quite interesting, considering that there is nothing complicated in it, in fact it’s necessary
1). loosen the tension roller and remove the timing belt 2). Carefully, so as not to lose the key, unscrew the gear 3). pull out the old oil seal and, after lubricating it with oil, install a new one
I wanted to film the whole process, but to be honest there was no time for that.
the old oil seal was all oak and was pulled out piece by piece.
that’s all, except that when I unscrewed the gear, the marks got lost and then I couldn’t cope with tensioning the belt, it was dangling. but it’s good that just after that I went to a hundred (got there :)) to change the rear pads, where they tightened my belt. I had to remove the wheel. ok, the main thing is that the oil seal has been changed) by the way, replacing this camshaft oil seal costs 1000 rubles :) but it takes about 15 minutes, essentially.
Diagnostics
In fact, there is nothing complicated here, especially for the front oil seal. If signs of leakage appear, simply inspect the motor. If the oil seal is damaged, it will be noticeable by oil drips on it.
The rear seal is more difficult. To inspect it, you will have to remove the gearbox. The primary diagnosis is made by a puddle of oil under the engine after parking.
Replacement
Having prepared the necessary tools, you can get to work.
- First of all, disconnect the negative terminal from the battery on your VAZ 2114.
- Move the piston of the first cylinder to top dead center.
- Remove the pulley from the camshaft.
- The key is then removed from the camshaft.
- The seal is easy enough to install. You just need to pry it off with a flat screwdriver.
- Before installing the new device, pay attention to the inner edges on both sides. They should be free of all kinds of damage, dents, rubber sagging, etc.
- The working edge must be lubricated with simple motor oil. This will allow the element to easily settle into a new place and also protect it from premature wear.
- If problems arise with the reverse pressing of the oil seal, its seating edge can be processed with a file or fine sandpaper.
- Inside the block head, the element is installed with its working edge. A regular wooden stick will help you carefully place the element in its place on the camshaft. Just do not use metal elements for pressing.
- It should be pressed in until it stops.
- Perform the assembly reassembly procedure.
- The camshaft pulley is installed as a protruding element of the hub in relation to the power unit. Be sure to adjust the camshaft belt tension level.
Method 1
The first step is to try to remove the pulley bolt using the standard method. The set of tools for this procedure is as follows: heads, spanners, jack. The step-by-step removal process looks like this:
- Unscrew the right wheel and jack up the car;
- Remove the plastic protection (if any);
- Loosen the generator belt tension bolt and remove it;
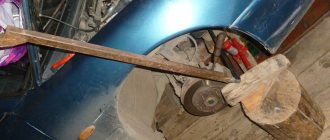
- Reach the pulley and lock it in one position;
- Remove the timing belt;
- Place a socket or a 19mm spanner on the pulley nut and try to tear it off;
- If the fastening does not work, treat the nut with WD-40 or tap the pulley with a wooden block. Often this allows you to get rid of sticking.
This method of dismantling is considered the easiest, but it is only possible if the fastening nut is slightly soured. Remember that treating with chemical lubricants before starting work will greatly simplify the removal process.
If this method does not bring results, check out the second one.
How to replace the camshaft oil seal on a VAZ-2114
Having a passenger car, the owner must not only monitor its cleanliness, but also, first of all, its technical serviceability. Quite often, car owners notice that what comes out of the exhaust pipe is not ordinary smoke, but bluish and oily smoke, and in addition to this, oil consumption during operation of the car increases several times. This may indicate that the camshaft seals are simply worn out, and a simple replacement operation will help fix the problem for the VAZ-2114.
For many, this work sometimes seems problematic, so cars that need it are most often transported to a service station. In fact, this process is not so complicated, and if you follow the recommendations in your work and carry out the whole process step by step, then everyone will be able to replace failed camshaft seals on a VAZ-2114 16 valves with their own hands.
Tools
Before starting work, be sure to set the car to the handbrake; wheel chocks will also come in handy. This will improve work safety.
Be sure to keep in mind that to replace the rear oil seal on the crankshaft, you will need to remove the gearbox. It’s better to do this in a pit, it will be much more convenient. If this is not possible, then you can simply make simple entries to gain access to the bottom of the car.
Replacing the front oil seal
It is recommended to replace the front oil seal yourself in the following sequence:
- use a screwdriver to remove the oil pump;
- remove the worn oil seal from the cover of the removed pump using a screwdriver;
- By resorting to the frame, a new part is installed in place of the worn one. The outer size of the new element should not exceed 41 mm; during installation, the working edge should be directed inside the pump;
- After making sure that the oil seal is well pressed, the oil pump is installed in its original place.
At this stage, the process of replacing the front valve that has become unusable is completed.
How to change the rear oil seal
Changing the rear oil seal will be a little more difficult, but this does not mean that a car enthusiast cannot cope with such a task on his own. The most important thing is to follow the instructions, and every car enthusiast can do the job no worse than a professional:
- The negative terminal of the battery must be disconnected from the power supply.
- The flywheel is dismantled. Before removing the flywheel, you need to mark its original location, taking into account the location of the crankshaft.
- The rear clutch housing shield is removed from the bushings.
- The fasteners that secure the oil seal are unscrewed; there should be 8 fasteners.
- The holder is removed.
- Next, you need to carefully remove the seal that has become unusable from the holder.
- Using a mandrel with a diameter of 99 mm, the new oil seal must be pressed into place of the one just removed, making sure that the working edge of the element is directed inside the holder.
- You will definitely have to replace the holder gasket, even if the appearance of the old one seems quite normal.
- To ensure reliable installation of the gasket, it is recommended to use a thick consistency lubricant.
- Before installing the oil seal, its working surface should be treated with engine oil; the same procedure should be done with the crankshaft flange.
- It will be much easier to insert the holder of the working edge of the new oil seal onto the crankshaft flange using a wooden tool, for example, a stick of the appropriate size. But metal products are strictly not recommended for this event.
- After making sure that all elements are installed correctly, you can begin fixing the holder and engine crankcase.
- Next, the clutch housing protective shield, flywheel and gearbox are installed in their original place.
Experts recommend using sealant for all threaded fasteners for a more durable fixation. After reviewing this information, it is easy to come to the conclusion that every car enthusiast can replace camshaft oil seals. So why waste money on paying service station workers? Of course, this activity must be carried out step by step and very carefully, and for replacement it is imperative to purchase high-quality components so as not to repeat the entire process after a short period of time.
Source
Causes of malfunction
First, let's look at why the oil seal may need to be replaced. Normal wear and tear is usually the main cause. The oil seal is a rubber-metal ring that is designed to prevent leakage of lubricant under pressure. Gradually, the effectiveness of the part decreases and should be replaced.
Replacement may also be required as a result of increased oil pressure in the engine. This can cause excess oil to be squeezed out through the seals. In this case, they should also be changed. But this situation is rare for a camshaft; usually in this case the crankshaft oil seal suffers.