This part can hardly be called the most important in a car engine. But it can cause a lot of trouble for a car enthusiast. We are now talking about the crankshaft oil seal, which, as practice shows, wears out much faster than other parts of the VAZ-2114 engine with 8 valves. Getting to this detail is not so easy. We will talk about how to replace the oil seal correctly in this article.
Reasons for replacement
The main reason for replacement is oil leakage. But here it is necessary to make one clarification. If oil streaks are visible on the front of the engine crankcase, this does not mean that the oil seal is faulty. First of all, the car owner should make sure that the crankcase ventilation system is working properly. If it (or the hoses) is clogged with dirt, then it is too early to change the oil seal. If the ventilation is in order, but oil still flows, the reason is definitely in the oil seal, and it needs to be changed urgently.
Necessary tools for work
The VAZ-2114 crankshaft oil seal is replaced in a garage or car service center. You can change it yourself if you have minimal plumbing skills and the necessary tools:
- jack and reliable support for lifting the car and hanging the internal combustion engine;
- wheel anti-roll bars;
- set of socket heads from 10 to 27;
- open-end and ring wrenches;
- slotted screwdriver;
- hammer;
- container for draining used oil from the engine sump;
- special graphite lubricant;
- automotive sealant;
- rags or wipes.
Repairs are best done by changing the engine oil and cleaning the crankcase. In this case, you will need a can of fresh oil, an engine sump gasket, an oil pump cover gasket, and a new front oil seal.
Important! Carry out the work on a lift or in an inspection pit. If they are absent, it is enough to raise the front part of the car as high as possible and install it on reliable supports, for example, cuttings of sleepers or cinder blocks. It is strictly prohibited to stand under a machine mounted on a jack.
Important points
- When trying to put a new oil seal in place using a mandrel and a hammer, in no case should you hit it too hard, as the mandrel will simply cut the oil seal.
- Before reinstalling the oil pump, the outer edge of the new oil seal must be generously lubricated with oil.
- Before installing a new gasket under the oil pump, it is necessary to apply a thin and even layer of graphite grease to it on both sides.
- Before installing the pan in place, its gasket must be thoroughly wiped with a rag. After this, a thin layer of sealant should be applied to it.
As you can see from this article, replacing the oil seal is not difficult. It's much more difficult to get to. An extremely important point in the above operations is to set 1 cylinder to top dead center. If this is not done, all subsequent engine assembly will be incorrect, and all valves may be damaged during startup. And replacing them will take much more time and money.
What tools are needed to replace the oil seal?
The VAZ-2114 manufacturer requires that replacing the front or rear crankshaft oil seal be carried out exclusively after removing the oil pump, which minimizes any risk of damage to parts located next to it.
Therefore, you will need to find a garage with an inspection pit and drive your car into it, as well as prepare the following tools and accessories:
- spare parts. In addition to the new crankshaft seal, you will also need to replace the oil pump gasket;
- socket heads and open-end wrenches;
- a basin for drained engine oil, as well as new lubricant, which will need to be filled in after installing the part;
- hammer and flat blade screwdriver;
- sealant.
You will also need a jack to remove the front wheel and gain access to the engine guard.
When and why do you need to change crankshaft oil seals?
Today this part is a very important part of the car. This is due to the fact that even with a slight displacement an oil leak will appear. According to experts, it is worth replacing the oil seal at least once every three years.
Although, this period of time is conditional, since in some situations it may be necessary to perform unscheduled repairs. For example, if the engine overheats
According to experts, it is worth replacing the oil seal at least once every three years. Although, this period of time is conditional, since in some situations it may be necessary to perform unscheduled repairs. For example, in case of engine overheating.
It is worth starting unscheduled repairs only if there are certain signs indicating the need for such work. In this case, an oil leak may be an alarm.
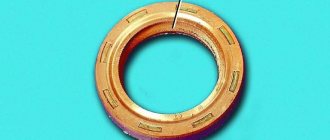
During any repair, the master must have a certain set of tools and materials on hand. When replacing oil seals, you do not need to use specific equipment. It is enough just to choose the appropriate size seals. Do not forget that these parts in a car, presented on the domestic automobile market, can be single-edged, as well as with or without anthers. Replacing oil seals should only be done with similar models.
Many modern car owners believe that only a qualified specialist working in a car workshop can change oil seals. This is a misconception, since today there are a huge number of manuals and recommendations posted on the Internet, thanks to which the work process is simplified.
Sequence of actions on a VAZ-2114 with 8 valves
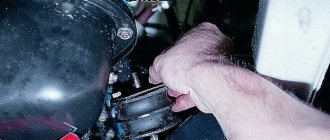
- The car is installed on the inspection hole. Wheel chocks are installed under the rear wheels. The right front wheel is jacked up and removed using a socket wrench. The engine protection is also removed.
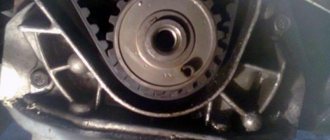
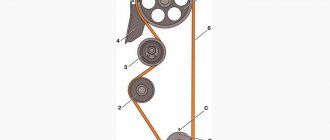
- The hood of the car is opened and the timing belt cover is removed. Now you have access to the crankshaft and camshaft pulleys and to the belt itself.
The timing cover is removed, the crankshaft and camshaft pulleys are visible
Aligning the pulley to the marks for bringing 1 cylinder to TDC
The pan has been removed from the engine and the oil has been drained.
The bolts on the oil pump are unscrewed, it can be removed
The crankshaft oil seal is installed in its original place
Video: expert advice on replacement on the 14th model
Signs of a leaking crankshaft oil seal
The main sign by which ordinary VAZ 2114 owners and illiterate servicemen “sentence” oil seals is an oil leak. Indeed, an oily sump and block on the timing side are a sign of a front oil seal leak, and leaks in the flywheel area are a sign of a rear seal leak. But there are two “buts”.
Signs of oil leakage through the front oil seal
Firstly, oil leaks can be caused by other reasons, and, secondly, leaking oil seals can be a consequence of a more serious malfunction.
Common causes of oil leaks around the seals include:
- Oil pressure sensor or oil filter bracket: Oil may drip from them onto the drive and scatter around.
- Leaking from the oil channel plug under the cylinder head casing.
- Leaking from the camshaft seal.
- A special feature of the VAZ 2114 with an 8-valve engine: the hole of the first manifold stud on the front side of the engine passes through the oil channel. When replacing the gasket on the inlet, this pin must be lubricated with sealant, otherwise a leak will occur.
Often problems with seals are symptoms of other problems. If the leak appears again soon after replacement, it may be due to poor quality consumables, or may be the result of the following problems:
- The breather is clogged (important for VAZ 2114 engines with high mileage - more than 200 thousand kilometers), and the oil seal is squeezed out by crankcase gases. When replacing, it would be useful to remove the valve cover and clean the filter mesh.
- The rings are stuck. Another reason for oil squeezing out through the oil seal. In this case, additional signs will be uneven compression and oil leaks from the dipstick.
- If there is play in the camshaft, the oil seal can be squeezed out by the shaft itself when the clutch is pressed. One of the saddest cases: the solution is engine capital.
Another reason for a leak from the oil seal may be the filling of low-viscosity oil. Follow the manufacturer's recommendations for oils for the VAZ 2114.
In any case, along with replacing the seals, it is better to check the condition of the components that may be associated with their leakage.
Seal sizes
When building a buggy or ATV, homemade shafts, gearboxes and other rotating parts are often used. Oil seals are used to prevent lubricant leakage.
Oil seal is an outdated name, preserved from those times when the junction of rotating shafts with the housing was sealed with hemp, felt, felt, etc., lubricated with lard. Nowadays these parts are officially called: “Rubber cuffs, reinforced for shafts.” It is this particular type of molded rubber products that is included in the review.
Oil seals, unlike bearings, are not standardized, but normalized products, that is, unified for the industry. They are manufactured at specialized enterprises - factories of rubber products (RTI). The customer and sometimes the developer is a specific machine-building plant.
Step-by-step dismantling
Let's look at how to change the engine oil seal of a VAZ 2114 with an 8-valve engine.
The work order is as follows:
- Place the car on a level surface, support the rear wheel with stops. Set the gearshift lever to the neutral position, remove the front right wheel and engine protection. You can remove part of the fender liner for easy access to the front engine cover.
- Under the hood, unscrew the bolts securing the timing belt protective cover. Loosen the generator and remove the generator drive belt.
Removing the protective cover
- Set the valve timing marks on the camshaft and crankshaft. To do this, rotate the crankshaft with a socket wrench until the arrows on the pulleys align with the special ebbs on the body. This corresponds to the position of the first piston at TDC.
We set the valve timing marks
- Before removing the timing belt, loosen the tension roller and unscrew the bolts securing the upper and lower sprocket. Inspect the belt for damage and traces of oil. Change if necessary.
Loosen the tension roller and remove the timing belt
- Drain the oil from the engine and unscrew the pan. It is secured with 16 10mm wrench bolts. Remove the clogged oil receiver and clean thoroughly.
Unscrew the bolts securing the pallet
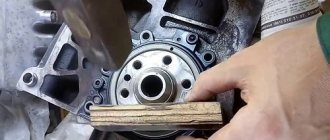
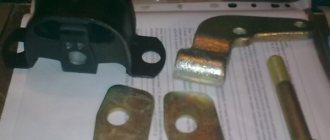
- Using a 24mm socket, unscrew the pulley mounting nut, to do this, secure the crankshaft itself. Under the pulley there is an oil pump, into the cover of which the front engine oil seal is pressed. It is secured with six 10mm bolts.
Securing the oil pump cover
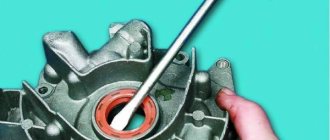
- Remove the oil seal from the seat using a flat screwdriver or carefully press it out with a socket of a suitable size.
Dismantling the old oil seal
Where is?
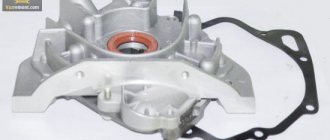
To prevent lubricant from getting onto components outside the oil pan, there is an oil seal at the outlet holes through which the crankshaft is connected to other engine components. One of them is front, the other is rear. Their purpose is to ensure the tightness of the housing.
Crankshaft seals
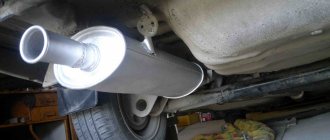
The front one is located behind the crankshaft pulley on the oil pump. To replace the rear one, it is necessary to dismantle the gearbox, clutch and flywheel, then the rear cuff will be accessible. You can see this clearly in the video posted at the end of the article.