What is the functionality of the radio?
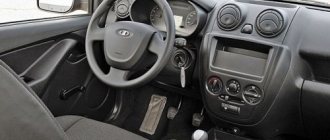
The fact that there is a standard radio in the domestic car Lada Granta Lux and in Kalina-2, and the devices are constantly being improved. A special feature of the radio is that it fits deep into the standard place, which is accompanied by minor difficulties when removing it. The large monochrome display displays a user-friendly interface.
Reviews from owners indicate that the software has an operating system based on the legendary Windows, the potential capabilities of which are increased by firmware. It is possible to create a desktop in the image of a household computer and connect to the Internet. To do this, you should use a 3g modem.
If you need to enter data, manipulation can be done using the on-screen keyboard. Own memory is not enough, so to meet the ever-growing demands of owners, it is recommended to use an SD card as a storage medium. This drawback is included in the list of reasons, due to the relevance of which, most motorists prefer choosing a foreign vehicle.
A convenient option for connecting with a mobile phone is available for the Lada Granta radio. This allows you to make calls without having to take your phone out of your pocket. You only need to activate a specific button on the device display. This is a kind of extended “hands-free” function.
The radio receiver is also not without pleasant features. If you program a news wave, the device will automatically switch to it from any other channel when a program on the designated topic begins broadcasting.
In the LADA Granta standard, the radio with an integrated LCD display is capable of supporting such file formats as:
- outdated "MP3";
- "WMA";
- "WAV";
- video files that support the “WMV” extension.
Overview of function types
- Easily connected with mobile phone. Convenient communication function.
- All standard Lada Granta radios are equipped with modern radios. They have standard settings that allow you to automatically switch between different ranges. That is, when news starts broadcasting on one channel, and in the meantime you listen to music, you will always be aware of all the latest events.
- The Lada Granta's head unit supports many modern formats. So, the LCD display of the stereo system will play music from MP 3, WMA, WAV. The video can be watched in WMV, MP4 format.
- The LCD display has accessible information content, a convenient, easy-to-read interface.
- One of the best touch keyboards, it works synchronously, with virtually no breakdowns.
- The Lada Granta's standard radio can easily play music from micro SD.
Head unit
Important. If it makes it easier for you to use a USB drive, then be aware that certain problems may arise here.
- Modern equalizer. It's easy to customize and you can listen to tracks in random order. Songs switch without delay.
- Has a photo album function. The stereo system makes it possible to view your favorite photos on the road. This is done from a memory card, and there is support for five formats.
- Phone mode. It requires special knowledge to set up the first time. It is mainly necessary for those people who are overloaded with work and solve many issues on the road.
- New models of car radios for Lada, 2191, are equipped with all navigation capabilities and a rear camera
What to choose for Grants
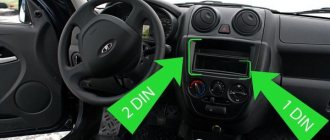
Granta can be equipped with a 1 or 2 Din head unit with a touch or standard display. When using alternative equipment, it is necessary to purchase or independently manufacture a decorative frame framing the body of the radio. This is especially true for 2 Din systems, since small head units are equipped with a standard frame that fits the Grant instrument panel. The final choice of car radio remains with the car owner.
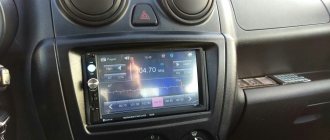
AvtoVAZ produces a special 2 Din radio for the Lada Granta, equipped with a touch screen.
To install a standard radio, you need to purchase an original decorative panel on the center console, since the standard mounting socket is not designed for such equipment.
Lada Granta Standard
The audio preparation of the Lada Granta Standard is arranged as follows: the car has power wiring harnesses connected to the head unit. Such wires are present only in the radio; there are no visible outputs of wires for the speaker on the doors.
Therefore, on the basic configuration of the car, the wires do not reach the audio system speakers. Under the panel on the driver's seat side there are wire outlets for the radio.
In order to connect them into one system, you need to find the corresponding audio system wire outputs on the Lada doors. After finding all the necessary outputs, the wires located on the panel are connected to the wires that are built into the doors.
On a car of this configuration, you will need to run the wires to the dashboard alone.
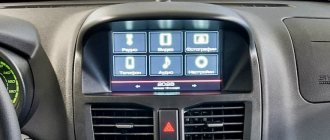
A few words about this configuration. The “Lux” assembly has a factory pre-installed radio with speakers. The radio has at its disposal such additional functions as a 5-inch touch screen, which also has a line input, a Bluetooth headset, and the ability to read flash media.
How to connect an amplifier and subwoofer?
Since the Lada Granta base is not equipped with musical equipment, and only a push-button radio is installed on board, the question justifiably arises: how is the standard radio installed in the cabin? In reality, this is a simpler procedure than it might seem at first. The occurrence of problems during installation is excluded, since a seat is already provided for the standard device on the Lada Granta panel, regardless of the level of equipment.
You can purchase the device in a retail chain or on an Internet site, where you can actually find an improved version, equipped with a navigation system with a detailed map of the Russian Federation. Don't forget to buy an additional luxury panel. Although multimedia will fit into the standard panel without any problems, the appearance will not be so beautiful. The price for this device reaches 2.5 thousand rubles.
Next comes the installation of the radio. The design feature of the landing niche in the Grants panel does not provide for the need for additional wiring.
- The first step is to remove the plastic pocket in the audio system opening. This is done using a flat-profile screwdriver. There is access to several connectors that involve connecting a radio.
- We remove the frame from the head unit and fix it at the location of the pocket.
- Next we move on to the connection. To do this, connect a couple of connectors and install the device in the landing niche.
- After this, you can install the speakers in the front door cards. The procedure involves the need to dismantle door trims with unlocking handles and adjust the position of the glass. Using a special template, we begin cutting out the mounting holes.
We attach the speakers to the cards using self-tapping screws. We insert the cables from the speakers into the input connectors intended for this on the rear panel of the car radio. We install the decorative door panels in their original places and evaluate the sound provided by the standard head unit. Thus, the radio is connected.
In addition to the need to connect a radio, many people want to connect a subwoofer and amplifier. Not every Lada Granta owner will be able to enjoy the sound generated by the standard radio. This fact forces car audiophiles to lean toward the additional installation of high-quality audio amplifiers and subwoofers. The goal is known - great sound.
To install the indicated devices yourself, we resort to the following simple manipulations.
- First, we dismantle the lower part of the center console.
- We remove the panel and find mini ISO connectors.
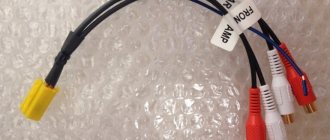
- We insert the plug of the previously purchased adapter into one of these sockets (indicated in yellow). We do not touch the blue and green cables. Owners who have already performed this procedure note the following - we can no longer use standard wires, so we resort to the “mini iso” connector.
- Next, we connect a special fuse to the battery, having previously connected the cable from the amplifier (marked in red) to it.
- The subwoofer in combination with the loudspeakers is connected to the amplifier. We connect the battery ground wire (black) to the LADA Granta body and the corresponding terminal on the amplifier.
- After the measures have been taken, we return the panel and radio to their place.
- Enjoy the updated and high-quality sound.
To install a radio on Grant, you need:
- Remove the decorative plug in the front panel by lifting it with a mounting spatula. Wires with ISO standard connectors are located in special routings on the back.
- Place a 1 Din mounting shaft in the rectangular hole and press firmly.
- Use a screwdriver or other object to bend the metal corners that will keep the part from falling out.
- Open the glove box lid to find the antenna cable, which is located under the floor sound insulation near the front passenger's feet.
- Connect the power adapter (depending on the type of head unit). Route the cables through the installation shaft.
- Install the speakers in their original places. The doors of the basic configuration do not have cables for connection; there is only a connection plug located near the clutch pedal. In this case, the cables should be installed independently, passing them through the corrugated protective channels located between the stand and the door.
- The laid wires are wrapped in foam rubber, which is secured with tape or insulating tape. This manipulation allows you to avoid extraneous sounds caused by the contact of cable insulation on the metal door panels.
- When using speakers with a diameter of more than 13″, it is necessary to make wooden or plywood podiums that will allow the equipment to be installed in a standard hole.
- Connect the plugs to the head unit, which is then inserted all the way into the mounting shaft.
- Check the operation of the radio receiver and player in different modes.
- Install the decorative frame in its original place.
To install a double-din head unit you need:
- Using a mounting spatula, remove the air conditioner control knob.
- Pry up and remove the plastic cover of the central part of the instrument panel. When dismantling, it is necessary to disconnect the wiring plugs to the control buttons for additional equipment.
- Using a hacksaw and a construction knife, cut out the central jumper in the instrument panel. At the same time, the transition channel for the central interior ventilation deflectors is shortened by 4-5 mm.
- Install the radio in the shaft using modified mounting brackets. The device is attached to standard points located in the instrument panel.
- Mount the modified decorative frame onto which the deflectors have previously been rearranged.
If the head unit supports a low-frequency speaker, then a separate wiring is laid to it, which runs under the trim on the thresholds. When using an active subwoofer with a bass reflex, it is necessary to route the power cables, equipped with a separate fuse, into the luggage compartment.
Connecting standard radios
Many consumers who buy standard radios for Lada are interested: if I take the entire multimedia package for my car, will I be able to install the entire multi-system myself. Let's try to do this. Also, installing all the equipment in the cabin may be necessity number 1, since the Lada model range is mainly sold without the initial complete set of the entire stereo system.
Let's reveal a little secret before installation
Note. On Lada Granta cars, installation is very simple. For example, when compared with models of earlier samples.
First you need to purchase everything to assemble your new device. You can buy everything you need in auto stores or at the car market. Another option is an internet site, here it is even possible to acquire equipment in improved versions, with new versions. These radios have all the full functionality, including all navigation systems and a complete map of Russia. In addition, the online store will be able to offer you the latest Lada Granta Lux radio.
Conventional stereo systems do not look so stylish in the interior of the Lada Grant, but a luxury panel will give it a sophisticated and chic look. And the cost is quite affordable.
First steps
Before installation, let's figure out what the whole process is. The niche for the radio is made so that after all the work only the control panel is visible. Nothing more unnecessary.
- Using a flathead screwdriver, remove the plastic cover that protects the audio system cavity.
- Look what's inside - you should see several connectors, they are designed to connect the device.
- There should be a mounting frame on the radio. It must be removed and placed on the pocket compartment.
Next we move on to connecting the radio. To do this, simply connect the two connectors together and put the stereo system in place. This is how easy it is to install a Lada Granta car radio. You can install the speakers either at the back or on the side of the front doors. To do this, just cut two holes for them.
Head unit for grants
Note. All work must be carried out with the battery disconnected.
Firmware
For some reason, many car enthusiasts prefer to use a standard Lada car radio with firmware. Although it does not affect the sound quality in any way, the fact remains not in favor of the original. Also, when using firmware of at least a Lux or 2 Din model, you can get additional functionality. In addition, this service makes it possible to create additional functions that the regular interface does not have.
Let's start the process
We will need an SD card using FAT formatting. You can use the same card when formatting in exFAT. Before the whole process, be sure to download the firmware. This can be done here. When everything has been downloaded, we next copy file documents to the root directory of the SD card. Before this, we save the received materials to a flash drive. Then we transfer the received data to the memory of our car radio. Overload in progress.
Firmware for radio
As soon as we see that the reboot status scale is in full, it means we can use the new expanded capabilities of our standard Lada Granta Lux radio, 2 din.
Note. To regain access to functions such as Bluetooth radio, remove the memory card with the analogue menu and reboot the system again.
Now you know all the details of all the functions, installation and firmware of the standard radios of the Lada Granta Lux, 2 din and other models of the audio system of this car brand. If you think that you are not able to handle all the necessary settings yourself, then you can look on the Internet for craftsmen who specialize in creating your personal menu for the entire system. There is evidence that they have learned to implement an interface where they can remove, for example, a radio receiver from the system itself and use directly necessary functions.
Remember. Also, the firmware sometimes requires screen calibration before operating the analog menu.
That's all we could tell you. If you follow the instructions received, the whole thing will be done faster, and you will definitely enjoy the updated head unit Lada Granta 2 din, Lux.
In the Lada Grant, the standard audio preparation of the car has already been completed from the factory, the wires for power supply and speakers have been laid, so installing and connecting the radio does not present any particular difficulties. The installation space in the front panel console of the car is designed for installing a 1-DIN car radio. No tools are required for installation; all dimensions are already made in accordance with generally accepted housing standards. When installing a 2-DIN car radio, you will need to cut out the partition and purchase a frame for the console to fit the size of your audio system.
Instead of a total
- If we install a simple radio, the size should be no more than 178 * 50 mm. Installation requires plastic spatulas or a screwdriver. Adapters and slides are included.
- To install 2 din, you need a new overlay on the console, a decorative frame on the GU itself, wire cutters and a metal blade to adjust the installation location.
- Are we replacing the standard speakers with another of the same size? Still need a new decorative frame. Otherwise, gaps in the panel will be visible.
More articles about Granta here.
Choosing the right radio size
We carry out installation either independently or by contacting specialists at the service center. In the second case, the service is paid.
By default, all VAZ and Lada models are equipped with a 1-DIN radio. The opening dimensions correspond to: 180 x 50 mm. This is an old standardization that has been in force since the times of the USSR. Modern audio modules can be purchased complete with a pre-installed LCD display. The size of the opening must comply with the standard: 180 x 100 mm, that is, doubled in height. Size marking: 2-DIN.
To install the radio in the Granta liftback, cut out the top pocket, remove the plastic, and install the assembled module. For a beginner, the process will seem somewhat complicated, so strictly follow the instructions.
Dismantling a standard music center
The general feelings of owners who have a standard radio in their car are positive. The display is informative and easy to read. The touch keyboard functions flawlessly. The standard radio itself is capable of high-quality reproduction of sound programs from micro-SD cards. However, using USB format media can be challenging.
The device also has some nice options:
- equalizer;
- activated replay mode;
- random sequence of playing tracks (“Random”).
Multimedia LADA Granta is capable of supporting images in 5 formats, which allows you to view photos without any problems. But not everyone can make the correct settings for the “phone” option on the first try. This function will be convenient for a busy owner who is forced to communicate by telephone even while on the road.
The standard speakers of the LADA Granta disappoint many, since even at a 45 percent volume level they emit wheezing, characteristic of bass overload. Some timid music lovers are alarmed by volume jumps when switching to “radio” mode.
Here is a list of shortcomings that provoked many Grantavods to purchase an alternative version of the radio. Today, the progressive version “2191” claims to replace the outdated standard device “2190”. The new device will please you:
- improved sound;
- interface for connecting with a rearview camera;
- navigation complex;
- integrated input for connecting a subwoofer.
Not every minimum configuration of a car today will please you with the presence of a standard radio. If, nevertheless, such a device is present in the database, it is far from a fact that it can please you with its informative interface and sound quality. If your version of the car has a push-button radio, then, as we found out from the article, installing a more modern radio, as well as the subsequent connection of the radio, is not a difficult matter, the main thing is to approach everything correctly.
The LADA Granta model also did not acquire the role of an exception in this list. After all, the trend of a modern car suggests the owner’s ability to carry out exciting measures to improve and tune his “iron horse,” and you shouldn’t be upset, because a push-button radio is easily replaced with a modern one.
Many motorists face the problem of removing the radio in their car. Some people cannot remove the standard device installed at the factory, others inherited the music along with the car, and others simply lost special keys. There are also plenty of reasons for dismantling - from repairing wiring to buying a new stereo system.
Often, standard head units (aka radios) are removed using the method described above, since they are attached to 2 or 4 clips. For example, the factory player on a Lada Priora car is held on by two latches, and to unlock them, thin steel strips must be inserted between pairs of radio channel switching buttons “2” - “3” and “5” - “6”.
In Priora, stripes must be inserted between the buttons
To remove car radios that are fastened with screws, you need to prepare a simple set of tools:
- thin flat screwdriver or knife;
- Phillips screwdriver;
- set of small sockets (from 6 to 10 mm).
With this mounting option, the factory turntable must be unscrewed using the heads
On different brands of cars, standard players can be mounted in different ways, but the principle is approximately the same: the device is screwed to brackets that are covered from the outside with a plastic lining. As an example, we propose to consider removing the radio on a Korean Hyundai Solaris car, performed in the following order:
- Use a flat-head screwdriver or knife to pry up the lower corner of the plastic decorative panel framing the stereo. Pull the edge and grab it with your hand.
- Gently pull it towards you and release the first latch, and then move around and unlock the rest.
- Holding the panel with both hands, remove it and, if necessary, disconnect the connectors located at the bottom.
- Unscrew the 4 mounting screws with a Phillips screwdriver and pull out the radio.
Audio preparation Grants of different configurations
In the “standard” configuration, the Lada Granta has pre-installed power wiring harnesses, which are located in the console opening. Electrical wires are connected only to the radio, so don’t be surprised if you don’t find them in the doorways. To wire to the doors, you will need to pull power wires, which are located under the console panel
In this configuration of the Lada Granta, the stereo system can be installed independently, if due attention is paid to it
In the Lada Granta Norma, the power wires coming from the console are already routed to the doorways. You only need to connect the audio system in accordance with the assembly diagram. It's not uncommon for the stock door wiring to not match up with some speaker connectors. To solve this problem, you need to purchase suitable wires and replace them in the doorway. Lada Granta Norma has a trim with a special pattern for the speakers. Based on it, you can cut the opening yourself.
During assembly at the factory, the Lada Granta luxury version is equipped with a touchscreen multimedia system and speakers. The improved radio tape recorder is complemented by Bluetooth function and a 5-inch display with line output. In addition, the built-in radio allows you to connect a USB 2.0 flash card, through which you can listen to recorded music.
The standard radio for the Lada Granta model is an improved device, the design basis of which is the “Sirf Atlas” processor, supplied by the well-known. In addition to the presence of a radio receiver, the device is equipped with a large touch screen and has the ability to connect an external source via a video input by replacing the software and performing firmware. However, in the basic configuration of a domestic car there is only a push-button radio. Many owners are not happy with this fact and want to connect a more modern radio. This article will tell you how to install a radio.
Removing the device according to the instructions
The algorithm for removing the radio if you have the keys is outrageously simple. It is worth considering in order to understand how to act if they are lost. The order is as follows:
- Remove the front panel of the player and the decorative plastic frame, prying it up with a flathead screwdriver if necessary.
- Insert the first key into the gap between the housing and the mounting frame, located at the end. You should feel slight resistance as the tool bends the latch.
- Repeat the same action with the second key.
- Grasp the radio with your hands by the protruding parts on the sides of the case and carefully remove it from the niche.
To remove the radio, 2 keys are used
Special keys must be inserted into the side openings
When the radio is equipped with four latches, access to them is through 2 pairs of round holes. You need to insert 2 U-shaped keys into them and pull them out by the body, as described above.
The music center can be easily removed using keys
How to remove the trim?
This is necessary for installing speakers. Here, the Lada Vesta owner will need maximum care and attention to eliminate the risk of scratching the plastic panels. Using a screwdriver is highly undesirable. It is better to arm yourself with a plastic card.
To remove the plug located on the end of the door, you will need to use a card to pry it through special recesses. Using the same principle, we dismantle the buttons for electric window lifts. Fastening components in the form of tendrils are located on the front, rear and side sections of the MUS.
The fastening of the casing is represented not only by screws, but also by 4 “hedgehogs”. The risk of breaking them is quite high if the owner does not use a specialized tool during dismantling. These “hedgehogs” are borrowed from cars from Renault-Nissan. You can use elements from Grants instead, but minor preliminary modifications will be required. Such “hedgehogs” are stronger and their price is several times lower.
According to these manipulations, the upholstery on the driver's side is dismantled. Removing the trim from the right door panel has its own peculiarities. There is no need to remove the window lift button. There is also no need to look for a self-tapping screw plug. A sufficient measure would be to remove the handle cover.
How to connect an amplifier and subwoofer?
If standard keys are lost, you need to make homemade ones, focusing on the shape of the slots. To see them, remove the device’s removable panel and plastic frame. Here is a list of available tools with the help of which owners of various cars manage to unlock the latches:
- thin steel strips 6-15 mm wide;
- stationery knives;
- plastic clamps for electrical wiring;
- nails and straight wire - for round holes;
- thin screwdrivers and other similar items that fit the shape of the cracks.
These steel strips can be used instead of keys
The first step is to remove the front panel of the radio.
To remove the car radio, use the same algorithm:
- Insert first one and then a second strip of thin metal (or a utility knife, thin screwdriver) into the technological opening. Feel each latch unlock.
- If the turntable is supported by 4 clips, insert four instruments.
- Slowly remove the radio from the niche at the same time as the improvised keys.
The strips need to be inserted into the side slots
The music center is removed along with the strips
Sound amplifiers
Quite often, the audio playback produced by a standard multimedia system does not suit car enthusiasts, so they connect various sound amplifiers for the Lada Granta Liftback. In this case, the radio will not suffer in any way, but the sound will indeed be much cleaner. To do this, you will have to dismantle the lower part of the center panel and remove the console. There you will find several mini ISO connectors. Find the yellow connector and insert the plug of the conductor you purchased into it.
In this case, the green and blue wires must be left in their original form. Car owners who perform this procedure note that in this case it is not possible to use standard wires.
Installation of Lada Granta car radio
Tools:
- Open-end wrench 10 mm
- Small flat screwdriver
- Knife (if necessary)
- Soldering iron (if necessary)
Initially, in this car model, the calculation is made for a 1-DIN radio. If the owner wants to install another type, a newer one, for example 2-DIN, he will need to start sawing the partitions in the console itself. And if the size is not suitable, then a suitable cantilever frame will have to be cut into the panel.
Here is a description of how to install a 1-DIN radio.
1. Remove the negative terminal from the battery.
2. Remove the plastic pocket installed in place of the future radio using a flat-head screwdriver.
3. Having taken out the pocket, on the back of it you will find slots where ISO connectors will be inserted to connect the radio. Disconnect the connectors to completely remove the pocket.
4. Now remove the metal frame from the radio and install it in the place where the plastic pocket was. Unbend the frame's tendrils to lock it securely in place.
There should be a click to confirm that the frame installation was successful.
5. Connect the connectors to the radio.
If you connect the radio to the connectors incorrectly, all car systems may fail, including, of course, the sound system.
Some radio manufacturers make custom connectors. Most of them come with an ISO plug. But there are times when none of the types are suitable, then the last option remains - cutting the wires. You remove the original plugs of the radio and the plugs of the car wiring and solder them together, but be sure to match the color.
A mistake many car enthusiasts make is twisting the wires and wrapping them with adhesive-backed insulating tape. In winter, the same electrical tape cracks due to frost. As a result, a short circuit may occur in the wiring, which will lead to the failure of all electrical systems of the car.
6. Insert the car radio into the previously installed frame.
Functions and installation 2 din
2 din differs from a stamped radio in the type of size. This designation conveys information to the owner about the dimensions of 178×50×180 mm. This device cannot be installed in any car. This radio has a sufficient number of functions:
- combined amplifiers increase signal reception several times;
- radio search is simplified due to the permissibility of viewing existing files or folders;
- the router map is calculated in the integrated radio navigator;
- with the help of shock protection, the service life is increased;
- access to interesting programs from radio stations in the FM and AM bands;
- enhanced low frequencies in music;
- Music Zone made it possible to switch the listening frequency while in the car;
- ability to connect external drives using a USB connector.
The development of digital technologies at the highest level is used in modern cars. But the size of a 1 din radio has a fit in any car, which cannot be said about a 2 din one. AvtoVAZ is mass selling the improved Lada car. The front-wheel drive sedan is recognized by many car enthusiasts in our country because it has an excellent combination of cost and quality. The modest configuration of the Lada Grant does not include some car devices, including a radio.
When installing acoustics in Grant's car, you don't need to think about how to lay the wires correctly, since they are already laid out: standard plugs and standard openings for connecting the radio are included in the package of the car. 2 din is a device with great capabilities and dimensions. To install it on the Lada Granta, you need to perform some preparation operations. First of all, remove the plastic pocket from the working panel using a screwdriver and unscrew 2 screws. The back of the panel has slots for car radio plugs, manufactured by the manufacturer, secured to the pocket body.
Remove the mounting frame from the car radio and install it on the body itself. Next, insert the radio and the plugs attached to it. Installing a radio requires the installation of speakers mounted on the front doors of the car. To do this, you will need to remove the door covers. First, with standard door configurations, it is necessary to dismantle the handle for opening the doors and lowering the windows. Make a hole in the door for the speakers.
This process goes quickly if you use a jigsaw and cut out the holes according to the template, which is always included in the kit. Secure the speakers to the door using self-tapping screws and prepare the connection wires. The wires are stretched from the speaker to the radio itself, because the standard connectors already have additional wires for connecting the speaker. Dismantling is carried out in reverse order.
Work on installing the radio should only be carried out with the negative battery removed. Upon completion of the work, place the terminal on the battery and check the operating condition of the car radio. Make sure that the speakers do not interfere with the opening and closing of the doors. That's all, the installation of musical equipment on Grant is completed. For those who have at least once installed a radio themselves, this process will not be difficult.
Decoding problems
The main pitfall of the described procedure lies in the security code embedded in the memory of most radio tape recorders. The bottom line is this: disconnecting the music center from the external power supply for 10-15 minutes will lead to the fact that the next time you turn on the car radio, it will require you to enter a security code (usually a four-digit one), without which it will not function.
The device requests a code after connecting to the on-board network
If the card with the code is lost or missing, the issue can be resolved in several ways:
- when it comes to a standard device, for a certain fee they will help you find the code at a dealership that sells cars of your brand;
- there are companies and individual specialists dealing with these problems;
- the free way is to search for code using various programs.
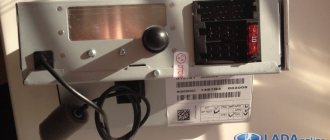
Serial number location
Regardless of the method chosen, you will have to remove the radio from the socket to find out the serial number. It is printed along with a barcode on a tag glued to the side or top of the case. After taking out the device, rewrite these numbers, and then try to calculate the PIN code using them using various online calculators on the Internet.
The issue of removing a car radio from its socket is not very difficult and will not require much time. But the consequences can be unexpected for an unprepared motorist. Hence the last piece of advice: find the lost pin code before turning off and removing the player in order to save your time and nerves.
The standard multimedia system 2190 on the Lada Granta has many useful functions, but this does not mean that one day you will not need to connect additional equipment to it (rear view camera, etc.) or remove it altogether. For example, to replace with more powerful multimedia systems or, conversely, to install a double-din radio without a touch screen.
In any case, you may need to dismantle the MMC on Grant, which we will talk about now.
Purpose and disadvantages of the radio
The main purpose of a car radio is to play music. Itelma MMC 2190 easily recognizes files with MP3, WAV and WMA extensions. The sound quality is quite decent. It is clean, there is no overkill with the tops or bottoms. During playback, artist and album information is displayed on the screen. The album cover may also be displayed, if there is one on the drive. The built-in equalizer offers preset sound options: rock, jazz, voice. Often, Lada Granta owners note that the 13 cm diameter speakers that come with the radio are weak.
The problem is solved by replacing or installing additional speakers on the rear doors. Sound insulation will also help improve sound quality. In addition to playing music, the multimedia center can display photos and videos. The software allows you to recognize the most popular photo files, such as JPG, BMP, JPE, PNG, JPEG, GIF. Pictures up to 1 MB in size are opened in one second. If the photo weighs, for example, 7 MB, then the radio will “slow down” for ten seconds.
The video player easily accepts the WMV standard with an extension of 320*240. The AVI 720 format turned out to be too complex for the multimedia center. The video plays with freezes, the sound lags significantly behind the picture. Therefore, owners who want to view higher-level videos will have to turn to various converters for help.
Reviews
| Module type | Price, rub.) |
| Standard 1-DIM (push-button version) | from 3500 – 3700 |
| Standard 2-DIM (sensor) only for Lada Granta liftback | from 7500 – 8000 |
| Third party manufacturers, depending on configuration and specifications |
| № | Positive |
| 1. | Victor, 39 years old: after buying the car, he did not change the radio, despite the push-button control option. The sound quality is good, the radio reception is excellent, that's enough for me. |
| 2. | Konstantin, 41 years old: bought the car second-hand, second owner. I didn’t change anything, I left the original radio. The functionality is good, the build quality is also good, it reads from a flash drive. |
| 3. | Vasily, 44 years old: I listen to the radio more, the reception in the city is good. True, it causes interference near metal structures, but this is natural. |
| 4. | Kirill, 36 years old: I work as a taxi driver, on wheels all day. The standard tape recorder saves the day, it works properly. My friends recommended replacing it with a touchscreen model from the new Granta, but so far the old one hasn’t failed. |
| Negative | |
| 1. | Victor, 38 years old: the standard audio module, although not bad, seemed to me not enough, so I replaced it with a foreign one and supplemented it with an amplifier. Now the volume is good, the quality is high. |
| 2. | Mikhail, 42 years old: I work as a courier, I drive for the entire shift. I expected more from the standard radio, so I had to replace it with a new one. The volume suits me, I plan to connect an amplifier - a crossover. |
| 3. | Ivan, 33 years old: I bought the car second-hand, immediately replaced the audio module, the reviews are not good. New and high-quality equipment from Trinity, no problems. |
| 4. | Vladlen, 40 years old: friends gave me a gift in the form of a radio with touch control for our anniversary. Before this there was a push-button one. Can't compare, quality, sound, control, functionality at a high level. |
Conclusion The opinions of motorists on the functionality and sound quality of the standard radio are divided, which is obvious. Everyone evaluates according to their own criteria. Some people care about sound, others about functionality, and others about control. Regardless of the type of radio: push-button or touch-sensitive, the workmanship is good.
Opening words
Every year, ideas about the quality and ease of use of a vehicle are increasingly changing and improving. Now you can not only enjoy trips in your favorite car, but also listen to your favorite music, a variety of radio programs, watch videos and even be an Internet user. Of course, having all these features will make your life more comfortable and convenient.
As you know, the more expensive the car, the better the audio system installed in it. The same can be said about the Lada Granta Luxury car. The stock radio here will be of the highest quality. Such a device will undoubtedly surprise all car enthusiasts. Of course, many will appreciate the availability of huge functionality, a reliable and safe working system, with a very convenient and high-quality interface. Such a device fits perfectly into the interior of the vehicle and correctly performs all the tasks assigned to it.
Removing the radio on Grant
The entire dismantling process will take no more than one minute if you have already removed the radio before. If this is the first time for you, then minor difficulties may arise only with finding the necessary elements by touch if the radio is not pulled out in the usual way.
1. Remove the plastic trim of the center console. To dismantle the MMC, it is not even necessary to remove the cover completely; it is enough to unclip only the upper latches using a screwdriver, a small knife or a spatula.
2. Slightly pulling back the upper part of the plastic trim of the center console, press out the MMC latches, which are located on the right and left. To prevent the latches from “settling” into place, you need to slightly pull the MMC towards you.
3. Having released the clamps, we remove the MMC from the niche.
1. Lower the glove compartment lid down and disengage the upper latches.
2. Put your hand into the opening and disconnect the interfering cables. Please note that not all MMCs currently have a USB cable installed that goes into the glove compartment.
The radio has been dismantled, now you can connect additional equipment to it, replace it with another one, or simply find out the model of your MMC by the sticker located on the rear panel.
conclusions
The Lada Grants radio tape recorder is a good quality product from a domestic manufacturer. Many car enthusiasts are happy with this device, but they don’t mind “correcting” it a little using firmware.
Since the beginning of 2011, all Lada Granta models have been manufactured with audio preparation: factory radios and receivers. The quality of reception and sound is not always at the highest level due to its cheapness and simplicity. When purchasing a Lada Grant from the showroom, the owner receives audio preparation, acoustic wires, and installed electrical wiring.
The door panels have already prepared openings for installing speakers. True, few people use the standard seat, as they prefer the rear shelf to improve the sound.
How to install 2 din in grant norm or standard
Everything is more complicated here. Need to:
- dismantle the center console trim - unclip the fastenings, move it forward and disconnect the buttons and heater handles;
- cut out a vertical plastic partition that will not allow you to install a 2 din device;
- file the plastic casing of the central air duct;
- try on a new acoustic unit, adjust the fastenings if necessary;
- install adapters from the delivery kit on the wiring (if required);
- install the device;
- if we leave the old center console trim: we cut out the partition, try it on, put it in place with the buttons and handles connected, adjust the decorative frame of the control unit, install it;
- if we install a new trim on the console under a 2 din device: we transfer the heater control unit and buttons from the old trim, install them in place, and put a decorative frame on the control unit.
How to choose a speaker system?
If the owner of a LADA Vesta needs high-quality sound, we recommend choosing two-component speakers. For these accessories, the high-frequency emitter is placed in a separate unit in relation to the low and mid-frequency head.
It is advisable to install such components in the front doors. The rear door panels can be "addressed" with lower quality coaxial speakers, which will serve as an expansion of the sound theater. To install high-frequency heads, additional cabling will be required. This is how the speakers are installed.
Which radio should I install?
The plant supplies basic versions of the machine without a head acoustic unit. The choice of equipment is up to the owner of the machine, who can mount a simple player in a small-sized case or an advanced multimedia processor with processor control.
Lada Granta in expensive modifications is equipped with a standard radio that allows you to connect external drives or smartphones. The design of the equipment allows you to update the software or install a navigation module (with a separate 3G modem). To store cards and additional software, an SD drive must be installed on a permanent basis, which reduces the list of switched devices.
Review of modern car radios
The variety of car radios is great, and it is becoming increasingly difficult to choose. The perfect choice of car radio depends entirely on certain rules. First of all, you need to make sure that the car has a special connector for this type of equipment. If there is one, you need to determine its size and only then go shopping.
Next, the driver must familiarize himself with the functions of modern equipment: the ability to reproduce audio recordings, receive radio signals, and broadcast television programs. The latter is not welcomed by car enthusiasts, since there is no full opportunity to watch TV while driving, and the signal quality leaves much to be desired.
Most modern car radios have additional functions: reading information from a flash drive, connecting a laptop and other gadgets, bluetooth, navigation, remote control and much more. Therefore, when buying a radio, you can not only get the opportunity to enjoy your favorite music on the road, but also many useful and interesting functions.
The car radio is the main element of a car's stereo system; the sound quality depends on it. The subwoofer will provide surround sound. It must be selected in accordance with the desires and requirements for the quality of music reproduction. All devices are divided into two types: 1 din radio tape recorders with a height of 50 mm and 2 din radio tape recorders with a height of 100 mm. This or that model is selected taking into account the opening on the car control panel. In this case, an adapter frame will help in installing the radio.
The power of car radios depends on the indicators declared by the manufacturer. The higher the rated power, the better the sound. Control occurs from the panel on which the buttons to press are located. An addition may be an FM tuner that can automatically search for radio waves. Using a removable car radio means regularly checking its fastenings.
Do-it-yourself installation
Next, we will look in detail at how to correctly install the radio on the Lada Granta manually. If you are not a fan of the standard audio preparation of the Lada Grant, pay attention to this algorithm.
We recommend: Electric additional pump for the heater of VAZ and other cars: selection and installation
As stated earlier, the power wires are initially wired, and all that remains is to understand how to properly connect them to the radio.
After removing the cover that covers the radio, two connectors will be visible in front of you. One connector is intended for connecting speakers in the doors, the second is for power supply.
The black and pink wires indicate ground and plus, and at the same time they are the main ones for power supply. If the connection is incorrect, the audio system will at least not work; in the worst case scenario, you will short-circuit the “–” and “+” terminals, which will result in the fuse blowing.
When connecting directly, be sure to insulate all wires, not just those used, to avoid a short circuit.
After connecting the necessary wires, we secure the speaker with self-tapping screws or screws and close the mesh.
It is recommended to install 5-inch speakers (12.5 cm) on the front doors of Lada Granta cars, but if desired, you can insert 16 cm, as a result of which the sound quality will only increase. Choose speakers so that the glove compartment can open completely. This problem often exists when owners choose larger speakers.
Some craftsmen cut out the trim on the rear doors and install pancakes (6x9), which sound even better. With this option, a teardrop-shaped mesh is purchased in the standard factory place for speakers, and speakers measuring 13 cm are installed.
After doing all this grant-audio preparation, all that remains is to turn on the speaker and wait for the radio to turn on.
SilverStrong IPS Android 9.0
Another radio on Android 9. Here you have options with 2GB and 4GB of RAM and 16GB and 32GB of ROM, respectively.
A simpler model costs a little less than 12 thousand rubles, and a more powerful one costs 15,000 rubles. Well, if you want to add DSP to it, you will have to pay 17,000 rubles. 1000 more expensive than Eunavi.
Navigation, Internet, camera support, buttons and flash drives and Bluetooth are in place.
Standard for Grant FL restyled multimedia S185
By choosing to replace a push-button radio, the advantages of a large (9 or 10 inch) screen of the S185 series multimedia line produced by Winca customers receive:
- high-definition display and protective glass – this is on the outside;
- and inside there is a premium FM tuner;
- as well as a 4-channel sound amplifier.
In addition, the multimedia system has:
- lowest possible cost;
- modern design;
- reliability of both electronics and sensor equipment, as well as the element base.
This audio system, by the way, is ideal for those of our garage tribe who value excellent FM radio reception on highways, even at the maximum distance from cities with a population of over a million. And for actual manual installation, the kit includes everything you need, from the adapter frame and antenna to various CAN buses and fasteners.
As for the characteristics of the restyled head unit, these are:
- the display is the most sensitive, namely TouchScreen;
- with good brightness and resolution (1024/600);
- with capacitive and frost-resistant Multi Touch control options;
- with Android 8.1 operating system;
- with the presence of Spreadtrum 8141E as a 4-core processor;
- with 1 GB RAM;
- with 16 GB of internal memory;
- with GPS navigation;
- and with other, both standard and non-standard functions such as multi-steering wheel options, auto ignition and other assistants, the availability of which must be checked with sellers.