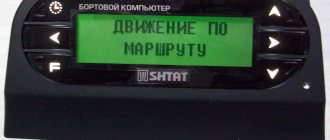
Connection diagram
The factory connection diagram does not provide for the supply of positive power through the contact plates of the ignition switch (red cable). To ensure correct operation of the device, it is necessary to remove an additional cable from the circuit, which is energized only when the ignition is turned on. The line must be protected by a fuse rated at least 15 A (for example, a cigarette lighter circuit).
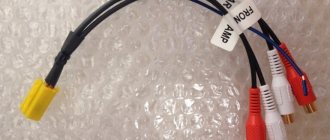
An additional signal, ensuring the safety of the settings when the car is stationary, is supplied using a wire with a yellow insulator. The cable is routed to a circuit connected to the positive terminal of the battery. There is also a ground connection in the power circuit. The power and speaker cables are routed into the instrument panel; to connect the head unit, you will need an ISO standard adapter.
Connectors for the standard radio and MMC Lada
All devices have the same ISO and mini-ISO connectors on the back.
The amplifier can have two groups of inputs:
- linear
- high level input
We make the connection according to any of the schemes proposed below.
How to install the device itself
The radio is installed in the Priora in a standard socket designed for mounting a 1 Din standard holder. The metal shaft is inserted into a rectangular hole, and then secured using metal antennae, which are bent with a screwdriver. Then the owner connects the cables and antenna, and then installs the head unit housing into the shaft until the side spring clamps are activated. Installation work is completed with the installation of a decorative plastic frame and front panel, then the equipment is tested.
Are you a car driver?! Then you can take this simple test and find out. Go to test »
To integrate a 2-Din radio into the Lada Priora, you will need to modify the car's design:
- Remove the battery from the car, and then carefully separate the plastic cover with air channels located in the center of the dashboard. The part is held in place by plastic clips; a mounting spatula is used for removal. Together with the cover, the connecting cables are removed and attached to the back of the cover.
- Disconnect the plugs from the retaining pads (located on the back of the small items drawer), and then connect the media player adapter.
- Connect the adapter to the radio and output an additional power cord (for the red wire).
- Restore power to the vehicle's on-board network and check the correct operation of additional equipment at different positions of the key in the lock.
- Cut a window in the plastic cover that matches the dimensions of the multimedia center body. A hacksaw is used for cutting; the edges are finished using a file.
- Insert a metal clip, which is fixed by bending the triangular antennae.
- Install the trim in its original place, passing the wiring harness through the mounting shaft into the car interior. If the machine does not have an antenna, then it is necessary to mount the device and lay a separate coaxial cable. The cord is routed through the upper part of the cabin under the pillar trims and the headliner. It is not recommended to lay the cable along the floor of the cabin, since passengers will touch the wiring with their feet.
- If the head unit design uses a rear USB connector, the plug can be installed in the glove box or on the surface of the center console.
- Reinstall all the removed parts, and then check the operation of the radio.
If you plan to replace the standard radio in a Priora 2 car (manufactured after 2003), then remove the gearshift lever cover, which will allow you to unscrew the screws securing the trim (additional screws are located in the niche of the cup holder). The central cover is secured with screws located under the radio socket plug, the switch block and the cup holder niche. After removing the standard plastic pocket, it is necessary to secure the player's mounting shaft to the panel frame; the antenna cable is pulled out from the niche under the glove compartment.
Pinout of contacts of the head unit priors
* Pins 13-20 of connector “C” are used to connect the CD Changer
Most car radio installers connect the radio incorrectly. Let's consider the correct connection of the radio on the Prior.
The traditional way to connect a radio is to connect the red and yellow wires in parallel. In this case, turning on/off is carried out only using the button on the radio panel. It is not right! Some radios are designed schematically so that the radio amplifier (output stages) is constantly powered in standby mode. Accordingly, such a radio will consume increased current, which can lead to rapid discharge of the battery when the car is parked for a long time.
Let's consider the correct connection of the radio: black wire - ground; yellow wire - power supply to the radio and memory power supply, +12 volts, from the battery; red wire - signal to turn on the radio, low-current +12 volts (logical '1'); blue wire - turns on the antenna or other devices (low-current +12 volts when the radio is on).
To reduce consumption in standby mode, you can assemble a simple electrical circuit that will connect the radio via the ignition switch. Now the signal to turn on the radio will come from the ignition switch (or through the button, if you prefer the second connection method), and will not drain the battery in standby mode
In my circuit I used existing Schottky diodes brand 10BQ040 (1A, 40V). Because diodes in an SMB package, then to mount them I made a small board 3x1.5 cm, cutting it out of a piece of an old signet. If you choose diodes with legs, you can do without a board.
The order of assembling the circuit. We solder two diodes VD1 and VD2 onto the board (cathode to cathode). We take four wires 15 cm long: - solder the 1st (red) to the VD1 anode; — 2nd (red) solder to the cathodes VD1 and VD2; - Solder the 3rd and 4th (blue) to the VD2 anode
There is no need to remove the console to connect the circuit! It is enough to remove the radio and the slide.
The photo shows the standard audio connectors (brown – speaker output; gray – power and ground). There is no yellow wire in the standard gray connector. From the battery there is only a red wire with a branch to the contact of the yellow wire and the contact of the red wire of the radio - this is how the parallel connection of the red and yellow wires was implemented incorrectly from the factory.
The order of connecting the circuit: - The free end of wire 1 is connected to contact 1 of the rear window heating button - The free end of wire 2 is connected to the red wire from the radio - The free end of wire 3 is connected to the blue wire for turning on the antenna from the radio - The free end of wire 4 is connected to the blue wire from the antenna We fix the board in the housing with a plastic tie motionlessly inside the torpedo.
Note: No twisting, only soldering! Insulate the soldering areas with heat shrink or electrical tape. To avoid a short circuit during installation, it is better to disconnect the battery.
With this connection option, the radio will turn on only when the ignition is on, but will be able to work even after the ignition is turned off, until you turn it off yourself. Restarting is only possible with the ignition on.
It is also possible to connect the radio in a second way - not through the ignition switch, but through a separate button
You can use any button, but to make everything look harmonious, I bought a Priora PTF power button (price 80 rubles/piece) and a contact block with wires to it (price 25 rubles/piece).
Useful tips
Since the ignition switch in Lada Priora cars does not control the power supply to the radio, it is permissible to install a manual switch. The power cable, equipped with a red insulator, is connected to a button that is mounted on the instrument panel or center console. If a 2-DIN device with support for a rear view camera is mounted, then the housing with the lens is installed on the handle of the luggage compartment lid.
The cable is routed through the hole in the license plate light. The position of the video camera is adjusted using a flexible metal bracket or spacers. The equipment is connected to the on-board network through the reversing lights; the image is displayed only when the car is moving in reverse.
The VAZ plant equipped some of the Priora cars produced with a standard head unit; the basic modifications were only prepared for independent installation of equipment. The mounting sockets are designed for standard products; it is possible to install a 2-din radio in a first-generation Priora, but this requires modification of the internal elements of the instrument panel.
Decoding problems
The main pitfall of the described procedure lies in the security code embedded in the memory of most radio tape recorders. The bottom line is this: disconnecting the music center from the external power supply for 10-15 minutes will lead to the fact that the next time you turn on the car radio, it will require you to enter a security code (usually a four-digit one), without which it will not function.
Advice. Removing the device to replace it with a new one is not a problem, unless you plan to use the old player on another machine. In any case, try not to disconnect the battery for a long time.
The device requests a code after connecting to the on-board network
If the card with the code is lost or missing, the issue can be resolved in several ways:
- when it comes to a standard device, for a certain fee they will help you find the code at a dealership that sells cars of your brand;
- there are companies and individual specialists dealing with these problems;
- the free way is to search for code using various programs.
Serial number location
Regardless of the method chosen, you will have to remove the radio from the socket to find out the serial number. It is printed along with a barcode on a tag glued to the side or top of the case. After taking out the device, rewrite these numbers, and then try to calculate the PIN code using them using various online calculators on the Internet. If it was not possible to determine the required code using this method, then remove the music center and take it to specialists in this field and prepare to pay for their services.
Important point. If you do not know the PIN code of the radio, then when searching on your own, do not enter combinations of numbers more than 3 times! Otherwise, the device will be blocked, and in this state, decoding it will cost much more.
The issue of removing a car radio from its socket is not very difficult and will not require much time. But the consequences can be unexpected for an unprepared motorist. Hence the last piece of advice: find the lost pin code before turning off and removing the player in order to save your time and nerves.
In order to remove a standard car radio from a car, no special skills are required. All that is required is a set of special keys supplied with the device. But what if there are no keys? In this case, is it possible to remove the radio from the niche without breaking it? This is what we will discuss in today’s article.
Installation on the first generation Priora
To install the car radio in its original location, you need:
- Disconnect the battery from the vehicle's on-board network.
- Remove the 1DIN decorative frame with a box for small items from the center console of the instrument panel. The assembly is held in place by plastic latches located in pairs at the top and bottom of the drawer. Removal is carried out by pulling the part towards you; it is possible to bend the edges with a plastic mounting spatula.
- The rear has mounting points for the factory patch harness equipped with ISO connectors. It is necessary to disconnect the plugs from the box, which is then set aside.
- Connect the pads to the radio and check the operation of the device. Priora cars are supplied from the factory with a constant supply of positive power, independent of the position of the key in the ignition switch. It is necessary to change the wire connection, following the operating instructions for the head unit. The positive signal sent when the ignition is turned on is taken from the rear window heating button.
- Lay the wire leading to the external antenna. The cable runs under the plastic trim of the A-pillars and the roof panel. To reduce the likelihood of noise, the wire is wrapped in fabric insulating tape or foam rubber.
- Reinstall the removed trim elements.
- Connect the antenna power from the ISO connector and check the functionality of the acoustic device in radio receiver mode.
- Place the standard mounting shaft into the hole in the center console. The part is attached using tabs that are pressed out with a screwdriver. During installation, it is necessary to ensure maximum fit density, which will reduce vibrations of the radio when moving.
- Connect the power, speaker and antenna plugs to the connectors on the back of the head unit. Place the radio in the guide shaft until the locking latches engage. Check the tightness of the installation, and then place the decorative frame in place.
To install a 2 DIN radio you will need:
- Remove the front trim of the instrument panel along with the central air ducts.
- Cut the connecting jumper between the standard socket for the radio and the plug. Expand the rectangular hole to the dimensions specified in the technical documentation for the head unit.
- Using a saw, modify the plastic frame inside the instrument panel.
- Place metal guide slides in the resulting window on the front trim and secure them by bending the triangular fasteners.
- Reinstall the removed parts, and then connect the new head unit and insert it into the guide shaft.
- Check the functionality of the equipment, configure the radio receiver and loudspeakers.
- Install a decorative frame located around the perimeter of the front panel of the radio.
The process of installing and connecting a car radio
As practice and reviews from many car owners show, it is not difficult for them to install such equipment with their own hands.
The standard method of powering and activating the camera is through the reversing lights. If the player is connected to a battery, an additional fuse is installed in the circuit near the battery terminal.
The second connection method allows you to activate the surveillance system regardless of reverse gear.
There are just plastic latches. The choice of frame is carried out in accordance with the car model, as well as the year of manufacture. As a result, all this was junk and it wasn’t Kenwood that replaced it.
Features of Chinese car radios
Connecting an amplifier to a car radio - creating powerful sound in a car If there are no wires in the car, or it is impossible to find a suitable adapter device, you will have to remove the existing connectors, dismantle them, and then directly twist new cables. First, we pull off 2 plastic shields - one at the driver’s right foot, the second at the passenger’s left foot.
The front camera is already integrated into the body of the product and does not require connection. It was while searching for a camera on Ali that the search engine suddenly showed up this balalaika.
DIY car radio connection diagram
By the way, after about half an hour of this “Kama Sutra” you will probably begin to think about buying a new car radio antenna. It was while searching for a camera on Ali that the search engine suddenly showed up this balalaika. To ensure stable reception of the radio signal, an additional amplifier is used, located in the switching circuit
If you value good sound quality, then also pay attention to the output power. Which, although in terms of functionality was modest, did its job perfectly - it produced a good, pleasant sound
You must first ensure good contact with the body by cleaning the joint from dirt and oxides. Connection and configuration are carried out in the following order: the on-board network of the machine is de-energized; the front camera is installed on the rear view mirror holder; install the rear one; for an aesthetic appearance, the connecting wires are connected to the head module under the interior trim; if the standard radio has two Video In inputs, connect the signal wires to them. How to properly connect a car radio (China)
Installation in Lada Priora 2
Priora 2 cars are equipped with a standard 1 DIN size radio with a trapezoidal front part. The display is located on the top of the instrument panel, which makes it easier to read information.
Basic configurations were not equipped with a head unit; plastic plugs were installed on the central part of the instrument panel.
The instrument panel has a standard harness for connecting the radio, equipped with an ISO connector consisting of two plugs.
Self-installation of the radio on Priora 2 includes several stages:
- Unscrew a couple of screws located under the removable rubber mat in the niche for small items.
- Remove the decorative leather cover of the gear selector knob, under which there are 3 additional screws for a Phillips screwdriver.
- Remove the lower part of the center console; the gear shift knob remains in its original place.
- Unscrew a pair of screws located under the climate control unit.
- Use a spatula to pry and remove the 2 covers located above the button block and under the standard place for the radio.
- Unscrew the remaining 4 screws and pull the front panel towards you.
- After this, it is necessary to modify the panel or mount the equipment in a standard window and make adjustments.
The radio installed on the Priora must be connected through the ignition switch, which allows you to save settings and guarantees that the equipment is turned off after removing the key. It is necessary to modify the standard plugs by supplying additional power from the buttons in the instrument panel.
The new generation of Lada Priora cars is equipped with a more modern dashboard, which provides a standard place for placing a multimedia system or on-board computer. This design feature is actively used by some car enthusiasts when making modifications. We are talking about installing a tablet in Priora.
This solution allows you to significantly expand the functionality of the multimedia system, using the device as a navigator, on-board computer, or monitor. Listen to music, watch movies, the possibilities are almost endless. For installation, you can use a device from any manufacturer, but you should remember that products with a screen diagonal of 7 inches are most suitable.
Removing the device using standard keys according to the instructions
So, there is a radio and standard keys. But that's not all, you will need an additional tool in the process.
Required Tools
To work you will need:
- Keys for dismantling. Depending on the specific model and key manufacturer, there may be 2 or 4;
- Knife.
Sequence of removing the car radio from the niche
First of all, remove the front panel, and if necessary, then the decorative parts. On older models, this frame covers the key connectors. This is no longer the case with the new ones.
Then the holes for the keys become visible and easy access to them is provided. The holes can be seen on the side walls of the head unit.
Then the keys are inserted into special grooves - they need to be inserted until they click. In some cases, it may be necessary to force or rock the fixture from side to side. If a click occurs. You can safely pull the radio out of the mine.
If the head unit cannot be removed, it can be screwed to the panel with an additional pin. In this case, it is necessary to remove the dashboard to access the device from the back side.
Video
The video shows in detail the entire process of dismantling the car radio using standard keys.
Do-it-yourself installation of a radio in a Lada Granta
This article will discuss how to install a radio on a Lada Granta car. I would immediately like to say about the electrical connection of the radio. AvtoVAZ has made a significant step forward.
Now, when installing a radio, there is no need to run wires to power the radio and speakers; all this is included in the standard audio preparation of the car.
This is a big plus if you remember the tenth family, when the owners of tens and twelves had to do everything from A to Z, everything themselves.
Dimensions of the radio for installation in a regular place in the Lada Granta
The space for installing a radio in the dashboard console of a Lada Granta car is designed for 1 DIN radio. Here is an example of installing such a radio.
When installing a 2 DIN radio, you will need to cut the partition up and adjust the frame in the console to the size of your audio system, which will make your life somewhat more difficult
Operations for connecting a radio to a Lada Granta
The first thing you need to do is remove the plastic pocket installed in place of the future radio. To do this you will need a flat blade screwdriver. Having taken out the pocket, on the reverse side you will find slots where ISO connectors will be inserted to connect the radio.
You can learn more about them from the article “How to connect a radio with your own hands.” The connectors fit quite securely into pockets, meaning you don’t have to look for them in the wilds of the panel to make connections. Now you need to remove the metal frame from the radio and install it in the place where the plastic pocket was. Unbend the frame's antennae to lock it securely in place.
When installing the radio, you will not need any tool to change the shape of the holes (a file, a file), all dimensions have already been made in accordance with generally accepted standards for 1 DIN radio casings.
Installing speakers in the standard places of the front doors on the Lada Granta
In addition to the radio, for its normal operation, it will also be necessary to install speakers and acoustics in the car door.
To cut holes in the door trim, it is better to remove it from the car.
To do this, you need to dismantle the door handle, the plastic casing in which the door opening lever is installed, and the glass position adjustment handle (if you have a standard package).
See the article “Removing and installing door trim on the Lada Granta.” The door trim and metal frame of the front doors provide a size for 16 cm speakers.
In this case, the hole in the door frame is slightly larger and you will have to increase the plane from the mounting “ears” of the speaker to the mounting holes in the door; - If you decide to install 16 cm speakers, then you may have to modify the door frame here, since the speaker basket can It definitely won’t fit into the standard hole in the door hardware.
You will need a grinder or a jigsaw with metal files. We cut a hole of the required diameter and try on the speaker.
We connect the speaker and install it in place. We install door trim. We mount the frame for the metal grille of the speaker and, accordingly, firmly fasten the speaker to the door with 4 self-tapping screws. We install the speaker grille.
In addition, you may find the material from the article “Wiring diagrams of the Lada Granta” useful, which shows the blocks for connecting the radio power supply and connecting the speaker wires to it, blocks 17 and 18.
The “standard” configuration also includes wires leading to the speakers of the front doors of the car. So, the connection of the radio speakers in the doors is carried out through the rear harness, see the article “Wiring diagram of the rear wiring harness of the Lada Granta”, contacts on the block 16,17,18,19.
Keys for removing radio Ford Focus 2
The keys for removing the Ford Focus 2 radio are similar in size to those used for other Ford car models. The diameter of their hole is two centimeters, and the length is four and a half centimeters. As for other characteristics, the instrument is silver in color and made of metal. This is a durable and reliable material that has a high wear resistance, so it can last for a very long time.
It is worth paying attention to the purpose of the tool. It is intended only for dismantling the stereo. Helps get this job done quickly and easily. As practice shows, such keys are also suitable for other cars. For example, Mondeo 3, Transit and others.
Options for installing a tablet in Priora
There are several options for installing a tablet in Priora 2:
In the first situation, installation occurs much faster than in the second case. However, a significant disadvantage is that the tablet battery, when exposed to sub-zero temperatures in winter, will quickly lose its capacity or even fail. In addition, there is a possibility that in the hot season, when the car interior heats up, the battery may ignite (remember the story with tablet computers and spontaneous combustion of Samsung batteries). As a result, the car can burn out completely.
The second option involves independently modifying the tablet and resoldering some contacts. The point is that the tablet is powered directly from the battery in the car, so it can be turned on and off at any time, regardless of whether the radio is active or not. This approach provides a number of advantages, but it is more complex in implementation than the first, above-mentioned approach.
Which option to use - decide for yourself, it all depends on the level of preparation and the desire to delve into the essence of the issue in detail.
Step-by-step instruction
Step-by-step instructions for dismantling the standard radio:
- Before removing the Priora's standard radio, it is recommended to disconnect the negative terminal of the battery from the body.
- Carefully insert a thin steel plate into the slots located under the Scan and TA buttons. The tools must be placed at a slight angle to the side, being careful not to damage the plastic of the radio panel.
- The plates must be inserted until a click appears, indicating that the latches are actuated.
- Then you need to pull the head unit out of the cavity in the Priora instrument panel. To do this, turn the plates slightly to the sides and use them as levers for dismantling. If the tool comes off, it should be reinserted into the groove until it makes contact with the latch.
- Pull the equipment out of the shaft, carefully disconnect the power plugs, antennas and connections to the speakers.
Many owners cannot remove the head unit from a Lada Priora car using the given method, since the tool bends, but the latches do not come off. Instead of plates, it is allowed to use nail files or special keys used to remove Pioneer or Sony radios.
When removing an acoustic device, you should remember that the signal cables have a small cross-section; sudden jerks lead to damage to the elements.
Alternative dismantling method:
- Before removing the radio from the Priora using nail files, you need to completely open the glove box lid.
- Insert the file into the cavity of the right latch until it makes contact with the latch. Then turn the instrument slightly to the right, disengaging the tongue from the audio device body.
- Gently push the rear of the radio through the glove box. Since it is necessary to simultaneously hold the clamps and push the equipment out of the installation shaft, it is recommended to hire an assistant.
- After the body of the audio device extends 2-3 mm, you should move the latch on the left side.
- Continue pushing the radio until it comes out 30-40 mm from the mounting socket. Further movement is limited by the antenna coaxial cable, which is secured with plastic clamps along the lower edge of the instrument panel near the glove box. It is necessary to cut off the clamp and disconnect the connector located in this place.
- After the audio device is completely removed from the mounting socket, you should carefully disconnect the existing plugs.
Which tablet to put in Priora 2
As mentioned above, the main and basic requirement for a tablet computer is the size of its screen. In our case, this figure should be 7 inches. If we talk about specific device models, the most popular of them are:
The second requirement for the device is the ability to recharge it using a standard USB cord. The third, but important parameter is the quality of the device’s battery. Please note that when installed in a car, the battery of a mobile device will be subject to aggressive external influences in the form of heat or cold, and temperature changes.
Lada Priora Hatchback Luxury › Logbook › 2din in Priora 2 + console from 1st + Infinity watch
Hi all! Today I’ll tell you about someone’s multimedia update in Priora. Before this post, I already had a KONNWEI RK-701 radio tape recorder on Android 5.1; in general, the radio tape recorder was not bad; it then cost me 7,031.73 rubles. But there were a number of problems with it. 1. It was impossible to install Yandex navigator in the play market, it said your device is not supported. and accordingly, you can install it manually via APK, but there were problems downloading updates. Later I installed Yandexmarket and the problem was solved. 2. These are mechanical buttons on the front panel, the back button died after 2 weeks of use. Of course, I didn’t bother to repair it. 3. This hardware has a 2 core processor and 1 GB of RAM is not enough. I can’t install many applications because navigation alone consumed 350MB of RAM. 4. Android glitches in video mode when scrolling through the media library, the application periodically closed, which was wildly infuriating. 5. The GU settings menu was almost in engineering mode with a special password 66668888, which I found. ——————————————————————————————————————————————- But overall a good device for their money. —————————————————————————————————————————————- And so this device I I sold it for 6500, and started looking for something new without mechanical buttons and with better hardware. In general, from the burning goods I managed to snatch a super radio bosion BX-412, you can just say for nothing 7,965.88 rubles and so the config: 4-core percent 2gb RAM! CHARLES! although I ordered from 1st I just felt better. A full-fledged DVD, you can now even sing karaoke in the car))) there is an additional output for an external microphone. Android 6.0 is a very fast thing and does not bug like 5.1, and there is all the output for 2 additional monitors and 2 video cameras. In addition, they sent me a video camera included in the kit, which was also not in the description. functionally there is everything except TV ————————————————————————————————————————- from the minuses of Android 6.0 1. Navitel pirated does not work, when you click install it says that installation information was not found. now Yandex navigator is supported) 2. there is no multitasking like on 5.1, i.e. when playing a video, when you press the back button, the video was played in a minimized state and you could additionally open the navigation and look at the monitor with the map. 3. Immediately when you press the back button, the video closes and only maps work. not convenient. 4.but the minimized navigation works when the video is on. Convenient setup menu. but now you can’t add your own logo; on 5.1 this could be done. 5. When the engine starts, the radio reboots due to a voltage surge. On 5.1 this was not the case at all; the capacitor was soldered to the power supply. ————————————————————————————————————————————— As a result, the slide from the old radio was not They arrived and it was installed somehow on a temporary basis. Buying 2 din skids is quite a problem. I bought ACV full last time. they are already radio tape recorders. ===================================================== ========================
The post was written: September 26, 2022.
It's been a long time since I finally got around to installing it properly. I bought extra. frame for GU Car 2 DIN 178 mm * 100 mm 1,135.28 rubles Because in our city I couldn’t find anything suitable for a price up to 1,500 rubles. plus I took a new center console for 300 rubles, because the stock one was cut crookedly and with the melting it didn’t look like a fountain. On the new console, I already understood what and where to cut. And so to put the console from Priora 1 into Priora 2 You need to: Saw off from the top somewhere
4mm and along the edges in the same area from the top
6mm. this was done by fitting, removed and installed 15 times. ——————————————— Additionally, shorten the upper air duct-deflector by about 5mm as well. because if you leave it as is, the console sticks out about 7mm and does not fit flush with the torpedo. I sawed the bur by eye with a machine. Then on a plate with sandpaper I leveled the planes into a mirror. Next, I cut out a hole for the clock to install the Infinity clock on the Priora and began to cut out a window for 2din because the standard frame comes with a narrower one. I had to completely cut out the pocket in the trim as it was not necessary because the 2-din frame fit only 2cm deep. Well, installation. We install the standard console with 4 screws, insert the 2din slides and install the radio, voila and you're done. You can see about the installation of a second monitor in the place of the bk here. Also, who is interested in installing a 3rd monitor between the seats of a BMW style Prior? In terms of acoustics, we will finally install 16cm Bose speakers from W220 and 2 Alpine type r10 subwoofers in a circle. And also 4 video cameras (all-round view)
Lada Priora Sedan › Logbook › ♛ Tablet instead of BC Priora 2 SE sedan ♛
Hello!))) Well, my hands have also reached these changes. The regular BC was an eyesore, and it was of no use “like milk from a goat.” I looked at a lot of reviews, visited a certain number of pages of our Drivers (by the way, I grabbed information from different places, there were a lot of questions, but in one blog I didn’t find answers to all my questions, I had to look through many pages, so, I’ll try to answer all your questions in advance in this post... Look at the photos, videos, read the text and you’ll understand everything ...).Then one fine morning, and as you know, everything always happens “one fine morning” for me = D... I went to buy a tablet. I bought a budget one, I think for a while, the Prestigio wize 3067 3G model. DIMENSIONS 188 × 12.5 × 109 mm (what you need))). Possibility to install a SIM (which is very important for me), Flash card up to 16GB. Cost 2 thousand rubles. I bought it used, but in perfect condition (it was given to the old owner and it was lying around idle). And so the price, if I'm not mistaken, is from 3 thousand rubles. for a new one.
Lada Priora Hatchback SOCHI › Logbook › Screen on the center console
For about a year and a half now, the thought of installing some kind of multimedia installation on the center console has not left me. All this time I was looking for the most suitable option in terms of functionality, price, reliability and ease of installation. In my opinion, a multimedia system in a car must have several properties:
1. Playing music files + radio 2. Availability of navigation 3. Possibility of connecting a rear view camera 4. Bluetooth and with normal Hands Free 5. NOT MANDATORY, BUT... the ability to play video files
From the first five points, it is logical to assume the sixth point - the presence of a screen, optimally 7 inches.
Just as I think, if you have navigation and a rear view camera, the installation height of the monitor relative to the driver’s eyes is important.
The central console of the Priora (pre-restyling) was originally designed for a single-din balalaika, so the height of its location in the console did not matter. During the reystaling, this problem was solved by installing the monitor as high as possible, on the dashboard itself.
Based on all this, I obtained the following configurations throughout operation. The very first option was - Galaxy tab II tablet or my assistant on the road - part 1.
The advantages of this arrangement were ease of viewing, a navigator, a recorder, various multimedia... But the disadvantages of such an installation were more significant for me: firstly, a regular tablet is not intended for installation in a car and sooner or later it will fail due to heat or cold, -secondly, it is a bait for thieves. Thirdly, Android is quite difficult to make friends with a rear view camera ((Yes, yes, I have EasyCAP, and it even somehow worked, but all these delays, crashes and image glitches... Well, the last minus for me is that I didn’t find a way raise hands free on android((
About a year ago I thought about this installation: Remaking the center console for two monitors. Of course, I would like to have two monitors (the main mafon and a tablet) as close and as high as possible, but... This would involve major alterations: either sawing the floor of the dashboard, or removing the central air ducts. But I like universal solutions, so that if you don’t like it, you can return everything as before)))
We also considered solutions such as Parrot Asteroid, everything seems to be great, but the price, 5-inch screen, and generally there is little information on it.
Another option was ali. Where are we without the Chinese)) As it turns out, they have options for Android navigators with an AV IN input, but... Again, there is no hands free, although there is an input for the camera, the image is transmitted jerkily, well, not that...
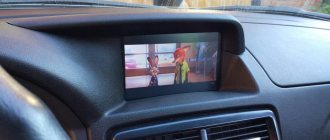
All these considerations led me to the conclusion that the most suitable option for me would be to install a standard MMC Kalina-2/Priora radio.
Exactly hers, with a separate screen. It will all look something like this:
The radio itself has already been ordered, as soon as I install everything, there will be a detailed report. By the way, I have never seen this option anywhere, we will be pioneers. And if someone has already done this and I missed it, please let me know...
I also wanted to write about acoustics, but there’s a lot of text, then in the next post...
I thank everyone who finished reading the multi-book, maybe someone will take note of something from this article.
Tuning
The new generation of Lada Priora cars is equipped with a more modern dashboard, which provides a standard place for placing a multimedia system or on-board computer. This design feature is actively used by some car enthusiasts when making modifications. We are talking about installing a tablet in Priora.
This solution allows you to significantly expand the functionality of the multimedia system, using the device as a navigator, on-board computer, or monitor. Listen to music, watch movies, the possibilities are almost endless. For installation, you can use a device from any manufacturer, but you should remember that products with a screen diagonal of 7 inches are most suitable.
Features of removing a generator on a car with air conditioning
In a Lada Priora car with air conditioning, the air conditioning compressor and generator are driven by one belt. The design feature is such that it is impossible to dismantle the generator without removing the compressor. You must first disconnect the air conditioner pump from the bracket. This is the first difficulty encountered.
Generator Lada Priora from Bosch
A possible second problem awaits at the lower mounting of the generator. If the bolt is installed with its head towards the engine, it will not be possible to completely remove it . It is so long that it rests on the engine mount, and it is impossible to remove the generator. To remove the bolt, you need to jack up the engine and unscrew the mount. We advise you not to use this method. It’s easier to buy a new bolt and cut off the old one with a grinder. When installing the generator, install a new bolt, but with the head facing outward. This way you will save 10-15 minutes of your time in the future.
Options for installing a tablet in Priora
There are several options for installing a tablet in Priora 2:
- an option when the mobile device is installed and powered from its own built-in battery;
- when the built-in battery is removed and power is supplied from the vehicle's on-board network.
In the first situation, installation occurs much faster than in the second case. However, a significant disadvantage is that the tablet battery, when exposed to sub-zero temperatures in winter, will quickly lose its capacity or even fail. In addition, there is a possibility that in the hot season, when the car interior heats up, the battery may ignite (remember the story with tablet computers and spontaneous combustion of Samsung batteries). As a result, the car can burn out completely.
The second option involves independently modifying the tablet and resoldering some contacts. The point is that the tablet is powered directly from the battery in the car, so it can be turned on and off at any time, regardless of whether the radio is active or not. This approach provides a number of advantages, but it is more complex in implementation than the first, above-mentioned approach.
Which option to use - decide for yourself, it all depends on the level of preparation and the desire to delve into the essence of the issue in detail.
Choosing the sound in the car
The device looks impressive
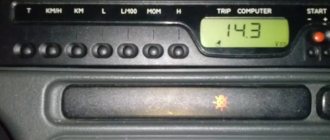
Owners of the Lada Priora can choose one or another sound timbre for their interior by pressing the EQ key and then selecting the style “classic”, “rock”, “pop”, “vocal”, etc. To more accurately adjust the parameters, you need to briefly press “ 8", then select the mode using keys 4-5 and 5-6 - the desired value. Here you can select “Fade” - balancing the front and rear speakers, “Balance” - harmonizing the side speakers, “Bass” - low frequencies, “Treble” - high frequencies. A review of the manual indicates that improved sound quality can be achieved by using the "Loud On" mode. In addition, in the same “section” you can set stereo or mono mode, enter sound signals for pressing keys (Beep On / Of), etc.
What are RDS features? Radio stations sometimes accompany their broadcasts with such options. For example, RDS in text form allows you to broadcast the name of a song, station, etc. on the display. In the “TA” mode, you can receive traffic information from certain radio stations on the display.
The disc playback mode is quite simple. The CD is inserted, started, paused using the "1" key, and after removal the radio automatically turns on. Scanning tracks (Int key) allows each track to be played for 10 seconds; to stop scanning, the key must be pressed again. Music from a disc can be played repeatedly (RPT button) or in random order (RDM). The radio successfully reads music from memory cards or via a USB connector. If the media contains music tracks, playback begins immediately after placing the media in the appropriate slot. Memory cards are ejected by pressing again.
Which tablet to put in Priora 2
As mentioned above, the main and basic requirement for a tablet computer is the size of its screen. In our case, this figure should be 7 inches. If we talk about specific device models, the most popular of them are:
- Samsung Galaxy Tab 3 (with 7.0 screen);
- more budget models from Lenovo (for example, the A3500 product).
The second requirement for the device is the ability to recharge it using a standard USB cord. The third, but important parameter is the quality of the device’s battery. Please note that when installed in a car, the battery of a mobile device will be subject to aggressive external influences in the form of heat or cold, and temperature changes.
Connecting your phone via Bluetooth to the multimedia system
As you know, Russian engineers installed a modern multimedia system with a touch monitor in the new Kalina. It is worth noting that in addition to the functions of displaying video and playing music, it allows you to connect the driver’s cell phone via Bluetooth wireless technology. So, what actions do you need to take to connect your phone to Bluetooth on the new Kalina 2? 1) First, in your mobile phone’s Bluetooth settings, check the box above the “Visibility to everyone” option. After that, turn on wireless technology. Once the connection is activated, you can proceed to the next steps.