Do-it-yourself installation of a radio in a Lada Granta
This article will discuss how to install a radio on a Lada Granta car. I would immediately like to say about the electrical connection of the radio. AvtoVAZ has made a significant step forward.
Now, when installing a radio, there is no need to run wires to power the radio and speakers; all this is included in the standard audio preparation of the car.
This is a big plus if you remember the tenth family, when the owners of tens and twelves had to do everything from A to Z, everything themselves.
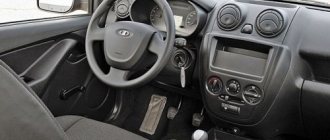
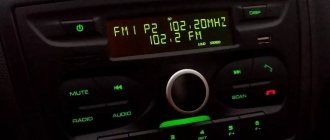
Dimensions of the radio for installation in a regular place in the Lada Granta
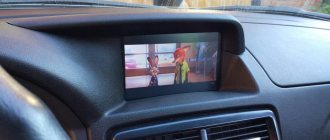
The space for installing a radio in the dashboard console of a Lada Granta car is designed for 1 DIN radio. Here is an example of installing such a radio.
When installing a 2 DIN radio, you will need to cut the partition up and adjust the frame in the console to the size of your audio system, which will make your life somewhat more difficult
Operations for connecting a radio to a Lada Granta
The first thing you need to do is remove the plastic pocket installed in place of the future radio. To do this you will need a flat blade screwdriver. Having taken out the pocket, on the reverse side you will find slots where ISO connectors will be inserted to connect the radio.
You can learn more about them from the article “How to connect a radio with your own hands.” The connectors fit quite securely into pockets, meaning you don’t have to look for them in the wilds of the panel to make connections. Now you need to remove the metal frame from the radio and install it in the place where the plastic pocket was. Unbend the frame's antennae to lock it securely in place.
When installing the radio, you will not need any tool to change the shape of the holes (a file, a file), all dimensions have already been made in accordance with generally accepted standards for 1 DIN radio casings.
Installing speakers in the standard places of the front doors on the Lada Granta
In addition to the radio, for its normal operation, it will also be necessary to install speakers and acoustics in the car door.
To cut holes in the door trim, it is better to remove it from the car.
To do this, you need to dismantle the door handle, the plastic casing in which the door opening lever is installed, and the glass position adjustment handle (if you have a standard package).
See the article “Removing and installing door trim on the Lada Granta.” The door trim and metal frame of the front doors provide a size for 16 cm speakers.
In this case, the hole in the door frame is slightly larger and you will have to increase the plane from the mounting “ears” of the speaker to the mounting holes in the door; - If you decide to install 16 cm speakers, then you may have to modify the door frame here, since the speaker basket can It definitely won’t fit into the standard hole in the door hardware.
You will need a grinder or a jigsaw with metal files. We cut a hole of the required diameter and try on the speaker.
We connect the speaker and install it in place. We install door trim. We mount the frame for the metal grille of the speaker and, accordingly, firmly fasten the speaker to the door with 4 self-tapping screws. We install the speaker grille.
In addition, you may find the material from the article “Wiring diagrams of the Lada Granta” useful, which shows the blocks for connecting the radio power supply and connecting the speaker wires to it, blocks 17 and 18.
The “standard” configuration also includes wires leading to the speakers of the front doors of the car. So, the connection of the radio speakers in the doors is carried out through the rear harness, see the article “Wiring diagram of the rear wiring harness of the Lada Granta”, contacts on the block 16,17,18,19.
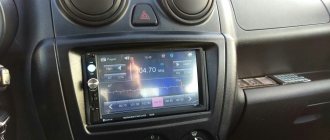
Lada Kalina Station Wagon Cros$ › Logbook › Replacing the standard radio with a 2DIN Pioneer (Part 2)
Greetings! As Ostap Bender said: “The meeting continues!” In general, I cut out the plastic of the back wall inside the panel, all that remains is to cut, grind, break, and bend these “Ears”.
I started a vigorous mental activity - I was looking for options on how to sharpen them, the grinder is the very first thing that comes to mind, but according to my calculations, it wouldn’t fit there (now I think differently - it was worth trying), I twisted a lot of devices in my head (yes, file =D), and chose a small drill and abrasive cutters, they cost about 150 rubles per set, so I took two!
After choosing a tool and accessories for it, I disassembled the center console, took out the standard radio, tried it on with a drill - everything is quite doable, and even convenient.
Further, there is nothing complicated, choose the most convenient shape of the roller cutter, and carefully, so as not to remove excess or damage anything, remove the metal millimeter by millimeter. This is what happened:
Then there is constant fitting of “Peony” until it fits between the sawed-off “ears”. Immediately the understanding comes that the plastic “ear” of the air duct, on which a metal bracket is placed, is preventing the radio from being tilted lower.
I also sharpened it and removed the bracket. What should we do? - The show must go on =D And again, trying on the “peony”. It must be said that only an installation tunnel is included with the radio, there are no mounting “ears”. Having traveled with the tunnel, which was attached to plastic with self-tapping screws on drywall, because I was hanging there like a nail in a glass, I realized: You can’t live like that! - after all, I had no idea how to secure it tightly there. There are no photos of the tunnel (((but I’ll explain in words: The tunnel with the radio tape recorder lay and was screwed to the bottom “shelf”, and between the side and the top there was quite a distance, about 1 -1.5 cm - I don’t remember exactly. Of course, it was possible to put something in and fix it, but easy installation and dismantling was needed in the future, because the acoustics had to be installed. It was decided to look for installation “ears”. And in Smolensk I did not find anything suitable . After searching on Google, I found a site, there were ears from Hyundai, wide, I liked them. There I also saw a frame for a 2DIN radio, Granta/Kalina2 (that's a separate story) and ordered it all. They were coming to me from VLADIVOSTOK (the ears are only there found) = D. When the parcel was received, I first started working on the mounting “ears”, began to modify them, and made 4 out of two ears!
And so, I bought the right size, “thick” car screws, connected and secured my “Pioneer”. This is what happened:
I started to figure out what was what with the frame. And it so happened that an unpleasant surprise awaited me here too: The frame was on a grant, and it fit the viburnum - it didn’t fit in general without the “collective farm”, there are latches on which it should be held in the tunnel for the radio! But "The show must go on." Having thought about it, I broke off the latches and modified the frame within the frame by adjusting, trimming and Super Glue, like this:
Dashboard
The torpedo has a great influence on the interior of the entire cabin. And if we compare the tidy of the Kalina with the classic Zhiguli models, then the Togliatti engineers have stepped far forward, but they are still very far from ideal. To produce torpedoes, the factory uses very low quality plastic. This negatively affected the performance of the instrument panel. The colors fade over time, the plastic itself becomes covered with small cracks, and the entire torpedo begins to make unpleasant sounds when moving. You can improve the appearance of the dashboard and get rid of extraneous sounds yourself, for this you need:
- Disassemble the torpedo and glue all the places where the plastic comes into contact with metal, foam rubber or other insulating material.
- If necessary, secure all electrical wiring harnesses with plastic clamps.
- Secure the air ducts that direct the flow from the heater.
- Replace all plastic fasteners with new ones.
- You can also make changes to the color scheme of the torpedo along the way by covering it with a special film. If the hands grow from the right place, this procedure is not difficult to perform on your own.
- Installing a “Grant” central tunnel with cup holders will significantly improve the appearance and add more practicality. The tunnel has a different color from the original instrument panel, this can be corrected by covering it with vinyl film. There are also no holes for the electronic mirror adjustment unit. They will need to be made separately or find another place for installation.
- By installing an armrest between the front seats, you will significantly reduce fatigue from driving a car over long distances. The armrest is also an additional niche for various small items.
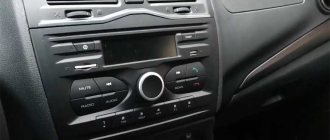
Lada Kalina Hatchback ICYLOW › Logbook › Installing a 2-DIN radio in Lada Kalina 2
Good day everyone, dear friend, subscriber, or just guest!
This topic is the most relevant at the moment, since there are essentially no such rectangular frames for double-din radios. You can see what exactly needs to be improved, and how it all looks in good quality, here, and also read the advice of other LK2 owners. And the story itself begins here
So, as they say, the eyes are afraid, but the hands do! That's exactly how I did it all. At first it was sooooo sad and awkward to cut everything, so I decided to start with the frame. . I did everything by the way with a wood burner, it cuts plastic like butter (the only downside is the smell) In the end, I approached the matter with ingenuity, no matter how I banged out such speakers myself
But that’s not what we’re talking about now) In general, I cut out the frame (which from the factory comes with a 1-DIN radio and a shelf for small items) with a reserve, not that I made larger sizes so that it would fit in there without any problems, no, on the contrary, I I cut it out in a circle three times. First I cut out all the large excess plastic, and then, millimeter by millimeter,
I adjusted the sizes twice, and in the end it turned out perfect! Let me remind you that the radio has its own case, and a frame, which actually performs the functions of a fastener, which is inserted into the front plastic frame, which I just cut out for the fastener, in the end, it fit in there, and it fit tightly, moving only when uniform movement of the right and left sides. In general, even without these bending staples it stayed there tightly!
Let's proceed to the second part of the work - cutting off the back wall, the one against which the radio tape recorder rested, thereby preventing it from completely drowning and taking its correct position. You can also see all this in good quality here. In the end, when I cut out the whole thing, everything fell perfectly into place. There were still a couple, or even more, centimeters left to the pipe and central air ducts of the stove!
So my fears were in vain, but I was prepared in advance for the worst case scenario, and ended up buying insulation and vibration at the car market. The insulation, by its design, simply does not allow heat to pass through, that is, it can be used as a gasket between those that are likely to heat up, but not contacting elements of the radio and stiffening pipes as well as wires, God forbid something overheats and melts all the wiring to hell. But I don’t need such happiness) In general, I glued this wonderful little thing to the pipe, then I glued all the walls except the top with noise, you never know it will rattle, so as not to disassemble it all ten times, I decided to think about this option in advance!
Then, we put everything back together, fasten the frame with four original bolts in its place, and we are glad that everything turned out quite well, I would even say it would have been better not to have done it)) it could have been done better! It’s still damn good when it turns out the first time, it’s not bad at all)) Of course, I ask you to forgive me for the photos of such quality, but what can I do, now I can’t even take pictures of anything on my phone, and these photos were taken by a friend)
All the best and successful installations of the long-awaited goodies :3
source
ELM327 programs for Windows Phone
Below are elm327 programs for smartphones based on Windows Phone.
Car Scanner
An excellent elm327 program for smartphones based on Windows Phone 8, 8.1 or 10. Perhaps this is the best application for this system - very convenient and intuitive. There is a paid and free version. The free version contains small advertisements, and the functionality is also slightly reduced.
Works with adapters: Bluetooth, Wi-Fi
If you find it difficult to make a choice, write to us by email
If you don't find what you're looking for, use the store search
Don't know what to choose? See which adapters are suitable for your car.
Visor for Priora (for installing a tablet)
Information
Description: Hello everyone from the auto city of Togliatti! I would like to bring to public discussion the idea of installing the Visor we made on the panel of Priora 1 for installing a tablet as a multimedia system. Show in full…
After you mount the Visor on the car panel and install our prepared tablet with special software. On board your car you now have:
1. Navigator (you can install two or three different navigation applications). GPS and Glance support. Works without the Internet.
2. Engine diagnostics (using ELM327 adapter). Engine operating parameters are displayed on the tablet monitor.
3. Video and music (playing most formats; a tablet can do this better than car radios).
4. Internet. (4G via 2 Sim cards or via WI-FI)
5. Online TV with many (66) TV channels via 4G.
6. The tablet supports two SIM cards. so you can take calls without being distracted from the road! You can answer by installing a hands-free device on the visor.
7. Install the SD card and download music and videos onto it. We watch and listen to everything we “pump up”.
8. Warning about speed cameras and their location. (the database is updated). A graphic and sound warning of the presence of cameras is displayed on the monitor screen in advance of the camera itself.
Well, if we install an active hub. the one here you can hook everything. What do you have enough imagination for? from external drives to rear camera and perimeter cameras. )))The sound is output to the AUX input of the radio or via Bluetooth (if supported by the radio). I didn't even expect that the sound could be so high quality. it all depends on the quality of the recorded audio and video sound.
How to return to the regular menu
On the “Desktop” display, in addition to the “My Device” icon, there is also one fascinating icon called “Home”. Double clicking on the “ Home” icon constantly returns us to the main menu of the VAZ radio. There is no other way. Before returning to the menu, be sure to close the application. You won’t be able to use Navitel’s voice prompts anyway if you turn on the radio, video, or sound.
Let us note another fascinating feature of the Navitel program. You can turn on the radio or play music in the main menu, then open “Desktop” and launch the application. So, in a similar mode, only music will sound in the speakers, and not voice prompts from the navigator. Perhaps in the firmware modified by AvtoVAZ everything will look different. And we note that another tuning option without reinstalling the firmware is connecting a rear view camera. Here they also install the driver, and that’s it.
Lighting
The Kalina's interior lighting leaves much to be desired. Only the front part of the machine is equipped with a lamp. The back row does not have any lighting devices. An LED strip will help fill the back row with light. It can be powered from the front lamp, and the wiring can be laid under the ceiling card. For convenience, you can install a separate switch in the rear row area so that passengers can turn it on themselves.
Tuning the Lada Kalina with your own hands will take a little time, but by doing so you will reduce the cost of its implementation. By making changes to problematic parts of the car, you thereby improve the impression of the entire car as a whole.
The lineup
To be honest, the second generation Kalina is not a completely new model. This is nothing more than the result of a deep restyling of the first generation car, which debuted in 2004. Many changes were made to the design, which also affected the reliability of Kalina 2. The problem of unpredictable breakdowns, due to which many people ignore AvtoVAZ products, was practically solved.
Lada Kalina 2 station wagon
Lada Kalina 2 hatchback
The “second” Kalina model range consisted of a hatchback and a station wagon. Subsequently, on the basis of the latter, an all-terrain version of Cross was created, differing from the original by increased ground clearance and a modified appearance. Kalina Cross is most popular in the secondary market. Kalina is supported by the fact that this model is assembled using modern equipment, thanks to which the notorious human factor during assembly is practically reduced to zero.
Lada Kalina is painted using an automated complex. So you won’t be able to find fault with the quality of the painting. However, on used copies it is better to monitor the condition of the enamel. It is better to touch up deep scratches and chips. Owners of Kalina will not have any major problems with corrosion, but additional anti-corrosion protection will still not hurt a domestic car.
Lada Kalina Hatchback › Logbook › Tablet in the car or the long way to CarPC
Greetings, friends))) Well, that's all. Finally the radio is installed. A tablet is installed in place of the screen. But first things first.
For a long time I couldn’t figure out how to secure the tablet itself to the center console. The entire structure should be removable if you suddenly need to remove the center console. At first I wanted to secure the tablet using a bracket and a car holder. But then I rejected this idea, and the crossbar above the air ducts was in the way.
Then he decides to make a case for the tablet for standard mounts, according to the dimensions of the standard monitor. Here you need to accurately measure the distance from the mounting location to the hole for the monitor in the center console. As always, textolite comes to the rescue)) I made such a case. The tablet “slides” into it from the side on a slide.
I soldered wires for the power button and from the battery for feedback for the charger. More on this below.
Now we need to think about catering. There are two options for me here: 1. Charging is always plugged in. The tablet is always on charge. It is worth removing the built-in battery so as not to kill it.2. Charging turns on only when the ignition is on. There is a possibility that the battery will not have time to charge during a short period of time behind the wheel. This is relevant for me, I travel quite a bit. Well, constantly turning the tablet on and off is not an option at all)). This is not serious. Both options did not suit me.
Therefore, it was decided to monitor the voltage of the tablet. Arduino nano comes to the rescue))). A program was written. The algorithm is as follows: the tablet is charged to 100% percent, then charging is turned off. Next, the controller waits for the charge to drop to 50% percent and charges the tablet again to 100%. This eliminates the constant consumption from the on-board network and + the health of the tablet battery itself.
Each Arduino nano input has a resolution of 10 bits i.e. we have a value on the port from 0 to 1023. Which corresponds to a voltage from 0 volts to 5 volts. To set it up, you need to make two measurements on the port. At 50% charge and at 100%. And yet, you should focus not on 100%, but, for example, on 95% to ensure that the digital output is triggered.
Such a board was made.
1 USB port for “controlled” charging2 for connecting external drives3 additional. With constant 5 volts.
After setting it up, it’s time to install all this stuff into the car. Under the climate control unit there are two holes with 6mm threads. This is where I will attach the power board.
I made a platform like this. On one side it is attached to the body, and on it is the board itself.
Installing the tablet in the case.
And, in fact, conclusions after all this: 1. Probably you shouldn’t have chosen Arduino for these purposes. She's glitchy. Sometimes it does completely inexplicable things. Currently in test mode. Feedback on the on-board voltage is provided. In the future, I want to turn everything off if the voltage drops below 12 volts. Turn off the cigarette lighter after some time after turning off the ignition.2. I chose the tablet a little wrong - ASUS Fonepad me371mg. As it turned out later, it does not support the OTG ACA detection operating mode. That is, it cannot charge and read USB flash drives at the same time. The problem is that in OTG mode (if you close pin 4 to pin 5 of microUSB), the tablet itself acts as a PC. And it supplies 5 volts via the power buses to power an external device. And since charging is supplied through the same buses, the tablet displayed the error “current protection on the usb port.” In general, it was either a charge or a flash drive. The same Nexus7 from 2012, after updating the kernel, can charge and read flash drives. In principle, this is not critical for me - I won’t listen to music from it anyway. But I would like to have the opportunity to connect something.
source
Posts 1 to 20 of 41
1 Topic by max_fil 2013-05-15 15:12:11
- max_fil
- Participant
- Inactive
- Registration: 2013-04-30
- Messages: 42 Thanks : 12
- Car: VAZ 21103
Topic: Tablet in panel
I thought of this idea. In one number. I found a tablet in the store for 2.5 thousand. 7″ 1000 MHz, 512 MB RAM. usb, etc. Of the minuses: no GPS, 3g, (but you can turn on a 3g modem) I want to push it into the front air ducts. I folded its dimensions from a piece of paper and, in theory, it should stick like a cast one, to the point that the airflow adjustment will remain. There is one BUT. On button tablet and volume control.
The question is: There are those who have done, or are planning to do, such a thing. Or maybe someone did it.
2 Reply from Admin 2013-05-15 15:42:07
- Admin
- Administrator
- Inactive
- Registration: 2012-02-20
- Messages: 3,257 Thanks : 624
Re: Tablet in panel
max_fil , https://xn--2111-43da1a8c.xn--p1ai/tunin... itora.html in the link to additional material, a topic on the forum where the author redid the power supply for the tablet.
3 Reply from max_fil 2013-05-15 21:22:10
- max_fil
- Participant
- Inactive
- Registration: 2013-04-30
- Messages: 42 Thanks : 12
- Car: VAZ 21103
Re: Tablet in panel
Thanks a lot. I've already looked at these topics. I'll think for myself how to adapt it. I'm good with a soldering iron. ))) If possible, I will try to post photos and instructions. )))
4 Reply from Kostya 2013-05-15 22:44:41
- bones
- New member
- Inactive
- Registration: 2013-05-15
- Messages: 5 Thanks : 4
- Auto: 2112
Re: Tablet in panel
I made it recently at my place, if you’re interested I’ll post pictures tomorrow
Automatically turn on the tablet
To automate the processes of turning on and off, I recommend installing the Tasker application for Android. In this case, you won’t have to waste time on unnecessary button presses.
I welcome everyone to my page!
So I came up with this idea, the idea of installing a tablet in Kalina 2. I admit, this idea was born in my head from the moment I found out that this could be done. So I bought everything I needed and off I went. BUT! Many topics have already been created about this, but none of them have highlighted the pitfalls and obstacles that arise when performing this installation. I’ll try to mention them in this post. So, I ordered a console for installing multimedia + 1DIN frame for Lada Priora on the motorring.ru website.
Next, I decided to vibrate the console from the inside, so that Kalina has enough elements that rattle and creak)).
And here is the first stumbling block on our way. I wanted to remove the battery from the tablet and, using a voltage stabilizer, supply power to the battery controller. BUT! I couldn’t start the tablet without a battery, I used a voltmeter to select the voltage on the stub, but it didn’t help. The tablet shows me the logo and goes out. Anyone who knows a good solution, please help! For now, I have lengthened the battery wire so that if a solution is found, I can get rid of it.
Then, I solder a wire to the GPS and WiFi contacts, because... foil vibration will create a screen for the signal. The wire is +-30 cm long. While no power solution has been found, I disassembled the USB 2.1A car charger and connected it to a button that will turn off the 12V power supply from the charger.
To lock and turn on the tablet, I chose a button without locking and also connected it to a wire soldered to the contacts for turning on the tablet.
We fix the tablet in the console. On the sides of the window for the screen, glue two layers of double-sided tape. This is in order to correctly install the tablet screen so that it does not go away when it is fixed. Also, this allows the tablet screen to not touch the frame of the console window.
Obstacle 2. Many who installed the tablet in Kalina 2 did not mention that the screen of the 7-inch tablet is slightly higher in height than the console window. I solved this using software from the Market, which allows you to change the area of the active screen, cutting it to the desired size, turning off the sensor in an unnecessary area.
In the hole for the solar radiation sensor, I cold-welded a plug purchased at the car market.
The tablet must be firmly fixed to the console. To do this, we take a perforated strip from construction rubbish in the basement and attach it to the console ears.
Now we carry everything into the car for final installation in its place. And here is the biggest problem that I solved with paint. Internal air duct. Everyone unanimously repeats how easy it is to remove. NO FUCK! It cannot be removed so easily; those locking washers dug their teeth into the panel stud so strongly that no methods helped me remove the air duct without loss. I had to break it to get it out. The air duct from the deluxe installed without any problems. Everything is installed and looks like this.
The tablet is connected to the GU via bluetooth, which allows you to maintain audio quality and control the tablet from the GU. Well, that's all! All the work was done in one weekend. I'm pleased with the result, but still the issue of nutrition and getting rid of the battery remains an issue. I look forward to your advice and comments
Thank you for your attention
Price tag: 8,000 ₽ Mileage: 50,000 km
Noise insulation
When a car moves along the road, a large number of extraneous noises arise, which strive to get inside the car. Noise comes from the wheels, engine, gearbox and other elements of the car. "Kalina" has standard sound insulation, but it is not enough, or it is of poor quality. To replace it, you need to disassemble almost the entire interior:
- Remove the seats (front and rear).
- Remove the carpet (if done carefully, you can re-cover it).
- Dismantle the old Shumka and factory anticorrosive.
- Apply a new anti-corrosion coating and lay sound insulation, then assemble all dismantled parts into place.
The work to improve sound insulation properties is very long and dirty. But with proper installation of the Shumka, you can make your car as protected as possible from extraneous noise.
Which tablet to put in Priora 2
As mentioned above, the main and basic requirement for a tablet computer is the size of its screen. In our case, this figure should be 7 inches. If we talk about specific device models, the most popular of them are:
- Samsung Galaxy Tab 3 (with 7.0 screen);
- more budget models from Lenovo (for example, the A3500 product).
The second requirement for the device is the ability to recharge it using a standard USB cord. The third, but important parameter is the quality of the device’s battery. Please note that when installed in a car, the battery of a mobile device will be subject to aggressive external influences in the form of heat or cold, and temperature changes.
FakeHeader
Comments 54
I couldn’t stand the battery. I have 3 buttons and a headphone output, there is no bluetooth in the radio, the aux saves me. I brought out the buttons for blocking, sound and for charging the tablet. I assembled the power supply myself, even the case was made of aluminum, it overheated and died. The topic with the tablet is good, all that remains is to make the mount more serious and connect the extension cord for the memory card somewhere. I found the frame for the radio at the car market for 300 rubles. Even in car dealerships they sell the Priorovskaya one with the inscription Kalina, but I found the one I needed. I had a problem when I installed the radio, the wiring harness hit the wall behind the radio.
The new Priora after restyling received a more modern dashboard (panel). A multimedia system (MMS) screen or an on-board computer (depending on the configuration) is installed on top of it from the factory. If these devices seem to have little functionality, install the tablet in the standard place on the panel.
You will need: a tablet (in our case, Samsung Galaxy Tab 3 7.0 Lite SM-T110), universal fastener PP1 (from a hardware store, dimensions 45x30x125 mm), splen, stationery knife.
Remove the panel visor and the MMC or BC screen. We screw the mounting plate to the BC mounting screws, bending it so that it presses the tablet to the panel. To ensure that the device holds tightly and does not rattle on the plate, we glue several layers of splen (we determine its quantity locally), in our case 2 layers of 4 mm each.
Now we cut the plastic to the size of the tablet in the seat on the panel and on top of the visor. We connect the USB charging cable to the tablet, insert its other end into the radio. We also trim the connector a little so that it does not rest against the panel.
We install the visor in place (the iron clips were removed, the visor holds perfectly without them). It turns out that the tablet in the Priora panel is now charged from the radio. To display the tablet's hardware buttons on the screen, you needed to use the Button Savior Professional 2.2.4 program. To turn the device on or off without a button, use the Screen Off program. If necessary, the tablet can be easily removed by pulling the visor towards you.
The tablet has extensive capabilities, for example, it allows you to play music or video, perform diagnostics (read error codes) via a special adapter via Bluetooth, and also be a navigator. Let us remind you that you can make the interior more stylish using vinyl film.
Connecting a tablet through a car amplifier
There are two options here:
- If your car has a standard audio system, then it can be replaced using an external amplifier and a tablet.
- If you have a removable radio, then you can use it as an amplifier and connect it to the tablet.
I used the first option.
Replacing a stock stereo system with a tablet requires connecting an external amplifier. The fact is that the tablet cannot be directly connected to the speakers. The audio output is for headphones only. That's why an amplifier is needed. I chose 4 channel because my car has four speakers. I have the amplifier installed under the front passenger seat, but it can be installed almost anywhere, such as in the trunk of a car, but I think that is too far from the battery. I chose a location under the passenger seat to limit cable length. The seat will have to be removed, but it's really not difficult. Google how this is done in your car.
The amplifier will be powered directly from the battery. To do this, you need to run fairly thick wires from the car battery. Read the amplifier's instruction manual to determine the required cable size. There are amplifiers that come with wires for connection. You can also save money and go buy such a wire yourself.
I chose the cheapest amp I could find. I rarely listen to music, mostly audio books, so the sound quality didn't bother me too much.
Tools and materials
You will need a ferrule crimper on the end of each wire. I have tips that have heat shrink cambric. Not a bad option and looks very professional.
- Wire Stripper/Crimping Tool
- Soldering iron (recommended)
- Screwdrivers
- Drill
- Knife with cutting blades
- Tablet from car dock (I chose Samsung Galaxy Tab 7+)
- 1/4" Lexan sheet (approx. 10"x6")
- Dye
- 1-1/4" circle cutter
- 3/8" drill
- Amplifier
- Car Audio Adapter
- 12 V plug into cigarette lighter
- Wire - thick-walled to the amplifier
- Wire - for speaker signals
- Gaskets
- Insulating tape
- Scotch
Connecting the tablet to the car’s on-board network (important note)
You need to connect two devices to the on-board network - a tablet and an amplifier. Of course, they can also be connected through the cigarette lighter, but this option can only be considered temporary. To avoid short circuits and ensure stable power supply, it must be connected directly to the battery.
If this is your first time on our Forum:
Best wishes, Administration of the Car Audio Forum Radio tape recorder
Always drunk Technical Director
sorry what is the topic about? How to screw a case from a tablet to a car dashboard with self-tapping screws?
sorry what is the topic about?
How to screw a case from a tablet to a car dashboard with self-tapping screws? As for me, this is very uninformative, especially for all those who like to install multimedia 2 din balalaikas from Mystery for 15k. Here you go, it’s cheap and functional, and the main thing is without any damage to the sound path. But if the air duct is closed, it’s bad
Always drunk Technical Director
I apologize, no damage “just” for sound. But that’s not what we’re talking about and you understand perfectly well what we’re talking about
Regarding the air duct, after reading the forums, many people deliberately block them, so that at least some air will start to flow into their feet. This is the simplest idea, tablet, screen or whatever. I was racking my brains about what could be done quickly and accessible to everyone, this is what happened. If there is a better suggestion, please describe it. I'm happy with everything so far. the most important thing is simplicity. You can make it more complicated, remake the entire panel for a 2 din radio, or you can redo everything completely, but I think not everyone can do this with their own hands, even with step-by-step instructions and pictures. but I really want it cheap and cheerful. For me, I’m just used to the fact that I have a tablet attached in the middle of the panel in my car, and everything would be fine, but on the Russian car it turned out to be a problem, I had to change it a little. I thought that someone else would encounter this and it would help someone, and someone else would suggest something more interesting. I don’t really want to throw money into the viburnum, it’s not the right car, but I’m not comfortable in it without a tablet either.
If anyone does the same, post a photo, thanks in advance
PS I saw how they hang a navigation device, a radar detector, a telephone, a video recorder and everything in wires and webs on a lobach. IT’S SO SAFER if the tablet is exactly where it is now
Always drunk Technical Director
This is the simplest idea, tablet, screen or whatever. I was racking my brains about what could be done quickly and accessible to everyone, this is what happened. If there is a better suggestion, please describe it. I'm happy with everything so far. the most important thing is simplicity. You can make it more complicated, remake the entire panel for a 2 din radio, or you can redo everything completely, but I think not everyone can do this with their own hands, even with step-by-step instructions and pictures. but I really want something cheap and cheerful
of course have! there is even an example of our BJ
Excuse me, a case screwed from the tablet to the panel with self-tapping screws is not even zero installation skill - it is at least the absence of an original idea!
It's like seeing phone holders in a taxi cab, attached with self-tapping screws to the dashboard through the original suction cup. Very cool!
An on-board computer in a car from a tablet is a logical choice, given the prevalence of these devices now. It allows the driver to receive many additional functions in addition to the standard car stereo system. Currently, standard vehicle systems have GPS. But owners of budget cars in the basic configuration are deprived of this. Android device offers a more advanced GPS system. An Android tablet can save all your Google contacts, access GPS directly, and have its own calendar of events. Can store music, use Internet radio, or play music using cloud players. These are features that are not available on even the most modern luxury cars.
I recommend choosing a tablet that already has a car dock. It can be installed, for example, instead of a 2-din CD player. Plus, the car dock makes the device easy to remove, so you can prevent theft and use the tablet for other purposes. Unfortunately, the cost of such models with a docking station starts from $300. For example, you can consider models such as ASUS Transformer Book T100TA 64 GB dock and HP SlateBook x2 32 GB. There are no universal docking stations; each tablet model has its own, specially designed.
If your car doesn’t have a standard system or you don’t want to cut anything, there are several ways to install a tablet on the dashboard yourself.