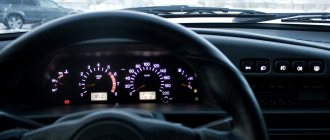
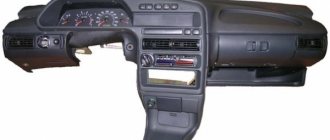
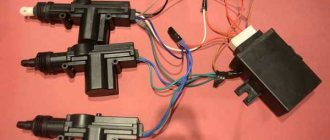
Many owners of Lada 2110, 2111, 2112, 2113, 2114 and Kalina cars have encountered the problem of failure to switch between the readings of the standard on-board computer or jumping arrows on the panel. There are three reasons for this malfunction in the “VDO” instrument panel.
Dashboard arrows stuck on Kalina
- Loss of ground contact on the bolt where the wires from all devices are attached.
- Wires are loose/broken in the steering column switch itself.
- Poor soldering quality of one of the two E6E resistors on the panel board.
If you experience malfunctions of the vdo panel and some indicators do not work, read the article, we will look at how to repair it.
Broken ground contacts
This problem manifests itself on the panel by displaying incorrect information; the tachometer needle may drop below the current level. The needles of other instruments may also freeze , either permanently or for a short period of time. The panel backlight may also disappear, but the arrows will show the correct data.
Bolt for fixing ground wires from all devices
Through trial and error, it was found that these glitches can occur due to the fact that the ground contact is broken . Under the dashboard, near the driver’s right foot (near the gas pedal), there is a special mount to which ground wires from all instruments are fixed.
To solve such a malfunction in the operation of the VDO dashboard, you simply need to improve the contact . Unscrew the bolt at “8”, disconnect and clean all contacts suitable for it. To be safe, it is advisable to treat them with “electronic contact cleaner”. After this, all that remains is to connect the wires and screw the bolt back.
When some of the hands work and some don’t work at all, the reason is most likely in their drive motors. Then the panel can only be repaired by replacing the pointer drive motors.
Bottom line of the route display
If you have stopped switching the parameters that are displayed in the bottom line of the route display (under the total or daily mileage), then the problem lies in the steering column switch.
It is responsible for switching between the following options:
- current time;
- outside air temperature;
The buttons on the switch work every once in a while
- travel time (valid from the last reset);
- average fuel consumption;
- instantaneous fuel consumption (changes as the vehicle moves);
- average speed since reset;
- residual power reserve with the remaining fuel in the tank;
- amount of gasoline consumed since reset.
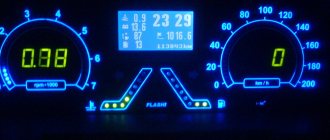
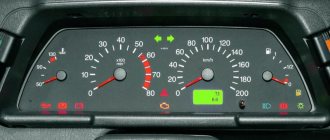
Designation of icons on the dashboard of Lada 2112
For a better understanding of the purpose of the indicators, their interpretation is given.
| Number in photo | Interpretation of lamps and indicators |
| 1 | Coolant temperature indicator; if the light comes on at the top of the scale, the engine has overheated. |
| 3/4 | The turn signal indicators light up simultaneously when the hazard lights are turned on. |
| 7 | Empty tank indicator; if the lamp lights up, stop at a gas station. |
| 8 | External lighting is turned on and operating normally. |
| 9 | The pressure in the brake system has dropped. It is necessary to immediately add fluid to the expansion tank of the system. |
| 10 | The high beam headlights are activated. |
| 12 | The odometer display shows non-resettable mileage. |
| 13 | The hazard warning lights are on. |
| 14 | The engine control system is damaged or not working correctly. |
| 15 | The battery is not receiving a charge. In this case, you should check the battery itself for wear and the generator set. |
| 16 | The handbrake is activated. |
| 17 | The oil pressure in the engine crankcase has dropped below normal. You should add fluid to the specified level and check the operation of the pump. |
| 18 | In a configuration with an airbag, it indicates that the squib drive is turned off. In other versions the light bulb is a backup one. |
Checking the steering column switch
Checking the contacts in the steering column switch housing
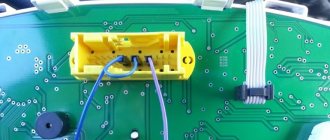
In those cases, switching between the BC readings on the panel should be done with a switch on the steering wheel, but this cannot be done - you should make sure that it is working. This steering column switch is used on the panels: “VDO” 1118-3801010, “Schetmash” 2170-3801010-01 and “Avtopribor” 1118-3801010-02. To check whether the steering column switch is working properly, it must be removed and disassembled.
Disassembling the switch consists only of removing the cover, which is held in place by a small metal latch in the form of a bracket. There are 4 contacts under the cover, which are connected to the Reset button and to the switches. There are yellow and black wires coming from the “Reset” button. There are green and red wires coming from the top switch button. All these contacts must be checked with a multimeter for resistance.
If it is, then everything is fine with the switch and you need to disassemble the dashboard to inspect the contacts and tracks. On VDO panels with one window produced in 2006-2007, there is a factory defect - poor contact of one of the resistors, which, during driving, cracks and interrupts the connection between the steering column switch and the panel board.
What exactly needs to be done
Check the cap on each of the wires: if the copper is burnt, clean it with ASIDOL, ammonia and ordinary chalk. The taps on the module should also be cleaned. For better protection, you can apply lithium grease (Litol-24). Here's what you can't do:
- Check for the presence of a spark by bringing a “grounded conductor” to the tap;
- Connect the “+” terminal removed from the battery to ground with the engine running;
- Apply voltage “+12” to any of the module contacts.
How to perform an express check: the key is at “0”, then we measure the resistance between taps 2-3, 1-4. Both values must match. By the way, the multimeter must be a dial gauge.
Troubleshooting VDO Instrument Panel Resistor
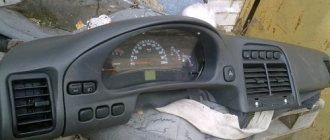
The problem described below appears only on VDO dashboards manufactured in 2006-2007 under article number 1118-3801010. It was installed from 2004 to 2011 on the Kalina, VAZ 2110, 2111, 2112, 2113 and 2114 models. We can recognize the manufacturer by its logo located under the inscription “km/h”:
Removed VDO instrument panel
This is due to a manufacturing error . On the dashboard board there are two resistors labeled “E6E”. One of these resistors was soldered crookedly . As a result of such defects, over time, cracks form in the solder due to which contact is lost and the on-board computer stops responding to the joystick of the steering column switch.
If the steering column switch is working properly, then this is definitely a problem in the “E6E” resistor!
What is needed to eliminate the VDO instrument disease
To complete the work you need:
- Soldering iron with fine tip.
- Solder (tin).
- Tweezers.
- Magnifying glass.
- Table fork.
- Screwdriver with star tip.
To diagnose this problem, you need to disassemble the dashboard. To do this, the dashboard is removed from the car and disassembled. And then the problem area on the board is inspected and soldered.
Disassembling the VDO dashboard
To disassemble the VDO panel, you need to snap off the front transparent plastic part of the panel, which is held on by six clips along the contour. Afterwards, the four star bolts are unscrewed and then the back cover is removed. After this, you need to snap off the black casing that remains on the front of the instrument panel. It is also held in place by plastic clips. This will allow you to remove the top glass and bottom cover from the dashboard.
Instrument panel with glass and bottom cover removed
To disassemble completely, remove the arrows and then unclip the latches from the board.
Removing the hands
You can use a table fork to remove the arrows on the instrument panel from their seats. Before shooting, it is important to remember their location! The fork must be inserted under the arrow and, by gently pressing and rocking, tear it out of its seat.
To avoid scratching the instrument scale, it is advisable to place some soft cloth or a cotton pad under the plug.
The location of metal clamps in the center of the board and plastic ones at the edges
Then we proceed directly to removing the board from the remaining part of the instrument panel. To do this, you need to snap off the four metal clips in the center, as well as the four plastic clips along the contour. In the photo, these fasteners are circled in black.
Why there is no light in the VAZ 2114 interior: the secrets of an electrician
The electrical equipment system of the VAZ 2114 car includes a whole range of different lighting devices.
It's good when it's light in the cabin
Conventionally, they can be divided into the following groups:
- Headlight;
- Tail lights;
- Lighting in the cabin.
To make it easier for the driver to navigate the road at night, halogen low and high beam lamps are installed in front of the car in the headlight unit. Turn signal lamps are also installed in one unit with them, so that when repairing the car the entire unit can be removed. At the rear there is one block on each side, which includes brake lights, turn lamps and reverse lamps.
Alternative solutions
Most car owners of the domestic “ten” are accustomed to replacing worn out and faulty windshield wipers with similar ones.
Often this happens because they do not see alternatives and are not familiar with them.
But this size can be increased to 530 millimeters . It is not recommended to install more, since this way the windshield wiper will not be able to work effectively, and the drive simply will not cope with the load. As a result, too long brushes cause squeaking and jerky work. Plus, don’t count on a long service life of the wiper mechanisms.
The original windshield wipers for the 10 are quite good. But there are more expensive, but also more highly efficient, high-quality devices.
Today it is fashionable to use frameless wipers, especially from Bosch. Their advantages lie in their compactness and a special, reliable leash mechanism.
But as practice shows, on the windshield of the VAZ 2110, as well as other VAZ models, they do not look very nice, because the fasteners on the leash turn out to be massive. Although if you modify them a little, you will get a very good result.
Types and causes of breakdown
These devices have several types:
- low beam headlights. Switched on while the vehicle is running. In Russia it is allowed to use them as a light source for daytime driving;
- high beam headlights. Operate at reduced voltage. This helps to reduce the intensity of light, which in some cases does not increase the visibility of pedestrians and cyclists on the road;
- fog lights. Their use in Russia is permitted (clause 19.4 of the traffic rules);
- front turn signals;
- individual light sources at the front of the vehicle with specific light intensity patterns.
The main manufacturers of high-quality DRLs are such brands as:
These and other models of light sources may differ in shape (rectangular, round, oval), the number of diode bulbs inside, power, and brightness.
Removing the center console trim of the Lada Granta
This video was created using the YouTube video editor (https://www.youtube.com/editor)
Replacing heater backlight lamps for Lada Kalina
Karkam auto electronics store https://goo.gl/sMg1K4 I quickly shot a video on removing the Lada
Today, manufacturers have even begun to produce silicone diode bulbs suitable for the Lada Granta. They can be located on one or several tapes.
Among the main reasons why DRLs do not light up are:
- lack of polarity check before installing light sources;
- The turn signal channel does not light up;
- fuse is blown;
- lack of heating or burnout of the filament.
Read:
To improve daytime running light sources and make them extremely useful and stylish for the car enthusiast, you need to do all stages of the work as efficiently as possible. Instead of standard lamps, which do not burn very brightly, you can install LED lighting without a base assembly. You can buy these components in almost every store that sells car parts. At the same time, when making a choice, you need to focus on models with the highest lighting brightness.
Operation of LED lamps
Features of operation of the VAZ-2110 heater
In order for the heater to serve for a long time and efficiently, it is important to use not only the device itself correctly, but also know some other rules
- If your car has air conditioning, it is best to use it in wet weather.
- There is no need to block the hot air nozzles with carpets. It is better to raise them above the level of the carpets.
- In winter, before using the car, it is imperative to clean the windows from dirt and moisture.
- In winter, it is recommended to use two adjustment positions for the installed heater. If you need to quickly drain the glass, you need to use the “all on the glass” position, and as soon as the car starts moving, you should switch to the “all on your feet” mode.
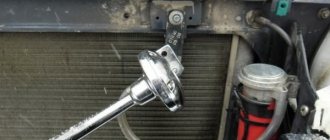
Why the wipers don't work
At some point, the car owner may notice that his wipers are not working. This may manifest itself in their complete stop or creaking operation.
Trapezoid Compatibility
First of all, look for the reason in the electric motor. But remember that mechanical problems also happen.
The most popular mechanical breakdowns of wipers:
- When the cleaners turn on, the sound of the motor is heard, but the brushes do not move or twitch slightly. Most likely, the nut securing the crank to the gearbox axle has lost its grip or has become completely unscrewed.
- Non-synchronous operation of the windshield wipers indicates a problem with the drive. Again, check the locking nut. When tightening the nut, be sure to first place the brushes in the correct position.
Installation, connection and fines for 4 PTF (fog lights)
Penalty for additional PTF (Russia and Ukraine)
3.1. The number, type, color, location and operating mode of external lighting devices do not meet the requirements of the vehicle design.
- Part 1. Driving a vehicle in the presence of malfunctions or conditions under which, in accordance with the Basic Provisions for the admission of vehicles to operation and the duties of officials to ensure road safety, operation of the vehicle is prohibited, with the exception of malfunctions and conditions specified in parts 2 - 6 of this article (No. 120-FZ) - entails a warning or an administrative fine in the amount of 100 rubles.
- Part 3. Driving a vehicle on the front of which there are installed lighting devices with red lights or red reflective devices, as well as lighting devices, the color of the lights and the mode of operation of which do not comply with the requirements of the Basic Provisions for the admission of vehicles to operation and the duties of officials to ensure road safety - entails deprivation of the right to drive a vehicle for a period of 6 months to 1 year with confiscation of the specified devices and accessories.
Driving by the driver a vehicle that has malfunctions in the braking or steering system, towing device, external lighting devices (at night) or other technical malfunctions with which, in accordance with established rules, its operation is prohibited, or converted in violation of the relevant rules, norms and standards - entails a fine of 20 to 25 non-taxable minimum incomes of citizens. (340-425 UAH).
xn--2111-43da1a8c.xn--p1ai
Priora fuse box diagram
| Fuse no. | Current strength, A | "Standard" and "Norm" | “Norma” with air conditioning and “luxury” |
| F1 | 25 | Engine cooling radiator fan | Reserve |
| F2 | 25 | Heated rear window | Mounting block, rear window heating relay (contacts). Electrical package controller, contact “10” of XP2 block. Rear window heating element. |
| F3 | 10 | Right headlight, high beam | Right headlight, high beam lamp. Instrument cluster, headlight high beam indicator. |
| F4 | 10 | Left headlight, high beam | |
| F5 | 10 | Sound signal | Mounting block, horn relay. Sound signal. |
| F6 | 7.5 | Left headlight, low beam | |
| F7 | 7.5 | Right headlight, low beam | |
| F8 | 10 | Alarm signal | Mounting block, alarm relay. Alarm sound. |
| F9 | 25 | Priora heater fuse | Reserve |
| F10 | 7.5/10* | Interior lighting, instrument panels, brake light | Instrument cluster, pin “20”. Brake light switch. Brake light bulbs. Interior lighting unit. Interior lighting. The door sill light on the right front door. Additional brake signal. |
| F11 | 10/20* | Wiper | Mounting block, high speed windshield wiper relay. Switch for cleaners and washers, contact “53a”. Wiper and washer switch, contact “53ah”. Heated rear window switch. Mounting block, rear window heating relay (winding). Windshield wiper motor. Rear window wiper motor (2171,2172). Windshield washer motor. Rear window washer motor (2171,2172). Airbag control unit, pin “25”. |
| F12 | 20/10* | Terminal 15 devices | Instrument cluster, pin “21”. Electrical package controller, contact “9” of block X2. Electromechanical power steering control unit, contact “1” of block X2. Reversing light switch. Reversing lamps. Parking system control unit, contacts “11” and “14”. |
| F13 | 15 | Cigarette lighter fuse Priora | |
| F14 | 5 | Left headlight, parking light, license plate light, trunk light | Side light lamps (left side) Instrument cluster, main light indicator License plate lights Trunk light Electrical package controller, pin “12” of block X2 |
| F15 | 5 | Right headlight, parking light | Side light lamps (right side) Glove compartment lamp |
| F16 | 10 | Terminal 15 ABS | Hydraulic unit, contact "18" |
| F17 | 10 | Left fog lamp | |
| F18 | 10 | Right fog lamp | |
| F19 | 15 | Seat heating | Seat heating switch, contact "1" Front seat heaters |
| F20 | 5/10* | Immobilizer control unit | Recirculation switch (switch on) Mounting block, relay for low beam headlights and parking lights (automatic lighting control system) Heater electric fan relay Automatic lighting control switch Windshield wiper and external lighting control unit, contacts “3”, “11” Automatic climate control system controller installation, pin “1” Automatic window cleaning system sensor (rain sensor), pin “1” |
| F21 | 7.5/5* | Rear fog lights | Light switch, contact "30" Diagnostic block, contact "16" Clock Automatic climate control system controller, contact "14" |
| F22 | -/20* | Reserve | Windshield wiper motor (automatic) Mounting block, windshield wiper relay and windshield wiper high speed relay, (contacts) |
| F23 | -/7.5* | Reserve | Windshield wipers and external lighting control unit, pin “20” |
| F24-F30 | Reserve | ||
| F31 | 30 | Electrical package control unit | Electrical package controller, terminal “2” of block X1 Electrical package controller, terminal “3” of block X1 Driver’s door module, pin “6” Threshold light of the left front door |
| F32 | Reserve |
| Relay | "Norm" | "Norma" with air conditioning | "Lux" |
| K1 | relay for turning on the electric radiator fan of the engine cooling system | Reserve | Relay for turning on the low beam and side lights of the headlights (automatic lighting control system) |
| K2 | rear window heating relay | ||
| K3 | starter activation relay Priora | ||
| K4 | additional relay (ignition relay) | ||
| K5 | space for backup relay | ||
| K6 | windshield washer and wiper relay | ||
| K7 | headlight high beam relay | ||
| K8 | horn relay | ||
| K9 | alarm relay | ||
| K10 | Reserve | Fog light relay | |
| K11 | Reserve | Front seat heating relay | |
| K12 | Reserve |
Mechanical problems
Often the windshield wiper on a VAZ-2110 may not work due to a loose nut pressing the blade holder. This fault can be repaired in a few seconds. It is enough to tighten a poorly tightened nut to restore the functionality of the wipers. Some events may indicate an unscrewed nut:
- When the electric motor is running, the brushes do not move.
- The brushes stop working on their own in an intermediate position.
Also, brush holders may stop due to poor contact pressure in the gearmotor. If the teeth on the gearmotor gear are crumbled, the brushes will also not work.
Mechanical part
It includes:
- The brushes themselves - their working part is made of rubber and is subject to fairly rapid wear;
- A trapezoid is a structure made of metal guides; they ensure the conversion of the rotation of the electric motor into the actual operation of the wipers. The trapezoid is subject to deformation and clogging of the joints.
Accordingly, from the structure of the windshield wiper assembly, it follows that all breakdowns belong to two groups:
- Mechanical;
- Electrical.
Consider mechanical breakdowns
- If, after turning on the wipers, their electric motor is clearly working, but the wipers themselves do not move or twitch convulsively, then the reason for this is the loosening of the nut securing the trapezoid crank of the wipers to the axis of the electric motor gearbox. Sometimes this nut does not just loosen, but is completely twisted.
- The wipers work, but the synchronization and smoothness of their movements are disrupted. In this case, the cause of the breakdown is the so-called “leash”. The nut holding it in place loosens.
Refinement of the backlight of the heater control unit Lada Granta and Kalina
It is no secret that the Lada Kalina heater control unit has migrated to more modern Lada Granta and 2nd generation Lada Kalina cars. Along with it came some shortcomings, for example, dim lighting. There are many ways to improve interior lighting, but we will focus on only one of them, which in our opinion is the best.
The reason for the poor illumination of the stove control unit is the green filter on the sticker. Most often, car enthusiasts simply erase it, thereby making the backlight a little brighter, but this does not solve another problem - uneven glow.
We propose to approach the issue comprehensively, improve the backlight and the scale itself on the heater control unit, and for this you will need:
- Layout of scales in Corel Draw x5 - To download files you need to log in to the site (password: lada.online).
- Matte film with adhesive layer, 0.5 m - 350 rub.
- White translucent film 0.4 m. - 250 rub.
- LED modules for illumination.
- Plotter cutting services - 180 rub.
Device
General structure of the windshield wiper system:
- As everyone knows, the wipers are driven into a state of “swinging” of varying speeds by an electric motor, which has a built-in gearbox, and the motor runs on direct current. Three brushes are “built-in” in the motor armature, with the help of which the VAZ 2110 wipers operate in three modes. There are only two speed frequencies: one for fast movement (for example, during a rainstorm), the second for slow or intermittent movement;
- The electrical component is the switch (under the steering wheel); relay switching on intermittent mode; additional relay; switch. The entire electrical system is connected by wires (in blocks) through a thermal bimetallic fuse. Moreover, both one and the other relay, as well as fuse F5, are located in the mounting part, and a bimetallic fuse with a limit switch is located in the electric motor gearbox;
- Directly windshield wipers. Their size is important, as well as the material, shape, and device. Check whether the already installed ones squeak, whether the mechanism and the leash are working, perhaps they need improvement;
- Mechanics. First of all, this is a drive that can break.
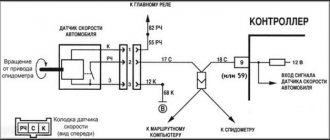
Wiper diagram for VAZ 2110
Replacing Heater Backlight Lamps Lada Granta
How to replace running lights on a Lada Grant On a Lada Grant car The dimensions are combined with daytime lights in one lamp. The ignition also turns on the DRLs, and when the headlight turns on, it turns off and the side lights turn on. The main advantage of light sources is efficiency compared to low beam headlights, as well as lower fuel consumption.
Don't confuse DRLs with side lights. This is much less bright and indicates the size of the car when parked at night. If you compare this light with other methods of car lighting, it is the safest (no glare, equipped with sufficient brightness) and consumes the minimum amount of fuel.
Refinement stages
Wiring
It is easy to modify or replace wipers. To do this you need to take several sequential steps:
- Disconnect the negative cable from the battery;
- Pull the wiper towards you;
- Remove the existing brushes;
- If there is a decorative trim, remove it;
- Unscrew the mounting bolt, thereby removing the old wiper;
- Compare the dimensions of the old and new cleaner;
- Ideally, the new device should not exceed the old one by more than 20 millimeters;
- Reverse the assembly procedure.
As you can see, changing windshield wipers is not difficult. But with the repair procedure, everything is somewhat different. But following the instructions, even an inexperienced VAZ 2110 owner will be able to do everything with his own hands.