An electrical problem after disassembling and reassembling the dashboard, that is, I installed the dashboard and the jokes began. In general I describe the situation. I turn on the ignition and the fuel pump fires, but the instrument panel does not work and does not light up (nothing on the instrument panel lights up at all and the arrows are all dead).
And then it gets even more interesting. I turn off the ignition. And if you turn on the wipers, the starter starts to turn when the wipers are turned on, and if you blink the high beams, you hear the crackling sound of some relay and the instrument lights up (oil pressure, check, etc.). The tachometer needle starts jumping, and the fuel pump also works, VAZ 21099 injector
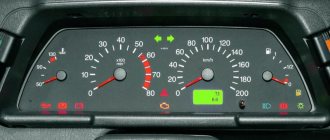
Types of panels
Instrument panels on the VAZ 2109 are of at least three types:
- Low panel;
- High panel;
- Electronic panel on nines with Europanel.
Europanel
Dashboards with a high panel do not have an econometer, but the speedometer is also based on a mechanical cable drive.
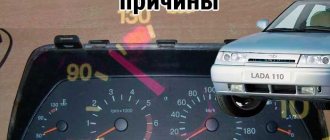
Why doesn't it light up?
If suddenly electrical appliances and indicator lamps on the dashboard stop working, certain actions must be taken.
- First, remove the cover of the mounting block and make sure that the fuse is intact. The fuse markings are located on the inner surface of the cover. You should look for fuse F16 or F5, depending on the year of manufacture of your VAZ 2109.
- If the fuse is intact, be sure to check whether the contacts of the fuse you are looking for have not oxidized. It is not uncommon for shields to fail due to broken contact.
- Check if there is power to the dashboard. To do this, you will need a warning light and the ignition on. Disconnect connector X4 in the mounting block and check for voltage at pin 3. The disadvantage of the VAZ 2109 design is that when it rains, the mounting block immediately becomes wet. This causes oxidation of the contacts in the pads, which causes the electrics to stop working. Sometimes not only the contact is oxidized, but also the board of the Nine mounting block.
If none of the above actions yielded results, you will have to be disappointed. After all, now you need to remove the dashboard and check the condition of the wiring, contacts, and negative connections. Here it is better to trust a professional electrician or set aside a whole day to troubleshoot problems yourself. There is no need to rush here.
Where did the backlight go?
Position of the ignition key in the lock
In the ignition switch, the key can occupy the following positions:
- 0 — all consumers are turned off. The key does not come out. Steering is not locked;
- I — ignition is on. The key does not come out. Steering is not locked;
- II - ignition and starter are on. The key turns fully clockwise, overcoming the force of the spring. The steering is not locked. In this position, the key is not fixed; for the starter to operate, it must be held by hand. Immediately after starting the engine, the key should be released, and it will return to position I under the action of the return spring. The ignition switch has a built-in locking device that will prevent the starter from being turned on while the engine is running. You can only turn the key to position II again after you have returned the key to position 0;
- III - ignition is turned off. The key is removed. When the key is removed, the steering is locked. To turn off the anti-theft device, insert the key into the ignition switch and, turning the steering wheel slightly left and right, turn the key to position 0.
Currently commenting:
Let's go shopping, I'm already. ))) I read the news and in Akue, the price of oil, the price of zabucks
I hope it doesn't happen. Otherwise I can’t survive on salt alone :smile-1:
With our quality of TV program content, a TV is no longer really needed. Slowly answer
Yes, the point is different. Just imagine, they will introduce a quarantine with a ban on leaving the house,
how much should you invest in food and TB so as not to lose or even earn??20t.r.? 50
Why invest? The ruble is getting cheaper? So what, everything has been stable for twenty years and with
Don’t you consider this situation as an investment of the population’s money in products? Doll
Certificate of registration of mass media No. FS 77-76203 16
Sources:
https://kalina-2.ru/remont-vaz/vaz-21099-ne-rabotaet-panel-priborov-prichina https://adaptsport.ru/remont/vaz-2109-ne-rabotaet-panel-priborov.html https://avto-mpad.ru/drugoe/ne-rabotaet-panel-priborov-vaz-2109-karbyurator.html
Popular faults
If we talk about the dashboard of VAZ 2109 cars, then they are characterized by certain problems. We will tell you about them, and also tell you how to act correctly in a given situation.
Fault type
Your actions
Gasoline level and temperature indicator does not work
In most percent of cases, this situation occurs due to breakdown of devices, sensors of these devices, or an open circuit of the power supply. Therefore, first check the circuit for continuity, make sure that the fuses have not blown. If this is not the case, check whether the gas level and temperature sensors are working. Only if none of the actions allowed you to get rid of the breakdown, you can begin to replace the devices themselves. No options, the problem lies in them
How is the instrument backlight brightness control connected?
On a VAZ 2109 (2108, 21099) car, the brightness of the instrument lighting can be adjusted by rotating the control knob.
If there is a malfunction in the instrument lighting (does not light up, cannot be adjusted), the easiest way to find the cause of the problem is to use the connection diagram.
Connection diagram for the instrument backlight brightness control on a VAZ 2109 (2108, 21099) car
Description of the connection diagram for the instrument backlight brightness control
— The voltage in the electrical circuit connecting the backlight lamps of the instrument cluster of VAZ 2108, 2109, 21099 cars is supplied from terminal “30” of the generator.
VAZ 2109 electrical faults and their elimination
Electrical problems
On the VAZ 2109, electrical problems arise over time. An experienced motorist should be able to cope with these problems. It is advisable that he independently eliminate faults on the VAZ 21093i, check the electrical equipment and draw the appropriate conclusions. In this article we will try to help the novice driver and familiarize him with all the basic electrical elements and their malfunctions.
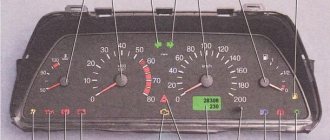
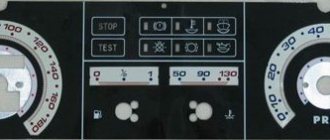
Tidy 21099 injector: icon designations
There are more lights and indicators here than on the carburetor. Additional light bulbs available:
- requirement to check the engine;
- STOP light.
Tidy 21099 carburetor: designations
The decoding described at the beginning of the article can be fully used as an example for this point.
Stop light on the dash 2109
The lamp signals the driver about the presence of unexpected problems in the on-board circuits. When such an inscription is activated on the device, it is recommended to immediately go to a service station and look for the cause.
general information
VAZ 2109 electrical faults
Let's start with general information. You should know that the VAZ 2109 has two power sources - the battery and the generator. The battery is designed to supply current when starting the power unit of a car, as well as to power the starter and other 12 V consumers when the engine is not running. When the engine starts, all the “initiative” goes to the generator. Now this element provides current to all consumers, even the ignition system and battery.
When the generator does not provide current
Note. Every driver must know that if the red charging lamp is on on the instrument panel, then no charge is supplied from the generator to the on-board network, that is, the stored battery energy is consumed. It is clear that the supply is limited and depends on the size of the battery and its capacity. Of course, in this case you can drive home without a generator, but you can no longer turn off the car and you will have to drive non-stop.
Work order
- First of all, you need to check whether the alternator belt is in place. It happens that it breaks off.
- If the belt is in place, intact and undamaged, then it is recommended to check its tension. To do this, press with your thumb from above and notice how much the belt is bent. 10-15 mm is the norm.
- We arm ourselves with the appropriate wrench and unscrew the nut securing the generator to the body. Then we insert the pry bar between the generator and the engine cylinder block. Using the lever method, we move the generator and tighten the fastening nut.
Working with a generator
- You need to check whether the corresponding fuse has blown. If yes, then replace it with a new one (more about fuses below).
- We start the power unit and check whether the battery charging lamp goes out. If it goes out, it means everything was done correctly.
- If it does not go out, then you need to check the cable that runs from the generator to the battery (positive). This could be where the problems lie.
Note. There are two wires coming from the battery: the thick one connects the battery to the starter, and the thin one is the one we need.
- We check the integrity of this wire. Maybe it's broken or something.
- You also need to carefully check contacts that may have become oxidized over time.
- All these faults, if found, are corrected. We start the engine and see if charging appears.
- If yes, then have a nice trip!
If there is no charging again, then you need to check the generator itself (see VAZ 2109: malfunctions on the generator and how to eliminate them). To do this, it is better to contact specialists or follow the advice that can be found on our portal.
Advice. As mentioned, you can drive with a damaged generator to a service center or your own garage. In order to minimize the battery current consumption, it is necessary to turn off all devices at this moment, such as the car radio, unnecessary lighting fixtures, fan, air conditioner, heater, etc.
Regulator check
If the motorist is experienced, then he can be advised to check the generator voltage regulator. This component is required to maintain the generator voltage within specified limits, even if the speed and load changes. It is possible that it has “worked out” and the generator is not functioning correctly. By car:
- We arm ourselves with a voltmeter equipped with a scale of up to 15-30 V.
- We always measure the voltage after some operation of the engine at medium speed.
- We measure the voltage with the headlights on, in the place between the corresponding terminal and the generator ground. The norm is thirteen/fourteen V.
- Otherwise, if the value is lower or higher, the regulator will need to be replaced.
Checking the removed regulator:
- We dismantle the regulator.
- Let's check it according to the diagram.
Voltage regulator test circuit
Note. If the regulator on a VAZ 2109 was produced before 1996, then it is better to check it together with the brush holder. This will make it possible to immediately detect broken brush leads and poor contact between the ends of the regulator.
- Turn on the test lamp between the brushes.
- We supply a current of 12 V to terminals B and B and the regulator body.
- Then we will double the current, the voltage is already 15 V.
- If the regulator is faulty, the lamp should not light up at a voltage of 15 V and light up at a voltage of 12 V.
- If it lights up in both cases, then the regulator is faulty and you can even accurately determine that there is a breakdown in it.
- If the lamp does not light in both cases, there is a break in the regulator.
Circuit breakers
VAZ 2109 electrical faults
Fuses are a kind of both defenders and scouts. They are the ones who signal the danger of a short circuit or other electrical problems if they burn out a second time. But electrical problems cannot be put on the back burner, because this threatens to ignite all the electrical wiring and cause a fire.
Note. Remember that it is strictly forbidden to replace a damaged fuse with a new one with a higher rating. Advice. To make troubleshooting easier, it is recommended to use the diagram below.
It is worth noting that different units can be installed on the VAZ 2109: old and new. A distinctive feature of the new fuse box is that it uses new fuses. Instead of cylindrical fuses (as on the old block), blade fuses are used here. In addition, new compact relays are also used in such a unit.
VAZ 2109 electrical wiring faults
Let us now analyze the fuse diagram for the VAZ 2109, since this is very important for working with the car’s electrical system. We will abbreviate the fuses by the letter P if the mounting block is of an old type and by the letter P if it is new. So:
- 1 and 2 P with 8 A (in the old block) and 8/9 P with 7.5 A (in the new block) are responsible for the fog lights.
- P number 3 with 8A and P1 with 10A - are responsible for the wipers, relays and headlight switch valve.
- P4 with 16A and P7 with 30A - are responsible for headlight cleaners, the electric motor of the heater motor, the rear window wiper gear motor, glove compartment lights, heated glass, etc.
- P5 with 8A and P16 with 15A - are responsible for turn signals, hazard warning relays, taillights, coolant temperature and fuel level indicators, etc.
- P6 with 8A and P3 with 10A - taillights, brake lights and interior lighting.
- P6 and P6 s 30A – are responsible for the front electric windows.
- P7 and P10 with 7.5A - are responsible for the license plate light.
- P8 with 16A and P5 with 20A - are responsible for the sound signal and various relays.
- P9 at 8A and P10 at 7.5A - responsible for the left marker and rear left headlight.
Messages 11
1 Topic by Andrey08 2009-12-16 13:01:12
- Registered: 2010-08-11
- Posts: 91
- Reputation:
Topic: Not Working: All Tidy, Wipers, Fern Guard on VAZ 21099
My friend has a VAZ 21099 injector.
And recently the following happened: all the instrumentation stopped working (speedometer, tachometer, etc.), the wipers and ferns do not work. the headlights seem to come on
Today I talked to him, they say in the morning everything worked fine, but in the afternoon it immediately turned off right on the go.
I advised him to pay attention to the fuse box (they say the frost has hit, condensation is forming or it’s just wet). I would like to hear your opinion, what do you think about this? mb has this happened to anyone?
I would like to hear your opinion, what do you think about this? mb has this happened to anyone?
2 Reply from maik 2009-12-16 19:38:20
- maik
- User
- Offline
- Registered: 2008-11-25
- Posts: 187
- Reputation:
Re: Not working: All tidy, wipers, fern on VAZ 21099
My friend has a VAZ 21099 injector.
And recently the following happened: all the instrumentation stopped working (speedometer, tachometer, etc.), the wipers and ferns do not work. the headlights seem to come on
Today I talked to him, they say in the morning everything worked fine, but in the afternoon it immediately turned off right on the go.
I advised him to pay attention to the fuse box (they say the frost has hit, condensation is forming or it’s just wet). I would like to hear your opinion, what do you think about this? mb has this happened to anyone?
I would like to hear your opinion, what do you think about this? mb has this happened to anyone?
You can also check the ground on the tidy. (mass is strength))) all troubles come from it.
3 Reply from ils 2009-12-17 06:58:25
- ils
- User
- Offline
- Registered: 2009-06-16
- Posts: 540
- Reputation:
Re: Not working: All tidy, wipers, fern on VAZ 21099
I agree with maik - most likely the mass has moved away. It is attached under the dashboard above the place where the steering shaft is screwed to the body. The second place is the ignition switch relay. I’ve seen two types of such relays - some have a tongue that needs to be screwed to the body (there is one in the engine compartment - it looks like a starter relay), the second has a black wire - it should go somewhere to the body. I checked it on the pile - as soon as the mass disappeared from this relay, the entire tidy died, the wipers also did not work.
4 Reply from SokolOFF 2009-12-17 08:38:33 (2009-12-17 08:42:23 edited by SokolOFF)
- SokolOFF
- User
- Offline
- Registered: 2008-12-25
- Posts: 624
- Reputation:
Re: Not working: All tidy, wipers, fern on VAZ 21099
Judging by the quantity of everything at once, I dare to guess:
- ignition switch contact group
- one of the pads (it seems red) flew out of the block on the passenger compartment side
-a flooded block is also an option
PS I would check in just this order)) Well, first, of course, a visual inspection of the block. As for the mass, IMHO, it’s unlikely. After all, the headlight switch in the same place takes a lot of weight.
By the way, I just remembered another question: are “headlights” HEADLIGHTS (low beam, high beam) or dimensions? And does the car even start? Simply, if the lights are on, but the car does not start, then 90% of the ignition relay is either a contact group (or their wiring). I had such a case.
- Registered: 2010-08-11
- Posts: 91
- Reputation:
Electrical faults of the VAZ 2109 and their elimination
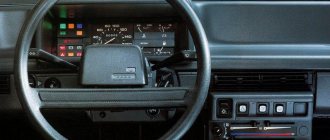
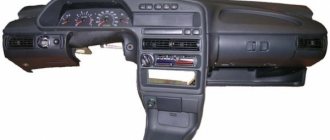
Instrument panel and its diagram
A common electrical problem on the VAZ 2109 is the instrument cluster. It is built into the dashboard on the driver's side and includes a system of instruments that monitor the current condition of the car. These could be devices such as an oil pressure sensor, an engine speed sensor, or simply a series of warning lights.
VAZ 21093 electrical faults
Signposts
- If the temperature and fuel level gauge does not work, the cause may be a malfunction of the light bulbs or sensors themselves, or an open circuit in the power supply.
- Treatment: test the entire circuit and check the fuses. If it doesn’t help, then check the functionality of devices and sensors, and then replace them.
Fuel tank arrow
- It also happens that you have just filled up at a gas station, but the indicator arrow returns to the beginning of the scale.
- We check whether the float limiter has been knocked down. It also happens that it is incorrectly installed or adjusted (limiter).
- We remove the sensor and re-adjust.
- If this same arrow constantly jumps and finally drops to the zero mark, the problem is a weak contact of the resistor. There may be another reason: a break in the resistor.
- Treatment: replace the fuel level regulator with a new one.
Light bulbs
- Another popular malfunction associated with the constant burning of this light bulb. The reason may be a short circuit in the sensor itself or its flexible bus.
- Treatment: disassemble the regulator, straighten the busbar and eliminate the short circuit.
Warning lamps
- If the indicator lamps on the instrument panel do not work, then they may have burned out or are loose in their sockets.
- Treatment: lamps are replaced or their contacts are tightened.
- It is possible that the contacts have oxidized. In this case, it is necessary to clean them thoroughly.
Note. In general, in this case it is recommended to test all wiring with a tester.
Problems with the speedometer
- An equally common malfunction that requires the following operation: replacing the cable.
- Before replacing, it is recommended to check the tightness of the tip nuts.
- It also happens that noise is heard when the speedometer operates. In this case, most likely, the flexible shaft was deformed.
VAZ 21093 electrical equipment malfunction
At this point, checking and troubleshooting the VAZ 2109 electrical faults can be considered a completed task. It is extremely important when working with your own hands that you do not ignore the instructions for the car. In addition, it will be useful to study various photo and video materials. If you learn how to fix such problems yourself, you can save a lot of money on your family budget, because the price for services of this kind from auto electricians is excessively high these days.
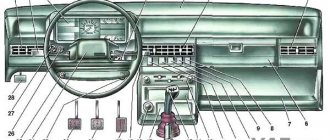
Dismantling
There may be several reasons for dismantling the low panel of the VAZ 2109:
- Body repair;
- Repair of panel components;
- Car noise insulation;
- The desire to replace the old torpedo with a new one, etc.
Regardless of the reasons that forced you to remove the panel yourself, the work should be carried out strictly according to the instructions.
We offer you a step-by-step guide that will allow you to remove the low type of panel installed on the VAZ 2109 without outside help.
Dismantling process
- Remove the stove control knobs. A total of three.
- Remove the heater fan switch knob. To do this you need to pull it towards you.
- Unscrew the 2 fasteners of the dashboard trims on both sides of the console. The cover needs to be pulled towards you.
- Disconnect the wiring block from the rear fog light switch.
- Disconnect a couple of power connectors and one power wire from the rear window defroster switch.
- Disconnect the wiring block from the hazard warning light switch.
- Remove the wiring harness from the exterior light switch.
- Disconnect the power supply for the cigarette lighter illumination.
- Disconnect the cigarette lighter wiring harness and remove the panel trim.
- Remove the 4 heater control panel fasteners.
- Unscrew the 2 fasteners of the instrument panel visor.
- Remove the instrument cluster visor itself.
- The spring clamps must be compressed.
- Remove the instrument cluster housing from the panel.
- Unscrew the speedometer mounting nut, and then disconnect the speedometer cable.
- Disconnect the block with wires (it is white) from the instrument panel.
- Remove the hose from the econometer fitting, and then remove the cotter pin.
- Disconnect the cable from the speedometer that resets the odometer for the day.
- You now need to disconnect the red block from the instrument cluster.
- Remove the instrument panel light switch handle and the headlight hydraulic adjustment handle. They need to be pulled towards you.
- Unscrew the mounting nut of the instrument backlight switch.
- Unscrew the fastening nut of the headlight hydraulic corrector socket.
- Remove the steering wheel and its paddle shifters.
- Insert the key into the ignition and turn it to position 1. This will disable the anti-theft device. Only after this can you turn off the power supply to the ignition switch.
- Unscrew the 2 mounting bolts and 2 nuts of the steering column tube.
- Remove this pipe, taking the ignition switch along with it.
- Pull the choke handle towards you (we are talking about carburetor suction). There should be a craving. After this, the handle is removed from the rod.
- Unscrew the 2 choke guide rod fasteners holding it to the instrument panel.
- Remove the mounting screw on the left side of the dashboard.
- Unscrew the fasteners for the lower panel fixation on the left.
- Similarly, remove the fasteners from the side and bottom on the right side of the dashboard.
- Unscrew the panel fastening screw, which is located inside the glove compartment.
- There remains one fastener on both sides of the panel, which must be unscrewed in order to eventually remove the tidy.
Numerous fasteners
The low panel is assembled in the reverse order unless it is planned to replace it with a more modern one or with a modified design. Then the assembly depends specifically on the panel that you have chosen for your VAZ 2109.
Do not forget that assembly is no more difficult or easier than dismantling. Therefore, you should not relax after completing only half the task.
Types of panels
Instrument panels on the VAZ 2109 are of at least three types:
- Low panel;
- High panel;
- Electronic panel on nines with Europanel.
On versions with a low panel, failure of the entire panel is extremely rare. This is due to the fact that here the speedometer and econometer are equipped with mechanical drives. Therefore, it is unlikely that they will fail along with the electrical component.
Causes of errors
The main reason why the fuel level may be displayed incorrectly on the instrument panel is long-term operation of the sensor.
Most often, the device is replaced with a similar one from another car model, for example, VAZ 21099, 2110. After the replacement, some drivers notice that the data is displayed incorrectly. Most often this happens if the sensor is removed from an earlier version of the car and installed on a later one, for example 2109
for 2110 model. In addition, incorrect data may also appear after installing the Europanel.
The reason may be in the contacts, but there is no exact solution, so if you want to change the sensor, then look for a similar model.
Another reason is a littered float. When this part of the device is left in gasoline for a long time without cleaning, it can become covered with a rather unpleasant coating. As a result, the structure becomes heavier, which leads to constantly overestimated performance, as well as to rapid breakdown of the lever and float. The float can be replaced, but only with exactly the same one, not a similar one.
Why doesn't it light up?
- First, remove the cover of the mounting block and make sure that the fuse is intact. The fuse markings are located on the inner surface of the cover. You should look for fuse F16 or F5, depending on the year of manufacture of your VAZ 2109.
- If the fuse is intact, be sure to check whether the contacts of the fuse you are looking for have not oxidized. It is not uncommon for shields to fail due to broken contact.
- Check if there is power to the dashboard. To do this, you will need a warning light and the ignition on. Disconnect connector X4 in the mounting block and check for voltage at pin 3. The disadvantage of the VAZ 2109 design is that when it rains, the mounting block immediately becomes wet. This causes oxidation of the contacts in the pads, which causes the electrics to stop working. Sometimes not only the contact is oxidized, but also the board of the Nine mounting block.
If none of the above actions yielded results, you will have to be disappointed. After all, now you need to remove the dashboard and check the condition of the wiring, contacts, and negative connections. Here it is better to trust a professional electrician or set aside a whole day to troubleshoot problems yourself. There is no need to rush here.
Disassembly of the unit, its reassembly
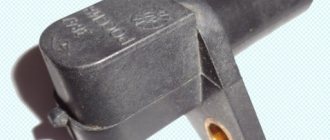
To check the functionality of the VAZ 2108, VAZ sensor 2109
it is necessary to disassemble the unit. You will need the following set of tools:
- screwdriver;
- key to 7;
- replaceable head for 10.
The following actions are performed sequentially:
- We recline the back seat and see the lid. Use a Phillips screwdriver to unscrew the fasteners and remove the compartment cover.
- There are a bunch of wires in the compartment, all of them must be carefully disconnected one by one so as not to damage them. This is where the 7 head comes in handy.
- Next, use a 10mm head to unscrew the fuel sensor itself, and then remove it from the gas tank. This should be done carefully, without jerking.
This completes all manipulations to disassemble the sensor assembly. Now the device can be cleaned, resistance checked or replaced. If there is external mechanical damage on the device body, you don’t even have to check it, but it is better to immediately replace it with a new one. The sensor cannot be repaired, just like its spare parts. Assembly is carried out in the reverse order, without any changes. Before connecting the wires, it is advisable to check their integrity. This is all that may be needed when dismantling the unit.
Popular faults
If we talk about the dashboard of VAZ 2109 cars, then they are characterized by certain problems. We will tell you about them, and also tell you how to act correctly in a given situation.
| Fault type | Your actions |
| Gasoline level and temperature indicator does not work | In most percent of cases, this situation occurs due to breakdown of devices, sensors of these devices, or an open circuit of the power supply. Therefore, first check the circuit for continuity, make sure that the fuses have not blown. If this is not the case, check whether the gas level and temperature sensors are working. Only if none of the actions allowed you to get rid of the breakdown, you can begin to replace the devices themselves. No options, the problem lies in them |
| When the fuel tank is full, the arrow points to zero | If you have worked on the fuel level sensor, the fault most likely lies with you. When manipulating this device, the float limiter is often knocked down. Either the limiter is installed incorrectly or adjusted, causing the resistor winding to end. To resolve the problem, remove the sensor and then adjust the limiter again |
| The fuel gauge needle regularly jumps and ends up at zero | Here, most likely, the resistor has weak contact with the current collector. Another possible option is that there is a break in the resistor. To resolve this situation, we recommend replacing the hot level sensor with a new measuring device |
| The fuel level lamp is constantly on | If this lamp is constantly on, there is probably a short circuit in the fuel level sensor supply wiring to ground. Another option is that the sensor’s flexible bus is shorted to the fuel intake pipe. You will have to disassemble the device to align the bus and get rid of the resulting short circuit |
| Indicator lamps do not work on the dashboard | There is a high probability that the light bulbs have simply burned out, or they are poorly held in their seats due to loose contact. Replace the bulbs, but first try tightening the contacts. Traces of oxidation may be detected. When cleaned, the light bulbs can work normally again. Also, do not exclude the possibility of wiring breakage or oxidation of the tips of the supply wiring. Try going over the wires with a tester, cleaning the contacts if necessary. |
| The speedometer does not work, the flexible shaft is noisy | In such a situation, you will have to change the speedometer drive cable or replace the entire speedometer assembly. But before you bother so much, check that the fastening nuts of the tips are tightened correctly and properly. The flexible shaft may make noise during operation due to deformation or violation of the permissible bending of the shell of less than 10 centimeters during installation |
How to change the mileage on a VAZ 21099
What prompted us to write this note was the question of how the mileage that cars travel on Russian “motorways” is actually displayed on the odometer. Agree, believing what the speedometer indicates, taking into account how widespread it is, when buying a car, will only occur to a completely gullible person.
Why is it necessary to wind the speedometer (mileage)? How to wind up a speedometer?
, like in no other country in the world, checking mileage is a more widespread procedure. Well, it’s not customary for us to demonstrate the actual mileage that a car has covered. The most fascinating thing is that winding up the speedometer, by hook or by crook, has a real reason. Practically, impartial reality forced us to the widespread dissemination of the “rewind the speedometer” procedure.
In the ancient times of the existence of such a country as the Russian Alliance, and even more so - the times of perestroika and post-perestroika collapse, Russian monsters of the automobile industry produced the “most modern”, “ultra-reliable” cars “Volga” and “Zhiguli”, assembled with the latest technology. Oh, yes - and also Moskvich.
Naturally, there were also “Cossacks,” but this magic of technology deserves another review: for example, “how to hand over scrap metal.” The quality of the products left us wanting not just the best, but a lot of the best. There was virtually no talk about a sufficient supply of spare parts.
We had to travel around towns and villages in search of the necessary parts.
It’s worth remembering, but for those who can’t, just take into account that these iron monsters have already achieved almost half a year of repairs after 120 thousand km. Standard problems that arise after such a run: a clutch that requires replacement, problems with the chassis, lost compression, an engine whose properties beg for a complete overhaul, etc.
So, if you don’t improve the mileage on a VAZ, it will be very difficult to sell such a car. Or for means that didn’t make much sense. But you still need to sell. Naturally, this bright idea first came to the owner of the car: HOW to twist the VAZ speedometer? An easy procedure - and the trusting client is sure that he will still travel a couple of 10 thousand km. This, in fact, is where the legs of the uncontrollable passion of our car enthusiasts grow from to wind up the speedometer at any cost.
How to change the mileage on a VAZ 21099
If checking the mileage on a VAZ is quite simple even for an inexperienced mechanic, then on modern cars ordinary mechanical odometers have begun to be replaced with increasingly complex devices. But it is unrealistic to suspend our person if he really needs to rewind his mileage. Now you can check the mileage on any car.
Yes, every day, with the development of technical thought, the procedure for winding the speedometer becomes more and more difficult.
The kilometers traveled by the car are now stored not only in the chip of the speedometer itself, but are also duplicated in completely different modules. Data can also be stored in the ignition module. And in the key, in the immobilizer, in the light module, in the interior and brake control units, in the engine control module - anywhere! The microcircuits into which data is recorded are conventionally dubbed “dots”. Depending on the car manufacturer, there can be from one to 4 such points!
Speedometer winding has become available only to highly qualified specialists with the most modern equipment. Although the development of the process itself did not undergo any special changes.
- The first method to change the speedometer is to reprogram the memory with data by connecting a programmer directly to it.
- The second method for checking mileage is programming the memory by connecting the programmer to the connector on the composition of devices in the car.
- The 3rd method of winding the speedometer is programming the memory with data by connecting the programmer to the car diagnostic connector.
The 1st method requires a huge amount of time and labor, but the 2nd method is much more science-intensive. He asks the mechanic to figure out both the memory encryption and what protocols are used to access it.
The 3rd method of winding up mileage will become virtually impossible in the near future. Manufacturers do their best to deny access to non-certified mechanics and electricians to programming car microprocessors. In other words, the newer the car, the more difficult it is to check the mileage on it, and the less likely it is to check the speedometer through the diagnostic connector.
Well, such a thing as storing data at several points significantly increases the financial costs of those who want to change the speedometer.
Let's summarize: winding up the speedometer of a new foreign car is an expensive pleasure, but checking the mileage on a VAZ is completely time-consuming and affordable.