The option of heated seats on domestic cars is no longer new. This feature should be present on every machine. With the onset of the first frosts, more and more VAZ owners are wondering why the heating does not work on the fourteenth. This is especially true for those whose cars are parked on the street.
Concerns from the northern countries were the first to install heated seats on manufactured cars. Initially, the option appeared on expensive cars, and later this will not surprise anyone on domestic vehicles.
Naturally, those who have already tried this option have only positive things to say about it.
Now we will look at the reasons why the seat heating system on a VAZ-2114 may not work. The information contained in the article will be partially useful to car owners of other cars, because the operating principle of the heaters is similar.
Let us immediately draw your attention to the fact that the process of troubleshooting is quite troublesome and will require you to have experience in carrying out repair work on the vehicle’s electrical network and the availability of certain devices.
Content
- Fuse
- Switch
- Break
How to repair heated seats? It is absolutely clear to all of us that not every owner of a heated car has the time and desire to troubleshoot problems. Many, faced with this problem, simply let it take its course, and with the onset of cold weather, they scold themselves for the lack of desire to fix the breakdown in a timely manner. It's good if the car is still relatively new. Then we just need to take it to a service center under warranty, where everything will be quickly fixed.
What to do if the car ages?
Or is heating simply not provided for your car, but was installed as an addition by a person long forgotten by you? In this case, it is enough to find an understanding electrician. Perhaps it will be your neighbor, relative, or a specialist at one of the service stations. Anyone who understands this matter will be able to quickly identify and fix the problem, while charging a relatively small fee. Let's look at the main reasons for this breakdown.
{banner_content}
What could happen?
It should be noted that heating problems in the VAZ 2114 can arise for various reasons, but they can be conditionally divided into two categories:
- heating is not provided;
- the air is heated too weakly.
It is quite possible to understand the problem on your own. However, first, it is important to understand where exactly you need to look for the root cause of the problem.
In particular, the culprit of difficulties may be:
- Airlock. Once in the area of the cooling radiator, air has every chance of moving into the thermostat. It is not possible to “drive” it out by starting the engine. You will have to add antifreeze to the pipe, thanks to which the air lock will quickly dissolve. Another, unspoken reason is lack of fluid. The antifreeze level should be checked at least once a month.
- Blockages. Quite often, the stove does not work due to the formation of blockages, which can be eliminated by dismantling and then cleaning the part. Immediately after this, the stove begins to heat up like new.
- Malfunction of the stove tap. It is quite simple to check the likelihood of this problem occurring - by tightening the cable located in the immediate vicinity of the pedal assembly. If the faucet does not open in this case, the only way out of this situation is to replace it.
- Broken fuse and relay. The simplest and at the same time unpleasant problem, which any technically savvy driver can easily cope with. However, determining why this situation has developed will be problematic. Most often, both the fuse and the heating relay fail due to a short circuit. But, if the driver wants to delve even deeper into the specifics of the problem, it would be more reasonable to move the car to the nearest service station.
- Motor failure. This usually happens when the car is used for a long time, and this component is rarely repairable. The most reasonable thing would be to simply replace it with a new element, having first checked the integrity of the remaining components. If everything is in order, you can purchase a new motor and install it in place of the previous one.
The heating system on the VAZ 2115 is standard. However, without sufficient skills and dexterity, you should not undertake repairs. It is better to entrust the issue to a professional who certainly cannot do any harm.
How to make heated seats VAZ 2114
22 May
Why does the VAZ-2114 seat heating not work?
Concerns from the northern countries were the first to install heated seats on manufactured cars. At first, the function appeared on expensive cars, and then this will not surprise anyone on Russian vehicles.
Naturally, those who have already tried this option have only positive things to say about it.
At the moment, we will look at the reasons why the seat heating system on the VAZ-2114 may not work. The information contained in the article will be partly needed by car enthusiasts of other cars, therefore the mechanism of operation of the heaters is similar.
Let us immediately draw your attention to the fact that the process of troubleshooting is quite troublesome and will require you to have experience in carrying out repair work on the car’s electronic network and the availability of certain devices
How to make heated seats on a VAZ 2110 without contacting a service center
Why do you need heated seats?
Having a similar function in a car is very necessary during periods of severe frost. Getting into a car that has been parked for a long time in the cold is unpleasant and unsafe for the health of the driver and passengers.
Overheating of seats also poses a danger to human health and to the car.
There are many articles on the Internet about the benefits and harms of heating. Let's dot all the i's. Driving for a long time with the heater on can have a bad effect on ladies and guys. Accordingly, it is recommended to use this option consciously in order to protect yourself from cystitis or prostatitis.
General rules for using heating:
- Do not allow the seats to become significantly overheated.
- When it's cool, turn on the heating and don't sit on them for a while.
- Once the seats have been warmed up, turn off the system. Next, heat the interior with a stove.
- You cannot stay in the salon in warm clothes for a long time.
Following these rules will help you protect yourself from overheating and not harm yourself.
Operating principle of heated seats
The heating elements are treated with a special coating that insulates them from direct contact with the upholstery. There are designs with one or two heating elements. The heaters are connected to the vehicle's electronic network through a control unit. Some system models allow you to adjust the temperature.
Next to the heater there is a sensor that controls heating. When the desired temperature is reached, the system turns off the power. There may also be a function for automatically maintaining the heating level, which is set by the driver. Other systems are timer controlled.
Built-in devices with 2 elements can provide rapid heating, after which the system switches to the lowest power and lowest heating. The number of modes depends on the heater model.
Possible malfunctions with heated seats
The heating device must have a fuse. On the VAZ-2114, two such elements are responsible for the measured heating operation. One fuse is located in the mounting block (F16), the other is located under the dashboard.
Connection diagram for seat heating buttons VAZ 2110
If you notice that the control lamps do not light up when the heating is turned on, the problem most likely lies in the fuses.
Relay problems:
- The system is turned on in an electromagnetic relay, which is located under the dashboard.
- After the unit is triggered, check the voltage at terminal 87 with a multimeter.
- If operation does not occur, then you need to examine the relay winding at terminals 86 and 87 with an ohmmeter.
- If the problem lies in the relay, it needs to be replaced.
- It is necessary to check the power with the power off at the connectors under the seats.
- The black wire is the ground of the car, the second is the power supply, which should have 12 volts.
- Use an ohmmeter to check the resistance of the heater windings. As practice shows, the problem most often lies here. The windings burn or break.
Depending on the situation, the problem with heated seats can be solved independently. However, this requires disassembling the chairs.
To summarize the article, we note that we have not considered all the possible reasons why heated seats may not work. But using the information above, you will know which direction to go to identify the problem.
If you have experience in carrying out such a repair plan, then finding the problem will not be difficult for you. Otherwise, we recommend contacting a specialist.
There is a special offer on our website. You can get a free consultation with our corporate lawyer by simply submitting your question in the form below.
Is modernization possible?
Often, while in the process of modernizing their own car, many drivers try to connect heated seats, which is quite often successful. What’s remarkable is that there is a ready-made circuit that can be easily installed in your car. It is suitable for several models at once: from 2111 to 2115. It should immediately be noted that the pricing policy for this invention is quite diverse, but experts strongly recommend not saving. A poor-quality heating system can fail without working for even a few months.
This is not at all difficult to do even for an ignorant driver. The greatest difficulty is the connection process.
A special button is mounted directly next to the handbrake, allowing the system to be activated at the moment when the driver needs it. All that remains is to connect the wiring. Most often this is done through the ignition relay and cigarette lighter, but variations are also possible, invented by the driver himself. The manufacturer clearly indicates all the nuances, providing the VAZ 2114 seat heating system with a color description. It will be almost impossible to get confused in it. However, if difficulties still arise, you should definitely contact a professional. Electronics are a rather fragile thing that, if handled incorrectly, will instantly fail. The entire car will be damaged.
Sources
- korchim.ru/biblioteka/salon/obogrev-vaz-2114.html
- enginehack.ru/ustanovka-podogreva-sidenij/
- ladaautos.ru/vaz-2114/pochemu-ne-rabotaet-podogrev-sidenij-vaz-2114.html
- drive2.ru/l/288230376152717339/
How to disassemble a cape for repairs
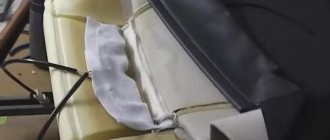
You need to start disassembling the cape by removing the clamp of the current-carrying wire. In order to remove it, you need to unscrew two screws.
Removing the wire clamp did not provide access to the connection of the wires with the heating elements and it was necessary to cut the fabric and foam rubber from the back of the heating cape. It is good to make the cut with scissors or a sharp knife. In this case, you need to be careful and careful so as not to damage the wires and the cut is smooth. Then, after repairing the cape, it will need to be sewn up with thread.
We install heated seats on a VAZ 2110 with our own hands
An autopsy showed that the heating winding was connected to the current supply wire by twisting followed by soldering. For insulation, insulating tubes are put on the solder joints.
A thermal fuse is included in the gap between the black wire and the lower end of the heating element for fire safety. This fact caused a pleasant surprise.
I removed the insulating tubes from the junctions of the ends of the heating windings with the current supply wire and checked the reliability of the connections. I found no defects. The rations were brilliant and high quality. I rang the windings again with the tester. The resistance of one of the heating windings, the bottom one in the electrical diagram, instead of 3 Ohms, was infinity. I had to start looking for the break point.
First, in order for the current-carrying wire not to interfere with work and not to break the ends of the heating windings with its weight, it was necessary to disconnect it from the windings by heating the joints with a soldering iron. In order to get to the heating conductors, I had to literally turn the car seat cover inside out. The following picture opened before my eyes.
On a sheet of foam rubber about two millimeters thick, the heating wires are neatly laid in a snake on glue in an insulating tube. The conductors are covered on top with a translucent sheet of thin, fragile elastic material with a sticky layer. There was full access to the wires to find the break point. All that remains is to find this place.
Installation of adjustment and protection elements
Control devices should be installed where it is most convenient for you, since they do not fit on a standard control panel and will look awkward there. Of course, there is the option of purchasing push-button heater control stations supplied by the car manufacturer itself. But they are very expensive and do not justify themselves.
And finally, you need to mount a relay, which is connected with a positive wire to the ignition key. Typically, this lock should supply 12 volts to the system when the key is turned. We connect the second output of the relay to the fuse, and we connect the mass of wires of the entire set to the body of the machine. This completes the installation of the heater. As you can see, making heated seats yourself is quite simple.
Explanation of the additional fuse and relay block
To turn on the main systems of any car, the manufacturer has designed the installation of auxiliary fuses. As a rule, they are located in the center console area. Each auxiliary module consists of several important relays and fuses.
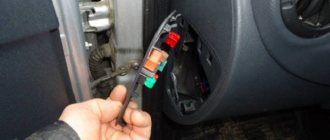
In this particular case, the box is located to the left of the glove compartment, behind the side trim of the center console. To quickly access the box, you need to remove part of the plastic protection. The protection is attached to Phillips bolts, so you need to prepare the appropriate screwdriver.
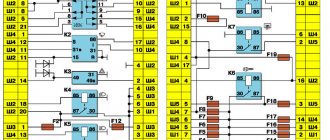
Location of the additional fuse and relay box 2114, 2115 , 2113 Additional unit in the passenger compartment Diagram of the additional unit
| № | Current, A | Purpose (Fuses) |
| 1 | 15 | Main distribution relay |
| 2 | 15 | Controller power |
| 3 | 15 | Fuel pump |
| № | Purpose (Relay) | |
| K4 | Fuel pump | |
| K5 | Cooling fan | |
| K6 | Main system control relay |
There are also options for other decryptions.
Explanation of the additional fuse and relay block
Relays that control the supply of current are present in the design of many vehicles. They are designed to perform a very important function - they turn on and off important electrical devices and mechanical systems of the vehicle. In simple terms, this is a device for supplying current to a required element.
Seat heating repair.
I dug through everything I could, but I can’t test it using the method described above. Here's what we managed to dig up:
Seat heating system
The seat heating system heats the seat cushions and backrests. The electronic unit for adjusting the selected heating temperature (3 stages) and monitoring faults is integrated in the switch block in the center console (SZM).
Principle of operation
The seat heating has 3 stages and is activated by pressing the switch with contact 15 closed. Three LEDs built into the switch block are used as functional indicators. The message that “pin 15 activated” is sent to the switch block in the center console via the K-Bus.
When the seat heating is switched on (press the switch once), stage 1 is first activated. The seat cushion heats up for approx. up to 44°C. All three LEDs light up to monitor operation.
When you press the switch again, the upper LED goes out and heating level 2 is activated. The seat only heats up to 39°C.
If you press the switch again, stage 3 seat heating will turn on. The bottom LED lights up. The seat heats up to 35°C.
If the switch is pressed again or the ignition is turned off, the system turns off. In addition, the seat heating can be turned off at any level by pressing and holding the switch for more than 1 second.
The seats are heated using carbon fiber mats in the central part and steel threads (steel filaments) in the side thickenings. One heating mat is installed in the seat cushion and backrest, respectively. As a rule, the middle part of the seat cushion and backrest, as well as the thickening of the cushion and backrest, are heated. The sports seat has additional heating filaments or carbon fiber mats installed in the hamstring support. The sports seats in the E39 series with fabric upholstery have thick cushions and backrests that are not heated.
The temperature value is measured by a special temperature sensor in the seat upholstery and transmitted to the switch block.
Control functions
Battery voltage
When the battery voltage is less than 11.4 V ±0.3 V, the electronics of the seat heating system turns off power to the heating mats. However, the function LEDs remain illuminated. Voltage begins to be supplied to the heating mats again if the battery voltage value is within min. 5 s exceeds 12.2 V ±0.3 V.
PCB temperature
Since seat heating consumes significant power (120 W), thermal sensors monitor the temperature of the printed circuit board in the switch block. When the temperature rises above 85 °C, the heating power first decreases. When the PCB temperature exceeds 95 °C, the heating is turned off. The function LEDs remain lit. The heated seats are automatically switched on again when the PCB temperature drops below 85 °C.
Fault monitoring
The seat heating electronics check the temperature sensor and heating mats for damage. Recognized faults are recorded in the fault memory of the center console switch block.
The following faults can be recognized:
short circuit or broken wires
short circuit or break in the temperature sensor wire
break in the heating mat circuit
If an open or short circuit occurs in the temperature sensor circuit, the heated seat system is turned off to prevent overheating. The function LEDs turn off.
For the heating wires, minus is brown, yellow-white is heating plus, and blue-white is the heating sensor wire.
Heated seats VAZ 2114: considering options
In the cold season, it can be very uncomfortable in a car without such a useful option as heated seats. Unfortunately, in older models of domestic cars, for example, the VAZ 2114, the manufacturer does not provide this option. But it is quite possible to install heated seats 2114 yourself. This will be discussed in today's article.
Heated seats VAZ 2114
Case – “cloak”
The easiest way to make your interior seats warm is to add an outer cover. You can purchase overhead covers at almost any auto store. The pads are made from ordinary dense fabric, inside of which heating elements are sewn.
A more expensive option is covers made of rubberized fabric; they will last longer than the first option. These “capes” are attached simply – just pull them over the seats and attach them to the springs. The heating elements operate from the cigarette lighter.
Heated cape VAZ 2114
Despite the simplicity and cheapness of the method, heating the seats of the VAZ 2114 using a “cowl” cover has several disadvantages:
- The covers can only be placed on the front seats.
- The cigarette lighter will always be busy.
- The product does not have temperature controls, so your seat may become uncomfortably hot.
There is another interesting option - putting new covers on the seats with sewn-in heating elements. This method is good because it allows you to transform the interior of the car, making it more representative, especially if the new covers are made of genuine leather.
Heated cover for VAZ 2114
Compared to a simple seat cover, such covers have a number of advantages:
- The heating is connected to the vehicle's on-board system and does not occupy the cigarette lighter.
- You can retighten both the front and rear covers.
- Ability to regulate temperature.
Well, you can’t avoid the downsides. The most important thing is that the cost of purchasing the covers will cost a pretty penny.
Standard heating
Standard heated seats on the VAZ 2114 are the best option of all. You just need to buy a seat heating kit from a dealer or a specialized store that sells original spare parts for VAZ.
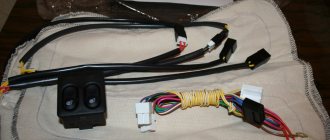
To install, you need to remove the trim from the seats, glue the heating element, embed the VAZ 2114 seat heating buttons, run all the electrical wires and put the trim back on.
Set for heated seats VAZ 2114
If you don’t have the opportunity to buy standard heating, it doesn’t matter. Modern manufacturers offer good options for third-party heated seats.
We make standard heated seats with our own hands
To work, you need to first prepare the following set of tools:
- various screwdrivers and wrenches;
- multimeter;
- insulating tape;
- felt-tip pen or marker;
- soldering iron;
- construction knife;
- pliers;
- glue;
- clamps and heat-shrinkable tubes.
Do-it-yourself heated seats for VAZ 2114
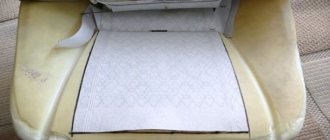
Once all the tools and materials are ready, you can start working. First you need to dismantle the chairs and place them in a convenient place. Then completely disassemble them, removing all plastic elements and casing. Place the heating fabric on the seat foam and use a felt-tip pen to make marks along the contour. Using glue, fix the heating fabric along the marks.
Installation of heating elements
Then you need to remove all the power wires and put on the casing. Now the seats can be attached to their places in the car and the power connected. Ideally, connecting the heating elements to the on-board system should be done by an electrician.
Connecting heated seats
But, in principle, you can try to do this work yourself:
- Using a multimeter, you need to find the 12 V power supply, ignition and backlight circuits.
- Connect the wire (+) of the thermal relay to the ignition switch.
- Connect the power cable to the positive terminal of the battery.
- Connect the negative wire to ground.
- Solder all wire connections using a soldering iron and wrap with electrical tape.
- Check the operation of the system.
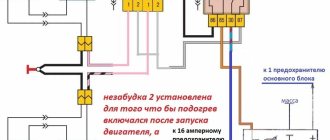
Below is a diagram of connecting the heated seats of the VAZ 2114 for the Emelya kit.
Keep in mind that the circuit must be assembled in such a way that it only functions when the ignition is on. If you assemble it incorrectly, then forgetting to turn off the heated seats at night, in the morning you will find a completely discharged battery.
Conclusion
It doesn’t matter if the manufacturer of your car hasn’t bothered with such a function as heated seats. With the help of our advice, you will solve this problem yourself.
vazremont.com
Additional lighting for the VAZ 2107 interior
Homemade seat heating: how to organize it without outside help?
Changes to standard lighting
– this is an opportunity to embellish the interior and make it unique. We took the lampshade from the new Priora. It looks good and has the necessary characteristics, both in size and in lighting effect. You will need regular masking tape, a knife with a sharp blade, a marker or pencil, and screwdrivers with a 12mm wrench.
We recommend running new wiring along the right pillar. Make the wire exits in the glove compartment area. We connect the minus to the body, and the plus, respectively, to the contact of the lamp. If you want the light to come on when the doors are opened, then you just need to throw an additional wire to the limit switch in the door and that’s all.
The alternative as it is
Today the built-in heating can be replaced with a special removable cape. Today, this is the most common option when the function is not working, available to all categories of drivers and car owners from budget to luxury models. A cape can be afforded, including by owners of domestic cars, where heating, in principle, is not provided. In addition, the heated cape can be used on the front seats. It can also heat the rear seats, which is very convenient, you’ll agree.
The cape is attached to the seat with hooks or elastic bands. It is easy to put on and quickly dismantle. One of its disadvantages is instability. The cape may fidget and move out of place. The heating cape with two adjustment modes operates from a regular car cigarette lighter. It is economical and practical at the same time.
A heating cape can last two to three seasons. This is from practice. Then the elements fail. But the cost of the product is such that anyone can buy it.
Repair work
They are carried out in a garage or in a comfortable room with good ventilation and sufficient lighting.
Repair procedure for heated seats:
- All plastic is removed from the seat shell. In some models it is attached to squeezing clamps, in others it needs to be unscrewed using a screwdriver.
- The casing folds back neatly. If it is attached with rings, then you can cut them with pliers or pliers.
- Removing the casing and inspecting the heating element (wire).
- If a burnt or burned-out wire is detected, it must be extended by soldering on both sides into the circuit.
- The spliced section is laid in thermal insulation and then in its place.
- Determining the cause of a wire break. If this happened due to pressure from the seat frame, then the contact point should be made as thin as possible using sandpaper or a file. It is recommended to place a thin gasket (rubber or plastic) on top of the wire and secure it with rubber glue.
- The seat is assembled in the reverse order. Instead of rings removed with pliers, you need to use plastic clamps.
Changing fuses
The cause of a malfunction of the front seat heating system may be a failed fuse. The car owner must refer to the “Operating Instructions” for the vehicle. In it, on the page with the diagram and description of the fuse box, find the one that is responsible for the operation of the seat heating system.
Having specified its denomination and marking, you need to purchase a new one and put it in place of the burnt one.
For example, on Citroen cars:
The fuse responsible for heating is marked: 10A 6997L2 VIN 6997L2
Its cost can range from 12 to 20 rubles. Fuse location: under the steering wheel, to the left of the main unit. It must be removed carefully by removing the block from the guides and prying it with a thin screwdriver.
Heating element integrity
This is a prerequisite for the functioning of the built-in seat heating system.
- Heating element. It is a wire with a nichrome spiral, coated with Teflon on top.
- Outer shell. It is made of technical fabric (thermal or carbon fiber).
In order for the elements to begin functioning in heating mode, it is necessary to ensure:
- Continuity of the circuit with the vehicle's on-board electrical network.
- No ruptures in the heating element or other damage to its integrity.
Replacing cables
Some car enthusiasts replace the standard nichrome wires with carbon fiber ones. For an ordinary seat you will need 5-5.5 m. This cable has greater mechanical resistance compared to nichrome and guarantees long-term trouble-free operation.
Technical parameters of carbon cable:
- resistance 1 m – 33 Ohm;
- supply voltage – 7-380 V;
- heating temperature (max.) – 200º C;
- insulation material – silicone rubber;
- diameter – 3 mm.
DIY replacement procedure:
- The circuit is assembled on top of the standard one and is connected in parallel.
- It is recommended to connect carbon fiber to copper wire by crimping them with copper tubes.
- To adjust the degree of heating of the seats, you can use a step-down board with voltage indication.
If you encounter difficulties when repairing the seat heating system yourself, it is recommended to contact service centers or auto electricians.
Why might the speedometer not work?
First on the list of reasons for speedometer failure is drive malfunction. Most often, it “licks” the edges of the shank gear in contact with the moving elements of the gearbox, which is why the drive stops rotating. On cars with a new type of sensor, this problem can be identified by diagnosing the ECU: there will be no signal. With this malfunction, neither the speedometer nor the BC work. The check engine light usually comes on as well.
On older cars, the needle often does not rise from zero due to wear or blockage of the drive cable inside the winding. In any case, the problem is solved by replacing the speed sensor.
The lack of a signal from the sensor on the VAZ 2114 may be due to other problems: for example, oxidation of the contacts on the sensor chip or a rupture of the boot and the ingress of moisture or dirt. Therefore, first of all, you need to remove the chip, assess the condition of the contacts and spray them with WD-40 or any other rust converter. If this does not help, you need to replace the drive.
Other answers to the question why the speedometer stopped working lie in the electrical circuit. Owners of cars with VDO instrumentation have access to factory diagnostics of the system. The odometer button is pressed, the ignition key is switched to mode 1 (power supply to the instrument panel), after which the button is released. The appearance of error 24 indicates that there is no signal from the speed sensor.
If self-diagnosis or ECU diagnostics at a service show that there is a signal, but the speedometer does not work, you need to remove the dashboard.
Arrow jumps on a VAZ 2114 are often associated with burnout of tracks. This is caused by increased voltage on the on-board network due to malfunctions of the stabilizer and time. In domestic instrument panels for Samara, low-quality solder was used, which gradually deteriorates due to thermal expansion. An unstable signal may appear as a jumping arrow.
There may be a discrepancy between the speedometer and BC readings: most often the BC shows correctly, but the arrow does not work. This is due to the failure of the drive on the speedometer itself. To repair, you will have to disassemble the tidy and remove the speedometer. Not all auto electricians, not to mention the car owners themselves, undertake such work, so it is easier and cheaper to replace the dashboard.
Drivers want more
Drivers want more. In particular, they dream of cooling the seats. Yes, exactly about cooling! If in winter heated seats are a pleasant bonus, then in summer it’s a living hell in a heated cabin. Even the air conditioner completely fails to cope with the functions assigned to it.
Today, the driving community's dreams of a cooler back and lower body are becoming a reality. The Japanese took care of and resolved this issue. She is the developer of the seat cooling system.
Owners of Nissan Patrol cars can talk about the pros and cons of seat cooling. These SUVs come standard with seat cooling.
Finally
Today we will not talk about the operating principle of the cooling unit: this is a separate topic. Let's just say one thing, it is not a cheap toy; the cost of the product is unaffordable for many - $200. The design can work in continuous mode for up to 8 hours.
The purpose of today's review was the topic of heating car seats and troubleshooting. The question is, how do we think we handled it? If you have any comments or positive/negative experiences, please write to us. We will be happy to answer questions that we think concern many drivers. Good luck on the roads.
How to connect running lights - DRL connection diagram
Fuel additives for diesel engines
5 Comments
In Russia, without a heated driver's seat it's generally bad, it's too cold, but it's also good if there's a heated steering wheel
I wonder if there is a similar heated cover for the steering wheel? Wireless
Subtleties of preparation for work
To set up an effective system, you need to start by selecting a suitable kit, taking into account the design features of the cabin.
Popular embedded systems options:
- Installation kits from German manufacturers are the most expensive, but also the most reliable and productive. Almost every complex is equipped with overheating protection. Weaco kits also provide different operating modes.
- The Russian-made Emelya kit is slightly cheaper, but also has decent characteristics. The heating element here is made of carbon fiber or in the form of reinforced cable.
- Chinese versions are the most affordable, but you should not connect them due to their low reliability. Uneven heating, problems with the power button, and possible short circuits are common, which is typical for Autoline versions.
When choosing the appropriate option, you can also consider products from Taiwan – the Megalight kit. But for VAZ cars it is better to choose the Emelya system. To properly equip seat heating with your own hands, you need to select tools and materials.
What you will need for work:
- screwdrivers and wrenches for removing seats;
- clamps (if necessary), marker;
- scissors, knife, pliers;
- soldering iron, electrical tape, multimeter;
- If the purchased kit does not contain double-sided tape, you need to buy it separately or use glue 88.
Important:
Before you start installing the system, you should check the package contents. Sometimes you need to additionally purchase wires, a fuse connector, and adhesive.
Finding a broken heating element
To search for a broken winding wire in a heated cape, you need any pointer tester, multimeter or any electrical circuit integrity dialer. If the multimeter has an audio dialing mode, then it is better to use it. You won’t have to be distracted to take readings from the device. If you are little familiar with how to ring electrical circuits, then you can read the site’s article “How to measure resistance, ring a circuit with an ohmmeter.”
Since the winding conductor broke due to kinks as a result of mechanical action, you should start looking for a break in the part of the cape that spreads over the seat. To search, you need to connect one end of the device probe to the beginning of the winding laid on the seat; according to the diagram, this is the connection point of the two windings. In the photo above, this is the right side of the cape.
The heating winding wire has a diameter of 0.3 mm and is not covered with an insulating layer. Therefore, a method is available to search for a break using a sewing needle. You need to take a sharp thin needle, attach the second end of the probe to it and pierce the insulation of the heating winding with the sharp end to find the break point.
For a faster search, you first need to divide the length of the heating winding wire into approximately two equal parts and make a puncture in this place - a continuity test. If the chain rings, divide the far part of the winding into two equal parts, and make the next puncture in this place. Mark the puncture sites with a marker to make it easier to find. If the chain does not ring, it means that the break point is between the last two punctures. Divide this area into two parts again and make another puncture.
The method of checking the halves allows you to find the break point by making the minimum possible number of punctures. I found a break through five insulation punctures with an accuracy of 3 cm. Insulation punctures in this case are harmless, since due to the elasticity of the plastic, the holes will be closed and there will be no holes.
Seat
Installation of heated seats in Moscow, heated mirrors in Yuzao
We open the seat in front, 15 centimeters on the left (if you look at the seat from the front) and almost all the way to the right. We find a central fabric stretcher, which is supported by a metal rod, which in turn is connected to another rod in the center. It is more convenient to first unfasten the rod on the sides - there are hooks there, then unclench the central tie and release the rod. When we have gained access to the entire area of the seat, we find a through hole in the foam rubber in the back - we will route the cable through it.
If you plan to install a temperature sensor, it’s time to take care of a place for it and its wires, which can be conveniently placed in the cable of the heating element.
About the pros and cons of heating
The following can be added to the piggy bank with a positive effect:
- Combating occupational diseases of drivers, especially truckers. We are talking about chronic colds, kidney problems and hemorrhoids. Discomfort is especially felt when the driver sits on a cold seat covered with leather covers. This is during slight cold snaps. And if the car spends the night in the parking lot even in winter, one can only imagine the mood of the driver, who knows what awaits his butt!
- Interim conclusions can be summarized as follows: heated seats mean comfort and disease prevention.
Now about the negative. Medicine is not happy with heated seats and warns of possible negative consequences
The luminaries focus users' attention on possible diseases such as:
It is recommended not to abuse this function. Drivers whose seats are covered with fabric may suffer most from excessive use of heating. In addition, doctors and specialists strongly recommend using an additional sensor to prevent excessive heating. He must independently turn off the system after a certain period of time.
Is modernization possible?
Often, while in the process of modernizing their own car, many drivers try to connect heated seats, which is quite often successful. What’s remarkable is that there is a ready-made circuit that can be easily installed in your car. It is suitable for several models at once: from 2111 to 2115. It should immediately be noted that the pricing policy for this invention is quite diverse, but experts strongly recommend not saving. A poor-quality heating system can fail without working for even a few months.
This is not at all difficult to do even for an ignorant driver. The greatest difficulty is the connection process.
A special button is mounted directly next to the handbrake, allowing the system to be activated at the moment when the driver needs it. All that remains is to connect the wiring. Most often this is done through the ignition relay and cigarette lighter, but variations are also possible, invented by the driver himself. The manufacturer clearly indicates all the nuances, providing the VAZ 2114 seat heating system with a color description. It will be almost impossible to get confused in it. However, if difficulties still arise, you should definitely contact a professional. Electronics are a rather fragile thing that, if handled incorrectly, will instantly fail. The entire car will be damaged.
Possible malfunctions with heated seats
The heating device must have a fuse. On the VAZ-2114, two such elements are responsible for the stable operation of the heating. One fuse is located in the mounting block (F16), the other is located under the dashboard.
If you notice that the control lamps do not light up when the heating is turned on, the problem most likely lies in the fuses.
Relay problems:
- The system is turned on in an electromagnetic relay, which is located under the dashboard.
- After the unit is triggered, check the voltage at terminal 87 with a multimeter.
- If operation does not occur, then you need to examine the relay winding at terminals 86 and 87 with an ohmmeter.
- If the problem lies in the relay, it needs to be replaced.
Another problem may be the usual lack of nutrition. To check this, do the following:
- It is necessary to check the power with the power off at the connectors under the seats.
- The black wire is the ground of the car, the second is the power supply, which should have 12 volts.
- Use an ohmmeter to check the resistance of the heater windings. As practice shows, the problem most often lies here. The windings burn or break.
Depending on the situation, the problem with heated seats can be solved independently. However, this requires disassembling the chairs.
To summarize the article, we note that we have not considered all the possible reasons why heated seats may not work. But using the information above, you will know which direction to go to identify the problem.
If you have experience in carrying out such a repair plan, then finding the problem will not be difficult for you. Otherwise, we recommend contacting a specialist.
There is a special offer on our website. You can get a free consultation with our corporate lawyer by simply submitting your question in the form below.
Post Views: 221
Decoding fuses and relays of block 2114-3722010-18
VAZ-2114, 2115 , 2113 cars of the first models with a carburetor have certain differences in the fuse module.
Old style block fuse and relay diagram
Circuit breakers
- Headlight cleaners (when turned on)
- Headlight wiper relay (contacts)
- Headlight washer activation valve
- Turn Signals and Relays - Hazard Light Interrupter (in Hazard Mode)
- Hazard warning lamp
- Tail lights (brake lights)
- Interior lighting
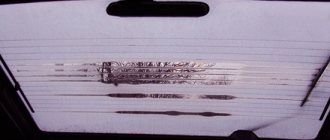
- Rear window heating element
- Relay (contacts) for turning on the heated rear window
- Socket for portable lamp
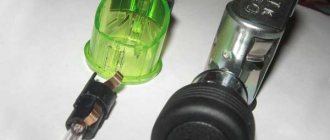
- Cigarette lighter
- Engine cooling fan electric motor and its activation relay (contacts)
- Sound signal and relay for its activation
- Power windows for front doors
- Power window relay
- Headlight cleaners (in operating mode)
- Relay for turning on headlight cleaners (coil)
- Heater fan motor - heater fuse
- Window washer motor
- Rear window wiper motor
- Rear window washer timing relay
- Windshield and rear window washer activation valves
- Relay (winding) for turning on the electric fan of the engine cooling system
- Relay (coil) for turning on the rear window heating
- Rear window heating indicator lamp
- Glove compartment lamp
- License plate lights
- Engine compartment lamp
- Instrument lighting lamps
- External lighting indicator lamp
- Heater lever illumination display
- Cigarette lighter lamp
- Left headlight (side light)
- Left rear light (side light)
- Right headlight (side light)
- Right rear light (side light)
- Left headlight (high beam)
- Indicator lamp for high beam headlights
- Turn Signals and Relays - Turn Signal and Hazard Light Interrupter (in Turn Signal Mode)
- Turn signal indicator lamp
- Rear lights (reversing lights)
- Gearmotor and windshield wiper activation relay
- Generator field winding (when starting the engine)
- Brake fluid level warning lamp
- Oil pressure warning lamp
- Carburetor choke warning lamp
- Parking brake warning lamp
- Signal lamp "STOP"
- Coolant temperature gauge
- Fuel level indicator with reserve warning lamp
- Voltmeter
- Relay-breaker for direction indicators and hazard warning lights
- Windshield wiper relay
- Power window relay
- Horn relay
- Heated rear window relay
- High beam relay
- Low beam relay
Option 2
Scheme: 2114/ 2115 — 3722010.3722020,
.3722010-08.3722010-10.3722010-18
Fuse designation
Relay (winding) for turning on the electric fan of the engine cooling system. Relay (coil) for turning on the heated rear window. Rear window heating indicator lamp. Glove box lighting lamp.
Fuse number 4 at 20A is responsible for the cigarette lighter.
- K1 - relay for turning on headlight cleaners
- K2 - relay-interrupter for direction indicators and hazard warning lights
- K3 - windshield wiper relay
- K4 - lamp health monitoring relay
- K5 - power window relay
- K6 - horn relay
- K7 - rear window heating relay
- K8 - headlight high beam relay
- K9 - relay for low beam headlights
READ Replacement of front struts of VAZ 2115
Versatility comes first: heated cover
“No standard seat heater? No problem, it will be there in a minute"
. This is exactly the concept that the creators pursued when creating thermal capes. Now it is possible to move the heater from one car to another in a matter of seconds.
The autonomy property makes it easy to diagnose seats and repair them at home. The cover can be quickly removed from the seat and various kinds of manipulations can be done with it in comfortable conditions. The disadvantage of this solution is
:
- power supply from cigarette lighter;
- the ability to install only on one seat in order to somehow compensate for the load on the power connector;
- The appearance of the interior will deteriorate a little.