Good day to all!
After finishing the work with noise and vibration insulation, I began to reupholster the seats with new upholstery, but before that I started installing seat heating, which is what we will talk about today.
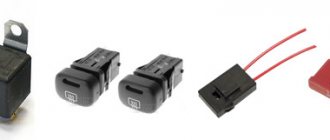
Since there are no detailed notes on the installation of heating (on the Priora Restayl) on the drive, I will try to explain everything in as much detail as possible. First of all, I’ll start with the necessary parts for installing heating: — 1) The seat heating kit itself (Priora Restayl) the price is about 2,500 rubles. — 2) Connectors for the Delfi fuse box (VAG) Article number: 907 326 03 I ordered 10 pieces just in case, because I will also put fuses from the foglights into the fuse box, which were previously placed outside the fuse box, and this does not look very aesthetically pleasing . — 3) Molex contacts in order to insert the wire into the pulp and paper block, I took about 20 pieces in reserve. I ordered them on the website, chip and dip code for them: 34803-0211 - 4) A set of heat shrink and electrical tape - 5) Spray adhesive or plastic clamps, as an alternative - a needle and thread to fix the heating on the seats. I used hog glue in a can. Now let's move on to installing the wiring.
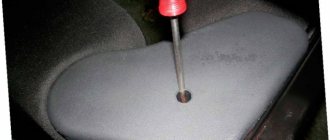
I extended the wiring to the trunk opening wires and the socket, fixed everything there with zip ties and hooked it onto the standard trunk wiring fasteners so that there would be no extraneous sounds from the heating wiring.
I am attaching a heating connection diagram:
I’ll describe the connection in more detail: In total, 7 wires were used and 6 were connected since contacts 4 and 6 are connected to each other by a jumper - and this is our positive contact. The 1st and 2nd contacts go to the heating element chips (where the 1st is the heating element of the left seat, and the 2nd goes to the heating element of the right seat) I connected the 3rd contact to the middle contact of the cigarette lighter (cigarette lighter illumination ) 4th and 6th positive wire which is connected by a jumper, it goes to the 6th wire and is connected to the fuse block - connector F19 there we put a 15A fuse and then we lead the wire to the yellow-blue wire there it will be necessary to strip the wire
then solder the heating wire onto it, after which we insulate the wire. The 5th contact goes to ground, I secured it under the handbrake nut. The 7th contact goes from the heating block to the pulp and paper block, connector XP1, pin 11, I enclose the pinout of the pulp and paper block:
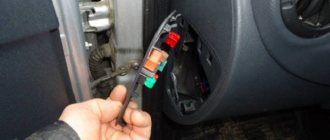
Now I’ll tell you in detail about disassembling the fuse box: In order to run the wires into the block and not mess with anything with extra flag housings for the fuse boxes. And so, first of all, we remove the block from the grooves so that it moves at least a little towards the interior, after which we remove the red lock from the back of the block:
after you have removed the red fastener, you need to unfasten the gray fasteners from the top and bottom using flat screwdrivers, after which the block will come out of the grooves a little and you will also need to pry the upper part of the block with another flat screwdriver and move the part that has come out a little downwards
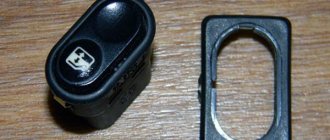
Now we have access to install new connectors in the block.
at the same time I also installed connectors for the PTF into the block, and the old flag ones were successfully removed
Now everything is installed according to Feng Shui
as the saying goes
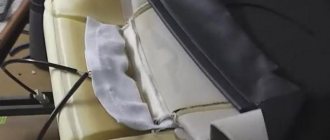
The heating elements themselves were glued by the hog using spray adhesive:
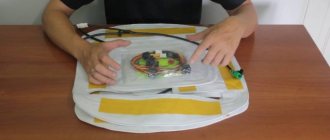
then I assembled everything and checked its functionality in all modes:
everything is functioning at its best, I hope this information will be useful to someone
.
Thank you for your attention!
include rain and light sensors, parking sensors, side airbags, heated mirrors. Taking into account our climate, the manufacturer provided heated front seats in the Priora and included it in the basic set of the luxury model. But what about those who don’t have such a useful option, but want to drive warm?
Let's consider the technology for installing stationary electric heating pads on a VAZ 2170. After familiarizing yourself with the proposed procedure, installing the device and connecting it to the on-board network will not be difficult even for a novice car enthusiast.
What kind of seat heating you can install yourself: types of heating elements
The car accessories market today is capable of satisfying almost any requirements of motorists. This fully applies to products intended for heating seats, which are available in two types:
Cases and capes
Before you make heated seats yourself, you need to know that the first option is characterized by low price and ease of installation.
All you have to do is put the cover on the chair, connect it, and the kit is ready to go. Typically the heater is plugged into the cigarette lighter socket, but terminal connections are also possible. However, this type of heating organization also has a number of significant disadvantages: low electrical and fire safety; uneven heating of the area; discomfort from wires; disruption of the interior layout; inability to use covers on the rear seats.
Lada Priora Hatchback EDM › Logbook › Three-level heated seats from Priora FL
So I finally found a reason to write something about the car, even though I was just lazy. Since the last publication, the car has traveled about 25 thousand kilometers, more than two years have passed. Feels fine. Consumables (liquid filters) are being changed, there were no sudden attacks. I can only remember a problem from last winter - air in the deflectors of different temperatures when the stove was on. From the central left one blows heat, from its neighbor there is warmth, and from the extreme ones there is cold. The matter was resolved by dismantling the heater core and flushing it under pressure. At the same time, the antifreeze was replaced. Now everything is fine. The handbrake somehow stopped holding - due to fatigue and curvature of the lever. Was replaced with a no-name part from the store. It was enough for exactly a month and a half. The splines on the base (not on the lever) were eaten away. The new one has been fine for six months, it seems to be holding up. A couple of weeks ago I replaced the brake discs - the thickness is 18 mm with the outermost 17.8 mm. Along with the discs, I also changed the pads. All original, TIIR in original Ladovian packaging. At the same time, the leaky CV joint boot was replaced. And yes, NIPPON pads are GOVNO! Creaky dogs. Now about the good stuff. I didn’t want to put anything on it at all, simply because these couple of years I’ve been waiting for the purchase of a new car. But for now it’s a little bit difficult - I don’t want to compromise, I want a specific car, so I’d better wait. I bought and installed the vaunted original Jimmy door switches, made in South Korea. The old ones are simply exhausted. The issue price is 100 rubles/piece. We purchased handbrake and gearbox handles in leather.
Price - 800/250 rubles. At the checkpoint the old one was already going bald. Well, at the same time I decided to buy a heated asshole, finally! I was always afraid that the generator wouldn’t handle it (BATE at 90A). But then a used 115 amp generator from KZATE turned up for a thousand, now it has been repaired and almost assembled, we will install it soon. There are plans to replace the cracked windshield with a heated one. Well, I bought the heaters, and when I received the parcel, I immediately rushed to install the device) I took a three-speed Prior from the new ones.
What to add? It’s good for the buttocks and lower back, I recommend it to everyone. If you want, fire it, if you want, warm up the little one. I can’t even imagine how I ever lived without it. And yes, BATE pulls, the drawdown on the bk is a maximum of 0.2 volts for 2 heating at maximum.
With the onset of cold weather, you want the car interior to be warm and cozy. Most motorists are wondering how to insulate their car for winter.
Today we will talk about installing standard seat heating from a luxury Lada Priora to a non-luxury one. Surely everyone would like to sit in a warm car seat on a hot and frosty winter morning.
About the pros and cons of heating
The following can be added to the piggy bank with a positive effect:
- Combating occupational diseases of drivers, especially truckers. We are talking about chronic colds, kidney problems and hemorrhoids. Discomfort is especially felt when the driver sits on a cold seat covered with leather covers. This is during slight cold snaps. And if the car spends the night in the parking lot even in winter, one can only imagine the mood of the driver, who knows what awaits his butt!
- Interim conclusions can be summarized as follows: heated seats mean comfort and disease prevention.
Now about the negative. Medicine is not enthusiastic about heated seats and warns of possible negative consequences. The luminaries focus users' attention on possible diseases such as:
It is recommended not to abuse this function. Drivers whose seats are covered with fabric may suffer most from excessive use of heating. In addition, doctors and specialists strongly recommend using an additional sensor to prevent excessive heating. He must independently turn off the system after a certain period of time.
Selecting heated seats
Heated seats from the cigarette lighter (cape)
This type of heating has a wide area of application and is quite easy to install. To install heated seats from the cigarette lighter, you do not need any auto electrician skills. To install such heating, you just need to insert the heating plug into the cigarette lighter and select the heating position. It should be noted that the reliability of such heating leaves much to be desired. Filaments are used as a heating element, but since the cape is poorly attached to the seat and is often subject to creases, which leads to the breakage of the filament and, consequently, failure of the entire heating.
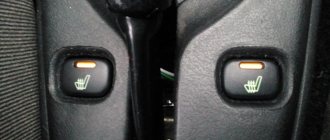
Heated seats standard
The standard heating for Lada Priora is a very reliable device that can be bought at any auto parts store at a price of 1000 rubles. Standard heating has only one heating position and does not regulate the heating temperature, i.e. The seat will heat up until you turn it off. This is its only drawback. The advantage of this heating is that there is no need to use additional intermediate relays to unload the contacts. Since the relay itself is already built into the button. The standard heating has heating elements for the seat and lower back.
Heated seats Emelya
Emelya's heated seats have proven themselves quite well on the market. The cost of such a heating kit is not cheap, starting from 2000 rubles. This heating is installed in the same way as standard heating. However, a significant difference from standard heating is the ability to regulate seat heating. But it is also worth noting that installing the seat heating button in the standard place will be difficult; you will have to cut out and trim the standard place. This type of heating has heating elements for the seat and lower back.
Causes of malfunction
Heating of car seats is carried out from electric heaters, which are built into its structure (in technical foam rubber).
The nickel heating element with a cross section of 1.5 mm is not covered with reinforcing braiding (it has only one), which under some circumstances leads to its malfunction.
Common causes of failure of the seat heating system:
- Excessive load on the side surfaces of the seats (lower part), leading to deformation and rupture of the heating element.
- Damage to the wiring from the outer frame of the seat. This is due to defects in the design of the seats by the manufacturer.
- The heating system fuse has blown. The cause of the malfunction may be a voltage drop in the network.
- Output from standing temperature sensor relay. A possible reason is a manufacturing defect.
- Malfunction of the heating system power supply. The problem may occur due to a manufacturing defect.
Installation of heated seats
We will look at installing seat heating using the example of installing standard heating. Since the installation of other heating systems will be similar to the installation of standard seat heating.
When cold weather sets in, every car enthusiast wants to drive his car in warmth and comfort. Many people are starting to buy all kinds of fan heaters that are inserted into the cigarette lighter and drain the voltage in the car. But the most experienced drivers, before the cold weather, begin to install heated seats for the Lada Priora.
After all, it is very harmful to sit on cold seats, and when the car has been parked for a long time, the cold from the seats increases significantly. And here it’s not far from illness; back problems will definitely make themselves felt after 3-4 such trips. But what about drivers who have a basic car and simply do not have heated seats? After all, as you know, heated seats on the Lada Priora are installed only on luxury trim levels. In our opinion, with our cold winters, it is simply necessary to install heated seats on all cars, and not make it an additional option, as automakers do. But those who bought, for example, a VAZ 2170, 2171, 2172 in the basic configuration should not be upset, because in our article we will tell you how to install heated seats on a Priora, including in the basic configuration.
But before we move on to installing factory heated seats, first let's look at the alternatives. If you do not want to waste time installing factory heating, then a special heated cape will be the ideal solution for you. The cost of such capes can start from 500 rubles and up to 2000 rubles. Of course, there is nothing complicated in installing such capes; just attach them to the seat using rubber holders, connect them to the cigarette lighter and you're done. But not everything is as good as it might seem at first glance. Such capes very often fail, since the thread in them is very thin and breaks very quickly from the weight of the driver. The second disadvantage is that your cigarette lighter will always be busy. The third disadvantage is the load from the heated seats on the cigarette lighter wiring. The fourth disadvantage is damage to the appearance of the seats. After all, you must admit that if you have leather seat covers and cheap rag covers are attached to them, it will look a little ugly. As you can see, there are both advantages and disadvantages.
Now let's move on to the standard heated seat kit. The standard heating is installed under the seat trim and is connected to the standard wiring, and not to the cigarette lighter like the heated cover. Of course, installing standard heated seats on Lada Priora from luxury trim levels is a bit labor-intensive process, since you will have to remove the seat trim and connect the power wires. Therefore, if your car is under warranty, then you should not interfere with the car’s wiring, as this may lead to the removal of the warranty from the car. But if you are still determined and minor difficulties do not frighten you, then this instruction is just for you. Well, let's get started?
Removing the front seats of LADA Priora.
- You need to move the seat all the way back.
- Remove the torsion bars.
- Using a 13mm wrench, unscrew the nuts securing the brackets.
- Tilt the seat back as much as possible and use an “8” wrench to unscrew the 2 bolts securing the slide.
- Then tilt the seat forward and unscrew the remaining 2 bolts with an “8” key.
- It is necessary to remove the seat from the car interior.
Instructions for installing heating on Lada Priora.
It is necessary to install a fuse in the wire gap.
Attention: If you do not have certain skills in car repair, we strongly recommend that you contact a specialized car repair service.
As you can see, installing heating on a LADA Priora requires maximum care. After all, if installed incorrectly, this can cause a short circuit in the wiring, and this in turn will lead to a fire in the car.
Therefore, if you have any questions about the product, you can always ask them to our experienced sales consultants who will be happy to answer your questions.
The alternative as it is
Today the built-in heating can be replaced with a special removable cape. Today, this is the most common option when the function is not working, available to all categories of drivers and car owners from budget to luxury models. A cape can be afforded, including by owners of domestic cars, where heating, in principle, is not provided. In addition, the heated cape can be used on the front seats. It can also heat the rear seats, which is very convenient, you’ll agree.
The cape is attached to the seat with hooks or elastic bands. It is easy to put on and quickly dismantle. One of its disadvantages is instability. The cape may fidget and move out of place. The heating cape with two adjustment modes operates from a regular car cigarette lighter. It is economical and practical at the same time.
A heating cape can last two to three seasons. This is from practice. Then the elements fail. But the cost of the product is such that anyone can buy it.
Connecting heated seats of Lada Priora
The “chip” with terminals must be connected to the block of heating buttons.
The black wire (“ground”) is attached to the car body. Alternatively, you can place it under the bolt in the area of the hand brake.
The white wire is responsible for the button illumination. We connect it to the cigarette lighter light.
The red wire is the supply wire (+12 V), stretches along the wiring harness under the driver’s seat and leads out to the mounting block.
After assembling the central tunnel, a block of buttons is installed in it instead of the factory plugs. Pass the wires between the tunnel and the floor, combine them with the wires of the chairs and fasten them with clamps. After this, you can install the chairs in their places. Installation is carried out in the reverse order.
Repair work
They are carried out in a garage or in a comfortable room with good ventilation and sufficient lighting.
Repair procedure for heated seats:
- All plastic is removed from the seat shell. In some models it is attached to squeezing clamps, in others it needs to be unscrewed using a screwdriver.
- The casing folds back neatly. If it is attached with rings, then you can cut them with pliers or pliers.
- Removing the casing and inspecting the heating element (wire).
- If a burnt or burned-out wire is detected, it must be extended by soldering on both sides into the circuit.
- The spliced section is laid in thermal insulation and then in its place.
- Determining the cause of a wire break. If this happened due to pressure from the seat frame, then the contact point should be made as thin as possible using sandpaper or a file. It is recommended to place a thin gasket (rubber or plastic) on top of the wire and secure it with rubber glue.
- The seat is assembled in the reverse order. Instead of rings removed with pliers, you need to use plastic clamps.
Connection diagram in the fuse box
Install the relay (1119-3747210-10) into the mounting block, connector K11.
The 87th contact of the relay is connected to the red wire of the button block.
The 86th contact of the relay is connected to the body ground.
The 85th contact of the relay is connected to the black-blue wire from the ignition switch.
The 30th pin of the relay is connected to the pink wire of the 30th pin of the high beam relay.
The fuse can be installed between the high beam relay and relay K11 on the pink wire.
As can be seen from the description, the Lada Priora heating connection diagram is very simple.
If, after all the steps taken, the heated seats on the Priora do not work, then you should check point by point that the wires and relays are connected correctly. You can also watch the video instruction “Heating the seats of a Lada Priora with your own hands.”
Dear customers, in order to avoid errors when sending connector 2172-3709710AX with wires to the seat heating control unit with thermostat on a VAZ 2172, in the “Comment” line indicate which switch block is installed, the model of your car, the year of manufacture.
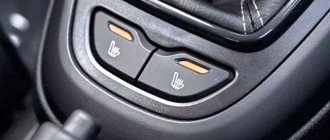
Most modern cars are equipped with many systems that provide comfort to the driver and passenger, one of which is heated seats. It is controlled using a block, looks attractive, modern, not only fits beautifully into the interior, but is also very easy to use.
Despite the fact that seat heating is a relatively new option on the bells and whistles market, this did not stop it from gaining global recognition among all motorists in the world in such a short period of time. Thanks to heated seats, the car driver can get rid of the unpleasant sensations that accompany him every time he gets into a “cold” car.
The front seat heating switch block 21720-3709710-00 with a three-mode regulator is located in the interior of the VAZ 2170/2171/2172 on the floor tunnel cover between the front seats. To remove the block, you need to pry it behind the lining with a screwdriver.
Unpleasant sensations are just the tip of the iceberg; cold sitting is fraught with more serious consequences than it seems at first glance.
The seat heating control unit 21720-3709710-00 (with a three-level regulator) is designed to turn on/off and adjust the seat heating (switching the electrical circuits of the driver's and passenger's seat heaters) in three positions on VAZ 2172 / Lada Priora 2 cars.
Contact carrier 191 972 724АХ with 8 contacts assembled with wires for connecting the front seat heating control unit with thermostat 21720-3709710-00 / Lada Priora 2 / VAZ 2172 and its modifications. The connector can be used to make your own cable. The contacts are already crimped onto the wires (wire length 100 mm) and inserted into the connector according to the pinout, so they can be installed on the car.
Using this block 21720-3709710-00, which has a thermostat, the heating modes of the driver's and passenger's seats on VAZ 2170, 2171, 2172 Lada Priora 2 cars are controlled by changing the position of the keys.
Replacing connector 2172-3709710АХ 8 pin assembled with wires for connecting to a three-mode control module of front seat heating switches 21720-3709710-00 / VAZ 2170, 2171, 2172 Lada Priora 2 and its modifications, can be done independently, without contacting specialized services service.
You can install heated seats on a Priora yourself; it will cost relatively little (compared to the fact that your health can suffer greatly from warming up a frozen car). The heated seat control unit can be installed in the Priora where it is convenient: the main thing to remember is that this is not the most necessary button when driving a car, it should not interfere with pressing other levers and buttons. Read the article to the end and your car will be warm even at minus 45.
Basic aspects and operation of a heated car seat system
When talking about heated seats, we mean a built-in structure connected to the car’s on-board network. The heating is located in the upper part of the seats and is equipped with:
- Heating element.
- Covered with a fabric cover.
Most often, a wire covered with Teflon with a chrome-plated spiral is used as a heating element.
The fabric shell in which the heating element is mounted is made of carbon or heat/fiber. The design is hidden in the lower part of the chair and its back. The work is carried out from the vehicle's on-board network.
When seat heating is activated, the working elements heat up to t 0 35-40 0 C. Constant temperature can cause discomfort for the driver and passengers. Therefore, a system is provided for reducing and stabilizing t 0 mode, which, in many models, can be adjusted independently.
Today, a number of manufacturers divide heated seats into two positions. You can turn on/off either the seat or the backrest. This, although a little, saves electrical energy. You need to understand that the car’s electronics are not able to provide planned (accurate) heating. Knowing the causes of a malfunction is half the success
In order not to waste time, you need to figure out why the seat heating is not working. The main reasons include the following:
- The heated seat fuse has blown.
- The seat heating circuit is broken. Problems with the circuit inside the heating tape.
- The switch located under the driver's seat has failed, or there are problems with the control panel.
In addition to the above situations, the stable operation of the system is affected by the quality of the product. A low level of reliability is present in almost all budget cars. Most often, factories save on additional rather than basic operations. If you accidentally press your knee on the driver's or passenger's seat, the seat heating circuit will be damaged.
Speaking of more expensive cars, this type of problem is practically absent. In the premium class, high quality heating tape is used that is resistant to mechanical damage. Although there is some confusion here too.
Installation of standard seat heating on Lada Priora
The standard seat heating kit for Priora should include:
- Heating elements (4 in total, two for each seat);
- Block for the control unit with wires;
- Priora seat heating unit.
At the same time, the article number for heated seats for the Lada Priora must contain the numbers 2170 - this, as any Priora owner knows, is the model number. It is worth distinguishing the standard heating kit for Priora 2 by catalog number - in comparison with the kit for Priora 1, they are different. The entire installation of seat heating on a Priora is best described with a detailed step-by-step algorithm, which has been tested by time and other car enthusiasts:
- We remove the front seats. Remove the factory covers from the seats, which are secured with a metal spoke and three plastic latches. You can disassemble the seats without dismantling them, removing only the covers, but then the process will become a little more complicated - it will be inconvenient to deal with wiring and laying out heating elements;
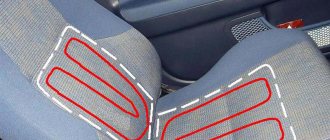
- We attach heating elements to the seats - one on the lower part, the second on the backs, in the lumbar area. Some people recommend attaching it with double-sided tape, but over time it can come off. It would be safer to sew the heating element to the pillow so that it does not move out of its place;
- Pull the wires from the heating elements through the hole in the mount under the pillow (run the wires from the lumbar heating elements to the place where the seat upholstery is attached). The piece of wire that passes through the hole can be protected from chafing using some kind of plastic tube. The power plugs for all four elements are out, all that remains is to connect them;
- Disassemble the central tunnel. Buttons for heated seats will be in place of the plug near the handbrake;
- The wiring is connected strictly according to the connection diagram for heated seats. Before doing this, it is recommended to disconnect the battery from the network. We install a terminal block to the heating control unit. The (-) black wire is attached under the bolt near the handbrake. A gray-red wire (for aesthetes, it is responsible for illuminating the buttons) is connected to the lighting of the cigarette lighter rim. The red 12V wire is pulled to the mounting block. You can't do without a fuse here. Then everything goes strictly “by the numbers”. Connect pin 87 to the red wire, pin 86 to the black wire. Connect the blue-black 12 V wire to pin 85, the pink wire to pin 30. You can connect to the mounting block via cut-in clamps to hold the wires tighter;
- Reassemble the tunnel and install covers on the seats.
The standard seat heating on the Priora is guaranteed to last for several seasons if it is connected correctly. And if immediately after installation the heating does not work, it means the wiring connection was incorrect.
wiring diagram for heated seats - looks like this
About switch problems and restoring functions
As mentioned earlier, one of the problems with the heated seat system is the failure of the switches. The algorithm is as follows:
- The switch connector is removed. While shaking it you need to pull it down. There are stops inside the casing. They are dismantled using a screwdriver. After removing the locking structures, the switch is removed. It has three wires. The one located in the middle is responsible only for providing a light signal. You don't need to pay attention to it. We may be interested in the wires located on the right and left.
- If they do not work, you will need to completely disassemble the device.
- There is a board inside the switch to which the contacts are connected. They may have come into contact with water or other automotive fluid. If this happens, the heating of the driver and passenger seats will not work.
- The board needs to be dried and cleaned. This is enough to restore the heating system.
Subsequently, the switch is assembled in the reverse order.
Briefly about seat heating kits
The following heating elements are used in various sets:
- high resistivity wire;
- carbon fiber.
Seats for Lada Priora The latter material has become widespread nowadays due to its reliability and safety. Products created on its basis are resistant to mechanical stress and can be easily adjusted to the required size using ordinary scissors. The use of electronic control units allows for smooth temperature adjustments.
The kit usually consists of
- a set of heating plates;
- wiring harness with connectors;
- thermostats;
- fastening devices;
- templates
Removing chairs
In each car and model, this procedure is carried out taking into account the design of the vehicle. Dismantling is mandatory and is explained by the need for correct diagnosis and the quality of subsequent repairs.
- heating switch buttons;
- electrical relays and heating unit;
- heating element.
The procedure for removing the seat (with classic fastening with 4 bolts to the floor):
- The chair moves to the rearmost position.
- The plugs (2 pcs.) are removed from the front parts of the guide rails.
- The bolts under them are unscrewed (2 pcs.).
- The seat moves to the extreme forward position.
- Remove the plugs from the rear parts of the guides (2 pcs.).
- The bolts under them are unscrewed (2 pcs.).
- The seat is removed or the backrest is tilted forward to carry out a “diagnosis” of the contacts of the tens.
- In order to remove the driver's seat, you need to tilt it onto its back in the cabin and disconnect all the connectors going to it (from the Airbag, seat belt sensors, etc.).
- Next, the seat is removed from the car through the front door.
Priora - analogues of heated seats
No matter how strange it may be, in stores you can’t often find analogues of the standard kit for Priora. Most often they are cheaper, but the heating elements have to be adjusted to size, and sometimes they are even trickier with the wiring. All that remains is the factory heated seats - although it costs more than its analogue, it will definitely fit on the seat, and everything will be more or less clear with the wiring.
Well, in general, here are the analogies:
- Emelya;
- Heated car cover “Heat”.
Content
How to repair heated seats? It is absolutely clear to all of us that not every owner of a heated car has the time and desire to troubleshoot problems. Many, faced with this problem, simply let it take its course, and with the onset of cold weather, they scold themselves for the lack of desire to fix the breakdown in a timely manner. It's good if the car is still relatively new. Then we just need to take it to a service center under warranty, where everything will be quickly fixed.
What to do if the car ages?
Or is heating simply not provided for your car, but was installed as an addition by a person long forgotten by you? In this case, it is enough to find an understanding electrician. Perhaps it will be your neighbor, relative, or a specialist at one of the service stations.
Anyone who understands this matter will be able to quickly identify and fix the problem, while charging a relatively small fee.
Let's look at the main reasons for this breakdown.
Fuse
We place our main hopes on it, since replacing it will not be difficult. First, you need to be firmly convinced that this is where the problem lies. To know the truth, just look at him. Most often, in modern cars, fuses are made of transparent plastic. Looking through it, you will see a thin wire, which melts when broken and this is clearly visible to the naked eye. It will be enough to select a suitable fuse and replace the burnt one with it.
How to remove the front seats
Instructions for dismantling the front seats will be needed not only for installing heating. The front seats in the Priora are installed simply, and to install and disassemble them you will need several tools and strength. By the way, on the Priora 2 seats in the “Lux” configuration have become softer and more comfortable, but the adjustment is still the same - you cannot adjust the height.
There are not many instructions on how to remove the front seat, everything is simple:
First you will have to move the seats all the way back and remove the torsion bars. You will need a size 8 wrench (for five bolts securing the slide) and a size 13 wrench (for four bolts on the bracket fastenings). First you need to unscrew the bolts on the bracket, then tilt the back of the chair back as far as possible and unscrew the two bolts on the slide. After this, tilt the backrest as far forward as possible and unscrew two more bolts. The seat can be removed from the passenger compartment.
The seat heating does not work, what should I do?
If everything is fine with the switch and the seats are not heated, you need to:
- Check the fuse for integrity; most likely it is located in the interior block.
- Under the seat, check the wiring in the connector for a break.
- Check if power is coming to the seat heating contacts.
If the power comes in, but the heating does not work, then most likely the heating filament has burned out; in almost all cars, the heating mat is divided into the seat itself and the back of the chair, so there will be two connectors.
Next, removing the car seat
- Remove the seat. To do this, you need to roll the chair back as far as possible and unscrew the front fastening of the slide, and vice versa, move the chair forward and unscrew the rear parts of the slide.
- Find the place where the upholstery is attached and remove it. Usually the mount is located at the bottom or side.
- Remove the heating mat (it is attached to the foam rubber with an adhesive backing).
- Glue the new heating element.
- Reassemble and secure the seat in the reverse order.
At first glance, everything is simple. However, this is not so, you need to remove the seats and disassemble it, which is not so easy, and it is possible to repair the failed unit.
The device is complex and is unlikely to be repaired on your own. It is better to entrust the problem and its elimination to the service center technicians - this is one option.
Main malfunctions of electric heaters VAZ 2170
If the chair is no longer warm, you should check the following components:
- seat heating fuse F15;
- ignition interlock fuse 20 A;
- relay;
- temperature switch;
- integrity of the heating wire.
The most common problem is that the thermal cable breaks down or burns out. Repairs may require removal of seats and upholstery. It is especially important to insulate the places of new connections well, otherwise new troubles cannot be avoided.
The option “Heated rear seats of a car” is no longer uncommon; it can be found in the list of equipment even for budget foreign cars. AvtoVAZ is constantly improving its LADA models, but the turn has not yet come to heating the rear sofa. Let's figure out how to equip your car with this useful function with your own hands.
Installation and connection of heated rear seats for all LADA cars (XRAY, Vesta, Largus, Granta, Kalina, Priora and Niva 4x4) is carried out in the same way. There are no fundamental differences. In this example, the modification process is shown on a Lada Priora car.
Drivers want more
Drivers want more. In particular, they dream of cooling the seats. Yes, exactly about cooling! If in winter heated seats are a pleasant bonus, then in summer it’s a living hell in a heated cabin. Even the air conditioner completely fails to cope with the functions assigned to it.
Today, the driving community's dreams of a cooler back and lower body are becoming a reality. The Japanese took care of and resolved this issue. She is the developer of the seat cooling system.
Owners of Nissan Patrol cars can talk about the pros and cons of seat cooling. These SUVs come standard with seat cooling.
Finally
Today we will not talk about the operating principle of the cooling unit: this is a separate topic. Let's just say one thing, it is not a cheap toy; the cost of the product is unaffordable for many - $200. The design can work in continuous mode for up to 8 hours.
The purpose of today's review was the topic of heating car seats and troubleshooting. The question is, how do we think we handled it? If you have any comments or positive/negative experiences, please write to us. We will be happy to answer questions that we think concern many drivers. Good luck on the roads.
We also advise you to read:
How to connect running lights - DRL connection diagram
Fuel additives for diesel engines
5 Comments
In Russia, without a heated driver's seat it's generally bad, it's too cold, but it's also good if there's a heated steering wheel
I wonder if there is a similar heated cover for the steering wheel? Wireless