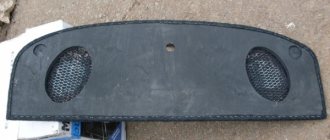
Built-in seat heaters svkavtomagiccomfort-40
Seat heating kit for Lada Priora
Seat heating kit for Lada Priora 2
Original seat heating elements for Lada Priora
Kit for connecting heated seats for Lada Priora 2
Kit for connecting heated seats for Lada Priora
When cold weather sets in, every car enthusiast wants to drive his car in warmth and comfort. Many people are starting to buy all kinds of fan heaters that are inserted into the cigarette lighter and drain the voltage in the car. But the most experienced drivers, before the cold weather, begin to install heated seats for the Lada Priora.
After all, it is very harmful to sit on cold seats, and when the car has been parked for a long time, the cold from the seats increases significantly. And here it’s not far from illness; back problems will definitely make themselves felt after 3-4 such trips. But what about drivers who have a basic car and simply do not have heated seats? After all, as you know, heated seats on the Lada Priora are installed only on luxury trim levels. In our opinion, with our cold winters, it is simply necessary to install heated seats on all cars, and not make it an additional option, as automakers do. But those who bought, for example, a VAZ 2170, 2171, 2172 in the basic configuration should not be upset, because in our article we will tell you how to install heated seats on a Priora, including in the basic configuration.
But before we move on to installing factory heated seats, first let's look at the alternatives. If you do not want to waste time installing factory heating, then a special heated cape will be the ideal solution for you. The cost of such capes can start from 500 rubles and up to 2000 rubles. Of course, there is nothing complicated in installing such capes; just attach them to the seat using rubber holders, connect them to the cigarette lighter and you're done. But not everything is as good as it might seem at first glance. Such capes very often fail, since the thread in them is very thin and breaks very quickly from the weight of the driver. The second disadvantage is that your cigarette lighter will always be busy. The third disadvantage is the load from the heated seats on the cigarette lighter wiring. The fourth disadvantage is damage to the appearance of the seats. After all, you must admit that if you have leather seat covers and cheap rag covers are attached to them, it will look a little ugly. As you can see, there are both advantages and disadvantages.
Installing a heater on a VAZ car
Winter is a challenge for any car owner.
Moreover, many are annoyed not so much by the deterioration of the road situation (snow, ice), but by the difficulty of starting a cooled power plant. Of course, those whose cars “winter” in heated garages do not have this problem, but there are relatively few of them. Most car owners have their cars idle overnight in the open air or in a regular garage (at best). And yet there are ways to alleviate the plight of car owners. One of the most optimal methods now is to install a heater on a VAZ or any other car.
Preheater
The problem of difficult starting of a power plant in winter is associated with several factors - the viscosity of the oil increases, the resistance in the battery increases, and it is no longer able to produce good starting currents. As a result, when trying to start, the starter “lazy” turns the crankshaft, and the rotation speed is clearly not enough to start the engine. And only after a couple of attempts, when the oil is mixed a little and the battery “warms up”, the engine can still be started, but this does not always happen.
Note that the chances of a successful start in cold weather are also affected by the technical condition of the power plant and the degree of its wear. Thus, the probability of owning a VAZ of the classic family (2101, 2106), produced 30-40 years ago, is significantly lower than a relatively new car. But installing a heater on a VAZ-2101 increases these chances, and significantly.
As noted, the difficulty of starting the power unit is largely due to the solidification of working fluids. But if you warm them up before starting, then the resistance that they create due to the increased viscosity will not exist, and it will be much easier for the starter to turn the crankshaft. It is precisely the preheating of the engine that is the task of the heater.
This device, in principle, is universal, so you can easily install a preheater on a VAZ, UAZ or any other make of car.
What is it intended for and how is it designed?
When the engine starts after a long stop, in the first seconds its parts come into contact with each other without lubrication. The viscosity of cold engine oil is higher than in the operating temperature range of the engine. Therefore, it takes some time for the lubricating fluid to penetrate through narrow oil lines to engine parts. Parts of the piston group especially suffer from cold starts. Thus, starting cold motors reduces their service life by up to 1.5 times. In order to avoid this, as well as to make it easier to start the engine in frosty weather, pre-start heaters are designed, powered by a 220 V network.
This device can heat up the engine in 30 minutes even in severe frost
Design and operation of the preheater
A modern heater is designed quite simply and is not much different from a boiler. The principle of its operation is to heat the coolant (antifreeze, antifreeze) to operating temperature, from 60 to 70 °C. When heated, the liquid begins to move through the pipes of the cooling system, heating the engine parts. To speed up heat transfer, many models are equipped with pumps that create pressure in the small circuit of the cooling system.
To create pressure due to temperature differences, heaters without a pump are connected to the cooling system at its lowest point. A device with a pump can be connected to the cooling system anywhere. When the temperature reaches the set value, the relay will simply turn off the heating element. If the temperature drops again, the relay will turn on the antifreeze heating again. Thus, you can connect the device in advance without fear of overheating the coolant.
In addition to heating the engine cooling jacket, heaters can parallel:
This way you can connect heaters with and without pumps. The power of the heating elements ranges from 500 Watt to 4 kW. The range of additional features depends on the model and complete set of each device. There are also quite simple heaters on sale that are screwed into plugs or drain plugs of engine cooling systems.
Scope of application and variety of models
A simple device and low cost are the main advantages of 220 volt preheaters over other varieties. These devices can be independently installed on any car. You just need to decide on how to mount the device in the engine compartment and follow the manufacturer’s installation instructions. The only condition limiting the scope of application is the mandatory presence of an electrical outlet nearby.
There are models with a remote control on which you can set the heating temperature of the liquid and the heating time of the timer
Such heaters are best suited for private homeowners or car owners living on the lower floors of high-rise buildings. Those who have a nearby garage with electricity will also be happy. After all, an electric heater can be controlled remotely, from a distance of up to 1 kilometer (with direct visibility). If there are obstacles in the signal path, the distance will be significantly reduced.
Today, motorists can purchase preheaters of both Russian and foreign production. Chinese Longfei devices, as well as Norwegian DEFA ones, are popular among motorists. German Webasto heaters are not very convenient due to installation difficulties, and they are also expensive. Among Russian-made products, one can note the Severs and Start trademarks, produced with sets of mounting spare parts for domestic and foreign car models. Each model comes with its own set of mounting parts, along with installation instructions.
Depending on the engine size, you can choose models with power from 1 to 3 kW
Video: efficiency and features of electric preheaters
Types, features of work
There are several options for such equipment, but in essence such a device is a conventional electric heating element that provides heating of one of the fluids of the power unit.
There are several types of heaters. Some of them heat antifreeze, others heat oil. In the case of coolant, by acting on antifreeze, it is possible to heat the cylinder block, as well as the elements of the power system, which is important for ensuring normal mixture formation.
But such a device has disadvantages:
But when using such a device, there is practically no need to warm up the engine after starting, since it is already heated, and warm air is immediately supplied from the stove to the cabin.
As for heaters that act on oil, such a device only heats the lubricant; the cylinder block and power system remain cold.
Since the volume of oil is small and it is all in one place, it takes little time to warm up. But due to the fact that only the lubricant heats up, after starting it will take time to warm up the motor itself.
In general, the effectiveness of using one or another device is approximately the same. When heating the antifreeze, we get a heated cylinder block and power system, which ensures good mixture formation (the result is excellent flammability of the mixture), but cold oil (the load on the battery and starter will remain high). If you heat the oil, then everything is exactly the opposite - the starter will turn easily, but the unit itself and the power system will remain cold.
Heaters also differ according to the power source used:
The first option is characterized by high power, and therefore the speed of heating of the working fluid. But to use it, the car must be close to the outlet.
As for autonomous devices, the heating element is powered by a battery, which means you can warm up the liquid anywhere, even in the field. But they are not very powerful, and during operation they drain the battery, and if it is already on the verge of exhausting its life or is simply discharged, then there will simply be no energy left for the starter after warming up.
Antifreeze heaters operating from a 220 V network have become widespread among car owners. In general, this is one of the most optimal options - the battery does not run out, the power of the heating element is high, and after using it, the driver also receives hot air from the stove.
Now manufacturers of automotive accessories and equipment offer different models of preheaters. All of them are almost identical in operating principle, but may differ in design - some consist only of a heating element, while others may additionally have a circulation pump.
The first option is simpler in design, and therefore more reliable. The circulation of liquid in it occurs due to temperature differences. Since the speed of fluid movement in such a device is low, less energy is required to heat the antifreeze passing through the heater.
In a pre-heater with a pump, the heating of the power plant is more uniform due to forced circulation, but in order to heat the liquid well, the power of the heating element must be high. In addition, due to the pump, the likelihood of equipment failure is higher.
How to install a 1.5 kW engine heater on a VAZ 8 valve! Kalina, 2108-10-11-12-13-14-15
Engine heating installation
ICAR company 1.5 kW If you would like to contribute to the Yandex channel, please contact 410013139365069.
All that remains is to install clamps on both hoses. As we now understand, although there are no difficulties, such a device can be installed on the “ten” without the help of others, exactly following the instructions. There is a special offer online on our website. You can easily get a free consultation with our corporate lawyer by simply asking your own question in the form below.
When placing the control unit, choose a more clean and dry place for it. Next you need to make the electronic connections:
- to the heater controller;
- timer monitor backlight.
Then, of course, secure the Webasto fuses, ground, and connect the power. Next we perform an additional easy function. The wiring harness should be connected to the heater. For this purpose, remove the plastic cover from it and insert the plug blocks into special sockets.
The best option for installing a timer in the cabin is considered to be the place where the standard clock is located. They should be removed from the container, then a few light manipulations remain. For example, make a hole for the timer, plug the 8-pin plug into the corresponding socket, and then secure the device itself. That's all - all that remains is to connect the battery and return the previously dismantled elements to the initial position for our client. A more detailed connection note is included with the device. As we have looked at, the work itself is not that difficult. All you need is vigilance, a little time, and strict adherence to the instructions.
Installation of equipment on a car
Installing a heater on a VAZ-2106 or any other model does not require any modifications to the power unit. Such equipment is external, and all that is needed is to correctly insert it into the power system.
The heater kit consists of:
Additionally, for installation you will also need sections of pipelines of the required length to make an insert.
There are several installation schemes for such a device, the simplest of which is shown below.
To ensure uniform heating, antifreeze must be supplied to the device from the lowest point of the engine, which is the drain plug of the cylinder block. But the exit of the already heated liquid is the opposite - to the top point.
To connect the equipment to the VAZ-2106 engine, you must:
When installing a heater, it is not even necessary to drain the antifreeze from the system. If you pre-assemble the heater (connect the pipelines to the block, tee and fitting) and quickly carry out installation work, then during operation 1-1.5 liters of coolant will leak out, which will then have to be replenished.
After installation, be sure to check all connections for leaks and, if necessary, fix them by tightening the clamps.
Installing the heater on a VAZ-2107 injector does not differ from that described above.
Installation of heated seats
We will look at installing seat heating using the example of installing standard heating. Since the installation of other heating systems will be similar to the installation of standard seat heating.
In order to install heated seats yourself, you need to remove the seats from the car and remove the upholstery from them. The heating installation will be divided into several stages.
- Removing the seats
- installation of thermoelements in them
- putting the seats back
Removing the seats
Tools needed to remove seats:
- Ratchet
- Head at "13"
- Head on "8"
- Head at "10"
- Screwdriver “+”, “-”
- Insulating tape
Seat removal process
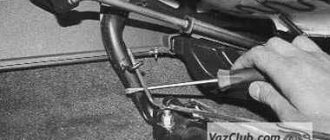
- Move the seat forward as much as possible and pull out springs 1 and 2
- Using a ratchet with a head set to “13”, unscrew the seat mounting brackets
- Using a ratchet with a head set to “8”, unscrew the seat skis in 5 places
- Disconnect the seat belt sensor plug
- We take out the seat
- Next we move on to disassembling the seat itself and installing thermoelements
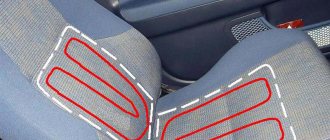
Installation of thermoelements
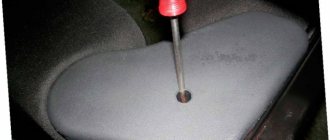
- We bend the plastic clips of the seat upholstery and lift the upholstery up.
- We slip the thermoelement under the upholstery and sew it to the foam rubber.
- We stretch the upholstery over the seat frame and secure it with plastic clips.
- Fold the backrest, pulling out the hooks securing the backrest.
These latches must be released
- Remove the backrest adjustment knob. You need to pull the plastic gear towards you and it will come off.
- Using a “10” socket, unscrew the bolt securing the gear to the seat
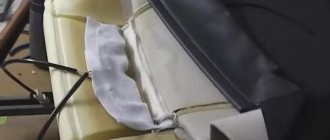
- We bend the pins holding the backrest upholstery and remove it from them.
carefully bend the pins and remove the fabric
- We slip the thermoelement under the upholstery and sew it to the back.
- We stretch the upholstery over the back of the seat and secure it with clamps.
- Connect the seat heating plug to the lumbar heating plug
- We extend the same procedure with the second seat.
Button installation and connection
Connection diagram
A simple diagram for installing standard seat heating in a Lada Priora
Connection
- We drill holes on both sides near the air duct for the rear passengers' feet to bring out the plugs for each thermocouple.
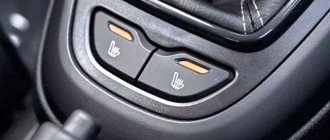
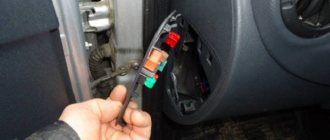
- Remove the cover for the seat heating button.
- We insert the wires into the holes under the seat heating button and separate the thermocouple wires in different directions and insert the holes.
- We screw the ground wire under the nut securing the central dashboard near the gearshift lever.
- We stretch the positive wire to the fuse block under the central dashboard.
- We connect the positive wire to fuse F11, this is the wiper fuse, power appears on it only after the ignition is turned on.
- We insert the wiring plug into the heating button and install the button in its normal place.
Seat installation
- We connect the free plug on the seat with the heating wiring.
- We check that the connection is correct, that is, the right button should be responsible for the right seat. If it’s the other way around, remove the button and swap the wires.
- Installation of seats is carried out in the reverse order of removal.
Start-M for VAZ 2170-2172 “Lada Priora” with an injection 16 valve engine
The Lada Priora family of cars has acquired a pre-heater from the German company Eberspaecher. A similar system became available for the first time on AvtoVAZ models. The price of the Priora in the Norma configuration, equipped with a heater, was 384 thousand 400 rubles - 17 thousand rubles more expensive than the base car. The manufacturer noted that this is approximately two times cheaper than installing such a system independently outside the Volzhsky Automobile Plant.
A pre-heater called Hydronic II is located under the front bumper of the Priora. A new set of brackets, liquid and fuel hoses were developed specifically for the model. The system heats the coolant using a gasoline-powered “boiler” and an electric pump that drives it through the interior heater radiator and the engine water jacket. In addition, the oil in the engine heats up, making it easier to start the unit, and the ventilation and heating system immediately begin to supply heat.
Engine preheaters can be autonomous (devices for heating the engine that can work independently) and dependent (devices that cannot heat the engine without outside help). This article will talk about dependent engine heaters, or more precisely about heating the engine from an outlet. Such heaters are usually called heating elements or boilers.
899_no_copyright
“The new option is especially relevant in regions with harsh winters and where there are no outlets in parking lots for powering electric heaters,” notes Lada Priora project director Nikolay Fofanov.
The Lada Priora is equipped with a Hydronic II heater. This is a second generation liquid engine heater. The heater package was developed specifically for Lada Priora. The heater itself has not undergone any changes, but taking into account the layout of the car and its design features, a special set of brackets, liquid and fuel hoses was developed, which made it possible to speed up the installation of the heater without loss of quality. Also, the heater control unit was programmed taking into account the climatic conditions of Russia.
The fuel consumption of the heater is approximately 5 times lower than that of an engine running and warming up at idle. At the same time, the heater operates almost silently and has less harmful effects on the atmosphere, the manufacturer claims.
At the moment, the assembly of Lada Priora with a pre-heater is carried out in the “Norma” version. The recommended retail price of the sedan with the new option is 384,400 rubles.
Stories from our readers
“Fucking basin. "
Hi all! My name is Mikhail, now I’ll tell you a story about how I managed to exchange my two-wheeler for a 2010 Camry. It all started with the fact that I began to be wildly irritated by the breakdowns of the two-wheeler, it seemed like nothing serious was broken, but damn it, there were so many little things that really started to irritate me. This is where the idea arose that it was time to change the car to a foreign car. The choice fell on the melting Camry of the tenth years.
Yes, I had matured morally, but financially I just couldn’t handle it. I’ll say right away that I am against loans and taking a car, especially not a new one, on credit is unreasonable. My salary is 24k a month, so collecting 600-700 thousand is almost impossible for me. I started looking for different ways to make money on the Internet. You can’t imagine how many scams there are, what I haven’t tried: sports betting, network marketing, and even the volcano casino, where I successfully lost about 10 thousand ((The only direction in which it seemed to me that I could make money was currency trading on the stock exchange, they call it Forex. But when I started delving into it, I realized that it was very difficult for me. I continued to dig further and came across binary options. The essence is the same as in Forex, but it’s much easier to understand. I started reading forums, studying trading strategies. I tried it on a demo account, then opened a real account. To be honest, I didn’t manage to start earning money right away, until I understood all the mechanics of options, I lost about 3,000 rubles, but as it turned out, it was a precious experience. Now I earn 5-7 thousand rubles a day. I managed to get the car buy after half a year, but in my opinion this is a good result, and it’s not about the car, my life has changed, I naturally quit my job, I have more free time for myself and my family. You’ll laugh, but I work directly on the phone)) If If you want to change your life like me, then here’s what I advise you to do right now: 1. Register on the site 2. Practice on a Demo account (it’s free). 3. As soon as you get something on the Demo account, top up your REAL ACCOUNT and go to REAL MONEY! I also advise you to download the application to your phone, it’s much more convenient to work from your phone. Download here.
Any engine preheating has its own pros and cons (even such popular systems as Webasto), so engine heating must be selected individually based on the capabilities and needs of each person.
Installation of foreign-made climate systems
Lada Priora air conditioner "August" is one of the most inexpensive options. If you want to buy a higher quality device, then you can opt for the Hull, Panasonic or Frost systems. In practice, the latest model is characterized by good compatibility with the Priora heating system, due to which the air flow filtration will be of better quality. As for the installation scheme, it is practically no different (the author of the video is Auto World).
But Frost also has its drawbacks: it happens that the installation gets very hot, does not cool the air well, and generally does not cope well with its assigned functions. But even if the unit works well, it will take longer to cool the interior. This is because the compressor itself is not particularly powerful. But despite the disadvantages, Frost also has advantages. When the air conditioning is turned on, it will generally not affect the functionality of the vehicle.
It should also be noted that the air conditioning units of this manufacturer were tested in African countries, and this says a lot. In particular, during testing, the installation cooled the interior well, while the engine of cars of various brands did not overheat. On sale you can find several variants of Frost condensers, which differ from each other only in the installation method. When installing the device, you will need to remove the heating system damper, but this will allow you to install an air filter, which is no less important.
In any case, when purchasing, you should focus on your preferences, as well as your budget. If the device gets very hot, you need to pay attention to diagnosing all its components and components. As a rule, this problem is caused by the need to replace the radiator. In addition, during operation, one should not forget about refueling the system, as well as its periodic cleaning. We have already written in more detail about how to clean the air conditioner on your own using improvised means; you will find information about this here.
Tags: preheating
Comments 17
START 1.5 KW Excellent heat! Priora hatch
SEVERS-M 1 KW - I’ve been using it for 4 years already
My brother has Start M, I have Severs M. The flight is normal.
if there is an outlet, then you can use one www.autoklimat.ru/ak/defa.html
Severs-M has been in good service for two years now, I’m happy with it.
It was a Chinese year, it worked stably, I removed it and installed the hydronic, I got tired of being tied to the socket =) They put it on a Severs-M jerboa for my father, they removed it after a month, he couldn’t warm up the 2.7 engine. We installed Longfei (China) 1.5 sq. It heats up the car to 55-60 degrees in an hour. She's been riding with him for 1.5 years now.
Tyumen definitely uses it from the Yamal floor, and there is a serious approach to such things
China with a pump, don’t install it, their pump jams
Severs-M. I've been using it for two years now without any problems.
and there is a guarantee and they showed it from the best side, now even the socket on the bumper is installed correctly!
How do I get the socket out? I’m tired of opening the hood every time! But I don’t want the plug to hang, you never know what they might cut off and even scratch the paint!
they attach it to the bumper or cut it into niches, it’s not noticeable, there it’s small, 5-pointed or 6-round!
Can you provide a link to Chinese? interesting to look at)
Why are you putting up Chinese rubbish! I’m from Tyumen, every 2nd Severs-M here installs and lives in peace during the winter!
I’m not going to bet, I’m just interested in looking, I haven’t met any Chinese ones.
Take Chinese))) a lot of people nominated their friends and not only for priors)))
Magnum (magnum) - pre-starting electric engine heaters
Magnum pre-heaters are designed for pre-heating of internal combustion engines and units with a liquid cooling system. The entire line of this manufacturer belongs to the type of pipe (“hose”) engine heaters. The heaters are attached at a certain point in the section of the hoses - the engine coolant pipes. Also, the entire list of Magnum heaters, regarding the structural type of the housing, is divided into three types: Special fixation (in replacement of the standard bell) - for KamAZ (G68, G68x18, G68x68) and MAZ (T70x25 / T58x25).
* the above numerical values are indicated in millimeters and indicate the diameter of the fitting part of the heater housing, which corresponds to the internal diameter of the nozzle (hose) of the engine cooling system.
Catalog of heaters and components of the Magnum brand and a complete list of “hose” type.
YOUR COMMENTS:
List of comments
02/28/2020 10:47 Avtonakhodka, Andrey Olkhovsky
09.30.2019 06:41 Avtonakhodka, Andrey Olkhovsky
Hello. Maybe this one will fit, but in the pipe only for the heater circuit (interior heater). There you need to know the internal diameter of the pipe.
29.11.2018 14:07 Avtonahodka, Andrey Olkhovsky
It's written in the description, but I didn't install it myself.
11/29/2018 1:38 pm Avtonakhodka, Andrey Olkhovsky
Hello. In stock, and delivery is approximately 300 rubles.
11/01/2018 12:47 Avtonakhodka, Andrey Olkhovsky
Hello. It won't be until New Year's.
10/31/2018 15:13 Avtonakhodka, Andrey Olkhovsky
Sorry, but I can’t tell you, you need to look locally, but we don’t have a service.
11/19/2016 12:26 Avtonakhodka, Oleg Rakhmanin
Hello, neither Defa nor Calix have a heater for the CWN engine, so from 220 V these heaters can be considered: Leader (Severs), Start, Lunfey (these are heaters with a pump that have proven themselves to be the best for many years, they are simple installation and ensure uniform heating) and Silicone plates that are attached to the oil pan, they have also proven themselves over the years. For tank-type heaters, installation is carried out based on the location of the thermostat and the presence of a drain plug: If the thermostat is located on the lower radiator pipe: 1) taking coolant from the engine block from the drain plug through the fitting, supplying coolant to the upper radiator pipe through a tee. 2) taking coolant from the heater return pipe through a tee, supplying coolant to the upper radiator pipe through a tee. If the thermostat is located on the upper radiator pipe 1) take coolant from the lower radiator hose through a tee, supply coolant to the engine block into the drain plug through the fitting. 2) taking coolant from the lower radiator hose through a tee, supplying coolant to the heater “supply” hose. 3) taking coolant from the drain plug of the engine block through the fitting, supplying coolant to the heater “supply” hose. 4) taking coolant from the stove return pipe through a tee, supplying coolant to the supply hose.
11/22/2016 21:23 Avtonakhodka, Oleg Rakhmanin
Hello, we seemed to discuss everything over the phone, I offered you options, you told me what you would think. And what is your solution?
Good afternoon, gentlemen, Please advise the prices and delivery times of the following:
No. Name quantity pcs. price, rub. with VAT 1 pc. 1 Pre-heater "Magnum G" 38/38-1.0T-220 kW with temperature sensor 2.00
You can offer an analogue of the requested product.
Sincerely, Yuri Dogadov, HYDROSTAR LLC, phone/fax mobile 5, Gruzinskaya street, Saint Petersburg, 192102, Russian Federation email; https://www.hydrostar.ru
11/19/2016 13:01 Autonakhodka, Oleg Rakhmanin
Hello, there is no analogue, the magnum heater can be ordered within 2 weeks, here is the link to order.
11/19/2016 1:27 pm Avtonakhodka, Oleg Rakhmanin
11/19/2016 1:27 pm Avtonakhodka, Oleg Rakhmanin
Hello, what is the engine model?
Preheater
The problem of difficult starting of a power plant in winter is associated with several factors - the viscosity of the oil increases, the resistance in the battery increases, and it is no longer able to produce good starting currents. As a result, when trying to start, the starter “lazy” turns the crankshaft, and the rotation speed is clearly not enough to start the engine. And only after a couple of attempts, when the oil is mixed a little and the battery “warms up”, the engine can still be started, but this does not always happen.
Note that the chances of a successful start in cold weather are also affected by the technical condition of the power plant and the degree of its wear. Thus, the probability of owning a VAZ of the classic family (2101, 2106), produced 30-40 years ago, is significantly lower than a relatively new car. But installing a heater on a VAZ-2101 increases these chances, and significantly.
As noted, the difficulty of starting the power unit is largely due to the solidification of working fluids. But if you warm them up before starting, then the resistance that they create due to the increased viscosity will not exist, and it will be much easier for the starter to turn the crankshaft. It is precisely the preheating of the engine that is the task of the heater.
This device, in principle, is universal, so you can easily install a preheater on a VAZ, UAZ or any other make of car.
Installing a 220V engine heater on a Priora
Pre-heater Lada Priora - Diagram
The preheater consists of two elements:
The boiler heats the liquid, and the pump pumps it through the engine water jacket and the interior heater radiator. Through heat transfer, the oil will also heat up.
As a final result, this system will not only simplify the so-called cold engine start, but will also allow the owner to get into an already warm, heated car interior.
Device control panel
There is a timer installed on the dashboard, with the help of which the heater will start. The system operates on gasoline, but consumes about five times less than a cold engine during warm-up.
In addition to saving fuel, the system also saves the resource of your engine. Everyone knows that every start of a cold engine reduces its life.
The preheater will be installed on 2014 cars with a 1.6-liter engine with 106 horsepower. Questions that worry most domestic motorists:
The preheater itself is reliable because it is manufactured in Germany. Cars with such a heating system have already successfully passed test tests. Due to the design features of the engine compartment layout, the system will be mounted under the front bumper, on the left side.
We install the air conditioner on the Lada Priora with our own hands
In a Lada Priora car, a device such as air conditioning plays an important role in terms of comfort for the driver and passengers. Is it possible to install such a climate control device in your car yourself? How installation is carried out, how to refuel the air conditioning system - read about it below.
How much does it cost to install air conditioning in a Priora?
August: Equipment price with delivery is about 24-25t.r. + for installation with refilling 7500 rubles + 2 pins for the ECU (for some reason they were not in the injection braid) 300 rubles total: with work 33,000 rubles Halla or Panasonic: more expensive, 37,000 with work.
PS It’s better to pay a little extra and take something that really works, and does not create the appearance of work.
Air Conditioner Installation Guide
Before you complete this task, you need to decide which option you will use. There are quite a lot of manufacturers of air conditioning units on the market today, so the purchased unit must meet the requirements and characteristics of the car. The device must have a long service life, resistant to vibrations that are typical for cars used to drive on our roads. It's no secret that our car enthusiasts are more inclined to trust Conder cars and products in general from foreign manufacturers.
Types, features of work
There are several options for such equipment, but in essence such a device is a conventional electric heating element that provides heating of one of the fluids of the power unit.
There are several types of heaters. Some of them heat antifreeze, others heat oil. In the case of coolant, by acting on antifreeze, it is possible to heat the cylinder block, as well as the elements of the power system, which is important for ensuring normal mixture formation.
But such a device has disadvantages:
Webasto installation features
Of course, the autonomous option is more comfortable. One of the most common systems of this kind now is the product of Webasto. There shouldn’t be any particular difficulties with connecting it, but the presence of certain abilities will still happen. Before proceeding with actual installation, it is necessary to do preparatory work, which consists of removing the battery, air filter, absorber, rear seat and fuel tank hatch. But that's not all. It will also be necessary to remove the engine crankcase protection and open the fuel tank cap for ventilation.
The heater itself is installed in a vertical position. Under the hood there is a more balanced version of its placement - on the shock absorber strut, to the left (in the direction of travel) of the battery.
When connecting to a liquid circuit, there are a few common rules to follow. For example, hoses should be laid straight, avoiding kinks, and the tightening torque of the clamps is expected to be 205 Nm. Also prepare some kind of container to collect leaking antifreeze.
Installation of equipment on a car
Installing a heater on a VAZ-2106 or any other model does not require any modifications to the power unit. Such equipment is external, and all that is needed is to correctly insert it into the power system.
The heater kit consists of:
Additionally, for installation you will also need sections of pipelines of the required length to make an insert.
There are several installation schemes for such a device, the simplest of which is shown below.
To ensure uniform heating, antifreeze must be supplied to the device from the lowest point of the engine, which is the drain plug of the cylinder block. But the exit of the already heated liquid is the opposite - to the top point.
To connect the equipment to the VAZ-2106 engine, you must:
When installing a heater, it is not even necessary to drain the antifreeze from the system. If you pre-assemble the heater (connect the pipelines to the block, tee and fitting) and quickly carry out installation work, then during operation 1-1.5 liters of coolant will leak out, which will then have to be replenished.
After installation, be sure to check all connections for leaks and, if necessary, fix them by tightening the clamps.
Installing the heater on a VAZ-2107 injector does not differ from that described above.
Selecting heated seats
In order to choose heated seats, you need to decide what kind of heating you need. There are several types of seat heating for Lada Priora: Cover, Standard heating, Emelya heating
Heated seats from the cigarette lighter (cape)
This type of heating has a wide area of application and is quite easy to install. To install heated seats from the cigarette lighter, you do not need any auto electrician skills. To install such heating, you just need to insert the heating plug into the cigarette lighter and select the heating position. It should be noted that the reliability of such heating leaves much to be desired. Filaments are used as a heating element, but since the cape is poorly attached to the seat and is often subject to creases, which leads to the breakage of the filament and, consequently, failure of the entire heating.
Heated seats standard
The standard heating for Lada Priora is a very reliable device that can be bought at any auto parts store at a price of 1000 rubles. Standard heating has only one heating position and does not regulate the heating temperature, i.e. The seat will heat up until you turn it off. This is its only drawback. The advantage of this heating is that there is no need to use additional intermediate relays to unload the contacts. Since the relay itself is already built into the button. The standard heating has heating elements for the seat and lower back.
Heated seats Emelya
Emelya's heated seats have proven themselves quite well on the market. The cost of such a heating kit is not cheap, starting from 2000 rubles. This heating is installed in the same way as standard heating. However, a significant difference from standard heating is the ability to regulate seat heating. But it is also worth noting that installing the seat heating button in the standard place will be difficult; you will have to cut out and trim the standard place. This type of heating has heating elements for the seat and lower back.
OPERATING PROCEDURE
ATTENTION! Before starting work, check the appearance of the electric heater and the insulation of the cord and plug.
7.1. Before connecting the electric heater to the network, it is necessary to secure the connecting cord to the car body.
7.2. Connect the electric heater to the network.
7.3. After 2-5 minutes of operation of the electric heater, check the inlet and outlet hoses. The outlet sleeve must be warmer than the inlet sleeve.
7.4. The engine warm-up time depends on the ambient temperature.
7.5. After warming up, before starting the car engine. The electric heater must be disconnected from the network.
SAFETY REQUIREMENTS
4.1 Before connecting the electric heater to the electrical network, you must check the integrity of the power cord, plug and socket. (When choosing electrical wiring and cable laying method, fire and electrical safety requirements must be taken into account).
4.2. Do not use electrical extension cords without a grounding wire and rated for a current of less than 10 A.
4.3. Before inspecting the electric heater, the connecting cord plug must be removed from the socket.
4.4. It is forbidden to plug in the electric heater with the cover removed.
4.5. It is prohibited to use the electric heater if there is no coolant in it.
4.6. The electric heater (as a device of protection class 1) must be connected only to a 3-wire single-phase power supply network.
Instructions for use:
Setting the time.
Rotate the dial clockwise until the hand points to the current time. The hours are marked along the edge of the disc in a 24-hour format. Each division between the numbers corresponds to 15 minutes.
Setting the timer.
The timer is set by pressing the black (blue) segments located around the dial. Each segment is 15 minutes.
Example:
One segment is pressed on number 16. The timer will turn on the desired electrical appliance at 16:00 and turn off at 16:15.
Up to 96 timer programs can be set for a 24-hour period. To put a segment in the “on” mode, press the selected segment with a ballpoint pen, screwdriver or similar object, and to turn it off, press it.
Exploitation.
Having installed the necessary programs, plug in the outlet with the timer. Connect an electric heater, which will be controlled by the outlet.
Types of heaters
Automatic heaters are divided into autonomous ones, powered from the on-board power supply, and “stationary” connected to a regular 220V network. There is a model range that ensures the preservation of the optimal temperature regime of the antifreeze fluid without additional energy consumption for 1-2 days, and specialized models of heaters for diesel engines.
Heaters powered by the on-board network heat the coolant and prepare the engine in autonomous mode. This is very convenient for those who like long trips, when the car needs to be parked overnight, and in a number of other cases. It is important to coordinate the choice of a heater with the power of the battery and the presence of a personal gasoline mini-engine, which ensures optimal performance.
Principle of operation
Powered from a standard voltage of 220/230V, the systems heat the vehicle’s coolant more economically and allow them to functionally expand their capabilities. Very often they can warm up the entire interior of the car to a temperature that is comfortable for a person, despite the fact that the windows are also cleared of frost at this time.
Automatic heaters of well-known brands installed in the standard pipes of the cooling system of the cylindrical engine block or built “under the hood” are highly reliable against overheating. With different powers, they come complete with a thermostat and an emergency thermal switch, which prevents the heater from operating if there is a lack of coolant in the system or other shortcomings. For example, the “Start Economy” heater
Source
Briefly about seat heating kits
The following heating elements are used in various sets:
- high resistivity wire;
- carbon fiber.
Seats for Lada Priora The latter material has become widespread nowadays due to its reliability and safety. Products created on its basis are resistant to mechanical stress and can be easily adjusted to the required size using ordinary scissors. The use of electronic control units allows for smooth temperature adjustments.