With the arrival of winter, all vehicle heating functions become especially important. It's hard to imagine a driver who enjoys the touch of a cold seat on his back. In such a situation, the surface takes a long time to heat up, not to mention the enormous damage to health.
Everything is easier with heated seats. It takes no more than a minute to heat the surface, after which the pleasant warmth penetrates through clothing and reaches the human body. With this option, winter driving causes fewer problems, including for the health of internal organs. But what to do if seat heating is provided, but for some reason does not work? In such a situation, the only correct solution is to repair the faulty drive.
How to repair a heated seat: all methods
Knowing the reasons for the malfunction is already half the battle. To avoid wasting time, figure out why the driver's seat heating is not working. There are several main reasons:
- Blown fuse insert (fuse).
- Open circuit inside the heating tape.
- Broken switch or control panel. The first one is usually installed under the car seat.
The problem with heated seats in many cars is their low level of reliability. For the most part, this applies to budget cars, whose manufacturers save on additional options. It is enough to rest your knee on the chair to damage the seat heating circuit. As a result, the device does not work.
As for expensive cars, such problems are less common in them. The reason is the use of high-quality heating tapes that are resistant to mechanical stress. But even in these cases, malfunctions are possible.
Checking fuses
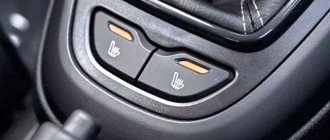
The effectiveness of seat heating depends on the correct functioning of the on-board network. That is why before performing the main tasks it is worth starting with the fuse. Please note that the failure of the latter can be determined by one more sign - the absence of glare from the lamp switches. Otherwise, we can conclude that the part is in good condition.
So, if the seat heater is not working, remove fuse F33 (-15 amp rating). The fuse link is located in the block at the bottom of the instrument panel (on the right side). If the lights do not light up, replace the fuse.
Where is the best place to start repairing?
A malfunctioning driver's seat heating system is a serious problem, so be prepared to have to disassemble and disassemble the seat. In the simplest cases, you can do without it, for example, if the cable is damaged.
If suspicion falls on the switch, then it will have to be removed. Theoretically, this is possible without removing the seat, but in practice it is better to remove the seat from the passenger compartment. The recommendation is due to the fact that switching approaches is difficult. Therefore, removing a part from a stationary chair can damage not only the upholstery, but also the switch itself.
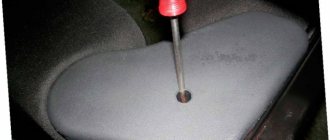
In a situation where a switching device fails and requires replacement, start by removing the connector. To do this, rock the part from side to side as you lower it. If it does not budge, do not use excessive force. Some manufacturers provide a special type of fastening that provides an individual approach to separation. Follow these steps: take a screwdriver, reach inside the case and apply light pressure. Now pull on the part to release it.
There will be three contacts before your eyes. Measure the resistance between left and right (the contact in the center is responsible for the light bulb). Note that the switch contains the following elements: a contact group, a tab, and a slider. The latter's task is to close the contacts using a resistor.
If the resistance does not change when changing the position of the adjusting wheel, check the contacts. It happens that heated seats do not work due to grease getting on them. To fix the problem, simply clean the contact group (everything should work).
Checking the heating tape for serviceability
If the described recommendations are followed and the driver's seat heating still does not work, check the integrity of the heating element. The advantage is that you don't have to take the chair apart to get the job done - just a little knowledge and skill is required. The algorithm of actions is as follows:
- Tilt your back to the maximum angle.
- Insert your hand into the resulting hole and try to find the fastening of the upholstery in the backrest. As a rule, there are three of them: two in the center (left and right) and one at the bottom.
- Remove the upholstery accessory.
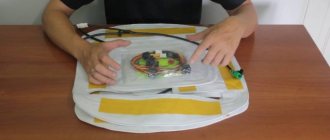
After completing the above work, disassemble the pair of non-functional heating connectors. If necessary, remove all three devices (remember to “unhook” the latches). Then check them for maintenance. Resistance does not play a key role in the diagnostic process. The main thing is that it exists in principle. During the verification process, pay attention to the following contacts:
- Two on the edges and two in the center.
- Four per pillow.
- A couple of contacts on the back.
Once you have determined the exact location of the break, you can begin repairs. We will look at how to do this if the seat heating does not work because of this.
How to repair heating: useful tips
If the above measures are not enough to restore heating and the device requires repair, disassemble the chair. To remove the seat, remove the four bolts and discard the connector holding the seat to the base.
Pay special attention to the seat belt, which is attached with a rim to the unheated seat. Here you will have to put a lot of effort into disassembling the device and then disassembling it. The housing itself is made of plastic and is secured with Torx bolts. The difference between the latter is the presence of special protrusions, so when disassembling you will need a special type of screwdriver. By the way, the biggest problems in practice are caused by disassembling the case. To speed up the process, you should adhere to the following algorithm:
- Remove the mounting plate.
- Release the latch.
- Pull out the belt buckle.
- Remove items from packaging. Do everything carefully so as not to damage the structure.
Disassembling a pillow is usually not difficult, but you will have to work on the pillow. To remove it, unscrew the clips and clips located on the left and right sides. Then pull out the lumbar support handle. If you do not complete the specified work, the device will not work.
An equally important point is to disassemble the handle with which the backrest tilt is adjusted. After separating the cushion from the area of the chair where the seat heating is not working, repairs can be made. The process consists of the following steps:
- Removing the top right cover.
- Removing the plastic housing and armrest.
- Release the rear support strip.
- Removing the headrest fastening and raising the backrest.
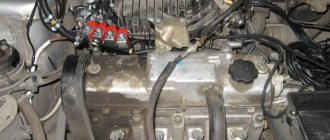
Once the above manipulations are completed, you can begin to repair the heated driver's seat, which is not working. The first thing to do is tear the foam where the wires enter, and then check the integrity of the cable products. Then take the Teflon cable and replace the damaged section. To improve the quality of contact, strip the edges of the wires and apply tin. Combine the finished structure into a common highlight, then insulate the area with cambric.
Before starting assembly, check the serviceability of the contact connections, and then return the chair to its original design. For proper installation, you will need glue to connect the heating element.
If the heating of the driver's seat suddenly fails, this is not a reason for despair. You can do the repairs yourself. The main thing is patience and some skills in dismantling, as well as subsequent inspection. The work will take an inexperienced driver 6-7 hours, an experienced specialist - 1.5-2 hours.
Video: Do-it-yourself seat heating repair
If the video doesn't appear, refresh the page or click here
Video: Do-it-yourself repair of seat heating for Volkswagen Passat
If the video doesn't appear, refresh the page or click here
Why does the VAZ-2114 seat heating not work?
The ability to heat seats on domestically produced cars is no longer a novelty. This feature should be present on every machine. With the onset of the first frosts, more and more VAZ owners are wondering why the heating does not work on the fourteenth. This is especially true for those who have cars on the street.
Nordic companies were the first to install heated seats on cars. Initially, the option appeared on expensive cars, but later this will not surprise anyone even on domestic vehicles.
Of course, those who have already tried this option speak only positively about it.
Now let's look at the reasons why the seat heating system on a VAZ-2114 may not work. The information in the article will be partially useful to car owners of other cars, because the principle of operation of heaters is similar.
We immediately draw your attention to the fact that the troubleshooting process is quite problematic and will require experience in carrying out repair work on the vehicle’s electrical network and the availability of certain devices.
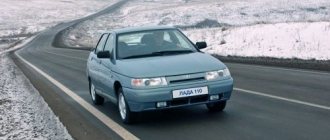
Location of fuses on the diagram for VAZ 2110, 2111, 2112
Today we will look at the location of fuses in VAZ cars of the tenth family, namely models 2110, 21102, 21103, 2111, 2112. We will also show where the fuses and relays are located on the diagram and talk about the purpose of each of them and how to replace the fuses with your own hands.
We will also touch on the most common problems with fuses among owners of these cars, diagnostic methods and replacement. I would like to say that car electrical systems, in particular fuses and relays in the VAZ 2110, 21102, 21103, 2111, 2112, are quite reliable. The service life depends on operating conditions and timely diagnosis and replacement with high-quality components.
Let's figure out why fuses are needed in a car. First of all, they are responsible for the safety of the wiring and other systems of the machine. It is important to understand that each specific fuse is responsible only for its task and in the event of a short circuit or failure, a fire is practically excluded. A specific fuse blows and this does not cause a chain failure of other systems.
Depending on the problem of failure of any component or part of the car for which the electrician is responsible, you need to understand whether the car can be operated with this malfunction or not. The traffic rules contain a list of faults that you cannot operate a car with. If you discover, for example, that the headlights have failed or the wipers are not working at all, you should immediately correct the problem. Well, you can drive a car with non-working power windows. So…
Content
How to repair heated seats? It is absolutely clear to all of us that not all owners of heated cars have the time and desire to solve problems. Many, faced with this problem, simply let it go and, with the onset of cold weather, reproach themselves for their reluctance to fix the problem in a timely manner. It's okay if the car is still relatively new. Then all that remains is to take it to the warranty service center, where they will quickly fix everything.
What to do if the car gets old? Or was heating simply not designed for your car, but was installed as an add-on by a long-forgotten person? In this case, it is enough to find a responsive electrician. Maybe it will be your neighbor, a relative, or a specialist at one of the gas stations.
Anyone who understands this problem will be able to quickly identify and solve the problem for a relatively small cost.
Let's look at the main reasons for this gap.
Dismantling works
To install heating elements, you first need to carry out a dismantling procedure. It includes the following activities.
- Unscrew the plastic fasteners that connect the seats to the body of your car.
- Remove the skids. Two pieces are located in front, and two more are located in the back.
- Remove the chairs from the interior, otherwise it will be extremely uncomfortable to work.
- Separate the back from the chair. To do this, there are bolts on the sides, which can be removed with a 10 mm wrench.
- On the back there is a plug for the headrests, which can be removed.
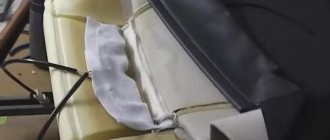
- The upholstery is removed from the hooks below. To do this, the hooks are slightly unbent.
- Now you can completely remove all the trim.
- Carry out a similar procedure with the second seat if you plan to install heating on it too.
While you are installing the heating, throw the upholstery into the washing machine. This will not harm her, and the interior will look newer and nicer.
Installation of heating elements
Many people forget about the need to securely fix the elements responsible for heating the seats. As a result, over time they can shift, thereby disrupting the performance of the system.
To avoid such situations, experts advise sewing heating elements directly to the inside of the upholstery. Although today some car owners prefer another option, which uses double-sided tape. The elements are held on it quite reliably, and the tape is attached to the foam rubber itself.
Switch
This is a fairly common problem. The first thing you need to do is remove the connector from it (with a slight movement and pull it down), then you need to press the latches that snap into place with a screwdriver and the switch will release. We measure the indicators between the extreme contacts. With the same resistance you will have to disassemble it, this will not be difficult.
Inside we will see a tab with contacts; a “slider” will move along them and close the necessary ones. This is what provides the different resistances. Most likely, they will be sufficiently cleaned of contaminants and work will resume.
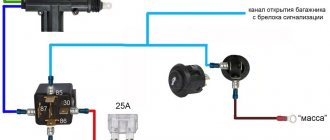
Fuse connection diagram
The figure below shows the order of connecting the plugs in the mounting block.
Drawing of connecting the plugs to the corresponding blocks of the mounting block.
The figure below shows a complete diagram with mounting block symbols.
From this diagram it is not difficult to figure out the order in which the plugs are connected.
- K1 - serviceability of lamps,
- K2 - windshield cleaner,
- K3 - turn signals, emergency lights,
- K4 - low beam,
- K5 - high beam,
- K6 - additional relay,
- K7 - heated rear window,
- K8 is an unused relay on VAZ models of the tenth family.
Video on removing the unit and replacing fuses
Dismantling
We begin tuning and repairs with the removal and subsequent disassembly of the seats, which is carried out as follows:
- We unscrew the plastic fasteners with which the seats are attached to the body;
- Unscrew the slides (2 each in front and back);
- We take the seats out of the cabin;
- Separate the backs. To do this, you need to unscrew the bolts on the sides with a 10mm wrench;
- Directly on the bottom of the seat you need to pull out 4 plastic fasteners and remove the trim;
- On the backrest you need to remove the plugs for the headrests. Then, at the bottom, remove the upholstery from the hooks, which will require slightly straightening them. Now you can remove the casing completely.
When making such repairs, it would be very good to wash the upholstery in a regular washing machine at the same time. This will not harm her, and driving a VAZ 2110 clean is somehow more pleasant.
Hello everyone! At the beginning of last winter I installed heated seats from a VAZ-2110. The thing is cool and necessary in winter, but it has one drawback: a couple of minutes after turning it on, it starts to fry your butt, and if you turn it off in cold weather, the seat cools down instantly and also becomes not very comfortable. I decided to upgrade the control unit to eliminate these shortcomings. I used the eight-bit AVR Attiny2313 microcontroller for which the firmware was written and a board was made for installation in a standard ten-pack case. Heating is regulated using PWM: current is supplied with a constant voltage in the form of pulses, and the wider they are, and the shorter the pauses between them, the more the element heats up. The power part of each channel is made of a MOSFET transistor; the operating mode is indicated by a combination of two LEDs, red and green. The connector terminals for connection, as well as the buttons themselves, are taken from the standard unit. The unit has three heating modes: 30%, 60% and 100% of full power. Each channel operates independently of each other, the last selected operating mode is stored in non-volatile memory (EEPROM) and is selected automatically the next time it is turned on. When you turn on the heating, the intensive heating mode at full power is first switched on for a while, after which the last memorized mode is automatically switched on. The intensive heating time can be adjusted during operation; for this, when the heating is turned off, the driver's seat switch is pressed for 2 seconds, after which the unit turns on the driver's heating at full power. As soon as it starts to get hot, turn off the heating, the unit remembers the time and switches to normal mode. In the future, it will turn on exactly for this time. Each channel is indicated by two LEDs: 30% - green, 60% - yellow, 100% - red. The intensive heating mode is indicated by blinking red, the time setting mode is indicated by blinking green. I wanted to make sure that the updated unit would fit without modifications to the existing wiring, but since the installation space in the unit is very limited, I had to use the simplest circuit for connecting a power transistor, which involves controlling the load minus and the constant presence of a plus on the second load terminal, but in the standard one it was the other way around: one terminal is constantly on ground and the plus is switched. Therefore, minor wiring alterations are inevitable. Schematic diagram:
In the final version, there were minor deviations from this scheme in case of interference from the ignition, generator, etc. (MK is very sensitive to power supply interference), but practice has shown that everything works fine without them.
While working on the device I came across this solution: https://www.drive2.ru/communities/e-stuff/blog/636105 The idea and implementation are interesting, due to the fact that they abandoned the original buttons, which eat up 60% of the usable area boards, in favor of mikrikov from ordinary household equipment, we managed to free up enough space for additional wiring of the MK, but we had to collectively farm our own stands for rockers made of PCB. I hoped that it would be possible to remove the original ones and put them on a new board, but I was mistaken, the quality of their manufacture left much to be desired and they were tightly rolled on the board and I had to make one stand of the same homemade kind. I also doubted that the microphones would provide sufficient pressing force in such a design; my fears were partially confirmed in the comments on the drive. In addition, the author of the device used a more expensive microcontroller, while at the same time my experience has shown that a cheaper and more compact one is quite sufficient.
Why do you need heated seats?
Having such an option in the car is extremely necessary during periods of severe frost. Getting into a car that has been parked in the cold for a long time is unpleasant and dangerous for the health of the driver and passengers.
Overheating of seats also poses a danger to human health, as well as to the car.
There are many articles on the Internet about the benefits and harms of heating. Let's dot all the i's. Driving with a heater for long periods of time can be harmful to women and men. Accordingly, it is recommended to use the option consciously in order to protect yourself from cystitis or prostatitis.
General rules for using heating:
- Do not allow the seats to become overheated significantly.
- In cold weather, turn on the heating and do not sit on them for a while.
- Once the seats have been warmed up, turn off the system. Next, heat the interior with a stove.
- You cannot stay in the cabin in warm clothes for a long time.
Following these rules will allow you to protect yourself from overheating and not harm yourself.
Seat heating fuse VAZ 2114
Replacing the heated seat
It was difficult to figure out where he was.
Subaru tribeca b9 seat heating repair
This video partially shows the disassembly of the seat
, and heating
.. And before removing
the seat
...
Necessary equipment
To install heating you will need:
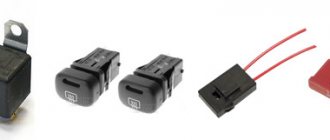
- Special heating elements for the backrest and the seats themselves. Preferably a normal one, for a VAZ 2110. It is also possible to install heating not only for the driver, but also for the front passenger. So you will need two sets. As a rule, the heating kit is sold immediately with heating elements for the two front seats, i.e. 4 pieces in total. The price of a standard kit for a VAZ 2110 varies from 1100 to 1300 rubles, also includes wiring and on/off buttons;
Standard seat heating kit
Health issue
Today, medical professionals are still actively arguing about the harm of heating seats inside cars. Some believe that heating is harmful to men's health. Others, on the contrary, consider this a normal and even useful addition to the car.
The decision is yours in any case. But we recommend not to get carried away with high temperatures. Just warm up the seat a little before you hit the road. And then turn off the system.
If you find an error, please select a piece of text and press Ctrl+Enter.
Everyone wants to make the interior of their car comfortable , and comfortable first of all when the fifth point is warm
Source
Break
To check if the worst thing has happened, you need to pull out the heating connectors. This can be done either without removing the chair or by removing it and all the upholstery that is in the way. Here everyone chooses a more preferable option for themselves. How to repair heated seats yourself in this case? In my opinion, it's easier to get out of your chair and calmly get to work, but you shouldn't try so hard without being 100% confident.
To do this, you need to pull out the connectors themselves from the gap between the backrest and the pillow (by placing your hand in it). When the connectors come out, we will definitely ring them. If there is no resistance, then there is a pause. Only after this we remove all the coating and look for the problem area.