VAZ 2110 window lift diagram
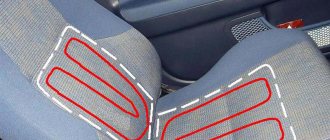
Electric windows (ESP) are convenient devices for controlling the side windows of a car, which are controlled by a special button and make it possible to lower or raise the side windows without rotating the previously used handles. This option is provided only in some modifications of the VAZ car, but nothing prevents you from purchasing a ready-made unit and installing it yourself.
The most preferred are rack-type ESPs, so as an example we will describe the process of their installation.
The connection diagram for the window regulator on a VAZ-2110 car is as follows:
- remove the negative terminal from the car battery to stop the supply of voltage to the on-board power supply network;
- we take the wires that come standard with rack-and-pinion window lifts and make a kind of harness out of them that makes connection easy;
- remove the car mounting block, which will require unscrewing the self-tapping screw that secures the special latch;
- turn the block over and carefully install block Ш1 of the pre-prepared wiring harness into the corresponding connector;
- dismantle the door trim;
- we pull the wires to the electric window drive. To do this, you will need to carefully pass them through the holes in the door itself and the body pillar on the desired side.
After this, buttons or keys are installed that will be used to control the power windows. Depending on your desire, they can be attached either to the door trim of a VAZ-2110 car, or to an existing control panel. In the first case, you will need to use an additional wire, which will allow you to equip the key backlight.
Connecting power windows VAZ-2109
Owners of a VAZ 2109 car can replace power windows with electric windows. On 2109 cars, electric windows can be connected via standard wiring, which already has everything provided for connecting an ESP.
This circuit is used to connect ESP on more “rich” configurations of the nine and it is advisable to use it when connecting independently. Below are diagrams for connecting an ESP with fuse blocks of new and old models.
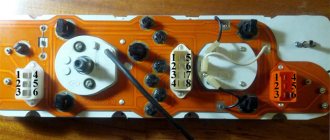
Wiring diagram for power windows on a VAZ 2109 with an old-style mounting block (17.3722):
- 1 - Mounting block
- 2 - Ignition relay
- 3 — Ignition switch
- 4 — Right door electric window motor
- 5 — Left door electric window motor
- 6 - Right door power window switch
- 7 - Left door power window switch
- K7 - Power window power relay
- A - To terminal “30” of the generator
- B - To the wiring harness block connected to the heater lever illumination display
- B - to the heater lever illumination display
- G - conventional numbering of plugs in the gear motor block
Electrical problems
First of all, check the power window fuse (on the VAZ 2110 it is fuse F5). If it is intact, then we check the voltage at the terminals of the window motor using a multimeter or a regular 12V light bulb. If there is no voltage, then we carefully check the wiring, the power window relay, and then the control unit (if any). See also Mounting block.
| Why doesn't the window regulator work? There are many reasons for the malfunction, ranging from the banal freezing of windows to failure of the window lifter mechanisms. Do you know how to check the window regulator? |
Installation of electric windows on a VAZ
The procedure is performed in the following sequence:
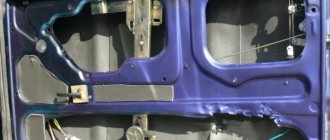
- temporarily remove the glass seal located on the inside of the door;
- remove the glass, and then dismantle the window regulator fastening mechanism;
- we install devices that will operate from an electric drive;
- connect the negative terminal to the battery and check the operation of the new window regulator;
- We install the glass in place and trim the door.
Unlike conventional mechanical devices, power windows are not equipped with traditional gear reducers, but with a special drum. The shaft of a DC electric motor is inserted into its hole located in the center. In this case, the motor is only a component of the gearmotor, on which, as we found out earlier, the speed and quality of raising and lowering the windows depends.
Installation of the lifting device is quite simple. It starts with disconnecting the battery. After this, use a curved screwdriver to unscrew 3 screws, unfasten the door trim latches and remove the door pocket. Using a thin screwdriver, pry off the handle (latch) of the window lifter - the tip of the tool is inserted into the recess between the latch and the socket.
The handle itself is removed. At the next stage, the car door opening handle is dismantled. To do this, use a screwdriver to pry the handle cover and remove it. Now use a screwdriver to remove the 2 fastening screws that were hidden by the cover plate. After this, the handle can be removed without much difficulty. Using a screwdriver, you can also remove the power window button, which serves to lock the door.
After removing 6 pistons, the trim covering the car mirror adjustment mechanism is also removed. As a result, it remains easy to dismantle the door trim. Armed with a 10mm wrench, unscrew the 2 bolts that hold the auto glass clips. Next, 2 nuts securing the lifting mechanism, nuts of the upper and lower fastenings, and 3 nuts securing the lifting mechanism are unscrewed in sequence.
Upon completion of the described stage, it is time to remove the lower guide pin of the lifting device from the door panel. To facilitate and simplify such an operation, the upper pin of the guide must be bent using a screwdriver. Now the entire lifting mechanism can be safely removed through the resulting opening in the door frame.
>Electric window diagram VAZ 2110-2111-2112
Design features of window lifters "Tens"
What is the electric window circuit in the VAZ 2110, for what reasons does the engine or the SP control unit not work, how to replace it and how to connect the device? First, let's look at the design features of the joint venture, which may vary depending on which specific doors they are used in.
Despite these differences, joint ventures for the most part consist of identical elements; let’s look at the example of electrical systems:
- Gear motor or drive. Taking into account the electrical circuit, this device provides the signal necessary to raise the glass.
- Grooves. These constituent elements are located on the inner surface of the door frame. The main purpose of the grooves is to hold the glass in a certain position and prevent it from tilting.
- Rails. Rails are used as guide elements used to move glass. These components are installed in the door body.
- Lifting mechanism with gears.
- Seal. The rubber seal allows you to limit the movement of the glass up or down.
- Wiring. Its diagram may differ depending on the type of joint venture, but in any case, it is through wiring that signals are transmitted from the control unit to the gear motor.
- The control unit itself has buttons that transmit an impulse about the need to open or close the glass.
Separately, it is necessary to say about the drives - depending on the type of joint venture, the drives can be different:
- Mechanical type devices. Mechanical devices are structurally composed of ordinary elements, several gears and a handle. In order to move the glass to a certain position, the driver or passenger will have to turn this handle clockwise or counterclockwise. A load will be placed on the drive shaft, which will allow the glass to be raised or lowered.
- The drive can also be electric. An electrical device has a more complex structure compared to a mechanical one. The design of such a joint venture includes a gearbox, drum, control module, etc. As mentioned above, an electrical circuit is used to connect all components, which must always be in working order. Once connected, the system is controlled using the buttons on the unit.
It should be noted that the joint ventures themselves can be subdivided according to the types of the lifting mechanism itself. Cable mechanisms were the first to be used, but over time, due to multiple disadvantages, such as slow operation and low service life, they were replaced by rack and pinion mechanisms. Unlike cable ones, rack and pinion ones work much faster, but louder, and their service life is much longer due to the reliability of the design (the video was shot by Artem Aver).
Power window lifter.
Electrical circuit diagrams for the VAZ 2110 car. Diagnostics of the electrical equipment for the Lada 2110 car. Instructions for troubleshooting the lighting system. Repair of generator and starter for Lada 2111 - 2112.
Electric windows are used to raise and lower the door windows and are installed on a part. These VAZ 2110 have a plug in the door trim instead of a window lifter handle, and there are corresponding backlit switches on the floor tunnel lining.
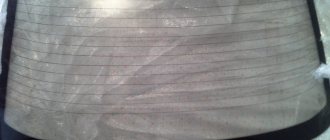
In the window lift mechanism, instead of a gear reducer, only a drum is installed, into the hole of which the output shaft of the VAZ 2111 gear motor is inserted.
The gearmotor consists of a worm gearbox and a DC electric motor with excitation from permanent magnets. The direction of rotation of the shaft depends on the direction of the current in the armature winding. To protect against overloads, a built-in thermobimetallic fuse is used. The faulty gear motor is replaced.
Voltage is supplied to the switches only when the ignition is on through a relay of type 904.3747-10 located at the rear of the VAZ 2112 mounting block.
- Wiring diagram for power windows
- 1 – mounting block
- 2 – ignition switch
- 3 – right front door power window switch
- 4 – right rear door power window switch
- 5 – electric window motor reducer of the right front door
- 6 – electric window motor reducer of the right rear door
- 7 – electric window motor reducer of the left rear door
- 8 – electric window motor reducer of the left front door
- 9 – left rear door power window switch
- 10 – left front door power window switch
- 11 – relay for turning on electric windows
- A – to power supplies
- B – to the instrument lighting switch
- C – conventional numbering of plugs in power window blocks
The window regulator slowly raises the glass - what should I do? There is a solution!
Hi all! Dear friends, you are all aware of what “jambs” and shortcomings each of us “happy” owners of domestic VAZ cars have to eliminate. Today’s article is another life-saving solution for those who are faced with the problem of poorly functioning beet lifters.
Electric windows (ESP) have been installed on foreign cars for decades, so, as a rule, there are no problems with them, which cannot be said about VAZs. On “our” swallows, such a miracle has been occurring for about 10 years, and as practice shows, the good old “meat grinders” in the form of a simple mechanical handle worked much more reliably. Get to the point! A defect was noticed on many models from 2109 to 2115, where, as a rule, the front right glass does not rise well. Moreover, the window lifters slowly raise somewhere from the middle or even lower, the glass slows down or stops rising altogether. At the same time, drivers help the ESP either with their hand or with a “clarion word”.
Installation and connection of electric windows on a VAZ 2110
Electric windows have greatly simplified life for car owners and increased the level of comfort while using the car. The devices are controlled by a single button, which allows you to adjust the opening of the side windows, taking into account the current situation, and without the need to rotate the handles. The downside is that such a mechanism is not installed on all VAZ 2110 cars, but only in some modifications. But this drawback can be corrected by installing window lifters yourself. We will look at how to do this correctly in the article.
How to choose a window regulator for a VAZ 2110
If you are planning to install and connect window regulators yourself, start by choosing the appropriate device model. The key criterion when choosing is reliability. The installed product must perform its functions for a long time and work without failures. Finding suitable options in the modern market is not difficult:
- Slat mechanisms are window lifters that are not easy to use.
- Traditional designs. The advantages of these products include ease of installation and affordable price. Disadvantages - small service resource (when compared with other types of competitors).
- Rack and pinion windows. Such mechanisms are in greatest demand. They are considered the most suitable and are the most reliable.
How does the window lift mechanism work?
Agree, sitting comfortably in the car, lightly pressing the button opens or closes the window.
Sometimes you don’t even think about how this tricky window lifter mechanism works.
Let's take a look inside. Any average electric window regulator consists of the following elements:
- drive mechanism;
- lifting mechanism;
- window control unit.
Drive mechanism
It is an ordinary electric motor that drives the lifting mechanism through a clever system of worm and gear drives. But with him it’s not so simple.
Lifting mechanism
The fact is that engineers have come up with several options for lifting devices, or more precisely:
- cable;
- lever;
- rack and pinion
Cable
In the first case, the window lift motor acts on a flexible element - a cable, chain or belt. Actually, this is clear from the very name of the drive type.
The flexible element is secured by a system of rollers inside the car door panel, and is attached to the glass using a plate. Everything is arranged so that the cable can move progressively up and down.
In principle, this version of the mechanism is the simplest and most maintainable.
Lever
Lever devices are popular with those automakers who value compactness.
The main operating link of the mechanism, as you might guess, is a lever (one or more) connected to the window lift motor through a gear.
One of the disadvantages of the lever system is the uneven speed of glass movement.
Rail
You would think that the rail would somehow move inside the door, but that is not the case. In fact, the rail is stationary, and the electric motor itself moves along it, having contact with the glass. It is believed that such structures are the most durable.
Window lifter control unit
I would also like to mention the control unit. In the simplest case, this is the so-called direct control, when the button independently connects the motor to the on-board electrical network, activating it.
By changing the polarity of the connection, the direction of rotation of the motor changes - everything is elementary.
A more complex option is electronic control. Electronics allows you to implement various interesting “goodies”, for example, automatic opening, reverse glass movement, etc.
Thus, dear readers, we have found out how the window lift mechanism actually works. As you can see, everything is quite simple, and now there is one less mystery in the car.
Thank you for your attention, friends, and see you again! Read an interesting article about electronic window tinting
Lada 2110 Carburetor › Logbook › Installing power windows on a VAZ 2110
I would like to save money when installing window regulators. I'll tell you how. So: The window regulator for 2110 costs 1,500 rubles for the front assembly and 1,600 rubles for the rear. Total - 3000 front + 3200 rear = 6200 rubles + installation.
We buy the following: 2 powerful motors for 750 rubles per front. You can do it cheaper, but the front ones are driven more often and would need more power. = 1500 RUR 2 engines "Kalina" x 450 RUR = 900 RUR 2 trapezoids x 250 RUR front bare (without motors) = 500 RUR 2 trapezoids x 250 RUR rear bare (without motors) = 500 RUR 8 bolts of the "receiver" - that's what through threaded rods with a 6-sided boss of 2 washers and elastic inside x 15 RUR = 120 RUR 1 block of buttons 4 pcs. = 120 rub. 16 meters of installation wire for 4 squares of copper stranded soft x 15r = 156r It turns out 3796 rubles. 35% cheaper. We also need door trim pistons. After much torment, I installed the Prirovsky ones. They hold up better than standard hedgehogs. Before installation, we assemble the station - insert the square of the motor drive into the fitting boss. CAREFULLY! The lug with the cable tries to jump away! If the cable unwinds, it will take a long time to insert it back with mats. It’s better to open the engine, coat the gasket with sealant (if there is one) and just coat the space under the gasket (if there is none) and thoroughly hammer the grease onto the worm. It is better to lubricate not lithol or grease, but CV joints. The one that doesn't freeze in the cold. Spray the brush assembly well with silicone grease. Not thick! And not VD-40. We attach the motor to the fittings with the same receiver bolts.
Installation is simple: 1. Remove the door trim. 2. Lower the glass 3. Unscrew the window regulator. 4. We thread it outwards. 5. Install the motor. When installing, you can slightly tighten the glass fastening. Because the glass gets a little warped in the frame and gets stuck. And if you make them a little looser, the glasses themselves find the right position and become as they should without jamming. 6. All holes match, no need to drill anything. 7. We stretch the wires through the door. 8. We check the installation by connecting to the battery (I check by connecting a screwdriver to the battery) 9. I stretch the wires under the central tunnel to the gear shift knob. HERE I have a button block installed. 10. I pull the buttons from the nearest powerful wire fuse (4 mm). 11. Checking the polarity. 12. I close everything in place.
Note. Why did I use 4 square thick wires? And not just sniffles? The fact is that motors consume a lot of current. And there is a lot of heating of the thin snivells. In addition, due to heating, the voltage drops significantly. On thin wires - up to 2 volts. As a result, it closes slowly and eats a lot. On thick wires it buzzes SOOO quickly. Faster than many foreign cars.
Models and manufacturers
Currently, the ESP market is oversaturated with a variety of devices and accessories. Below are the most popular ones in the Russian Federation.
Window lifters made in Italy. They are installed in both the front and rear doors of cars of any model.
The device is installed while preserving the entire standard mechanism installed by the car manufacturer.
The basis of the design consists of a durable flexible cable drive connecting the electric motor and the driven gear on opposite sides. The composition includes adapter bushings, of which there are about 30 in the set. They are able to adapt ESP to more than 200 car models.
Spal De Lux price is approximately 5,000 rubles
Lifts made in Taiwan, Cenmax company. Absolutely universal i.e. can be installed on every car.
Thanks to this device, you can quickly, easily and silently control the windows of your car. The model is mounted under the door trim.
The main advantage of the mechanism is the very reliable material of the sleeve. In addition, these electric windows have special engine protection from excess load and overheating.
The cost range of Vigilant ACM 002 on the domestic market is 2,000 - 2,500 rubles
Garnet - universal window lifters of domestic production. They can be installed on both domestic cars and foreign cars.
This model produces no more noise than a functioning engine with a working muffler.
The price of the product ranges from 2,500 to 3,000 rubles
Window lifter.RF › Blog › Replacing the rear windows of the VAZ-2110
This report on the installation of electric windows in the rear doors of a VAZ-2110 was prepared by our buyer Andrey Aleksandrovich Serebrennikov from Sevastopol, as part of his participation in our promotion.
And finally the long-awaited rear electric windows have arrived.
It all starts with removing the door card. We unscrew everything that can be unscrewed, and then pull off the card with the pistons, you just need to pull it off carefully, you can break off the leg under the pistons.
Then unscrew the 3 “8” nuts that hold the lowering lever, and the 2 “10” nuts that secure the guide to the door, be careful not to lose the growers!
Then unscrew the 2 bolts securing the guide to the metal base of the window.
Holding the base of the window with your hand, we take out the entire mechanism and place it at the bottom of the door, now we need to secure the window.
Since there was no stick at hand to support the bottom, an L-shaped wrench was used in this way:
Now the window does not try to move down, and will not interfere with us pulling the entire mechanism out.
We pull out the mechanism through the lower left hole of the door (for the left rear door), the whole difficulty lies in removing the mechanism block itself, since the pulley is very long and does not want to fit through.
Then I checked the power windows for functionality by connecting it to the wire going into the door and pressing the button so that I wouldn’t have to take it all back out later.
We begin to put the ESP inside the door. Compared to the stock one, I didn’t experience any difficulties; everything fits in quite quickly.
We begin to attach it all to the door. And then I discovered a small problem: there are only 2 fastenings of the ESP unit to the door and they are designed for nuts at “10”, while the standard ones were at “8”. It's good that I take it with me in reserve. In total, instead of 5 fastenings we get 4, but now everything is turnkey to “10”.
We check the functionality and fasten the card in place. And we are waiting for the deluxe 2 cards to arrive so that we can fully enjoy the view of the salon!
The operation of the window lift cable, or the cable mechanism for raising the glass in a car
The cable window lifter consists of the following components:
- The cable is a flexible part that ensures the reliability of the device. Some car models use a chain or belt instead of a cable; they are more reliable. The tension of the flexible part is carried out using 3-4 rollers. The rollers are attached to the inside of the door.
- The guide pipe on which the rollers are mounted.
- Drum. This is the part on which the cable is wound.
- The plate on which the glass is attached.
- Rollers. Among the rollers, one is spring-loaded, which allows you to adjust the tension of the cable: tighten it if it is too stretched. Can be used to tension a spring.
Cable-driven device The mechanism works as follows:
- The plate is attached to a cable and moves along a guide pipe located vertically.
- The lower edge of the car glass is connected to the plate.
- When a knob is rotated or a key is pressed, the drive gears are activated, and these movements are transmitted to the drive drum. In this case, one branch of the cable is wound onto the drum, the other is unwound.
If the glass is too wide, distortions are possible, since one cable will not hold it. To avoid this, two guide pipes are installed. The cable runs through them and holds the glass in two places.
The design resembles two triangles, the vertices of which are the rollers and the drum. The cable mechanism is more popular. It is compact because it can be installed on any car model. Its big drawback is the stretching and breaking of the cable, which makes it impossible to move the glass.
Selecting window regulators for installation on a VAZ-2110
If you want to install electric windows on your car, you will first need to choose the most reliable device that will serve for many years without causing any problems. On the modern market you can find the following options:
- traditional cable structures, which are relatively easy to install, but differ from others by not having a very long service life, wear out quickly;
- strip devices that are not very convenient to use;
- rack and pinion window lifters, which are deservedly recognized as the most suitable and reliable in operation.
When choosing devices suitable for your car, pay attention to factors such as:
- the speed of raising and lowering the glass, which largely depends on the gear motor installed on the car;
- the ability to use the device in the cold season;
- noise level during product operation.
Taking into account all these factors, you will be able to choose window lifters that will not only work flawlessly, but also will not create any problems in specific operating conditions.
Typical cable faults
There are three main cable faults:
- chafing and breakage;
- twisting;
- stretching
In addition to the listed malfunctions, cable wear can occur for a number of other reasons. For example, if the device is installed incorrectly or foreign objects get into the glass groove.
A malfunction of the mechanism can be determined by the following signs:
- glass jams in one position;
- difficulty moving glass;
- there is no reaction when you press the button;
- jerks when moving.
The cable can weaken not only due to long-term use, but also when the plastic clamps break, which should be replaced. If the window lift cable is broken, it must be replaced.
How to install and connect power windows on a VAZ-2110
The most preferred devices are rack type, so we will describe the installation process as an example. The connection diagram for the window regulator on a VAZ-2110 car is as follows:
- remove the negative terminal from the car battery to stop the supply of voltage to the on-board power supply network;
- we take the wires that come standard with rack-and-pinion window lifts and make a kind of harness out of them that makes connection easy;
- remove the car mounting block, which will require unscrewing the self-tapping screw that secures the special latch;
- turn the block over and carefully install block Ш1 of the pre-prepared wiring harness into the corresponding connector;
- dismantle the door trim;
- we pull the wires to the electric window drive. To do this, you will need to carefully pass them through the holes in the door itself and the body pillar on the desired side.
After this, buttons or keys are installed that will be used to control the power windows. Depending on your desire, they can be attached either to the door trim of a VAZ-2110 car, or to an existing control panel. In the first case, you will need to use an additional wire, which will allow you to equip the key backlight.
The process of dismantling and replacing the device
If you decide to repair the front or rear SPs or replace them, then you will probably know how to remove the device. The procedure for removing and connecting a new window regulator may vary. It all depends on the type of joint venture, as well as the design features of the car.
Let's consider the process of replacing a manual SP with an electric one:
- First, the ignition is turned off and the car battery is disconnected; this must be done in order to de-energize the on-board network.
- Then the control handle located on the car door is removed. To dismantle the handle, remove the stopper located under the special washer - all these components are located on the handle itself. Using a flat-head screwdriver, you will need to move the latch to the side and remove the locking element from the slot. These steps will allow you to dismantle the handle. If this element is installed tightly enough, then try prying it off with a screwdriver.
- After this, the armrest handle is dismantled. Using screwdrivers, remove the plugs - behind them there are screws that secure the handle. They are unscrewed with a Phillips-blade screwdriver. To make things easier, you can also remove the handle trim on the side rearview mirror. After completing these steps, you will need to remove the door trim. At this point, the preparatory stage can be considered complete.
- Next, in order to electrically install the motor, control unit and other components of the joint venture, you will need to gain access to the latches. These components are used to attach the device itself to the glass. The device is fixed with two screws; they can be unscrewed with a wrench.
- When these steps are completed, you will need to remove the glass or fix it in one position with tape. It is necessary to disconnect the socket from the slot and unscrew the nuts using a wrench; this will allow you to dismantle the old SP mechanism. To install a new system, you will need to connect the block with wiring to the plug on the mounting block. In this case, it must be connected to the back of the fuse box.
- Next, the devices themselves are installed directly with an electric motor, control module, lifting mechanism and other components. First, all the components must be installed in the car door. When the fastening studs in the frame are installed, the nuts that secure them will need to be completely tightened. When installing, be sure to use the instructions that come with the kit, as well as the connection diagram. The latter will be required to properly connect the connector with the wiring.
- When all the elements of the electrical circuit are connected, it is necessary to connect the battery terminals and diagnose the performance of the joint venture. To do this, you will need to close the contacts on the wires.
- Then the central module with buttons is installed. This device must be installed either in the doors, or on the center console, or on the tunnel that runs from the console to the rear seats. The last option is more preferable.
- Now you need to lower the mechanism with the electric motor until you see that the mounting holes of the holder coincide with the technological holes in the mount. This clip must be bolted.
- Using the control keys on the central unit, you will need to make sure whether the joint ventures are working correctly and whether there are any problems with their operation. If no errors were made during the work and all actions were performed correctly, the window regulators will work correctly. If you make mistakes, you may encounter performance problems. At the final stage, you will need to assemble the door and install the trim in place. In the place where the handle for raising and lowering the glass was located, you will need to install a plug.
Installation process of electric windows
In addition, it is necessary to install the power windows themselves. The procedure is performed in the following sequence:
- temporarily remove the glass seal located on the inside of the door;
- remove the glass, and then dismantle the window regulator fastening mechanism;
- we install devices that will operate from an electric drive;
- connect the negative terminal to the battery and check the operation of the new window regulator;
- We install the glass in place and trim the door.
Our instructions in pictures will help you understand the installation procedure in more detail.
Types of mechanism, design of window lifters
Some internal mechanisms are different. There are rack and cable drive types. Each device differs in technical characteristics and has its own advantages and disadvantages:
- The rack and pinion device is more reliable. The risk of glass distortion is minimized even after long-term use. The movement of the device is carried out thanks to gears that run along a belt rack. However, the carriage requires regular lubrication, which is why you have to disassemble the door card at least once a year.
- The cable device breaks more often. It often jumps off the rotating mechanism. Slow movement and resistance of the rubber seals can cause the cable to come off. This happens if you turn the handle sharply. The main advantage of the mechanism: good maintainability without serious financial costs.
The devices have the same location. The window regulator of the front right door of the VAZ 2107 car is located identical to the mount in the driver's side panel. The design includes:
- handle;
- cladding with a lock;
- socket, roller bracket;
- screws;
- mechanism with gears;
- pressure plate;
- glass;
- cable;
- roller: upper, tension;
- fasteners.
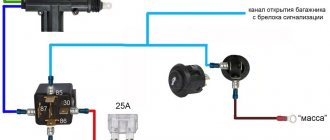
Features of connecting power windows
Unlike conventional mechanical devices, power windows are not equipped with traditional gear reducers, but with a special drum. The shaft of a DC electric motor is inserted into its hole located in the center. In this case, the motor is only a component of the gearmotor, on which, as we found out earlier, the speed and quality of raising and lowering the windows depends.
Before installing a new power window, you must select the correct device based on its technical characteristics, and also make sure that the product is in a fully folded state. Otherwise, you are unlikely to be able to install the product efficiently and ensure its flawless operation after connecting it to the vehicle’s on-board network.
You've probably noticed that on almost all foreign cars the power window buttons are duplicated on each car door. To connect additional ESP buttons in the doors, you need to run an additional three wires into each door .
Standard ESP connection diagram
Changed to this scheme (here without rear ESP)
Connection diagram for additional ESP button.
How the additional ESP button is made on Kalina
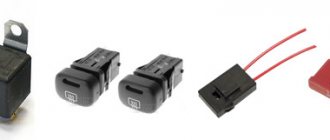
To install one duplicate button in the door you will need:
- 2x contact (plastic connector) block male + female 1 pair
- Large male terminals 2 pcs.
- Mom large 2 pcs.
- Mom little 7pcs
- Earth 1pc.
- Power window button 1 pc.
- Button installation cup 1 pc.
- Power window button connector 1 pc.
- Wire diameter 0.75 4 met.
- Door pistons 7pcs
If your ESP buttons have been moved to the doors. then the insert into the harness for additional buttons will look like this. The meaning is that we need to run 3 wires :
- Ground (Ground, in theory, can be taken into the doors, but there is not always good contact there, so it is better to run a separate ground wire)
- +12V “after ignition” (with power window relay at ChYa)
- illumination (take it from the cigarette lighter, since it is in the middle between the doors.)
Disconnect the negative terminal from the battery.
We look for +12V on the ESP relay (black and white wire) to it and screw both of our red +12V
Then we climb through the door. There are 2 wires going to the ESP motor - gray and blue, through a connector. Unplug the connector:
We take 2 wires (I have black and black and white), of such length that we can reach from the original chip with the blue and gray wire going into the corrugated door to our future button. We crimp 2 large male terminals onto them and insert them into the connector. We put it on the chip with blue and gray going into the corrugated door, so that the black comes from the gray, and the black and white comes from the blue:
Insert the wires into the button connector:
- Red +12V
- Black mass
- White backlight
- Black with gray wire chips
- Black and white with blue wire chips
We crimp with small “mothers” and insert the ESP buttons into the connector. We do it according to the scheme:
- Red +12V to slot 2
- Black ground - in slot 5
- White backlight - in slot 4
- The black wire from the gray wire of the chip goes into slot 6
- Black and white from the blue wire chips - into slot 3 (THREE).
Do not mix up the button connector sockets! That's not all, we need two more short wires, through which we will now connect our button to the ESP motor, like we'll do it as before. For beauty, we take the same colors of wires that were attached to the original chip going into the corrugated door, i.e. black and black and white. It will be like a continuation of the original wires, and in the middle of them is our button. We insert the black wire into socket 1 of the button connector. Black and white - into socket 7. We crimp the other ends of these wires with large “mothers” and put the purchased connector on them so that when putting this connector on the dangling chip going to the ESP motor:
- The black wire went to the gray ESP motor chips
- Black and white - to the blue wire of the ESP motor chip.
In principle, that's all. Don't pay attention to the orange wire in the photo - it's a mass for heating the mirrors.
You can use the button from Kalina. it is more beautiful and a little more expensive than the VAZ 2110.
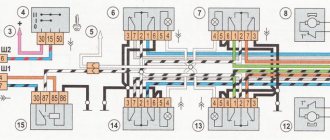
Electrical circuits of cars VAZ 2110, VAZ 2111, VAZ 2112, repair
Electrical diagrams of VAZ 2110, VAZ 2111, VAZ 2112
Why does the window regulator work poorly?
- The first reason is poor lubrication of the window lift mechanism. During operation, the ESP mechanism gradually loses lubrication, causing the windows to slowly lower or rise. The solution to the problem is to remove the door card, after which all working parts are lubricated. If after lubrication of the window lifter mechanism the problem is not eliminated, we continue to search for it.
- Often the reason may be poor adjustment of the glass itself. That is, a situation where the glass itself is not installed correctly on the lifting bar. In this case, it is necessary to remove the door card and adjust the position of the glass using the adjusting nut, and then check the operation of the ESP.
- Factory defect. If everything is ok with the mechanism and the glass is in place as it should, I advise you to check the guides along which the glass itself moves. That is, we are talking about a tunnel in which glass flows. As bitter experience shows, it is this manufacturing defect that often becomes the reason why the window lifter slowly raises. Due to the narrowing of the guides, additional resistance occurs, as a result of which the motor slows down and the glass slows down. Your task is to understand exactly where the resistance arises and try to correct it. The work is quite simple and consists of removing the velvets and slightly expanding the narrowing area of the metal.
- The fourth reason is poor lubrication of the guides. Sometimes, during operation, the guides, or it would be more correct to say the tunnel along which the glass moves, wear out, become abraded, become dirty, etc. As a result, the glass experiences excessive load and resistance, which naturally leads to the window lifter slowly raising the glass. The problem is solved quite simply, we take cotton swabs and clean the tunnel from dirt and sand. Then we take a lubricant, it can be silicone grease or WD-40, or something alternative, and lubricate the guides. We don’t skimp on the lubricant, but we don’t put it in excess either, we just generously coat the sliding areas of the glass, then check the result.
- Wear of velvet. Due to increased wear of the velvet covers, or more simply put, glass seals, the latter may rise more slowly. However, if this is the problem, then most likely the power windows on all doors will not work well. The solution to this problem is to replace the worn velvets, after which the problem should go away.
- The electric window drive is faulty or has poor contact. If there is something wrong with the motor that raises the window or there is poor contact in the connections, then you cannot avoid problems with raising and lowering the windows. Incorrect operation of the drive, as a rule, manifests itself in both directions, that is, raising/lowering, but most often, lowering is more difficult. In order to fix this problem, it is necessary to remove the electric motor, check its serviceability, lubricate it, etc. After this, we check the operation of the ESP again.
If all the steps described above are completed, then the problem should most likely go away; if this does not happen, you should continue the search or completely replace the ESP. That's all for me, I'm waiting for your solutions to this problem! Perhaps some of you have encountered a situation where the window regulator does not raise well, I would be grateful if you describe your case, as well as a way to solve this problem. Bye!
Diagram of electric windows VAZ 2110, VAZ 2111, VAZ 2112, Lada Ten
Electric windows are used to raise and lower door windows and are installed on some cars. These VAZ 2110 cars have a plug in the door trim instead of a window lifter handle, and there are corresponding illuminated switches on the floor tunnel lining.
In the window lift mechanism, instead of a gear reducer, only a drum is installed, into the hole of which the output shaft of the VAZ 2111 gear motor is inserted.
The gearmotor consists of a worm gearbox and a DC electric motor with excitation from permanent magnets. The direction of rotation of the shaft depends on the direction of the current in the armature winding. To protect against overloads, a built-in thermobimetallic fuse is used. The faulty gear motor is replaced.
Voltage is supplied to the switches only when the ignition is on through a relay of type 904.3747-10 located at the rear of the VAZ 2112 mounting block.
Possible malfunctions and ways to eliminate them
Now we suggest that you familiarize yourself with the causes of the main malfunctions that can occur in the operation of a joint venture. If there is a problem, the window regulators will either refuse to work at all, or will function incorrectly or be noisy.
Main causes of problems:
- Malfunctions in the operation of the electrical circuit, that is, wiring. If the wiring is damaged, the control motor of the joint venture will no longer receive a signal about the need to raise and lower, and accordingly, the operation of the joint venture will be impossible. The wiring may be damaged, in some cases the reason lies in insulation failure or oxidation of contacts. Damaged sections of the electrical circuit must be replaced, oxidized contacts must be cleaned or replaced.
- Inoperability of the gear motor. Electric motor failure usually occurs after several years of intensive use. If the unit fails, normal operation of the joint venture will be impossible, the drive must be repaired or replaced, here the specific nature of the breakdown must be taken into account.
- Damage to the control module with keys. If all the power windows do not work at once, then most likely the reason lies in the inoperability of the control unit. Perhaps the contact with the car's electrical network has been broken or the board itself has failed. The board itself must be replaced. If only one or more lifts do not function, then the reason may lie in poor contact of the control button with the network. Again, you need to get rid of the oxidation and reconnect the button.
- Mechanical wear of the gear. This problem is usually caused by long-term and intensive use of the joint venture; the gear teeth can be damaged as a result of wear. Repair is impractical; the gear must be replaced.
- The fuse responsible for the operation of the joint venture has blown. The fuse element may be located in the mounting block with all other fuses and relays. But if you installed the joint venture yourself, then the fuse may be located next to the battery. A failed device must be replaced (the author of the video is the V Village Life channel).
Serial connection - diagram
We connect the output of additional button 1 in the driver's door to input 6, and output 7 to input 3 of the main button on the passenger door. We cut the wires in the block connecting contacts 5-6 and 6-3. The minus of contact 5 now goes only to the backlight, and contacts 6 and 3 now take output from additional buttons 1 and 7 of the driver's door. Installation in parallel will result in short-circuiting during lifting and lowering. Power wires are highlighted in bold.
Read more: How often to change 5w40 engine oil
When using trigger buttons, connect all ESP motors only through a relay. When using a conventional door closer, relays are also needed, since they are not in the long-press closer block and all the current flows through the buttons and wires from them.
How to remove the window lifter handle Renault Logan
Window regulator Renault Logan
Repair of parts of window regulators or the entire mechanism in a Renault Logan
requires following step-by-step instructions and having a set of tools at hand, but any car owner is able to carry out this function without the help of others.
Functions of power windows, reasons for replacement or repair
Window lifters (regardless of what type are installed - mechanical or electronic) in a Renault Logan are designed to lower or raise the car windows.
Manually controlled mechanisms, as usual, are installed on the basic configurations of Renault Logan , elements with electronic drive for 2 or 4 windows are included in the “top” versions of the car.
Electrical problems
Do-it-yourself camouflage on a car
It is better to start diagnosing a malfunction by checking the condition of the fuse, which is responsible for the operation of the power windows in the VAZ 2110. Usually it is numbered F5. If necessary, the fuse must be replaced with a new one. If it is intact, proceed to the next stage. You will need a 12 volt light bulb with two wires going to its positive and negative side.
Connect the wires to the terminals of the window lift motor and press the button. If the light comes on, the wiring is good, but if not, start looking at the wires for breaks. Also don't forget to check the corresponding relay.
Another problem with the electrical wiring circuit is when the window opens when the button is pressed, but when it is released the glass rises again. In some cases, the button does not work until you turn the ignition off and on. These signs indicate a malfunction of the button, so you can try to remove it and clean the contacts, and if necessary, replace it with a new one.
Tracks or contacts in the mounting block
Another reason may be a broken contact of the mechanism relay in the mounting block.
Considering the circuit of the mounting block, we can conclude that a constant plus comes to pin 30 through a fuse, and when we turn on the ignition, we apply another plus to pin 85. As a result of turning on the ignition, an electromagnetic field appears, which closes pins 30 and 87, which provides power to window lift buttons.
This means that if the operation of the plus on the ignition switch is disrupted, the contacts stop closing, even if the relay is in working condition. You can check this by closing contacts 30 and 87 directly, then the plus will come without the ignition switch and if the problem is in it, then the power windows will work.
But there may also be the opposite situation, that we do not have a constant positive supply to pin 30, and when we turn the ignition key, the contacts close, but nothing happens. In this case, it is best to ring the contact with a tester and find out whether there is constant voltage. For testing, you can connect the plus directly to pin 87, but this is not safe, since the wire will go outside the fuse.
Features of the new model
The electrical wiring of the VAZ 2114 has a different design than its predecessor:
- Inside the car;
- In the engine compartment;
- In the rear of the body.
The new engines were equipped with a more powerful ignition system, as a result of which the wiring diagram of the VAZ 2114 to the injector had some peculiarities.
- A wiring harness was added to connect to the terminal of the ignition module, which supplied impulses to the spark plugs;
- A wiring harness has been added for connecting to the electronic switch;
- Wiring has been added to connect the adsorber valve to the injection system controller.
Photo of the ignition module pinout
For reference: there is a misconception that the ignition module replaces the coil. In fact, the ignition module has 2 coils and 2 switches at once. The first coil supplies an impulse to the 1st and 4th cylinders, and the second - to the 2nd and 3rd cylinders.
The wiring for the VAZ 2114 has undergone changes not only due to the addition of new electronic devices, but also due to the automaker's further plans to modernize the functionality of the car.
- It is possible to connect heated exterior mirrors;
- It is possible to install heated front seats;
- It is possible to install front fog lights, etc.
Connection diagram for fog lights: instructions for VAZ 2114
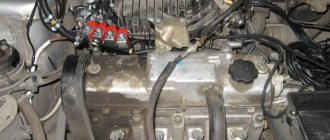
Engine compartment
The first thing that owners of a carburetor power system pay attention to is the modified wiring diagram of the VAZ 2114 to the injector. To operate on a lean mixture, the vehicle is equipped with:. To operate on a lean mixture, the vehicle is equipped with:
To operate on a lean mixture, the vehicle is equipped with:
- Forced fuel injection system directly into each cylinder;
- Installation of an increased power ignition system on the vehicle;
- Self-learning ECM - electronic engine control system.
The ignition module on the VAZ 2114 allows you to increase spark generation power
For reference: a feature of EURO 3 standards is the low content of unburned fuel components in the exhaust gases. To this end, the car's fuel system reduces the amount of gasoline in the air-fuel mixture, compensating for this by better filling the cylinders due to forced fuel injection.
To ignite a lean air-fuel mixture in the engine cylinders, it is necessary to provide a more powerful spark at the moment when the piston is at TDC (top dead center).
This is realized by installing an ignition module, the operating principle of which is implemented:
- The generator produces alternating electric current;
- It is supplied to the ECU, which converts it to direct current;
- From the control unit, current is supplied to the windings of the ignition module coils;
- High voltage is generated in the secondary winding (according to the law of induction) of the coils;
- It is supplied to the spark plugs at the start of the ignition phase.
Advice: if you want to understand the operation of a car’s ignition and power system, it would be a good idea to watch video materials from a school physics course. Or find videos on automotive websites.
Vehicle interior
For the VAZ 2114 model, the automaker developed and installed a new dashboard, which differed from its predecessor:
- the absence of a glove compartment in the upper part - it was moved lower;
- new instrument panel;
- the advent of an on-board computer
For reference: the on-board (trip) computer gave readings about the outside air temperature, the voltage in the vehicle's on-board network, current fuel consumption, power reserve and other parameters.
Torpedo VAZ 2114 with a new instrument panel, better known as “Europanel”
The emergence of new electronic components has led to a change in the wiring diagram of the VAZ 2114 panel.
- a wiring harness with a connector for the on-board computer was added;
- an outside air temperature sensor has appeared, installed in front of the radiator;
- The voltmeter relay appeared.
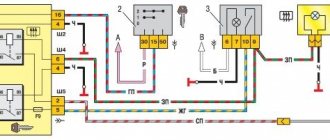
Wiring diagram for power windows on a VAZ 2114
In addition, a wiring harness was added to the front door panels, which were equipped with electric windows.
The diagram below shows:
- mounting block with terminal “A” to the power source and “B” to the external lighting switch;
- relay for turning on electric windows “K5”;
- switch for the right front door “2” and “5” for the left door;
- gearmotor of the right door “”3” and “4” - left door;
- ignition switch "6".
The wiring for the VAZ 2114 window regulators was also completed with an actuator unit
Window lifter drive motor
Acting as one of the leading manufacturers of power window drive gearmotors for Russian cars and trucks, Junyuan Auto Parts guarantees the manufacture of auto components in strict accordance with original products. Product quality tests are carried out by reliable Chinese quality control services. EscortCity. The products have also passed mandatory foreign certification.
Characteristics 1. The coating of the motor housing promotes corrosion resistance, characterized by a clean and smooth surface without scratches, deformation, damage or other defects. The connection elements are well tightened, preventing loosening. 2. The operating parameters of the power window drive gearmotor are in accordance with national and international OEM standards. 3. Many years of experience in the production of electric motors and gearmotors. Export of products to the Russian market: 6 years. Annual export volume: 150,000 pcs. 4. Product quality meets the requirements of the Chinese national standard QC/T626-2008 “Technical requirements for power window drive gearmotors”. 5. Certification of products according to the State Standard of Russia (GOST). 6. Cooperation with the Russian OJSC Avtokom, one of AvtoVAZ’s suppliers.
Other features Annual production volume of this series: 500,000 pcs. Guaranteed supply: 40000pcs. Warranty period: 24 months
Technical data of power window drive gearmotors
Window lifter drive motor 1
Motor reducer for window lifter drive VAZ 2108-2115 left (2110-3730611)
| Product number | JY201 |
| Catalog number | |
| OEM number | 2110-3730611 |
| OE number | 2110-3730611 |
| Model | VAZ 2108-2115 left |
| Voltage | 12 V |
| Power | 12 W |
Motor reducer for window lifter drive VAZ 2108-2115 right (2110-3730610)
| Product number | JY202 |
| Catalog number | |
| OEM number | 2110-3730611 |
| OE number | 2110-3730611 |
| Model | VAZ 2108-2115 right |
| Voltage | 12 V |
| Power | 12 W |
Motor reducer for window lifter drive VAZ 1117-1119, VAZ 2123, left (1118-3730611)
| Product number | JY203 |
| Catalog number | |
| OEM number | 1118-3730611 |
| OE number | 1118-3730611 |
| Model | VAZ 1117-1119, VAZ 2123 left |
| Voltage | 12 V |
| Power | 12 W |
Motor reducer for window lifter drive VAZ 1117-1119, VAZ 2123 right (1118-3730610)
| Product number | JY204 |
| Catalog number | |
| OEM number | 1118-3730610 |
| OE number | 1118-3730610 |
| Model | VAZ 1117-1119, VAZ 2123 right |
| Voltage | 12 V |
| Power | 12 W |
Motor reducer for window lifter drive VAZ 2108-2115 left (2110-3730611)
| Product number | JY205 |
| Catalog number | |
| OEM number | 2110-3730611 |
| OE number | 2110-3730611 |
| Model | VAZ 2108-2115 left |
| Voltage | 12 V |
| Power | 12 W |
Motor reducer for window lifter drive VAZ 2108-2115 right (2110-3730610)
| Product number | JY206 |
| Catalog number | |
| OEM number | 2110-3730610 |
| OE number | 2110-3730610 |
| Model | VAZ 2108-2115 right |
| Voltage | 12 V |
| Power | 12 W |
GAZelle window lifter drive motor, left (3110-3730611)
| Product number | JY207 |
| Catalog number | |
| OEM number | 3110-3730611 |
| OE number | 3110-3730611 |
| Model | GAZelle left |
| Voltage | 12 V |
| Power | 12 W |
GAZelle window lifter drive motor, right (3110-3730610)
| Product number | JY208 |
| Catalog number | |
| OEM number | 3110-3730610 |
| OE number | 3110-3730610 |
| Model | GAZelle right |
| Voltage | 12 V |
| Power | 12 W |
DAEWOO LANOS window lifter drive motor, left (96190207)
| Product number | JY209 |
| Catalog number | |
| OEM number | 96190207 |
| OE number | 96190207 |
| Model | DAEWOO LANOS left |
| Voltage | 12 V |
| Power | 12 W |
DAEWOO LANOS window lift motor, left (96430356)
| Product number | JY209A |
| Catalog number | |
| OEM number | 96430356 |
| OE number | 96430356 |
| Model | DAEWOO LANOS left |
| Voltage | 12 V |
| Power | 12 W |
Window lifter drive motor 2
DAEWOO LANOS window lift motor gearbox, right (96190208)
| Product number | JY210 |
| Catalog number | |
| OEM number | 96190208 |
| OE number | 96190208 |
| Model | DAEWOO LANOS right |
| Voltage | 12 V |
| Power | 12 W |
DAEWOO LANOS window lift motor gearbox, right (96430355)
| Product number | JY210A |
| Catalog number | |
| OEM number | 96430355 |
| OE number | 96430355 |
| Model | DAEWOO LANOS right |
| Voltage | 12 V |
| Power | 12 W |
Motor reducer for window lifter drive VAZ 2109, VAZ 2110 left (20.3780, 2110-3730611)
| Product number | JY211 |
| Catalog number | |
| OEM number | 20.3780 |
| OE number | 2110-3730611 |
| Model | VAZ 2109, VAZ 2110 left |
| Voltage | 12 V |
| Power | 24 W |
Motor reducer for window lifter drive VAZ 2109, VAZ 2110 right (20.3780-01, 2110-37306110)
| Product number | JY212 |
| Catalog number | |
| OEM number | 20.3780 |
| OE number | 2110-3730610 |
| Model | VAZ 2109, VAZ 2110 right |
| Voltage | 12 V |
| Power | 24 W |
Feedback
Types of window regulators and the main causes of their breakdowns
Today the following types of window lifters are in use on VAZ:
- rack type (experts consider them the most reliable of all known designs);
- cable;
- plank.
Depending on which company produced the product in question, it can be installed in the car door as standard, or, if it does not fit in size or other technical characteristics, it can be altered without unnecessary problems.
Since both domestic and imported gear motors can be installed on the lift, the described devices, depending on the type and origin of the electric motor, may differ:
- by the speed at which the glass is raised or lowered;
- according to the noise level recorded during operation of the window lifter;
- if possible, its normal operation in winter conditions.
The parts in question can fail for a number of reasons, which can be summarized into two main groups: mechanical and electrical failures. The list of possible reasons looks like this.
- The whole design doesn't work. The cable has broken or become jammed. Lifting mechanism malfunction.
- The electric motor failed due to moisture getting into it. Such a malfunction occurs quite often, since the gearmotor has a leaky housing into which water leaks, which is why rust forms inside the device over time. As a result, spreading corrosion destroys the entire mechanism.
- The power window relay has failed. The performance of this component can be determined by replacing the problematic relay for testing with a guaranteed working one.
- The corresponding fuse has blown. If after installing a new element the device starts to work, then this is the reason. If the new fuse blows again, you need to look for the short circuit.
- Short circuit in the circuit. Its location is determined by which fuse burns when turned on. The cause of this malfunction can be either burnt out wire insulation or a failed gear motor or mechanism switch.
- Breakage of the switch. Determined after replacing the problematic one with a new, known-good switch.
- Break in the common circuit. This can happen due to a mechanical break in the electrical wire, disconnection of the block or poor contact in it.