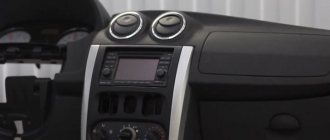
Installation of 1 din radio in Grantu standard and norm
What is needed to install a radio in a VAZ 2190:
- The radio itself is also the head unit;
- flat screwdriver;
- Straight arms.
Abbreviations and symbols in the text:
- GU – head unit;
- MMS – multimedia system;
- DIN (din) – installation size for acoustics in a car.
Step-by-step instructions for installing the head unit
- a narrow flat screwdriver or plastic spatula for installing acoustics;
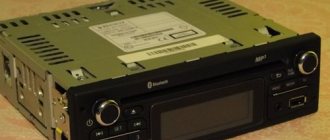
- 1-din radio with frame.
The seat in Grant is designed for 1 din.
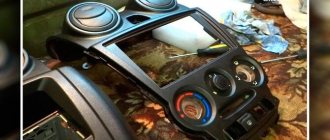
To work with large 2-din sizes, you will need to cut out the partition and install a decorative frame. Step 1 . Using a flat-head screwdriver, remove the plastic plug for the radio. To do this, carefully pry it around the edges and pull it towards you.
The placeholder for the radio is installed from the factory.
Step 2 . On the back of the plug there is a mount for ISO connectors. There are two connectors: music power and wires for the speakers.
Step 3 . If necessary, connect an adapter for your radio to the ISO. Usually it comes included .
If an adapter is not needed , proceed to step 4.
If an adapter is needed for acoustics, it is included in the kit. Example in the picture.
Step 4 . We remove the glove compartment. Holding the glove compartment clamps in the upper position, forcefully lower the glove compartment down.
Overcoming resistance, we pull the lid towards ourselves - the glove compartment is removed.
Removing the glove box on a Grant is easy when you know where its latches are located.
Step 5 . We climb under the panel in the area of the front right passenger's feet with a flashlight. Behind the felt on top we find a thick black wire - at its end there is a plug for the factory antenna.
We extend the plug to the installation location of the radio.
Here we are looking for the antenna wire.
Step 6 . We install metal slides for the radio. a screwdriver to bend the fastenings of the slide at the top and bottom to ensure secure fastening.
These fasteners secure the slide into the panel opening.
Step 7 . We connect the power connectors, speakers, antennas to the radio. We insert it into the slide all the way. We attach a decorative plastic frame.
What to do if the length of the wires and antenna is not enough
To get by without extending the wires , you will have to suffer:
- We put our hand under the panel in the glove compartment area;
- We put the radio in the slide and connect it to the plugs;
- We blindly connect the power, the connector for the speakers, the wires for the amplifier, and the antenna.
Disadvantages of the method : we spend a lot of time, the process is dreary and inconvenient. We'll probably rip off your wrist.
Plus : there is no need to build up wires, which will then interfere with the installation of the PG, resting against the back wall.
If the radio tape recorder dangles in the slide and rattles
It happens that the acoustics hold weakly in the sled , although they sit firmly. Solving the problem:
- Using the keys for dismantling (included with the control unit), remove the radio;
- We take a small piece of vibroplast (resin-based foil) and glue it onto the slide from the inside, top or bottom - this way we will ensure that the tape recorder is completely pressed against the slide without unnecessary vibrations;
- Once again, use a screwdriver to press down all the fastenings of the slide: some might have been under-tightened;
- We put the acoustics back and check - all unnecessary vibrations during shaking should disappear.
Features of audio system installation
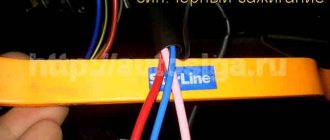
When connecting the stereo system wiring, it is necessary to take into account certain features of the electrical supply. This is provided using red and yellow wires. The first is responsible for remembering the audio system settings, the second is for turning off the radio, which is controlled by the car’s ignition.
It is recommended to use a parallel connection type for both wires so that the audio system can only be turned off manually. In this case, it will not be affected by the car’s ignition key, but there will be a problem of excessive electricity consumption in parking mode, which is solved by installing a special regulator for the red electrical wire. With its help, you can turn off the radio by hardware when leaving the car for a long time. This regulator can be connected to the alarm system, that is, when the vehicle is locked, the audio system will turn off automatically.
The disadvantage of this system is the extra current consumption, but in any case it is much less than the indicators that provide power to the radio during standby mode.
Removing the standard radio in Grant Lux
The difference between grants of the luxury configuration: the MMS (multimedia system) installed from the factory. This is a 2 din device.
To remove standard acoustic grants :
- take a knife or plastic spatula to dismantle the acoustics and disconnect the decorative trims to the right and left of the radio. It is not necessary to take pictures;
- in the gap between the cover and the panel we find the head unit lock. There are two of them on both sides. Press it out with a screwdriver;
- we take out the GU on ourselves.
Everything is described in detail in the video:
Replacing the standard MMC in Grant
The process - after removing the acoustics, we install a new system.
Difficulties : you may have to finish the fastenings of the new system for VAZ ones. Plus you need the right frame. The factory MMC frame may not fit.
Have you bought a new 2 din radio, but there is no frame for sale? You can do it yourself . Example at the link.
Settings
After all operations have been completed, you should configure the new device and check the voltage in the on-board network. Many Grants suffer from current leaks or have a weak generator. With a powerful audio system, this can drain the battery quickly. Therefore, it is necessary to determine the cause of the leak and eliminate it. The generator may also require modification or replacement. Cars from the first years of production often have problems with this unit.
The 2 DIN audio system is distinguished not only by high sound quality and ease of use, but also often by advanced functionality. Often this is a full-fledged multimedia complex based on Android. In addition, the device allows you to connect an amplifier and subwoofer, as well as a rear view camera.
Also watch the video tutorial on installing a 2 DIN radio:
Find out what kind of lighting to install in your car from our article.
How to install 2 din in grant norm or standard
Everything is more complicated here. Need to:
- dismantle the center console trim - unclip the fastenings, move it forward and disconnect the buttons and heater handles;
- cut out a vertical plastic partition that will not allow you to install a 2 din device;
- cut down the plastic casing of the central air duct;
- try on a new acoustic unit, adjust the fastenings if necessary;
- install adapters from the delivery kit on the wiring (if required);
- install the device;
- if we leave the old center console trim: we cut out the partition, try it on, put it in place with the buttons and handles connected, adjust the decorative frame of the control unit, install it;
- if we install a new trim on the console under a 2 din device: we transfer the heater control unit and buttons from the old trim, install them in place, and put a decorative frame on the control unit.
Reviews
| Module type | Price, rub.) |
| Standard 1-DIM (push-button version) | from 3500 – 3700 |
| Standard 2-DIM (sensor) only for Lada Granta liftback | from 7500 – 8000 |
| Third party manufacturers, depending on configuration and specifications |
| № | Positive |
| 1. | Victor, 39 years old: after buying the car, he did not change the radio, despite the push-button control option. The sound quality is good, the radio reception is excellent, that's enough for me. |
| 2. | Konstantin, 41 years old: bought the car second-hand, second owner. I didn’t change anything, I left the original radio. The functionality is good, the build quality is also good, it reads from a flash drive. |
| 3. | Vasily, 44 years old: I listen to the radio more, the reception in the city is good. True, it causes interference near metal structures, but this is natural. |
| 4. | Kirill, 36 years old: I work as a taxi driver, on wheels all day. The standard tape recorder saves the day, it works properly. My friends recommended replacing it with a touchscreen model from the new Granta, but so far the old one hasn’t failed. |
| Negative | |
| 1. | Victor, 38 years old: the standard audio module, although not bad, seemed to me not enough, so I replaced it with a foreign one and supplemented it with an amplifier. Now the volume is good, the quality is high. |
| 2. | Mikhail, 42 years old: I work as a courier, I drive for the entire shift. I expected more from the standard radio, so I had to replace it with a new one. The volume suits me, I plan to connect an amplifier - a crossover. |
| 3. | Ivan, 33 years old: I bought the car second-hand, immediately replaced the audio module, the reviews are not good. New and high-quality equipment from Trinity, no problems. |
| 4. | Vladlen, 40 years old: friends gave me a gift in the form of a radio with touch control for our anniversary. Before this there was a push-button one. Can't compare, quality, sound, control, functionality at a high level. |
Instead of a total
- If we install a simple radio, the size should be no more than 178 * 50 mm. Installation requires plastic spatulas or a screwdriver. Adapters and slides are included .
- To install 2 din, you need a new overlay on the console, a decorative frame on the GU itself, wire cutters and a metal blade to adjust the installation location.
- Are we replacing the standard speakers with another of the same size? Still need a new decorative frame . Otherwise, gaps in the panel will be visible.
More articles about Granta here.
Most of the Lada Grant's standard radios have all the modern additional functions that you can't do without now.
Lada Granta interior design
Hidden text
With a greater installation depth, you will have to come to terms with the protrusion of the control unit above the surface of the console, compensating for it with appropriate design. You also don’t have to waste time searching for a PG intended for standard installation in any specific car model. Without a major rework of the console, nothing will be installed.
Nothing is known yet about any GI produced specifically for Grants. Although anything can happen, because there was one (MyDean) for Kalina2. There are changes to this paragraph. MMC TRINITY appeared for Granta. A little expensive, but maybe there will be other options. Wait and see.
Overview of function types
- Easily connected with mobile phone. Convenient communication function.
- All standard Lada Granta radios are equipped with modern radios. They have standard settings that allow you to automatically switch between different ranges. That is, when news starts broadcasting on one channel, and in the meantime you listen to music, you will always be aware of all the latest events.
- The Lada Granta's head unit supports many modern formats. So, the LCD display of the stereo system will play music from MP 3, WMA, WAV. The video can be watched in WMV, MP4 format.
- The LCD display has accessible information content, a convenient, easy-to-read interface.
- One of the best touch keyboards, it works synchronously, with virtually no breakdowns.
- The Lada Granta's standard radio can easily play music from micro SD.
Head unit
Important. If it makes it easier for you to use a USB drive, then be aware that certain problems may arise here.
- Modern equalizer. It's easy to customize and you can listen to tracks in random order. Songs switch without delay.
- Has a photo album function. The stereo system makes it possible to view your favorite photos on the road. This is done from a memory card, and there is support for five formats.
- Phone mode. It requires special knowledge to set up the first time. It is mainly necessary for those people who are overloaded with work and solve many issues on the road.
- New models of car radios for Lada, 2191, are equipped with all navigation capabilities and a rear camera
Multimedia capabilities on buttons
If we evaluate the Grant FL push-button radio according to the criteria of modern times, then although it is a basic design, without any frills it is quite a harmonious design for a rather modest salon interior. The build quality is without any complaints, without any gaps or backlashes. With green backlight.
In the left, and therefore in the part closest to the driver, there is:
- on/off button;
- CD card slot;
- multifunctional buttons – Radio and Audio.
Further down the center are:
- radio display;
- decoder washer;
- At the bottom there is a row of multifunction buttons.
On the right side of the audio system panel there are:
- telephone mode entry button;
- USB connection;
- Various multi-function buttons.
As for the USB connector, the following connections are possible:
- Flash card with memory up to 64GB;
- Flash player with 1024 GB RAM;
- HDD with FAT32;
- phone, however, only for charging.
To connect mobile devices using Bluetooth, including listening to music tracks, there is a special button with a picture of a handset.
In addition to Bluetooth, as expected from the name, the radio tape recorder has Handsfree functions, allowing you to use your phone hands-free. True, the instruction manual for the radio receiver and music file player contains a warning that some models of cellular devices cannot interact with this MMC.
As a summary, it should be said that the standard push-button multimedia Grants FL has, let’s say, the basic functions of musical accompaniment for trips in this car, especially for representatives of our garage community for whom buttons are more convenient than sensors.
What young drinking buddies in our community cannot come to terms with is because they need touch screens and high-quality sound of modern music tracks.
Connecting standard radios
Many consumers who buy standard radios for Lada are interested: if I take the entire multimedia package for my car, will I be able to install the entire multi-system myself. Let's try to do this. Also, installing all the equipment in the cabin may be necessity number 1, since the Lada model range is mainly sold without the initial complete set of the entire stereo system.
Let's reveal a little secret before installation
Note. On Lada Granta cars, installation is very simple. For example, when compared with models of earlier samples.
First you need to purchase everything to assemble your new device. You can buy everything you need in auto stores or at the car market. Another option is an internet site, here it is even possible to acquire equipment in improved versions, with new versions. These radios have all the full functionality, including all navigation systems and a complete map of Russia. In addition, the online store will be able to offer you the latest Lada Granta Lux radio.
Conventional stereo systems do not look so stylish in the interior of the Lada Grant, but a luxury panel will give it a sophisticated and chic look. And the cost is quite affordable.
First steps
Before installation, let's figure out what the whole process is. The niche for the radio is made so that after all the work only the control panel is visible. Nothing more unnecessary.
- Using a flathead screwdriver, remove the plastic cover that protects the audio system cavity.
- Look what's inside - you should see several connectors, they are designed to connect the device.
- There should be a mounting frame on the radio. It must be removed and placed on the pocket compartment.
Next we move on to connecting the radio. To do this, simply connect the two connectors together and put the stereo system in place. This is how easy it is to install a Lada Granta car radio. You can install the speakers either at the back or on the side of the front doors. To do this, just cut two holes for them.
Head unit for grants
Note. All work must be carried out with the battery disconnected.
Firmware
For some reason, many car enthusiasts prefer to use a standard Lada car radio with firmware. Although it does not affect the sound quality in any way, the fact remains not in favor of the original. Also, when using firmware of at least a Lux or 2 Din model, you can get additional functionality. In addition, this service makes it possible to create additional functions that the regular interface does not have.
Let's start the process
We will need an SD card using FAT formatting. You can use the same card when formatting in exFAT. Before the whole process, be sure to download the firmware. This can be done here. When everything has been downloaded, we next copy file documents to the root directory of the SD card. Before this, we save the received materials to a flash drive. Then we transfer the received data to the memory of our car radio. Overload in progress.
Firmware for radio
As soon as we see that the reboot status scale is in full, it means we can use the new expanded capabilities of our standard Lada Granta Lux radio, 2 din.
Note. To regain access to functions such as Bluetooth radio, remove the memory card with the analogue menu and reboot the system again.
Now you know all the details of all the functions, installation and firmware of the standard radios of the Lada Granta Lux, 2 din and other models of the audio system of this car brand. If you think that you are not able to handle all the necessary settings yourself, then you can look on the Internet for craftsmen who specialize in creating your personal menu for the entire system. There is evidence that they have learned to implement an interface where they can remove, for example, a radio receiver from the system itself and use directly necessary functions.
Remember. Also, the firmware sometimes requires screen calibration before operating the analog menu.
That's all we could tell you. If you follow the instructions received, the whole thing will be done faster, and you will definitely enjoy the updated head unit Lada Granta 2 din, Lux.
In the Lada Grant, the standard audio preparation of the car has already been completed from the factory, the wires for power supply and speakers have been laid, so installing and connecting the radio does not present any particular difficulties. The installation space in the front panel console of the car is designed for installing a 1-DIN car radio. No tools are required for installation; all dimensions are already made in accordance with generally accepted housing standards. When installing a 2-DIN car radio, you will need to cut out the partition and purchase a frame for the console to fit the size of your audio system.
How to perform a flashing?
The stock firmware for the Lada Granta radio has become very popular among car enthusiasts. This does not require installation of a new type of radio. This function does not have any effect on the sound quality, but it allows you to provide the interface with additional options that are not available for the standard version of the radio. For example, you can generate a convenient touch keyboard that allows you to communicate with the Internet.
To flash stock multimedia, you should get an SD card formatted in “FAT” or “exFAT”.
- First, download the firmware from the network. It’s easier to find her among the “Grantavod” members of the forum.
- After downloading, we copy the necessary files to the root directory of the card itself, having previously saved them on a flash drive.
- We insert the card into the corresponding slot of the car radio and reboot it.
- After filling out the download status scale, we use the updated interface with expanded capabilities.
Elements of the acoustic system and subwoofer selection
A car subwoofer is an element of car acoustics designed to reproduce low frequencies of sound, usually 20-120 Hz. This element affects the quality of other acoustic components and prevents them from overloading. The choice of a subwoofer must pursue one goal - to make the speaker system more accurate and stronger in the sound range. Subwoofers can be closed or open. The larger the open subwoofer, the greater the sound pressure. The closed one has the shape of a box into which there is no air access, so the sound is weak.
A subwoofer with a bass reflex has a mouth for air penetration and a pronounced bright sound. This is the most popular and widespread type of acoustic element. Another member of the family of subwoofers, the band pass, looks presentable, but it is absolutely inferior in sound.
Which subwoofer should you choose? First of all, when purchasing, you should know the parameters of the head.