Small sensors in a car's electronic system play a vital role. If some of them malfunction, it is not at all possible to start the engine, but even if the motor runs, its main technical indicators will show a significant difference in the nominal values. A malfunction of the VAZ 2112 16 valve crankshaft sensor can significantly reduce the “quality of life” of the internal combustion engine. More details about the main symptoms of a malfunction, methods of diagnosis and repair in a garage will be discussed in detail in this article.
Features of injection systems
The injection system operates thanks to a sensor system and a control unit. All signals are input to the microprocessor unit, which regulates the operation of the actuators. The following sensors are responsible for the correct operation of the engine:
- Crankshaft positions.
- Camshaft positions (not on all versions).
- Intake manifold pressure.
- Lambda probe.
- Speed.
- Mass air flow.
- Throttle position.
And the main role is played by the VAZ-2110 crankshaft sensor (8 valves or 16), since the moment of injection and supply of high voltage to the spark plug electrodes depends on it. The design has a temperature sensor, but it has virtually no effect on operation. It is necessary to control the engine temperature and send a signal to the dial indicator (or to the on-board computer). But it will be indispensable if it is necessary to implement automatic switching of fuel types (from gasoline to gas and back).
Replacement instructions
In the event that the car begins to behave worse on the road, and a check shows that the controller has failed, most likely the VAZ 2110 knock sensor will need to be replaced. To replace it, you will need the device itself and a little time; in general, the replacement procedure is not complicated and can be completed in a few minutes.
Follow these steps:
- First you need to understand where the controller is installed. In the case of the “ten”, the regulator is mounted on the engine housing in the engine compartment, in particular, you can see it between cylinders 2 and 3. A dipstick for measuring the engine fluid level is also located near the installation site.
- After this, make sure that the ignition is turned off and you can disconnect the power wiring from the device.
- Using a 12 or 13 wrench, in this case it all depends on the type of controller, you need to unscrew the fixing nut, after which the device is dismantled and replaced with a new one.
Removing the controller yourself
Algorithm of operation of the injection system
The microprocessor has several inputs and outputs. The inputs receive signals from all sensors. But first, these signals are converted and, if necessary, amplified. The microcontroller is programmed to work with sensors and actuators. Programs (firmware) can provide various engine characteristics.
You can achieve an increase in power (gasoline consumption will increase) or a decrease in consumption (power will suffer). But most motorists prefer programs that provide work with average parameters. In this case, the signal from the VAZ-2110 crankshaft position sensor does not change; only the reaction of the actuators to changes in input data is adjusted.
A little about the crankshaft
The crankshaft is the most important element of any internal combustion engine. It is driven by the starter (at the moment of starting) and the pistons (in operating mode). From it, torque is transmitted to the gearbox, gas distribution system, and auxiliary mechanisms. And in order for fuel injection to be carried out in a timely manner, a spark to form at the right moment, a VAZ-2110 crankshaft sensor is needed.
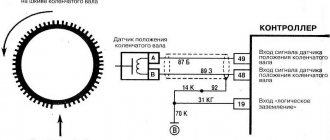
It monitors the position of the pulley and transmits a signal to the electronic control unit. The pulley has teeth, the distance between them is the same. But in one place there is a gap - two teeth are missing. The position sensor reacts to the approach of metal. When an empty area passes near the sensor, a signal is generated - the control unit is notified that one revolution of the crankshaft has occurred.
Replacing the VAZ 2110 Lada controller
- Repair manuals
- Repair manual for VAZ 2110 (Lada) 1996+.
- Replacing the controller
| EXECUTION ORDER |
↓ Comments ↓1. General information 1.0 General information 1.1. Vehicle Specifications 2. Engine 2.0 Engine 2.1 Possible engine malfunctions. 2.2 Replacing the coolant 2.3 Replacing the engine oil and oil filter 2.4. Installing the piston of the first cylinder to the TDC position of the compression stroke 2.5 Replacing the camshaft drive belt and tension roller 2.6 Adjusting the camshaft drive belt tension 2.7 Removing, troubleshooting and installing the flywheel 2.8. Replacing engine seal parts 2.9 Cylinder head 2.10 Grinding in valves 2.11 Adjusting clearances in valve drive 2.12 Removing and installing engine 2.13. Engine repair 2.14. Lubrication system 2.15. Cooling system 2.16. Exhaust gas system 2.18. Features of VAZ-2112 engine repair 3. Transmission 3.0 Transmission 3.1. Clutch 3.2. Gearbox 3.3. Front wheel drives 4. Chassis 4.0 Chassis 4.1. Checking the technical condition of suspension parts on the car 4.2. Rear suspension 5. Steering 5.0 Steering 5.1 Inspection and check of the steering on the vehicle 5.2. Steering column 5.4. Steering mechanism 5.5 Possible steering malfunctions. 6. Brake system 6.0 Brake system 6.1. Vacuum booster 6.2. Main brake cylinder 6.3. Pressure regulator 6.4. Brake hoses and tubes 6.5 Bleeding the brake system 6.6 Replacing brake fluid 6.7. Front wheel brakes 6.8. Braking mechanisms of the rear wheels 6.9. Parking brake 6.10 Possible malfunctions of the brake system. 7. Electrical equipment 7.0 Electrical equipment 7.1. Mounting block 7.2. Generator 7.3. Starter 7.4. Ignition switch (lock) 7.5. Checking and replacing spark plugs 7.6. Integrated engine management system (fuel injection system) 7.7. Contactless ignition system 7.8. Lighting, light and sound signaling 7.9. Windshield wiper 7.10 Replacing the electric motor of the radiator fan of the cooling system 7.11. Heater electric motor 7.12. Cigarette lighter 7.13. Instrument cluster 7.14 Checking the carburetor solenoid valve control unit 7.15 Possible malfunctions of the EPHH control unit. 7.16 Electrical diagram of a VAZ-21102 car 7.17 Electrical diagram of a car with a carburetor engine 2110 7.18 Engine control diagram 2111 (pin M1.5.4) 7.19 Engine control diagram 2111 (pin MP7.0) 7.20 Control diagram for engines 2111 and 2112 (pin M1) .5.4N, "January-5.1") 8. Body 8.0 Body 8.1 Possible body malfunctions. 8.2. Replacing the buffers 8.3 Removing and installing the radiator trim 8.4 Removing and installing the locker 8.5 Removing and installing the wing 8.6. Hood 8.7 Removing and installing upholstery, trim and windshield frame lining 8.8. Trunk lid 8.9. Side doors 8.10 Removing and installing the front seat 8.11 Removing and installing the upper and lower lining of the floor tunnel 8.12. Seat belts 8.13. Rear view mirrors 8.14. Instrument panel 8.15. Heater 8.16 Anti-corrosion compounds for body treatment 8.17. Features of body repair of models 2111 and 2112 8.18. Body care 9. Applications 9.0 Appendices 9.1 Fuels, lubricants and operating fluids 9.2 Basic data for adjustments and control 9.3 Filling volumes 9.4 Lamps used in the car |
What happens if the sensor breaks?
If the VAZ-2110 crankshaft sensor fails, symptoms characteristic of its failure will appear. If the device breaks down completely, the engine will stop immediately, since the following processes will not be performed:
- Complete absence of signals to the ignition module. Sparking does not occur when the crankshaft is cranked by the starter.
- The flow of gasoline into the ramp completely disappears or slows down.
- The control unit fails - it stops producing signals necessary for the normal functioning of the engine.
Sometimes the active surface of the sensor simply becomes clogged. In this case, it is enough to clean the dirt. But if the cause of the breakdown lies in the device itself, then you only need to change it completely.
Replacing the VAZ 2110 speedometer
On a VAZ-2110 with an injector, a separate device indicating the speed of the car is not sold, and the instrument cluster on 2110-11-12 is replaced as an assembly. If it turns out that the cause of the malfunction lies in the instrument panel, it must be replaced. We remove the instrument cluster (old model) as follows:
- on opposite sides of the steering wheel from below, unscrew the two screws of the plastic frame;
- unscrew the two top screws of the plastic frame, the frame is secured with 4 screws in total,
- pushing the cover forward, disconnect all the plugs from it;
- unscrew the screws securing the instrument panel, they are located on the sides of the combination;
- we pull off the instrument panel from the upper latches and move it towards the steering wheel;
- at the back of the instrument cluster, disconnect the two plugs;
- We take out the dashboard, now all that remains is to install a new part and reassemble it in the reverse order.
Main symptoms of breakdowns
But if the device has not completely failed, but is only showing signs of breakdown, you will see it immediately. A light will light up on the instrument panel to indicate engine errors.
This will be accompanied by the following signs:
- Unstable idle.
- Reduced traction characteristics of the vehicle.
- Spontaneous change in engine speed.
- Difficulty starting the engine.
- The presence of pops in the intake manifold.
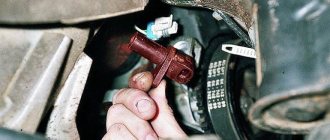
If such symptoms are present, you need to replace the VAZ-2110 crankshaft position sensor. It is located near the oil pump cover, next to the generator drive pulley.
Replacement
The check showed that the sensor was to blame. Therefore, you have no choice but to replace it with a new one. For this:
- The coolant is drained. It is better to drain the maximum amount. Especially if the coolant has long been due for replacement;
- Disconnect the terminals from the battery;
- To make it more convenient to work, remove the air filter from its seat;
- Turn off the ignition and remove the sensor connector;
- Use a 19mm wrench to remove the sensor. The sealing ring must be removed along with it;
- A new seal ring is taken and a new, high-quality coolant sensor, suitable for the VAZ 2110 model, is mounted in place of the old one;
- The entire assembly process is performed in reverse order.
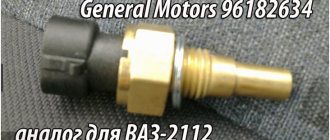
The coolant temperature sensor for the VAZ 2110 plays an important role. The owners of this model know very well that its failure is not a rare situation. The good news is that the replacement procedure is not complicated and can be carried out by any driver, even whose driving experience does not exceed several days.
As for the cost of self-repair, you only need to purchase a new O-ring and the sensor itself, of course. Today, a good quality device for a “ten” costs about 200 rubles. The tools are only the most standard ones, so you won’t have to buy anything or spend any extra money.
A professional will do the work at the auto repair shop, but the cost of the repair will be appropriate. Plus, many service stations use cunning moves, trying to force the car owner to perform a number of additional measures. Sometimes they are really useful, but sometimes they are just an attempt to get more money out of you.
Decide for yourself whether it’s worth taking the car to a service center to replace the TOZ sensor, or whether you can calmly complete the entire procedure yourself in an hour, but save a decent amount of money.
Sensor diagnostic methods
Regardless of how you check the device, you will have to remove it completely. To do this, you need to make marks on the crankcase so that later the new sensor can be installed correctly. The device is unscrewed using the key to “10”. When installing, be sure to maintain a gap between the active part of the sensor and the sync disk - it should be from 0.6 to 1.5 mm.
First, perform a visual inspection of the device - if it has mechanical damage, scratches, or dents, it is recommended to replace it. But if there are no external signs of damage, you will have to carry out diagnostics with an ohmmeter or voltmeter. Of course, if a diagnostic scanner is available, it will show you a crankshaft position sensor error. But only an error can appear when the wiring is broken.
Comprehensive check for Opel Vectra B
Now let's take another car and use it to consider the last of the verification methods - comprehensive.
This test is much better than with a conventional multimeter, but in terms of accuracy it is not as accurate as an oscilloscope.
The problem car will now be the Opel Vectra B. We leave the symptoms the same.
The initial work is also no different from the VAZ-2110: the sensor is removed, inspected, thoroughly washed, and only after that you can start checking the condition.
But for a comprehensive check you will need more equipment:
- Multimeter;
- Megaohmmeter;
- A device for measuring inductance. It is better to carry out all measurements in a heated room so that the readings are correct.
First, the coil resistance is measured, as described above. Resistance readings must be within the range specified in the technical documentation.
The next check is to measure the winding inductance, for which a device is used to measure it. A working DPKV inductance should be in the range of 200-400 mH.
The devices are pictured below.
The insulation resistance is also checked with a megohmmeter. When a voltage of 500 V is applied, the resistance value of the sensor should be no more than 20 MΩ.
Based on these measurements, it is determined whether the DPKV is working or requires replacement.
Photos of the devices are below.
How to check a sensor with an ohmmeter
In this way you measure the winding of the device. To do this, switch the multimeter to resistance measurement mode and carry out diagnostics. Sensor manufacturers set a certain range of resistance values - 550-750 Ohms.
Therefore, if you go beyond this range, you can talk about a breakdown of the sensor. But it should be noted that sensor manufacturers allow a slight deviation from the lower and upper limits. But for a small value - no more than 10%.
Normal engine temperature
For all previously produced cars (since 1992), the normal operating temperature of the engine was 90 degrees C. This value was generally accepted not only for Russia, but for the whole World, and all automakers were based on it in their standards. With the further development of automotive technology, it became clear that it is not always possible to adhere to the specified figure (especially due to the variety of engines and their systems).
As a result, at the newly held international congress, it was determined that the standard operating temperature for gasoline engines of all types will henceforth be considered the range from +85 C to +105 C. Any engine temperature within these limits is considered normal, but any, even small exceeding it to a greater extent is already overheating.
If the temperature in the engine drops below the specified norm, the car will lose power and acceleration dynamics. If the temperature goes beyond the upper limits, the engine can boil and suffer significant damage (long-term driving with a boiling engine can threaten not only its serious damage, but also wear and tear on the units adjacent to it).
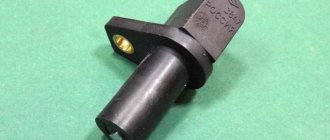
Design and functions of DPKV
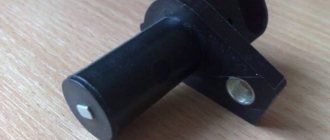
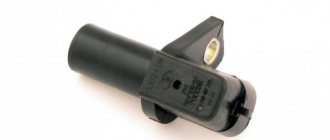
This vehicle unit allows you to adjust the fuel injection system of your vehicle. In addition, the DPKV is responsible for the synchronization of the functioning of each of the fuel injectors and the entire ignition system of the car. The crankshaft position sensor device has the following elements:
- Sample of a nylon frame;
- Steel magnetic cores;
- Winding kit for which thin copper wire is used;
- Wiring insulation (usually resin or enamel is used).
The main purpose of this position sensor is to create synchronized operation in the ignition system and when operating a set of fuel injectors. If this spare part malfunctions, unstable operation occurs during fuel supply. Additionally, your engine may suddenly stop running at full speed, causing wear on the valves and cylinders.
How does the fuel system receive the signal from the sensor?
While the sensor is operating, the on-board computer (microcontroller inside the car) determines the specific position of the piston at a certain moment of its operation in each of the cylinders. To regulate operation using a sensor, the process is built according to the following plan:
- The crankshaft has a special gear in which 2 teeth are specially omitted.
- When the crankshaft moves, all the teeth pass next to the DPKV sensor, greatly distorting the state of its magnetic field.
- As a result, pulses are generated in the inductance coil of this device, which are sent to the on-board computer database. In this case, the missing 2 teeth are the starting or zero point, thanks to which the computer determines the initial position of the shaft.
- Next, the computer inside the car counts the number of pulses sent by the device and determines the position of the crankshaft in each period of time.
- After this, the return signal is sent by the computer to the sensor responsible for triggering the fuel injector, which already supplies fuel to the ignition system.
Thus, if the DPKV works correctly, the car will operate at the highest performance, while consuming a minimum of fuel.
Advice: the electrical diagram on the VAZ-2110 will easily help you find out the cause of the sensor malfunction. It shows the location and combination of all elements of the car.
We check the mass air flow sensor on a VAZ-2110 with a multimeter
The sensor block, the first wire may not be there - this is normal.
To do this, we need to understand the pinout and the sensor connection diagram. As you can see, the block has only five wires:
- + 12 Volt.
- + 5 Volts.
- Total ground (green wire).
- Air temperature output signal.
- Air flow signal output (yellow wire).
Electrical diagram for connecting the mass air flow sensor.
The pinout may differ in different firmware versions and on different sensors. Everything is clear with the first two contacts - take a multimeter and check the presence of voltage when the ignition is on. If there is no signal, we look for the cause either in broken wires or in poor contact. Now we check the main indicator - the accuracy and magnitude of the air flow signal. By the way, this can be checked without a multimeter, using the on-board computer, if one is installed:
- We go to the menu, look for sensor parameters.
- Find the voltage Udmrv.
- The rating for all of the above modifications is from 0.996 to 1.01 V.
The platinum thread gets tired over time and distorts the impulse upward. A change of even one hundredth of a Volt is unacceptable. If the computer is not installed, we use a multimeter. We check the voltage between 3 and 5 (minus) contacts, setting the measurement limits on the multimeter to 2 V. Turn on the ignition, but do not start the engine.
The scale shows 1.00 - the sensor is in excellent condition.
On a scale of 1.26 – the sensor is “dead”.
Check table
We evaluate the result using this table:
| 0.99-1.02 V | The condition of the air flow sensor is excellent, close to new |
| 1.02-1.03 V | Sensor in good condition |
| 1.04-1.05 V | The platinum thread is worn out, you need to think about replacing the sensor |
| More than 1.05 V | The sensor does not work, urgent replacement is necessary |
Where is the crankshaft position sensor located?
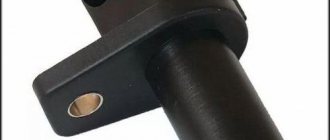
This component is located in a bracket, which is installed in the central area of the pulley on the generator drive. As a rule, on most modern cars it is not installed end-to-end, but with a gap of 1-1.5 mm near the structure of the toothed pulley itself.
For ease of disconnecting and adjusting the DPKV, a 50-70 cm wire is connected to it, which has the necessary connectors for keys. To align and adjust the position, you only need to adjust the washer secured above the seat of the element itself. Adjusting the washer can be done either by you yourself or by specialists at a car service center - in any case, it will allow you to avoid early breakdown of the engine cylinders and significantly reduce fuel consumption.
Crankshaft position sensor
Crankshaft position sensor location
If a malfunction occurs in the crankshaft sensor, the vehicle’s on-board computer is unable to set a number of characteristics necessary for the operation of the ignition system:
- Calculate the amount of fuel required for injection;
- Determine the right moment for injection;
- Change the angle of rotation of the camshaft;
- Determine whether ignition has occurred or not (relevant for gasoline engines).
Advice: problems with ignition affect the operation of all systems of the car. Often, after the fuel system, the steering rack on the VAZ-2114 begins to break down.
in our VKontakte group
DIAGNOSE YOUR CAR YOURSELF!
Code P0335 is entered if:
the crankshaft turns; For one rotation of the engine crankshaft, the controller reads less than 58 or more than 60 teeth on the crankshaft pulley master disk. If a permanent malfunction occurs, the “CHECK ENGINE” lamp lights up after 2 drive cycles.
1. Check the wires and resistance of the crankshaft position sensor. Resistance may change slightly as temperature increases.
2. The output signal of the sensor should have an alternating current voltage amplitude of about 0.3 V when the crankshaft is cranked by the starter.
HOW TO CHECK:
1. Use the Errors menu to clear the error codes. Crank the crankshaft for 10 seconds or until the engine starts.
Main symptoms of DPKV malfunction
The main signs of problems with the crankshaft position sensor:
- The process of “detonating” the engine (a characteristic knocking sound appears when the hydraulic compensators are operating) during a greater load on the car, when driving onto high mountain surfaces at low speeds.
- The engine runs unstably - a sharp drop in rpm at idle is followed by an equally sharp increase. Also, your car may simply stall when idling, both while driving on the highway or when stopped for a while, for example, at a traffic light.
- The engine does not gain speed, although it is running at full power.
- The motor power periodically drops and rises in the absence of any external factors influencing this process.
- The aerodynamic characteristics of the car are significantly reduced.
- Problems arise when starting the engine (it stalls quickly or does not start at all).
- The spark disappears when the system is ignited - it either does not appear or may be completely absent.
If you find at least 3 of the above symptoms, then the problem lies in the crankshaft position sensor.
Tip: the indicated list of faults may also indicate the occurrence of other problems during engine operation. For example, sudden changes in engine power and a decrease in speed may indicate a blockage in the fuel pump itself. That is why before repairs it is necessary to diagnose not only the engine, but also the same wheels. You can see what pressure indicators should be according to the standards in the tire pressure table.
Air flow control
The location of the mass air flow sensor (MAF) is on the air duct running from the filter to the throttle valve. The device consists of 3 elements located inside the air flow. The first one measures the temperature of the incoming stream, and the other 2 heat up to a certain degree. The stronger the flow passing through the air sensors of the VAZ-2110, the more intensely they are cooled. The controller that supplies the voltage determines the air flow by the energy spent on heating the 2 elements in relation to the temperature of the first meter.
There is another design of the MAF device with a silicon mesh and two elements; it operates on the same principle. The marking of the first type is 2112-1130010, the second - 21083-1130010. Receiving signals from these devices, the processor makes a calculation and changes the duration of fuel injection for the VAZ-2110. The following signs indicate a sensor failure:
- the engine stalls when switching from high speed to idle;
- unstable operation at idle;
- difficulties arise when starting the engine;
- increased fuel consumption.
Replacing the mass air flow sensor control device is not difficult; you need to disconnect the wires, remove the old sensor from the air duct and install a new one.
How can I check the serviceability of the DPKV?
Nowadays, the most popular are 3 methods, which are carried out quickly and provide information about the performance of the sensor with high accuracy.
Diagnostics of the crankshaft position sensor with an ohmmeter
When measuring the resistance of a winding set on a sensor, you can use a special device - an ohmmeter (or in other words, a multimeter). When checking, the device should show a value in the range of 550-750 Ohms.
Testing process - the resistance of the coil in the inductive sensor is measured. If the coil on the sensor is damaged, then first of all the damage will be reflected in the resistance value. That is why, at the beginning of the diagnosis, the required range is set and the correct operation of the element is checked using probes.
This type of check is basic and most elementary, but it cannot give 100% confidence in the serviceability of the spare part.
Why the scanner does not connect to the VAZ 2110 ECU and how to fix it
Often, car owners are faced with the problem of the inability to connect a device with a control module, why does this happen:
- You purchased a low-quality adapter. In this case, we are not talking about the firmware, but rather about the inoperability of the hardware, which is typical for defective devices. If the board fails or is initially inoperative, then it will be impossible to check the operation of the motor. Accordingly, how to connect to the control unit.
- Damaged or defective cable that prevents device communication. It is necessary to diagnose the wire to identify damage.
- Another reason why there may be no connection is due to bad firmware. If the software version is too old, it will be impossible to synchronize the device with the car.
Video: checking the crankshaft position sensor
So what kind of Sensor is this? Now let's try to figure it out.
The crankshaft position sensor (CPS) provides the ECU (electronic engine control unit) with information about the angular position of the crankshaft and the moment the pistons of the 1st and 4th cylinders pass TDC. If the sensor malfunctions, problems with engine operation occur. Let's consider the appointment, testing and replacement of DPKV.
What does the crankshaft sensor do?
DPKV synchronizes the phases of fuel injection and pulse supply to ignite the combustible mixture in the combustion chamber. In other words, based on its readings, the controller determines when and into which cylinder the fuel mixture should be supplied.
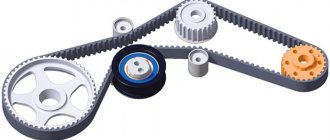
The sensor is of the inductive type and reacts to the passage of the teeth of the drive disk on the generator drive pulley near its core. The teeth are located on the disk at 6° intervals. To synchronize with TDC, two teeth out of 60 are cut off, forming a cavity. When a depression passes by the sensor, a so-called “reference” synchronization pulse is generated in it.
Signs of a faulty crankshaft sensor.
A completely faulty DPKV will not allow the engine to start. In other cases, sensor malfunctions can be identified by: - poor engine starting; — unstable operation of the motor; — reduction in engine power; — detonation with increasing load.
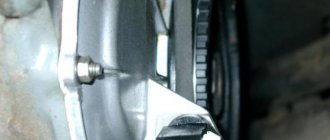
Where is the crankshaft sensor located?
It is installed on the oil pump cover.
Replacing the crankshaft position sensor VAZ 2110
To remove the crankshaft position sensor you will need a 10mm wrench. Procedure: Turn off the ignition and disconnect the sensor connector. Unscrew the sensor mounting bolt using a 10mm wrench. Remove the DPKV from the oil pump cover bracket.
Installation is carried out in reverse order. DPKV catalog number: 2112-3847010.
How to check the crankshaft position sensor with your own hands.
Checking the crankshaft position sensor comes down to checking the resistance of the windings. If the readings of the device (ohmmeter) differ from 550-570 Ohms, then the crankshaft sensor is faulty. If the crankshaft position sensor error does not disappear, then you should clean the sensor from dirt and check the integrity of the wire and the quality of the connections in the circuit. The crankshaft position sensor cannot be repaired.
Good luck to everyone on the roads!
Where is the VAZ 2110 injector ECU located?
Before performing work, read the precautions for repairing the engine control system (see 8.4.1)
1. We prepare the car for the work (see 5, paragraph 2).
2. Using a Phillips screwdriver, unscrew the three self-tapping screws securing the right trim of the instrument panel console and remove the trim.
10 mm socket wrench
loosen the two nuts securing the ECU.
4. By moving it forward, we remove the plastic bracket of the ECU from engagement with the studs of the bracket for the electronic units and remove the ECU from under the console.
5. Having released the clamp of the wiring harness block, disconnect the block from the computer.
10 mm socket wrench
Unscrew the four bolts securing the ECU to the bracket.
7. Remove the ECU from the bracket. Installation
We install the electronic unit in the reverse order.