Welcome to the kuzov.info blog!
In this article we will look at how to make a car seat with your own hands. The article contains information about the design and materials of factory seats, basic information about ergonomics and the design and safety of car seats. Let's figure out what kind of polymer foam should be used for the soft part of the seat, how to cut and shape it. We will also consider the process of creating the base of a bucket seat from composite materials, as well as from a solid sheet of metal.
The content of the article:
- The design of modern car seats
- Polyurethane foam (polyurethane foam)
- Characteristics of polymer foam for making car seats
- Seat design and ergonomics
- How to cut and shape seat foam?
- Manufacturing process of a car seat from composite materials
- DIY Sheet Metal Bucket Seat
- Factory seat conversion
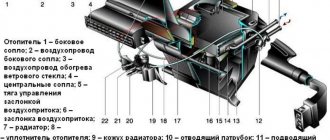
The design of modern car seats
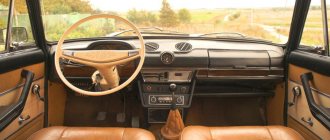
The car has two types of seats, front single seats and a rear bench seat. The front seats have a soft part with a certain contour that follows the curves of the human body.
Designing a car seat is not an easy task. It must provide comfort and safety, be relatively light weight (to save fuel consumption and minimize additional loads in an accident), wear-resistant and at the same time have style.
A brief description of seat components will provide insight into the basic design requirements of a car seat for comfort and safety.
- The seat frame (frame) is usually made of steel tubular and formed sheet elements. The function of this frame is to provide support for the soft seating elements and support the weight of the driver or passenger. The seat frame and its attachment to the floor of the vehicle must be strong enough to withstand the forces encountered in frontal, rear and side collisions with the vehicle.
- The non-structural part of the seat (polymer foam back and seat bottom) provides occupant comfort and distributes the load between the frame and the occupant during a crash. The headrest increases driver comfort and prevents neck injuries.
- Seat position adjustment mechanism. All parts of this mechanism must be strong enough to withstand stress in emergency situations, as well as repeated daily use.
- Fastening the seats to the floor of the car.
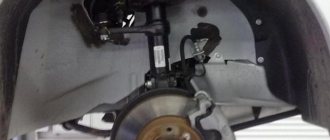
Acura MDX I Solved the problem of a stuck driver's seat!
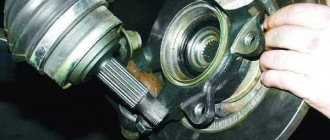
Due to the sagging of the soft part of the driver's seat and the stretched skin under the butt, I decided to add foam rubber there. I took off the chair and dragged it home, it was so heavy. I grabbed the bottom of the chair from the front and back. I thought I grabbed the frame of the chair from the front, but it turned out to be the guide for adjusting the chair in the horizontal plane. When I came home I discovered that this guide had come out of the grooves. Inside this guide tube there is a cable, the ends of which, when viewed in section, have a square cross-section. One end is inserted into the motor, and the other to the guide rail of the chair. I spent a long time conjuring how to put this guide tube and cable back in, but nothing worked. All upset, I thought why the hell did I take this on. I lost so much time with this tube, I decided to leave it for last.
I started disassembling the seat. I'll tell you no less hemorrhoids there, under the seat there are a bunch of wires and plugs. While I was removing the seat, I also had bad thoughts, because everything that was disassembled needs to be reassembled later in the same way. I removed the seat, started to dismantle the skin, here there are even more hemorrhoids, all the fastenings are on wire rings that are not so easy to loosen. And while you open them with grief, you think about how to attach them back later. Because of the complexity, I think I won’t remove the entire leather cover, I’ll just put foam rubber under the side support. But having overcome my fear, I decide to sort everything out to the end.
As a result, we see the following picture in the photo. The heated seats are intact, there are no burnt wires, the lateral support is very tired. I removed the seat heating, it was glued at the edges, cut out the foam rubber according to the template, glued it to the seat, glued the heating to the new foam rubber and began installing the leather. I did the lateral support last so that this foam would not interfere with attaching the skin in the central part of the seat. It’s not convenient for one person to attach the skin in place, because with the additional foam rubber for fastening the skin, you had to press down very hard, so my wife pushed the foam rubber on one side with her fingers to access the fastening, and I pressed down on the skin with one hand, and hooked the wire rings with the other hand - platypus fastenings. The fingers around the nails hurt on the second day. If someone needs to add foam rubber only for lateral support, then the above-described agony of removing the skin can be avoided. Having removed the seat from the chair, you can move the skin from the side support upward, put foam rubber and pull the skin back. Which is what I did at the end of the whole operation. I placed foam rubber under the side support along the entire length, pulled the skin back and decided that in the place of large folds I needed to add another piece of foam rubber (you can see a piece in the photo).
I attached the seat to the chair frame, attached all the wires and plugs back and set about replacing the removed guide tube. I couldn’t think of anything other than a small collective farm that doesn’t affect the work of the chair. I sawed off half a centimeter from both ends of the tube and made a longitudinal cut on one side of the tube so that the end of the cable could fit into it. I inserted the cable into the tube, inserted the solid end of the tube into the motor, and pushed the motor aside. At the other end of the tube, he bent the cable into the longitudinal slot of the tube, inserted the cable into the right side of the entire structure, and bending the motor with the inserted tube back, the cable on the right fit back into the tube, and the tube wound into the groove on the right side of the structure. Wow, I'm getting smart. As a result, the tube stood in place, I aligned it in the middle and wrapped it with electrical tape at both ends, including the cut on the tube.
For myself, I am once again convinced that no matter where the hand of a simple layman puts his hand, the end result will differ from the stock (manufacturer). In other words, you can always see where Kulibin’s hand has been. I don’t consider myself crooked, because... In life I like to do everything with my own hands, incl. renovation of your apartment with turnkey redevelopment.
Polyurethane foam (polyurethane foam)
Polyurethane foam has been used in car seats for over 30 years. There are different technologies for making this material. Regardless of the technology by which the foam is made, its characteristics of hardness and density are of greater importance. The durability of the seat and its comfort depend on these characteristics.
Simply put, polyurethane foam is produced by the reaction of polyols and diisocyanates. Both products are derived from crude oil. A series of additives are also necessary to produce high quality polyurethane foam. Different additives are needed depending on the area of application of the foam.
Polyurethane foam is most often used as the upholstery of car seats due to the design freedom that this material allows. Also because it provides the required comfort to the seats. Polyurethane foam is also widely used in the furniture industry.
Polyurethane is used in cars because it:
- Has light weight
- Helps reduce cabin noise. Excellent noise and vibration absorption.
- Wear-resistant. Polyurethane is not prone to corrosion and retains its properties even under difficult operating conditions.
- Polyurethane can be molded into any shape, so it is well suited for the manufacture of ergonomic, comfortable car seats.
- Polyurethane can be recycled (reused).
The design of the upholstered part of the seat has changed radically with the development of molding technology. In recent years, the density of polyurethane used in major products has been reduced by 30 to 40 percent, but the mechanical properties remain the same.
Defects in car seats
A car seat is subject to stress, so over time the upholstery and parts wear out. Defects often appear in the interiors of new cars. This is due to pets, children, and the drivers themselves. Any car dealership employee, without hesitation, will name problems that require restoration of car seats.
The most common stains from denim, markers, pens, belts, food
Appear if the driver's seat is not lubricated with protective cream, accelerate the appearance - sun, wet clothes
Appear as a result of natural wear and tear, under the influence of high, low temperatures, wet clothes, when there are many cracks, a wrinkle forms on the car seat
Hole, scuff, scratch
From pet claws, rivets, fittings
Appears at the site of abrasions, cracks or in places of “broken” foam rubber; it breaks along the seam if the threads are rotten
Broken side support
The driver slides out of the seat
The chair loses its shape if it is not inserted correctly into the cabin due to the drying of the foam
Contact with outer clothing, poor care
Organic, inorganic, mold
If the abrasion is not restored in time, repair of the leather seat upholstery is inevitable. Dirt caught in exposed fibers will cause cracks, tears, and paint to fall off.
Car seats often require complex repairs after an accident. In a side collision, restoration requires lateral support, seams are torn, and the filler is damaged.
How are upholstered parts of car seats made in a factory?
The moldable soft parts of the seat are made simultaneously in one element (the entire seat) by injecting a mixture of foam (isocyanates, polyols, catalysts and additives) into the molds. When the foam rises and expands, it occupies the entire space of the mold, hardens, after which the manufactured part can be removed from the mold.
After being removed from the mold, the soft parts of the seat are placed on a conveyor and sent to a special installation, which opens the cells of the foam material and gives it elasticity. Next, the parts are sent for quality control and revision. Then final vulcanization is carried out.
Although the process seems simple, there are many intricacies involved in manufacturing to get the polymer seat foam to the desired softness. The hardness of the foam can be changed by adjusting the amount of isocyanates in different parts of the casting molds. This way you get one solid soft part of the seat with parts of different degrees of softness (soft center and harder side supports).
Filling the base
When your frame blank is ready, the next step is filling it. A good option is polyurethane foam, on which softer fabrics, felt, foam rubber and other porous materials are attached on top.
To create the desired shape, you can take thinner materials and use them in more layers. When creating a “frog” saddle, sometimes it is enough to find old Soviet seats from the “Ural” or “Dnepr” as a blank. And then work wonders only with the case.
Characteristics of polymer foam for making car seats
When making a car seat, it is important to choose the right polymer foam. Foam material should be selected based on comfort, body support and safety. Vibrations occur in a moving car, which the seat must dampen. In most cases, polyurethane foam is used to make the soft part of the seat. This is a fairly accessible and relatively inexpensive material. Polyurethane foam of different densities can be sold from furniture manufacturers or on the Internet.
Let's look at the types of polyurethane foam and their properties.
- Foam density means the same as in other materials, the amount of mass of the material for a certain size or volume. It is commonly believed that foam density refers to how firm it is when pressed, but that is not the only meaning of this characteristic. Density indicates the durability of the foam. High and medium density foams feel the same when you sit on them, but the denser ones will be more durable. Thus, foam density is interrelated with the quality and durability of the product. Density is the most important characteristic when choosing foam. Density measures how little air there is in the foam. Higher-density foam has greater resistance to collapse and subsidence than lower-density, cheaper foam. The higher the density, the more durable the foam material.
- A density between 45 and 75 is considered high density foam and very hard, medium density foam from 25 to 45. If the density is below 25, then it is a soft foam. High-density foam is optimal for use under heavy daily loads.
- For seating, you can also use foam material of different densities for different places. The densest is for the lower part of the seat, since this part takes the greatest pressure, and the less dense is for the back. You can simply use one type of foam (medium or high density) for the entire seat.
- Reducing the foam density or firmness does not make the seat feel more comfortable. Why is this happening? Reducing the firmness and/or thickness of the foam results in higher compression when someone sits on it. If the foam is compressed to more than 40-50% of its original height, the foam compacts too much and feels hard. It's counterintuitive, but the more the foam's firmness is reduced beyond this level, the harder the foam will feel when a person sits on it.
- It is also important to understand that different thicknesses of material will have different effects on weight and pressure. The thickness of the foam will affect the ability to support weight.
- There is also polyurethane memory foam. It contains additives that increase elasticity and density. The memory effect is achieved due to the viscoelasticity of the polymer foam. This property means that the compressed foam takes a long time to return to its original position. Memory foam was developed in 1966 in collaboration with NASA research to improve the safety of airplane seats.
Open or closed cells
Polyurethane foam consists of cells. They can be open or closed. Open cell foam is more common. Cells are open to neighboring cells. Closed cells are not open to neighboring cells. Closed cell foam can float for a long time without sinking and is used on boats and yachts.
Open-cell foam is characterized as a soft material. Air moves easily throughout the material as the foam contracts.
Closed-cell foam is much denser and firmer than open-cell foam. Its air bubbles are completely sealed (closed) from each other. This material generally has a higher compressive strength. Closed cell foam is often used in water equipment because it does not absorb water.
You can buy foam of different thicknesses. One thick layer of foam can be uncomfortable. You can use several layers of foam of different densities (like a sandwich). The bottom layer is the densest foam, then medium density, then a thin layer of soft foam. All layers must be glued together using special glue. This method allows the weight to be distributed more evenly across the seat. It turns out to be an imitation of springs on old soft seats. All layers must be within the thickness of the factory seat.
When making a seat, do not forget about the height of the ceiling in the car and the amount of free space under your head.
Work order
Let's now look at the range of work recommended for restoring chairs with a wide variety of damage.
Removing and disassembling the seat
This step can be skipped if only cosmetic repairs are required. Let's say, installing a patch on a cut, hole or other damage. If more complex work is required, we suggest following the algorithm:
- Remove the seat from the dealership and disassemble it into its component parts. It’s most convenient to lay them out on the table so that everything you need is at hand and you don’t get confused when reassembling.
- If this is your first time disassembling a car seat, it makes sense to sign and number each of the parts so that you don’t get confused about them later.
- Start by dismantling the external fasteners and carefully remove the upholstery itself.
- To remove the upholstery, you will have to use either a stationery knife or sharp scissors. Moreover, very carefully - with the tool we only rip out the seams.
- Some assemblers glue the upholstery to the internal parts of the seat - be as careful as possible in such areas. If the material does not give way, try treating the difficult area with gasoline or solvent.
- It wouldn’t hurt to use a portable vacuum cleaner - you’ll be surprised how, during use, so much debris and dust has accumulated inside the seat and under the upholstery.
- Now it’s time to remove the pillow and backrest from the frame. Dismantling completed!
If you notice damage to the seat reclining mechanisms themselves, you need to carry out the following procedures:
- At the base of the pillow, find the lining - remove it.
- Unscrew the bolts holding the hinges of the lower part of the structure.
- Remove the axle and then remove the backrest.
- At the base of the frame, remove the hinges of the now upper part of the structure.
- At the base of the pillow, use the same bolts to secure a new mechanism in place of the faulty one.
- Adjust the position of the upper part of the seat by aligning the holes.
- Using an axis, connect the pillow and the backrest.
- Using hand welding, connect the hinges and the backrest.
Reveal new parts
The next important stage of our work is cutting. It is best to buy suitable fabric in the required volume in advance. To avoid hassle with cutting, use elements from the old removed upholstery as patterns. Here, proceed just like in school: attach the desired part to a piece of fabric, and then use a sharpened piece of soap, chalk, or a special marker to trace it strictly along the contour. Of course, you need to work from the wrong side of the material so that the drawn lines do not stain the fabric.
It is important not only to accurately trace the pattern, but also to ensure that the direction of the fibers on the pile fabric coincides. Depending on what material you use, pay attention to how much its edges fray when cutting the fabric. To ensure minimal consequences, work with well-sharpened scissors. There is also a special tool that not only cuts tissue accurately and quickly, but also cauterizes it - an electric knife. If you are working with loose material with scissors, you can burn its edges with a regular lighter, avoiding a strong flame, which will only deform and ruin the material.
Connecting the parts of the new case
After the necessary elements are cut out, all that remains is to connect them together with the old parts. Depending on the material of the cover, either “parachute” threads or a glue gun are used.
You need to be careful with glue guns: the composition used may not be suitable for the upholstery material. The fabric either will not stick together or will deteriorate under the influence of the substance. Therefore, it would be a good idea to study the instructions and also test the gun on a piece of similar material.
If this is your first time repairing a car seat, keep in mind that the upholstery parts are connected in such a way that their edges end up on the wrong side of the cover. Do not allow excessive overlap of material, and even more so, folds and distortions of the fabric.
After you have stitched and secured the seam, place soft foam material under it and gently but firmly beat it with a small hammer. This is necessary so that the joints of the parts do not become brittle.
Replacing foam pads
The foam filler located under the seat upholstery may deteriorate due to external damage or over time. When replacing this material, make sure that there are no internal voids left. Otherwise, when you put everything back together, the car seat will lose its shape and “float.” It will become not only unattractive in appearance, but also very uncomfortable. So much so that you will have to redo the whole job again.
To prevent this from happening, we recommend that you immediately use high-quality foam filler. For car seats, a material with a glued fabric cover is suitable. Give your preference to a filler whose manufacturer guarantees the mechanism’s resistance to compression and long-term use.
After you have replaced the old foam rubber with a new one, you need to place the updated upholstery on this material. A special adhesive spray is excellent for gluing: it is evenly distributed specifically over the upholstery material, connecting it to the foam filling without spoiling the latter.
Assembling the chair
After all restoration measures, the car seat is assembled in the reverse order. It is important to follow simple instructions:
- Connect the seat hinges.
- Assemble the pillow and carefully put the cover on it.
- Using the same hinges, connect the seat to the pillow, and then securely fasten them with screws.
- After the car seat is assembled, install it in its original place in the car.
- To ensure that the updated upholstery regains its factory appearance, do not forget to steam it before use.
- The renovations are now complete!
Seat design and ergonomics
- To ensure that the driver and passenger do not experience discomfort, the seat design is developed using the basic principles of ergonomics. The design of the seats should be developed taking into account long journeys, so that the person does not get tired due to an uncomfortable posture. Prolonged exposure to improperly supported posture by sitting leads to excessive static loads on parts of the body, causing a feeling of discomfort. Front car seats are designed to support your hips, buttocks, lower back, upper back and head.
- The main elements of a car seat are the backrest, the lower part of the seat and the headrest. These components are made from foamed polymer to provide rider comfort. The headrest can be adjusted, prevents damage to the head and neck during an accident, and also supports the head while riding.
- The bottom of the seat should be slightly concave. One of the functions of the seat bottom is to prevent the driver from slipping out of the seat belt during a frontal impact. For this reason, the bottom of the seat should be at an angle of 10 to 20 degrees to absorb the kinetic energy that the driver's mass produces during a crash. The length of the lower part of the seat is a significant factor in comfort for several reasons. First, if the seat bottom is too long, it will put pressure on the back of the sitter's legs, closer to the joints, an area that has a lot of superficial nerves and blood vessels. Pressure in this area will lead to local discomfort and limited blood flow to the legs. Secondly, a seat bottom cushion that is too long will pull the occupant forward, away from the seat back, making it impossible to provide adequate lumbar support. Third, a long bottom pad may limit leg splay interference with knee movement and may prevent postural changes that alter the distribution of pressure under the buttocks and thighs. To summarize, the length of the seat cushion, measured along the hip line, should not exceed 440 mm from the compressed seat back. For tall people, the seats can be equipped with a cushion with adjustable length (within 10 cm). The design of the lower seat cushion should allow easy posture changes so that the sitter can adjust the position of his pelvis to change the pressure distribution. If the seat cushion is too soft, changing the position within the driving limits will not significantly change the pressure distribution.
- The backrest should be as high as possible without obstructing the rear view for small drivers.
- The lumbar support should be tight, but flexible enough so that there is no discomfort from its pressure. Ideally, lumbar support should be adjustable. For low-back seats, fixed lumbar support should have minimal longitudinal curvature.
- When designing the seat, consider the weight and height of different people.
- Separately, it is worth mentioning the sports car seats. Their design is designed around the shape of the human body to provide better lateral support and weight distribution that helps the driver handle stress and stay in the seat when cornering. The sports seats have special openings for 3, 4 or 5 point seat belts to increase safety in extreme driving conditions. These seats have a reduced weight compared to standard ones. They are universal and technically can be installed on any car.
Selection of cladding material
Natural and artificial automobile leather are best suited for reupholstering car interiors. Both materials are characterized by high performance qualities, which sets them apart from the less popular carpet or velor. At the same time, leather covering is much easier to do with your own hands than, for example, flocking the interior. The reason for this is the high elasticity of the material, as well as the usual set of necessary tools. Recently, motorists are increasingly choosing Alcantara. However, the price for the original material is almost higher than the cost of genuine leather, while its cheaper substitutes cannot boast of high quality.
For these reasons, we will dwell in more detail on materials such as genuine leather and eco-leather.
Genuine Leather
Genuine automobile leather will become a real decoration of the interior. Is it possible to imagine a luxury car covered with a hard carpet or covered with multi-colored vinyl film?
However, a beautiful appearance is not the only advantage of genuine leather. It can withstand both frost and heat. Cracks will not appear on it due to temperature changes. Another positive property is resistance to ultraviolet radiation. Many materials fade in the sun, so after just a few years of use, the control panel and front seats, which are located directly under the windshield, become noticeably paler compared to the rest of the trim. But this will not affect natural leather. You can be sure that the interior will retain its color.
The interior of the car, covered in leather, looks expensive and solid.
Do not forget about the fire resistance of the material. Accidentally dropped cigarette ash will not harm the interior. Moreover, genuine leather does not absorb foreign odors, which is very important for those who like to smoke inside the car. The skin is also not afraid of other mechanical damage: it will take a lot of effort to scratch or tear such a coating.
On sale you can find material of various textures, including crocodile or ostrich leather. However, when choosing between smooth and perforated leather, it is better to give preference to the latter type. It is softer and more pleasant to the touch. In addition, its wear resistance is noticeably higher.
Perforated leather is softer and more pleasant to the touch
The only thing that can discourage you from upholstering the interior with genuine leather is its price. Its use becomes especially risky when you tighten it yourself. After all, if at some point something goes wrong, a large amount will be thrown away. If you are not ready to take such a risk, turn your attention to eco-leather.
Eco leather
Currently, artificial leather has practically received a second life. Outdated technologies have been replaced by newer ones. Low-quality leatherette is no longer used for upholstery of car interiors, giving way to eco-leather.
Eco leather is a synthetic material. During its manufacture, a thin layer of polyurethane is applied to a woven cotton or polyester base. At the same time, the characteristics of the material directly depend on the thickness of the layer: the thicker it is, the stronger the eco-leather is, but at the same time tougher. For car upholstery, the optimal thickness of polyurethane was experimentally determined.
The material received the name “eco leather” for two reasons. Firstly, during operation it does not emit toxic substances that adversely affect vehicle passengers. And secondly, after its invention, the number of animals killed for their skin decreased sharply, which pleased animal rights activists.
In terms of its external qualities, eco-leather is very close to its natural ancestor. Using special technologies, embossing is applied to the material, making it quite difficult to distinguish it from genuine leather. Moreover, the higher the price of the material, the more identical their appearance.
The appearance of eco-leather is very close to the appearance of natural material
Eco leather has a rich palette. You can use classic black or extreme red in the interior, or you can combine colors to your liking. But coloring natural material will cost you a pretty penny.
In terms of other characteristics, artificial leather is also not inferior to natural leather: wear resistance, moisture resistance and fire resistance are its strong qualities. Both of these materials remain clean for a long time, and if necessary, stains and dust can be easily removed with a wet sponge and soft cloth. It's no secret that many people are allergic to animal fur and skin, as well as the chemicals used in tanning. Eco-leather is perfect for them, as it is absolutely hypoallergenic.
We recommend: Penalty for installing LED lamps in headlights in 2019
At the same time, the cost of eco-leather is several times lower than natural leather, which makes it more accessible to the general public. You can safely take one or two meters in reserve if you are doing self-upholstery for the first time. The remaining material can be used to make a cover for the steering wheel, gear shift lever and other small elements of the car.
Regardless of whether you choose natural or eco-leather, purchase the material from specialized automotive stores. There are many reasons why leather used for making furniture, clothing and shoes is not suitable for upholstery. For example, its instability to temperature changes and reduced wear resistance.
Both natural and artificial materials have drawbacks that may seem insignificant to some. In cold weather, the coating quickly cools down, and in the sun it gets very hot. Accordingly, this slightly reduces the level of comfort. Whether it is worth paying attention to this feature of materials is up to you to decide. In any case, leather is one of the best solutions for interior decoration of a car.
Car seat design (design)
You can use a computer to design a car seat. Various design programs are used in the automotive industry: Catia, NX /Unigrafix, Solidworks, ANSYS, LS DYNA, Creo..
For example, the computer program NX (formerly called "Unigraphics"), developed by Siemens PLM Software. A set of applications of the NX CAD software package allows you to develop a layout of the seat and its elements. The NX software package is used by such manufacturers as Mercedes Benz, GM, Jaguar Land rover. Car manufacturers BMW, Volvo, Honda, Audi, Porsche use another program Catia V5.
You can use the program to create a model of a bucket seat, then print it on a scale of 1 to 1 on a plotter in layers (with a distance of 2.5 cm), then draw the contours on 2.5 cm foam, cut the foam to shape and glue it together. Next, smooth the mold to form a mock-up mold, level it with putty and sanding, apply wax and make a matrix. Using the matrix or directly according to the shape, you can make the main frame of the seat from fiberglass or carbon fabric and resin. The process of manufacturing a car seat from composite materials is described in more detail in this article below.
Refinement of VAZ seats
It doesn’t matter which car you decide to tune - old or new, in any case it will give the car more individuality. To carry out such work, you will need various kinds of tools and materials, here everything depends on the scale. At a minimum, for these purposes you will need scissors, a needle and thread, foam rubber, springs, knitting needles, PVC panels, polyurethane foam and more.
Step one. Remaking the back The process of technical tuning includes several stages for the seats of the VAZ 2110. You can start by changing the backrest; the seat of the VAZ 2110 provides back support, and the comfort and health of the driver depends on how well this happens.
Modification of VAZ 2110 seats
First of all, the backrest should be quite rigid; on VAZ tenth series cars, the backrests are too soft, so the back and lower back are overloaded, as a result of which sitting for a long time in such a chair causes discomfort.
On newer models, a plastic shield is installed in the back, and on the seats of VAZ 2110 models there are springs and they do not provide the necessary rigidity. By the way, installing additional springs in the back also does not solve the problem of rigidity. To solve a similar problem, the upper part of the backrest can be covered with tin, as the author did. The lower part of the back is covered with fiberboard or plywood. Of course, it is best to use materials that have technical properties similar to plastic, since it is lighter and more reliable.
By the way, the problem when the seats sag is solved in approximately the same way. Step two. We modernize the lateral support of the seats. On practically all foreign-made seats, the VAZ 2110 seats have good lateral support; on VAZ cars it is too small or there is none at all.
To make the side seats of a VAZ 2110 seat with your own hands, you will need thick foam rubber. Pieces of the desired shape and size are cut out of it, and then inserted into the side parts of the seats. If desired, similar support can be provided in the seat backs. You can choose the sizes yourself, it all depends on the driver’s personal preferences. To make two knitting needles you will need hardened steel wire with a diameter of mm. First you will need to install two knitting needles in the middle part of the foam thickness, under the cavities.
They will form the basis for fastening. Next you need to install six rings for communication, they are marked in green in the diagram. Subsequently, a removable spoke with curved VAZ 2110 seats is installed; it should be one cm shorter than the length of the cavity.
It is also worth noting that the tenth VAZ family was sold in hatchback and station wagon body styles. VAZ 2110 seats The most popular was the sedan, but other representatives did not go unnoticed in the automobile market. A good power plant, an indestructible gearbox, simple electrics and a completely adequate suspension - these are the main advantages of the car.
But the salon is not included in this list.
Everything here is overly simple and somehow ascetic. One of the seats for the VAZ 2110 will be the large seats for the VAZ 2110 for the owner. They are somewhat shapeless and not very attractive in appearance. The seating position in the car is deep, so the view is not the best, unless you are a centimeter or more tall. Not everyone can get comfortable behind the wheel. And the position of the steering wheel is quite strange, it requires a higher position for comfortable control.
However, this problem can be solved quite simply - by purchasing, altering and installing seats from a good foreign car.
Remove the rear seat of a VAZ 2110
Today we will determine which seats from foreign cars are suitable for VAZ and the entire tenth family of domestic cars. At car service stations, you ask this question and receive a skeptical look from the master in response. This is a rare task for workshops; not all bodywork specialists can perform this task.
However, you can go in three ways to solve the problems that arise:. Which option to prefer, choose. But before installing such a seat, it is worth checking the quality of welding.
How to cut and shape seat foam?
- You can get any shape of foam by cutting and sanding it and gluing different parts together.
- You can use a marker to mark cutting lines. You can draw a grid on the polyurethane foam, which will make it easier to make cuts of the correct shape (just like when learning to draw).
- Foam does not have a solid structure, so it is not easy to cut.
- The foam can be cut with a serrated bread knife. You need to move the knife in one direction and start a new pass over again. This way you can cut fairly long sections. When the cut size is small but has a complex shape, you need to cut through the foam with a knife, making short reciprocating movements.
- You can use an electric carving knife. An electric knife has 2 blades that cut in opposite directions at the same time. The opposing back-and-forth motion of the two blades cuts the foam rubber instead of being stretched by the movement of the blade.
- There are special cutters for foam material (Foam Rubber Cutter). This tool makes an even cut.
- A hot wire or hot wire foam cutter works well to cut foam, but is not very easy to use. The hot wire cuts foam very well. You can even make such a cutter yourself by searching for instructions on the Internet. The disadvantage of using hot wire to cut foam material is that polyurethane, when melted, releases very toxic fumes that poison the body.
- For the initial cuts, you can use a rough hacksaw blade with a hacksaw.
- You can soak the foam in water (if it is open cell foam) and freeze it. This will make it easier to cut. Just don't have a lot of ice. When using this method, you need to take into account that the polyurethane foam will dry within several days.
- Most places that sell foam material will also be able to cut the foam into the shape you need. You can make drawings with the required dimensions, take the foam with the drawings to one of the local furniture workshops and, for a fee, cut the foam to shape. In this case, you will receive high-quality work at an affordable price.
- With an electric knife (or other tool) you can only get a rough shape, which then needs to be refined by grinding with a machine, grinder or drill with an attachment.
- Using a sander or grinder with a grinding wheel requires experience, as the material is sanded quickly. A belt sander works well. The sander should lightly touch the foam material when processing. You can start sanding with a coarse abrasive, then move on to a less coarse one.
- When grinding and cutting, you need to do everything slowly. Foam is processed slowly.
- The resulting surface can be additionally leveled with 5 mm soft foam. It can be glued to the finished form with a special spray adhesive (3M spray adhesive), or combined with the upholstery.
- To keep both hands free while shaping the seat foam, tape it to your workbench. Also, when processing foam, it can be nailed to the workbench or screwed with long self-tapping screws. Once the nails or screws are removed, the holes will not be noticeable.
- As was written earlier, complex seat shapes can be achieved by gluing additional blocks of foam material to the main block, then the glue dries for a minute and the glued elements are pressed together. Use only special adhesive (for example, 3M spray trim adhesives) that is sprayed onto both parts of the material. So, for example, you can increase pronounced lateral support on the seat. Once bonded, the material can also be shaped by cutting and sanding.
- Aliexpress sells ready-made blanks of soft seat parts, already cast to a standard shape, which can be modified to fit a specific seat.
- Before sewing and installing the upholstery, you need to test the seat. Take at least 30 minutes to sit and perhaps identify any uncomfortable areas that need some work to make your body comfortable.
What to do if there is not enough range of seat adjustments
The simplest answer to such a question is to sell the car and buy a more convenient one. However, this is not always possible. For example, because the model is completely satisfied with other parameters and there are no alternatives in this sense on the market. Or finances don't allow it. At the same time, we should not forget that a person once bought the car in which it seemed uncomfortable to sit in, believing that it would not cause him problems.
Indeed, just sitting behind the wheel of an exhibition model of a model in a car showroom or even driving it for several kilometers before purchasing, it is not always possible to get a good feel for the ergonomics of the car. And then, after purchasing it, it suddenly turns out that after an hour of taxiing, the back “goes numb” or the ankle begins to “cramp” - due to the not entirely comfortable driving position.
And it turns out that the seat should be moved another three or four centimeters back or raised a couple of centimeters up, so that the car owner behind the wheel feels like a person, and not a wreck twisted in an uncomfortable position. And there is nowhere to move or raise the seat.
So, replacing a car is excluded for one reason or another, and the driver’s happiness with the existing transport is hampered by the insufficient range of adjustments. The most radical method of solving the problem involves completely replacing the standard driver's seat with a similar one, but from a completely different car.
Here, as a rule, we are talking about installing b. u. chairs from some premium foreign car, with longer “sleds” (metal “rails” along which it moves back and forth). Accordingly, the range of adjustments here will be completely different.
Let’s immediately make a reservation that modernizations of this kind are considered “a change in the design” of the machine, and therefore must be agreed upon with the relevant traffic police authority.
The second option for increasing the range of adjustments is a little cheaper, but also requires dismantling the standard chair. In this case, its fastenings, as a rule, are simply moved back a few centimeters.
Sometimes they are also raised higher - with the help of some kind of metal spacers. The most “budget” option is possible if the car owner’s hands grow from the right place and he has a garage with welding equipment at hand. In this case, he can try to simply lengthen the standard “sled” of the chair by the required amount, thus increasing the free movement of the seat.
In any case, this kind of “improvement” also requires moving the seat belt buckle mounting point. In addition, it should be borne in mind that if the driver’s seat is slightly shifted back from the original position, in the event of an accident, the airbag will “shoot” as if he is sitting in the calculated place, which will violate the intent of the designers of the car’s safety systems.
Source
Carbon fiber and fiberglass seats, their characteristics and features
The front seats of the car can be made of carbon fabric with epoxy resin or fiberglass. These materials can provide sufficient strength to the seats. Thus, factory bucket seats from well-known companies can be made from the same composite materials. For example, Recaro SPA seats (carbon fiber + Kevlar) and Recaro SPG seats (fiberglass).
These seats have been safety tested and are strong enough to keep the driver safe while driving and in an emergency.
Let's look at the characteristics of carbon fiber and fiberglass, their differences, advantages and disadvantages in the manufacture of car seats from these materials.
- Carbon weighs less and is a stronger material, but it is also more expensive and is used exclusively with more expensive epoxy resin, which is more difficult to process. The process of obtaining a high-quality carbon laminated surface is more complex. Carbon is more fragile than fiberglass. For this reason, carbon is mixed with Kevlar, which is very rigid. Carbon Kevlar is superior in strength and light weight, but is expensive.
- Fiberglass is a very easy material to work with, has a good strength-to-weight ratio, and is also inexpensive. Often used with cheap polyester resin. As a result, fiberglass can provide sufficient strength for little money, but cannot compare with carbon Kevlar in extreme operating conditions.
- The difference in weight between seats made from different materials is very significant. The carbon seat (Recaro Hans Pro Racer XL SPA) has 45% of the weight of the fiberglass seat (the Recaro Hans Pro Racer XL SPG). Kevlar carbon requires less to achieve the required strength than fiberglass.
Let's sum it up
You can always assume that increasing the operating comfort of a car is a good thing. But the costs of this process can be colossal if we are talking about an old domestic car. In this case, you will have to invest a lot of money in the purchase of materials, their preparation, as well as preparatory work in the car itself. Here, even dismantling old seats can be difficult for a master for a number of reasons. When calculating the budget for replacing seats, you should always take into account important factors that indicate the feasibility of such actions and investments. Often, after studying the issue, owners simply abandon such an idea.
Manufacturing process of a car seat from composite materials
The processes for making a car seat from carbon fiber with resin and from fiberglass are similar, but have their own characteristics. To create a fiberglass part, you can use inexpensive (as opposed to epoxy) polyester resin, which dries fairly quickly. There is no need to obtain an ideal surface, as is the case with a carbon product, which simplifies the manufacturing process. There are two ways to create a seat from composite materials (fiberglass or carbon):
- Making a layout, creating a matrix based on the layout and obtaining the seat itself based on the matrix. While the future seat is in the matrix, it can be reinforced with stiffening ribs. This manufacturing method ensures a high quality surface of the product, but requires additional money and labor to create the matrix. The matrix, both for fiberglass and carbon seats, is made of fiberglass.
- The second option for obtaining a seat made of carbon or fiberglass is to manufacture it directly according to the existing mock-up form. This is a faster method and quite suitable for creating a seat, since a perfectly flat surface is not required (especially if a soft part is added to the seat and it is sheathed). The model can be created from any easily moldable material. For example, you can glue several layers of extruded polystyrene foam together and cut it into the shape of a bucket seat. As was written above, design computer programs have the ability to divide the designed object into layers and then print them out in full size on a plotter. This way you can print out a mock-up of the seat, cut out individual layers of polystyrene foam to the desired shape, glue them together and modify them to a smoother surface. You can also use plywood as a basis for the seat layout, and obtain the necessary curves using construction foam and putty.
The detailed process of creating a fiberglass product can be studied using the example of making a hood, described in another article “how to make a hood from fiberglass.”
Let's look at the features of creating a car seat from carbon fabric and resin.
Necessary tools and materials for replacing upholstery and filling
Please note that car seat repair instructions vary depending on the material used for the upholstery:
- thick fabric;
- fleecy material;
- synthetic leather;
- Alcantara is an artificial material that imitates suede.
Thus, for repair we will need:
- fabric, leatherette or other upholstery material;
- foam lining;
- glue or glue gun;
- chalk, soap or a special felt-tip pen for cutting;
- small hammer;
- stationery knife;
- hacksaw;
- sharpened scissors;
- car vacuum cleaner;
- needles of different sizes especially for handmade work;
- Screwdriver Set;
- awl;
- pliers;
- dense, strong threads - nylon, parachute, silk.
The process of creating a carbon fabric and resin seat
- There are several ways to work with carbon fiber and epoxy resin. Here we will look at a simplified version of carbon lamination, and also mention other techniques for working with this material.
- Wear rubber gloves when working with carbon fiber and resin.
- The temperature when working with resin should be above 15 degrees (ideally 15–25 degrees).
- Wax is applied inside the matrix or on top of the mold layout and rubbed over the surface. Next, apply a generous layer of release agent (PVA Release) with a brush.
- After the release agent has dried (about 20 minutes), apply the first uniform layer of epoxy resin. Next, this layer should dry until it is slightly sticky, but will not leave resin on your finger when touched. Then a second layer of resin is applied, more abundantly, so that the carbon fabric can easily slide over the surface until it takes the desired position.
- You need to cut the material to size. Carbon fiber is difficult to cut. To make cutting carbon fiber easier, use the following technique: make a cut where you want to cut. Next, pull out 2-3 individual fibers from the fabric. Now you have a perfectly straight line along which you can cut carbon fiber fabric more easily. Trim excess material around the edges, as it hangs over and causes distortion of the material inside the mold. The margin around the edges should be about 15mm or a little more, which will be cut off later.
Cutting carbon fabric is not easy. If you make a cut and pull out 2-3 fibers, you can easily make a straight cut.
- After cutting the carbon fabric to the desired size, it is laid out on the previously applied resin and carefully smoothed, and the resin is applied again on top. It is important to expel all the air from under the fabric. Use a special smoothing roller. Next, carbon fabric is applied again, leveled, and covered with resin. This way you can apply 4 layers of fabric. The final layer of fabric should be given a generous coat of epoxy and left to dry.
- Heating the carbon fiber with the resin will speed up the curing process. Can be heated from 120 to 177 degrees Celsius for several hours (when working with polyester resin and fiberglass, heating is unacceptable, as this will distort the shape of the product). You can also let everything harden naturally more slowly. This usually takes at least 24 hours. The resin will not fully cure at temperatures below 15 degrees.
- After the final layer of fabric and resin, additional layers of resin can be applied in stages, which will improve the appearance, but will not increase strength. Each layer must be dried before applying the next.
- It is necessary for the carbon material to be saturated with resin. There should be no excess resin on top of the fabric. Now you need to wait for the resin to dry. After this, you need to put a second layer of carbon material in the same way as the first. You also need to impregnate the material with resin. If this is the last layer, then it must be left to dry and harden overnight and then remove the resulting product from the mold. If you need special strength, you can add another layer of carbon material. The more layers, the stronger the product will be, but the weight will also increase.
- Instead of using expensive carbon fiber in each layer, you can use more affordable fiberglass. The first two layers must necessarily consist of carbon fiber, but after that you can alternatively use fiberglass, which will be located between the layers of carbon material. There are even carbon fiber making kits containing carbon fabric and fiberglass. Before adding a layer of fiberglass, you need to wait until the resin dries.
- Before removing the product from the matrix, the resin must completely harden, otherwise removal will be more difficult and there is a possibility of damaging the product. After removal, you need to cut off the edges of the product.
- A vacuum bag is required to keep the material pressed tightly to the mold as the resin cures. The vacuum also removes all air bubbles. The more air you remove from underneath the resin and fiber, the stronger the carbon fiber will be when it hardens. All this also contributes to obtaining excellent quality of the front part of the product. The vacuum also squeezes out excess resin. Carbon fiber does not follow complex shapes and curves well, so if everything is done manually, without a vacuum, waves may appear that distort the shape of the final product. When this process is used, the pressure inside the bag is reduced and the external pressure is increased, which removes excess air and resin. This method helps produce a laminated product with a smooth surface, fully saturated fabric and improved adhesion.
- Vacuum Infusion Processing. This process is similar to the previous one, only the resin is poured in after the pressure inside the vacuum bag is reduced. This prevents excess resin from flowing in and air from entering. The product is durable and lightweight.
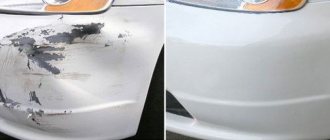
How to remove a burn
To carry out restoration work, the seat should be disassembled and brought home. You can't make repairs without removing the car seat. To remove the burn, you will need an iron, TERMOTEKS powdered hot melt adhesive, and pieces of upholstery fabric. The product for gluing leather and textiles is inexpensive.
The work sequence is as follows:
- clean the edges of the burn with scissors;
- cut a circle from thick fabric with a diameter 2-3 times larger than the hole;
- put under the defect;
- pour glue under the edges, remove excess;
- cover with a sheet of whatman paper A4 folded in half;
- iron with a hot iron;
- cut out a patch from upholstery fabric with a diameter corresponding to the hole, first add glue, then put it on;
- iron.
The more accurate the patch size, the better the repair.
DIY Sheet Metal Bucket Seat
The ergonomic design of the bucket seats makes them comfortable for fast driving and protects against lateral loads during sharp turns. They have pronounced lateral support.
The seat frame can be cut according to a template from a solid sheet of metal 1.5 - 2 mm (140 cm by 85 cm).
Print the template at actual size (seat_template). You can use several A4 sheets glued together and cut out in the right places. Next, place the template on a sheet of metal and outline it. Cut the sheet along the outlined outline. Now bend the metal and weld in the right places. At this point you have the basic seat frame.
If you don't have a metal bending machine, you can make small bend lines on the outside, then use the edge of a bench or workbench and press the metal. The cut will help bend the metal in straight lines.
Sports bucket seat dimensions
To make the seat more comfortable, you need to cut pieces of foam and glue them to the seat. For the top part and the back itself, 2.5 mm foam was used and for the sides and bottom part 5 mm.
To give your feet more support, you can make 3 layers of rounded foam.
The side foam is molded to make the top edge slightly rounded and make the top blend smoothly into the 2.5mm foam.
For the upholstery in this example, fabric of two colors was used (black and red). First, make templates according to the shape of the seat, then cut out the upholstery material using them, with extra space for seams.
Preparing for reupholstery
Working on reupholstery requires perseverance, patience and following recommendations.
Before you start updating the seats, it is necessary to carry out preparatory work:
- dismantle the seats, which are secured with four bolts. Before doing this, disconnect the battery terminal and electrical wiring terminals.
- remove all fragments of old covers and sign them. In addition, it is better to write the name of the material that will be replaced in this place.
- remove the standard cover from the seat, first bend the metal clips from the back. cut the cover at the seams, it will be used to cut a new one.
- calculate the material. Take measurements of each part of the old cover. Make a pattern, leaving at least a few centimeters at the edges.
Factory seat conversion
As a basis for creating a car seat with your own hands, you can take a factory seat. The frame can be left unchanged, or some elements necessary to change the shape can be added. The soft part of the seat can be changed by cutting off the foam or gluing additional segments. For example, you can convert a standard car seat into a sports bucket seat.
First you need to draw a rough sketch of the desired shape of the seat on paper, taking into account the size and shape of the original seat. You need to disassemble the original seat and think about how you can change the frame so that the shape matches your drawing. When creating a seat, you need to consider ergonomics, comfort and safety.
In our example, the lower part of the frame has been modified. Two plates were added with hinges and torsion springs (to allow the plates to move slightly up and down). This was planned by the ergonomic design of the seat. This mechanism relieves pressure and tension on the hips and legs while pressing the pedals of the car. In addition, the side part of the lower frame was increased, in areas of future increased lateral support.
Not only the design of the foam is important, but also how it will be attached to the frame. Everything needs to be planned in advance and the places where the foam cuts and fastenings should be marked. It is necessary to take into account the location of the metal rods that will hold the rings for attaching some areas of the upholstery. The rods can be built into the soft part of the seat (in special grooves). Instead of grooves with rods, Velcro fasteners (textile fasteners/Velcro) can be used to attach rings. One part of the fastening is on the polyurethane foam, and the other on the upholstery. Such fastenings are often used on modern seats.
Useful tips
It is difficult to put the upholstery on the back. In order not to waste a lot of effort and time, it is turned to the left side. Place it on the top of the seat and gradually unfold it. In order for leather upholstery to sit well on the base, it is treated with hot air.
Under the influence of heat, the leather softens, easily stretches, cools, contracts, and tightly fits the seat. A hairdryer is used for heating; the temperature is adjusted by distance. They don’t stay in one place for long.
It is better to do seat restoration on a flat surface. The work table must be large to lay out the material. Sewing on a sewing machine is the most difficult part when reupholstering a car seat.
Rear seat disassembly step by step
To carry out repair work or installation without negative consequences, you must follow all stages of disassembling the rear seats. First you need to remove the rear seats of the Lada Vesta. You need to feel the special latches with your fingers and pull them gently up. Once the latches pop out, the chair will rise up. However, you should not raise it too high. It is not necessary.
Next, you need to move the seats a little towards the trunk so that you can lift the edge, which is located near the trunk itself. It must be lifted until the staples come out of the brackets. Only after these manipulations can you remove the rear seat in the car and remove it from the cabin.
It is worth remembering that when installing the lower seats from fasteners, you need to be very careful so as not to break them. Latches can also fail when installing seats on the Lada Vesta. These latches are fragile because they are made of hard materials.
If repairs to the gas tank equipment are necessary, removing the backrests on the rear seats will not be necessary. The fuel pump is located immediately under the soundproofing carpet.
When disconnecting the middle seat belt fastenings, you must use a socket wrench with a 14-mm head. First, unscrew the screw and then remove
Such work must be carried out with extreme caution, because when assembling a car, the manufacturer lubricates all bolted joints with a special lubricant
After this, you need to unscrew the screw of the bracket, which is located on the side. There are two of them - one screw for each chair. In this case, you will need a head of 13. After these steps, the seat cushions must be released by removing them from the latches and tilting them forward. Having unscrewed all the bolts at the back by 13, you can dismantle the seat on the car.
Which seat is suitable for VAZ 2107? So many options
If you decide to modify a domestic “classic”, then you should figure out which seat is suitable for the VAZ 2107. It should be noted that the original seats do not have a high level of comfort. Therefore, VAZ drivers often prefer to install seats from other models. This allows you to make the car interior more comfortable and convenient. In practice, there are many options that are perfect for your car and also require virtually no modifications. You just need to choose the option that suits you best. There are also a number of models from which chairs can be installed with minimal modifications.
Which seat is suitable for VAZ 2107? In fact, the answer to this question is quite simple. There are quite a large number of options. A lot here depends on the capabilities of a particular driver. Not all of the acceptable seats can be quickly found in good condition. Also, some of them can cost quite a lot, this factor is also worth taking into account.
What is suitable for a Russian SUV?
Many complaints from car enthusiasts about Niva’s factory seats come for several reasons:
- it is difficult for a tall driver to find a comfortable position, literally - “knees rest against the dashboard”;
- short motorists have the opposite complaint - “legs dangling in the air”;
- The seat folding mechanism often breaks down, which is why it is constantly required to be repaired;
- The rear seats fold awkwardly.
The simplest solution to the problem is the development by AvtoVAZ designers of height-adjustable seats. But the obstacle here is the folding design required for three-door cars. The production of adjustable and at the same time forward-folding seats will lead to an increase in cost. Therefore, the owners of Russian SUVs have no choice but to solve the issue themselves and install seats from a foreign car on the Niva. Often, the rear seat is also replaced along with the front ones.
Owners of five-door versions of SUVs do not face such problems, where, due to the extended wheelbase, the driver and passenger seats are quite comfortable. For example, it rarely occurs to owners of a Chevrolet Niva to install seats from a foreign car. Their rear sofas are also more comfortable and can be folded out in a 60/40 ratio.
Car enthusiasts who are experiencing inconvenience and want to make a replacement should first find out which seats are best suited for the interior of the VAZ-21213-21214. Judging by the practice of tuning enthusiasts, with varying degrees of difficulty it was possible to install such seats on the Niva:
- from Mazda - 3;
- from Ford Focus II;
- from the 5th series BMW, produced in the E60 body;
- from Nissan Micra.
This is not a complete list; some craftsmen managed to squeeze seats from a Mercedes C-Class into a Niva with a short body. If we summarize the results of all the experiments, then the most suitable seats for the VAZ-2121 are from imported middle-class cars produced in a three-door body. The reasons are clear: they fit well in the cabin in size and are equipped with a folding mechanism to accommodate rear passengers.