The VAZ 2110 car is in serious demand among domestic buyers. This is a fairly reliable, moderately powerful product from the AvtoVAZ concern.
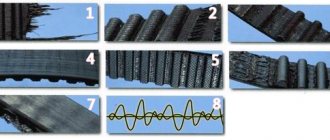
Causes of belt breakage
One of the common problems with the model is the failure of the timing belt. The reasons for this may be different:
- Simple wear and tear caused by a long period of use of the vehicle;
- Regular increased loads under which the engine has to work intensively;
- Mechanical damage as a result of improper operation or received during the repair of other components;
- Manufacturing defect.
Regardless of the causes of the problem, it must be eliminated.
Over time, it stretches so much that the gear teeth jump by 1-2 links. This disrupts the valve timing and causes interruptions in engine operation. But this is the best-case scenario for such a situation. The worst is when the strap breaks and the valves bend.
How to set timing marks on a 124 engine
Should the tension be checked on a hot or cold engine?
In conclusion, let’s talk about two more secrets. The first one - as a reminder: on a 16-valve engine, the correct belt tension is obtained only when adjusted while hot. Second: depending on the position of the crankshaft and camshafts, the belt tension changes cyclically from minimum to maximum
Second: depending on the position of the crankshaft and camshafts, the belt tension changes cyclically from minimum to maximum
Second: depending on the position of the crankshaft and camshafts, the belt tension changes cyclically from minimum to maximum
A little different. Or rather, almost like that, but I don’t know how to explain. In general, under the action of valve springs, camshafts in certain positions tend to rotate in different directions, tensioning or relaxing the belt. But there are situations in which the springs of one cylinder themselves balance the springs of the other - and the RV pulley itself will not rotate anywhere. And this position is close to the TDC position
Or rather, it is 2 teeth away from it (in fact, it depends on the shafts used). 2 teeth is a small thing. One spring has not yet straightened out, and the other has just begun to compress. The force there is minimal, the RV pulley can be turned +/- 5 teeth easily by hand
Help in choosing a timing belt and rollers
The reliability, efficiency and operating life of the motor depend on the quality of the rollers and belts chosen for replacement.
Research shows that the cost of a belt is from 450 rubles, and rollers will cost you at least 600 rubles.
When buying spare parts, be guided by the opinions of VAZ 2110 car owners. There are many forums. Also consult with specialists at the service station. They will be able to give professional advice, or even order quality components for you.
Surveys among owners of AvtoVAZ’s creation, namely the VAZ 2110, showed that the most popular belts are products manufactured by the following companies:
- Gates;
- Bosch;
- Kraft;
- Power Grip;
- Dayco;
- Contitech.
As for videos, it’s better to pay attention to the following brands:
- Gates;
- Power Grip;
- VPZ;
- BRT;
- Dayco;
- Marel.
Of course, the choice is purely individual and depends on the financial capabilities and available assortment of a particular store. But if the necessary elements are not available in your city, you can always order them online. Nowadays this is not a problem.
Belt problems
When replacing the timing belt, you should pay attention to the type of damage that caused the belt to fail. Using these symptoms, you can easily identify signs of a malfunction. Let's consider the causes and consequences of untimely replacement, listing the main ones:
- If it’s frayed, torn or damaged – it’s almost always due to the reupholstery.
- The absence of one of the teeth means weak tension.
- A high degree of tooth wear indicates incorrect tension, as does the presence of wear between several teeth or the appearance of abnormal noises.
- Cracks – temperature differences beyond the calculated limits.
- An oily surface suddenly indicates an oil leak. It is worth replacing the timing belt as soon as possible and finding the leak.
- End wear indicates misalignment, angular or parallel.
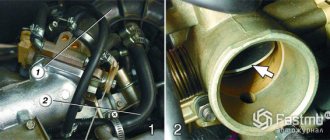
Do valves bend on a VAZ 2110?
This problem is considered common among some individual VAZ 2110 models.
Groove for valves
To understand whether the valve is bent on a VAZ 2110, it is necessary to determine which engine is installed. On certain engines (VAZ 2111, 21114, 21124 engines) there are special grooves on the pistons and when the valves break into the pistons, bending does not occur.
On other VAZ 2110 engines such grooves are not provided. (VAZ 2112) Some car enthusiasts grind such grooves on their own on VAZ cars, but this should be done carefully and in checked places because engine compression may be impaired.
Manufacturer's recommendations
- Your primary task as a car owner is to periodically visually inspect the unit.
- In addition to replacing the element, it is necessary to simultaneously replace the tension rollers.
- VAZ 2110 comes with 8 and 16 valves. The replacement process also depends on this. So, in an 8-valve valve, one tension roller is installed, and in a 16-valve valve, a support and a tension roller are installed.
Replacing the timing belt of a dozen is not difficult. It is not necessary to contact specialists. It is quite possible to do it on your own.
Set of tools
To complete the job of replacing the timing belt you will need:
- A set of spanners and open-end wrenches;
- Mount;
- Screwdriver Set;
- A special key with which to tighten the roller or simple pliers with curved rings;
- Car jack;
- Rags, protective gloves.
Many people ignore the advice on using gloves. Especially in the summer when it's hot. But they are needed to protect you from injury.
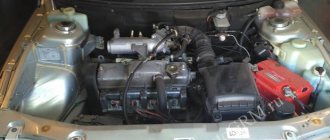
There is no need for an inspection hole. You will need to remove the right wheel to remove the timing belt if your Ten is equipped with power steering. So you can't do without a jack.
Features of model 2110
The features of this model include the following:
- Availability of ventilated brake discs.
- Galvanization of parts that most often rusted in older models.
- On-board control system.
The gas distribution mechanism on the VAZ 2110 suffers from frequent breakdowns, or more precisely, from damage and ruptures of the timing belt, which is a closed rubber ring, the dimensions of which vary in different engines. It is possible to replace it without any particular difficulties; if you have time, you can figure out this procedure yourself, saving on repairs in the workshop.
And also, its damage may indicate problems with the gas distribution system, which are worth investigating. Let's look at how to replace a belt and analyze damage to the timing belt.
About the engine
The engine performance of the 2110 is quite good for the time it was produced.
On 2110 cars, a variety of engines were installed, both carburetor and injection, with 8 valves (VAZ 2111, 21114) and with 16 valves (VAZ 21120, 21124).
List of VAZ 2110 engines:
- 2111,
- 21114,
- 21120,
- 21124.
According to the standard, the VAZ 2110 was equipped with an 8-valve engine, in variations numbered 21114 and 2111, which differed in minor characteristics. The 8-valve engine, marked 21114, earned the greatest recognition due to its high power and relatively low fuel consumption.
The standard operating mileage for this engine is 250,000 km. When using high-quality oil poured into the engine, you can extend the life of the car by 20–30 thousand km.
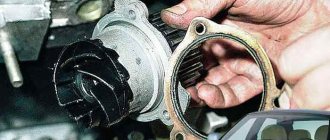
Checking the condition of the belt
First, remember that you need to check the condition of the belt once a year, or every 10-15 thousand kilometers. Replacement is carried out after every 50 thousand kilometers.
To examine the status of an item, follow these steps:
- Remove the plug from the protective front timing cover;
- Remove the alternator belt so that it does not interfere with you;
- Unscrew the six bolts, which will allow you to remove the cover;
- Access the belt and examine it.
Removing the timing belt cover
If you notice any of the following, be sure to proceed with replacing the belt:
- The element has bulges or cuts;
- Broken threads and traces of delamination appeared on it;
- There are abrasions, cracks or folds;
- Oil is leaking.
Installation process
First, about what we will need for this:
- jack;
- screwdrivers with different blades;
- hexagons;
- socket wrenches;
- roller tension wrench;
- extension tube.
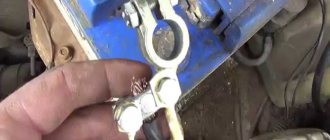
- We install the car in a level position and fix it.
- Now you definitely need to turn off the power to the car. To do this, disconnect the left terminal of the battery.
- We remove the bolts that secure the belt drive housing.
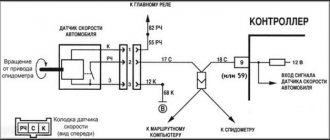
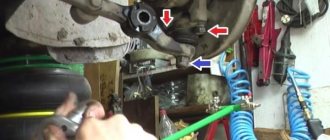
- Disconnect the crankshaft sensor. Now it’s very important: we check the alignment of the marks that are located on the camshaft gears and on the rear surface of the housing.
5. The marks on the flywheel crown must also match. Their combination must be checked. To do this, unscrew the plug located on the crankcase. The flywheel gear is located above it, and the mark is located on it. It should be aligned with the notch on the crankcase. 6. Now we need to loosen the gear tension and check the position of the mark on the crankshaft pulley. Now you can remove the belt. In this case, the flywheel must be fixed. To do this, you need to insert a metal pin between the crankcase and the crown. 7. Now take the 17 key and unscrew the bolt securing the generator pulley. We check the marks placed on the oil pump and crankshaft gear.
8. Take a 15mm wrench and remove the tension roller. We remove the timing belt drive and begin installing a new consumable. 9. First, pull the belt onto the generator pulley. Use a special wrench to turn the tension roller to the right. This is done using a special key. If you don’t have one, then pliers with curved tips will do just fine. Adjust the belt tension. It should be optimal - the belt should not sag, and it should not be overtightened. If you grab the belt with your fingers and can only turn it 90 degrees, then everything is fine. Incorrect tension will certainly lead to premature wear of the belt drive. 10 We assemble all other parts from the reverse. Don't forget to remove the screwdriver that we jammed into the crankcase. 11. Now all that remains is to start the engine and check its operation. If there is no extraneous noise and the engine runs as usual, then everything is fine.
Belt replacement
Replacing the timing belt must be described separately, depending on how many valves your VAZ 2110 has - 8 or 16. Self-repair of the unit on an 8-valve engine is considered easier, although you should not have any serious problems with a 16-valve engine.
8 valve
The sequence of work will be as follows:
- Disconnect the battery by removing the negative cable;
- Unscrew the bolts from the belt protective cover;
- Remove this protective cover;
- Remove the front wheel on the passenger side, while simultaneously removing the mudguards and engine compartment protection;
- Turn the generator pulley clockwise so that the marks on the cover and the pulley match;
- Remove the protective plug from the gearbox and check in the resulting hole to see how much the control marks match;
- Using a metal screwdriver or other object, you need to block the flywheel;
- After this, you can unscrew and remove the generator pulley;
- Make a few turns to loosen the nut that holds your belt tensioner pulley in place;
- Remove the old belt. You won’t need it anymore, so feel free to send it to the landfill;
- The space needs to be cleaned and degreased. White spirit is perfect for this;
- After rinsing, dry everything using a dry and clean cloth;
- Install the new roller following the direction arrows. If they are missing, then take the inscription into account. It should be located from left to right, that is, you could read it without any problems;
- To tighten the belt, move the roller counterclockwise;
- Check that all marks and the degree of belt tension match correctly;
- The compression ratio should be checked on a cold engine and at an air temperature within 15-30 degrees Celsius;
- Turn on the motor and with the unit running, check whether you have installed everything correctly;
- If the sound is normal, then the installation was completed correctly;
- Reassemble the removed elements in reverse order.
The replacement can be considered complete.
16-valve
Diagram of the timing mechanism 16 valve VAZ 2110
The VAZ 2110 is equipped with two types of engines - with 8 and 16 valves. At the same time, replacing a 16-valve valve is considered more difficult. Experienced craftsmen assure that for a high-quality timing belt change it is enough to put in a little more effort and attention.
Therefore, in this case, the work must be done as follows.
- Remove the six nuts that hold the protective cover in place. Remove the protection cover.
- Release the crankshaft sensor.
- Find an area on the pulley that is missing a tooth. It will act as a guide to find top dead center.
- Install the piston from the first cylinder so that it is at top dead center.
- Align the pulley and crankshaft sensor, lock the pulley, unscrew and remove it.
- Next, loosen the nut located on the tensioner pulley.
- Remove the old belt and also remove the tensioner pulley.
- Clean the freed space from dirt, oil, and clean it with a dry cloth.
- Install a new belt and secure the pulley with bolts. It is recommended to replace the roller itself at the same time.
- Make sure that the belt and drive marks match, as well as the timing gear marks.
- Tension the belt using the tensioner roller.
- Check the elasticity after stretching.
- Make two full revolutions of the crankshaft to check the quality of the assembly.
- Make sure that the marks match, after which the pulley can be installed in place.
- Turn on the engine, check for correct installation, and then reinstall the protection casing.
How to set timing marks VAZ-2112 16 valves
A break in the timing belt of the 16-valve VAZ 2112 engine can lead to bending of the valves. The result is an expensive engine overhaul. To prevent this from happening, you need to promptly replace the VAZ 2112 timing belt. Moreover, you can do it yourself.
The belt has a resource - a set service life. If this period has expired, the spare part must be replaced even if it looks normal. After all, a break can happen at any moment.
When asked how many kilometers it is necessary to replace the belt so that the belt does not break, experienced car enthusiasts give different answers. Some believe that after 50–60 thousand kilometers. Others clarify: this replacement period is relevant for an 8v (eight-valve) engine. If a 16v (sixteen-valve) engine is installed, then replacement must be done after 30–45 thousand kilometers.
In the video, a practitioner shows what timing belts look like after a long run and whether advertising should be trusted. Filmed by ExpertR channel.
Selecting a new belt
It is necessary to choose the correct size belt. The length of the product should be 742 mm. An important question for car enthusiasts is which manufacturer is better to choose. Today, high-quality products are produced by both foreign and domestic suppliers:
How to change it yourself?
Before changing the timing belt yourself, you need to study the diagram of the gas distribution mechanism, stock up on the necessary tools, and also imagine the order of work in the form of a sequence of actions.
Before replacing, study the timing diagram. There are differences between modifications of the VAZ 2112, but the basic algorithm is approximately the same for all modifications. This algorithm can also be used on VAZ cars of other modifications, for example, 2110. It is necessary to have a good manual that explains the progress of work step by step. And if you have at least a little experience in car maintenance and minor repairs, we can calmly carry out timing belt maintenance ourselves and change the necessary parts.
Tools and materials
The set of basic tools is small:
- socket heads for 10, 15 and 17;
- spanner or open-end wrench 17;
- large flat screwdriver;
- key for the tensioner pulley (if power steering is installed on the car).
The materials required are a new timing belt.
Step-by-step instruction
- The work begins by removing the negative terminal of the battery.
- Using a 10mm socket, unscrew the six bolts and remove the gas distribution mechanism cover.
- The crankshaft sensor chip is disconnected.
- The crankshaft sensor mount is unscrewed. Then you need to remove the sensor.
- The sensor hole must be aligned with the part of the pulley where there are no teeth. This is done so that the crankshaft sensor can detect TDC (top dead center). In addition, the area without teeth is used to block the pulley. After alignment, you need to put a 12mm hexagon in the hole of the sensor and fix the pulley.
- When the pulley is blocked, the generator nut is unscrewed.
- The belt tension roller bolt is loosened. After this, the belt is removed. Often during this operation the tension and support rollers and the pump are also changed.
- Installing a new timing belt. There are two ways to correctly install this part. First: put on the belt with the tension roller removed. The tension is adjusted after installing the roller. Second: install the belt by turning the exhaust camshaft pulley using a 17mm wrench.
- Next, you need to tighten the timing belt using the adjusting bolt. It rotates using a 10 key. Rotation clockwise increases the tension, counter-clockwise weakens it.
Replacing a belt on a car with power steering
If your car has power steering. then the procedure for replacing the timing belt has some differences. Before starting work, it is necessary to remove the power steering reservoir, since it blocks access to the timing belt.
In addition, cars with power steering do not have an adjusting bolt. The belt is tensioned using a tension roller and a special key. If such a key is not available, you can use a homemade device consisting of two nails and a screwdriver.
Stories from our readers
“Fucking basin. "
Hi all! My name is Mikhail, now I’ll tell you a story about how I managed to exchange my two-wheeler for a 2010 Camry. It all started with the fact that I began to be wildly irritated by the breakdowns of the two-wheeler, it seemed like nothing serious was broken, but damn it, there were so many little things that really started to irritate me. This is where the idea arose that it was time to change the car to a foreign car. The choice fell on the melting Camry of the tenth years.
Yes, I had matured morally, but financially I just couldn’t handle it. I’ll say right away that I am against loans and taking a car, especially not a new one, on credit is unreasonable. My salary is 24k a month, so collecting 600-700 thousand is almost impossible for me. I started looking for different ways to make money on the Internet. You can’t imagine how many scams there are, what I haven’t tried: sports betting, network marketing, and even the volcano casino, where I successfully lost about 10 thousand ((The only direction in which it seemed to me that I could make money was currency trading on the stock exchange, they call it Forex. But when I started delving into it, I realized that it was very difficult for me. I continued to dig further and came across binary options. The essence is the same as in Forex, but it’s much easier to understand. I started reading forums, studying trading strategies. I tried it on a demo account, then opened a real account. To be honest, I didn’t manage to start earning money right away, until I understood all the mechanics of options, I lost about 3,000 rubles, but as it turned out, it was a precious experience. Now I earn 5-7 thousand rubles a day. I managed to get the car buy after half a year, but in my opinion this is a good result, and it’s not about the car, my life has changed, I naturally quit my job, I have more free time for myself and my family. You’ll laugh, but I work directly on the phone)) If If you want to change your life like me, then here’s what I advise you to do right now: 1. Register on the site 2. Practice on a Demo account (it’s free). 3. As soon as you get something on the Demo account, top up your REAL ACCOUNT and go to REAL MONEY! I also advise you to download the application to your phone, it’s much more convenient to work from your phone. Download here.
- If the belt is too tight, you won't be able to turn it 90 degrees with any fingers.
- if you don’t tighten it enough, the belt will dangle and hit the plastic casing (this shouldn’t happen). We tighten it until the sound disappears at idle and when accelerating.
As a result, if the timing belt tension is correct, then when the casing is removed, its long part will fluctuate within 1 cm. from the axis.
How to change it yourself?
You can replace the belt on an 8-valve VAZ 2114 with an injector engine yourself or by ordering the appropriate service at a service station. During the shift process, there are nuances that must be taken into account when performing the task. If you make mistakes and do not change the strap correctly, this can lead to rapid wear and breakage. Below are instructions for replacing the belt in a VAZ 2114 8 valve.
Tools
If you change the belt yourself, prepare the following:
- a set of open-end wrenches, you will need tools for 13 and 17;
- long flat blade screwdriver;
- 10mm ring wrench, you can use a ratchet head;
- key for installing the tension roller;
- wheel wrench;
- jack.
User Pro Remont shared a video that describes in detail the procedure for replacing the timing belt pulley and timing belt in a VAZ 2114 car.
Algorithm of actions
How to change a belt correctly:
- Drive the car into a garage with a pit. The surface on which work is performed must be level. Switch the gear selector to neutral position.
- Loosen the bolts on the front right wheel. Place this part of the car on a jack so that the wheel can be rotated.
- Open the hood of the car. Using a 10mm wrench, remove the three screws that secure the plastic strap protector.
- Using a 13mm wrench, you need to loosen the bolt that secures the tension roller. Remove the device.
- You can see a mark on the camshaft gear; it is made in the form of a rectangular protrusion on the edge. When performing work, it is necessary that this mark coincides with the protrusion located on the fastening of the strap casing. If these marks do not match, you need to turn the wheel until they match.
- Then find the rubberized plug installed on the top of the clutch housing; it is located to the right of the power unit’s BC. The part is carefully pryed off with a screwdriver and removed from the seat. Under the plug you can see the flywheel crown; there is a mark on this device. It should be opposite the triangular protrusion located on the left. If the marks do not match, then take a 17mm wrench and loosen the tensioner. Using a pulley removal wrench, turn the device counterclockwise to loosen the timing belt.
- When the upper part of the belt is removed from the gear assembly, take a 17mm wrench and turn the crankshaft until the flywheel marks are opposite each other. The flywheel itself must be secured in this position; to secure it, use a screwdriver and install it between the teeth. If you have an assistant, ask him to hold the tool to prevent it from turning.
- Now you can remove the right wheel. Unscrew the screws that secure the arch protection and dismantle it.
- Using a 17 mm wrench, unscrew the nut securing the generator set pulley. When unscrewing, make sure that the flywheel does not turn.
- Dismantle the generator pulley and remove it from its seat.
- Remove the timing belt from the crankshaft disc.
- Using a 17mm wrench, completely unscrew the tensioner pulley lock and remove it from its seat. If you loosen the fastening, the belt can be removed.
- Install the new product onto the crankshaft disc. When installing, make sure that the marks are not broken. Install the generator set drive pulley by first placing a strap on it.
- Place the product on the gear of the mechanism. Install the tension roller.
- The strap is being installed. During installation, the tension roller must be turned with a special tool purchased in advance at the store. If you don't have one, you can use two self-tapping screws and a screwdriver. Self-tapping screws are installed in the grooves, and a screwdriver secures them. Turning is done counterclockwise. Tension the belt using the tension roller and tighten the screw that secures the roller.
- It is necessary to set marks if they are lost during the work process. The installation procedure for all components is performed in reverse order.
Photo gallery
Photos of belt replacement are shown below.
Unscrew the screws securing the timing belt protective casing. The mark on the camshaft gear should coincide with the mark on the casing fastening. Loosen the belt tension roller by turning it counterclockwise. Remove the belt from the pulleys and install a new product. Unscrew the nut securing the generator shaft. Put on the new belt and tighten the roller.
A few words about the importance of correct tension
Many motorists know that improper functioning of the timing belt can cause very serious engine damage. This is due to the principles of operation of the mechanism, which boil down to the timely and high-quality opening/closing of the engine valves. This approach not only allows you to adjust the valve timing of the internal combustion engine, but also differentiates between sensitive valves and constantly knocking pistons.
If the timing belt begins to work incorrectly, the gas distribution order is disrupted, as a result of which engine elements begin to wear out at an accelerated rate. Similar disturbances in the functioning of the engine can also occur due to improper belt tension.
In addition, drive tension that does not meet the standards accelerates wear of the main timing elements, the list of which includes:
- directly the belt drive itself;
- rollers;
- torque clutches;
- guides;
- tensioner
Repair of each of the marked timing parts takes much longer than normal belt tensioning. Well, there is nothing to say about the cost, if you can tighten the drive yourself and completely free of charge, then you will have to pay for replacing the components of the mechanism.
How to change it yourself?
You can replace the belt on an 8-valve VAZ 2114 with an injector engine yourself or by ordering the appropriate service at a service station. During the shift process, there are nuances that must be taken into account when performing the task. If you make mistakes and do not change the strap correctly, this can lead to rapid wear and breakage. Below are instructions for replacing the belt in a VAZ 2114 8 valve.
Tools
If you change the belt yourself, prepare the following:
- a set of open-end wrenches, you will need tools for 13 and 17;
- long flat blade screwdriver;
- 10mm ring wrench, you can use a ratchet head;
- key for installing the tension roller;
- wheel wrench;
- jack.
User Pro Remont shared a video that describes in detail the procedure for replacing the timing belt pulley and timing belt in a VAZ 2114 car.
Algorithm of actions
How to change a belt correctly:
- Drive the car into a garage with a pit. The surface on which work is performed must be level. Switch the gear selector to neutral position.
- Loosen the bolts on the front right wheel. Place this part of the car on a jack so that the wheel can be rotated.
- Open the hood of the car. Using a 10mm wrench, remove the three screws that secure the plastic strap protector.
- Using a 13mm wrench, you need to loosen the bolt that secures the tension roller. Remove the device.
- You can see a mark on the camshaft gear; it is made in the form of a rectangular protrusion on the edge. When performing work, it is necessary that this mark coincides with the protrusion located on the fastening of the strap casing. If these marks do not match, you need to turn the wheel until they match.
- Then find the rubberized plug installed on the top of the clutch housing; it is located to the right of the power unit’s BC. The part is carefully pryed off with a screwdriver and removed from the seat. Under the plug you can see the flywheel crown; there is a mark on this device. It should be opposite the triangular protrusion located on the left. If the marks do not match, then take a 17mm wrench and loosen the tensioner. Using a pulley removal wrench, turn the device counterclockwise to loosen the timing belt.
- When the upper part of the belt is removed from the gear assembly, take a 17mm wrench and turn the crankshaft until the flywheel marks are opposite each other. The flywheel itself must be secured in this position; to secure it, use a screwdriver and install it between the teeth. If you have an assistant, ask him to hold the tool to prevent it from turning.
- Now you can remove the right wheel. Unscrew the screws that secure the arch protection and dismantle it.
- Using a 17 mm wrench, unscrew the nut securing the generator set pulley. When unscrewing, make sure that the flywheel does not turn.
- Dismantle the generator pulley and remove it from its seat.
- Remove the timing belt from the crankshaft disc.
- Using a 17mm wrench, completely unscrew the tensioner pulley lock and remove it from its seat. If you loosen the fastening, the belt can be removed.
- Install the new product onto the crankshaft disc. When installing, make sure that the marks are not broken. Install the generator set drive pulley by first placing a strap on it.
- Place the product on the gear of the mechanism. Install the tension roller.
- The strap is being installed. During installation, the tension roller must be turned with a special tool purchased in advance at the store. If you don't have one, you can use two self-tapping screws and a screwdriver. Self-tapping screws are installed in the grooves, and a screwdriver secures them. Turning is done counterclockwise. Tension the belt using the tension roller and tighten the screw that secures the roller.
- It is necessary to set marks if they are lost during the work process. The installation procedure for all components is performed in reverse order.
Photo gallery
Photos of belt replacement are shown below.
Remove the screws securing the timing belt guard.
The mark on the camshaft gear must coincide with the mark on the housing mount
Loosen the strap tension roller by turning it counterclockwise
Remove the belt from the pulleys and install a new product
Unscrew the nut securing the generator shaft
Put on the new belt and tighten the roller