The thermostat is one of the most important elements of the cooling system of an internal combustion engine. It is designed to regulate the direction of movement of the coolant (coolant) depending on the degree of its heating.
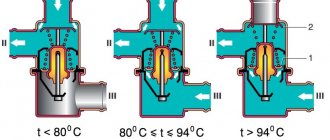
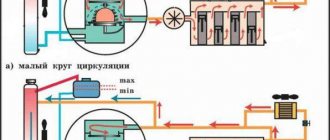
When starting a cold engine, a working thermostat is closed, which forces the coolant to move in a small circle without passing through the cooling radiator. This is necessary so that the engine heats up faster.
When the coolant temperature reaches 85-90 degrees, the thermostat valve will open and antifreeze or antifreeze will flow into the radiator for cooling.
Thermostat malfunctions
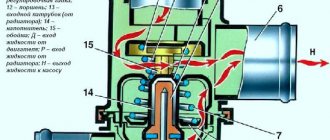
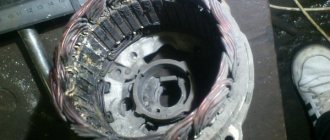
The design of the thermostat consists of a housing with pipes and a sensitive element with a valve, which actually shuts off the pipeline. The housing itself fails extremely rarely, and only due to mechanical damage.
Most often the sensitive element breaks. It is a sealed cylinder filled with a wax-based solid. The cylinder contains a piston with a rod. When heated, the substance melts and expands, pushing the piston. The latter extends and closes the valve.
The most common reasons for thermostat failure are:
- deposits of products of corrosion processes on the moving parts of the sensitive element;
- dirt, scale or foreign objects entering the thermostat housing;
- poor quality coolant;
- malfunction of the water pump (pump).
One symptom of a faulty thermostat is an overheating engine. It indicates that the coolant (coolant) moves in a small circle without passing through the radiator. It can also happen the other way around, when the liquid moves constantly in a large circle. In this case, the engine will take a very long time to warm up.
What is a thermostat?
A thermostat is a component of a vehicle's cooling system that maintains the recommended coolant temperature.
The main component is the valve.
Depending on the position of this valve, the liquid will flow in a large or small circle. With the help of a thermostat, the engine will not overheat as a result of constant operation over a long period of time.
In the case of winter cold, the device significantly saves the fuel needed to operate the engine. Plus, the time spent warming up the vehicle engine to the optimal temperature will be reduced. On a car such as the Lada Kalina, replacing the thermostat is necessary if, in the temperature range of +85...+100 degrees Celsius, its valve does not open.
The principle of operation is to comply with the normal laws of physics. The solid heat-sensitive element melts during the heating process, due to which the damper opens independently. The degree of openness depends, first of all, on how much the heat-sensitive element has melted. As the device operates, it determines the further path of coolant flow.
Let us remember that it can flow either in a small or in a large circle.
Verification methods
There are two ways to determine the functionality of the thermostat. The first method involves checking without dismantling. To do this, you need to start a cold engine, warm it up to operating temperature (about 90 degrees), and touch the lower radiator hose.
A cold lower pipe at this temperature indicates that for some reason the thermostat did not open. If it is hot, the thermostat operates normally.
For a more accurate check, you will need to remove the thermostat cover with the sensitive element. Place it in a metal container with clean cold water and place it on the stove to warm up. When the water temperature reaches 85-90 degrees, the element should operate, pushing the valve stem forward. If this does not happen, the thermostat is faulty.
Thermostat price
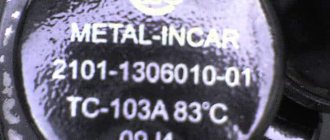
The approximate price of a thermostat cover with a sensitive element in our stores is 450 - 700 rubles . When choosing a spare part, it is better to give preference to branded VAZ models. The catalog number of the Lada Kalina thermostat is 1118-1306010.
The cost of replacing this unit ranges from 500-800 rubles.
In order not to overpay for the work, you can replace the thermostat yourself, but before that, do not forget to check it using the method described above with heating water.
Replacement
Required tools and tools:
- container with a wide neck with a volume of at least 5 liters;
- open-end or socket wrench 13;
- hex key 5;
- screwdriver with Phillips bit;
- clean rag.
1. Having placed the car on an overpass or in a car pit, raise the hood and disconnect the negative terminal on the battery.
2. Open the filler cap on the radiator and the cap on the expansion tank.
3. We move under the car, find a drain plug in the form of a 13 bolt on the bottom of the cylinder block. Place a container under it, unscrew it, and wait until all the coolant has drained. After this, tighten the plug.
4.Remove the air filter housing.
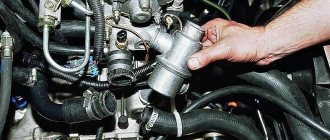
5. On the right side of the block head we find the thermostat. Using a screwdriver, loosen the clamps of the thermostat pipes. We remove all hoses. Use a rag to remove any remaining coolant.
6.Use a 5mm hexagon to unscrew the three screws securing the thermostat cover.
7.Remove the non-working thermostat.
8.Check the integrity of the rubber seal. If there are signs of damage on it, we replace it with a new one.
9. Install a new thermostat. We connect the hoses and clamp the clamps of their fastenings, having previously lubricated the joints of the hoses with sealant.
10.Fill with coolant.
Now we check whether we did everything correctly and how the new thermostat works. We start the engine and let it warm up to operating temperature. We touch the lower pipe, determining its temperature. If it is hot, then the thermostat is working as it should.
Do not forget to check the tightness of the connections between the pipes and the thermostat housing.
Thermostat for Kalina reviews
| rokVieM |
| Rating: 6 / -2 PM mention |
What brand of thermostat do you recommend?
quote: Pramo (Pramo), I took it in the BBC, for 10 ku, recently I took it for my father for 8 ku, also from Pramov.
I scoured the internet. some kind of vernet French everyone praises. only the black SCTs don’t seem to be bad either. I haven't seen these on sale here. at least at the lighthouse (mostly I buy everything there).
| Siman777 |
| Rating: 0 / 0 PM mention |
| Siman777 |
| Rating: 0 / 0 PM mention |
| Siman777 |
| Rating: 0 / 0 PM mention |
quote: Originally posted by rokVieM: yes, they all have it written that the opening t is 85 degrees))) but what’s the point.
I scoured the internet. some kind of vernet French everyone praises. only the black SCTs don’t seem to be bad either. I haven't seen these on sale here. at least at the lighthouse (mostly I buy everything there).
the choice is yours
| driver007 |
| Rating: 1 / -1 PM mention |
PS I have three cars of the ninth family in use every day, this problem never arises.
—————— CAR SERVICE “NIKO”, March 8th St., 16 (on Avangardnaya behind “Goat Park”) Repair of internal combustion engines, gearboxes, transmissions, suspensions. Auto electrician. Ultrasound injector flushing for VAZ, GAZ, UAZ, Foreign cars. tel.cell 67-66-66,55-05-66, from 9 to 19, seven days a week
| rokVieM |
| Rating: 6 / -2 PM mention |
This raises another question: is it normal that when driving with the heater on, the engine temperature does not rise above 78 degrees? There is no cardboard installed in front of the radiator and the engine is not covered with any blanket.
The questions seem simple.
| staff2011 |
| Rating: 2 / -1 PM mention |
| S.K. |
| Rating: 212 / -70 PM mention |
| rokVieM |
| Rating: 6 / -2 PM mention |
sellers gave 2 weeks for testing)))
| Alexander 63 |
| Rating: 5 / -8 PM mention |
| rokVieM |
| Rating: 6 / -2 PM mention |
quote: Originally posted by Alexander 63:
I sell thermostats from the Pekar plant, there were no complaints.
quote: Originally posted by booma:
set it will return to 92
and dviglo said thank you??
| booma |
| Rating: 3 / 0 PM mention |
| Alexander 63 |
| Rating: 5 / -8 PM mention |
I can't understand you rich people)))
| Details77 |
| Rating: 1 / -5 PM mention |
| Details77 |
| Rating: 1 / -5 PM mention |
| Gospod_in |
| Rating: 52 / -49 PM mention |
| Alexander 63 |
| Rating: 5 / -8 PM mention |
quote: VERNET, by the way, is not that expensive, it will be a little cheaper than Pekar
I'm not talking about the price, I was moved by pity((((((((((((
Well, why is there such an opinion that designers at factories are complete idiots, and they are my colleagues(((((((((((((
| Details77 |
| Rating: 1 / -5 PM mention |
quote: why is there such an opinion that designers at factories are complete idiots, and they are my colleagues(((((((((((((
| Alexander 63 |
| Rating: 5 / -8 PM mention |
| Ziban |
| Rating: 0 / 0 PM mention |
| rokVieM |
| Rating: 6 / -2 PM mention |
| TAPAKAH |
| Rating: 0 / -1 PM mention |
| Belomor |
| Rating: 2 / 0 PM mention |
| rokVieM |
| Rating: 6 / -2 PM mention |
quote: Originally posted by TAPAKAH:
where and how much did you buy the master, where is the baker sold?
Thermostat for viburnum 8 valves which is better
In the engine cooling system in a Lada Kalina car with an engine of 8 valves, as well as 16 valves, the thermostat plays a significant role, because it is a regulating link, thanks to which the operating temperature necessary for the normal implementation of the combustion process is maintained in the circuit. The main signs of failure of this part are:
- unit overheating;
- inability of the motor to reach its operating temperature.
Let's look at how to replace such an important component as a thermostat using the example of a Lada Kalina 8-valve engine; similar work is performed on a 16-valve engine. Doing this work yourself will allow you to gain enviable experience and save a lot of money.
Thermostats for VAZ (Lada) Kalina
for repair of VAZ (Lada) Kalina
I bought this thermostat for Kalina 2007. 8 cells, after a month it jammed, won’t open, the engine overheats and the antifreeze boils away. It will be expensive to change every month. Spare parts are of poor quality.
Order ween or metal incar. These thermoelements are the most reliable and fit without modifications.
I decided to modify the cooling system in Kalina, and install a thermostat from Granta 2190. I bought it, and when cooking in a saucepan, it opened at only 82 degrees, and very sharply. I decided to install it, because all the hoses were converted to the grant scheme and will be ready for work tomorrow.
On the very first morning after installation, I was convinced that the average opening temperature was 79-80 degrees, it didn’t give more than a plus, the whole car was wrapped up - cardboard in front of the radiator! Stove at 1st speed. Fuel consumption has also increased. Either marriage or China.
Features of replacing the thermostat on Kalina
How to replace a thermostat? To successfully implement the indicated procedure, the owner will need to adhere to the steps below.
- First, disconnect the connector of the sensor connected to the intake air tract filter element unit.
- To ensure better convenience, we recommend that you completely remove the air filter housing from the engine compartment. It is held in place by three fastening points, 2 of which are based on elastic bands, and the third is located in the battery area.
- Before draining the antifreeze from the cooling circuit, we determine how to carry out this manipulation. Here we highlight two of the most convenient methods.
- The first method is a procedure that allows you to perform a drain using a conventional air compressor used to inflate tires. This option eliminates the need for a pit or lift, and the work itself can be done in any suitable location. Now you know how to change it, but let’s add that the undeniable advantage of this method is that there is no need to remove the pipes and unscrew the plugs located on the engine block and radiator.
- Before the procedure, we stock up on an empty container, the capacity of which is equivalent to 4-6 liters of liquid, as well as directly on the compressor with the device.
- Open the cap on the expansion tank, from which we also remove a small diameter hose. We seal the “bare” tank fitting with adhesive tape.
- We place this hose in a pre-prepared container and hold it securely inside the container.
- The hose leading from the discharge pipe of the compressor unit is inserted into the hole in the expansion tank (sealed).
- By briefly turning on the compressor, we force compressed air to penetrate into the system. Air displaces liquid from the circuit, and it flows into the container.
- We carry out the procedure until the antifreeze is completely removed from the LADA Kalina system.
- The second common method is to drain through open plugs on the radiator and engine block.
- For this purpose, we also prepare a suitable container and, using the indicated manipulations, completely drain the liquid. Don't forget to screw the plugs back in.
- Now, using a convenient screwdriver, we loosen the fasteners of all pipes suitable for the thermostat and then remove them.
- To dismantle the thermostat itself, we arm ourselves with a hex key, size “5”, and unscrew the 3 screws.
- If, after unscrewing, the unit does not “want” to be disconnected from the lines, then using the same screwdriver, we loosen it, running the tip between the adjacent surfaces.
- We clean the mating sections of the main pipes with the LADA Kalina thermostat from scale formations and at the same time replace the sealing gaskets.
- We install the new product in its original place, tightening the bolts securely.
- After this, we connect all the dismantled pipes to their original places, not forgetting to tighten the fastening clamps.
- We check the reliability of the screwed plugs and fill the system with antifreeze. We do this through the neck in the expansion tank of LADA Kalina.
- In some cases, it will be convenient to replace the thermostat along the way if its service life suggests this action or is approaching such a need.
- Upon completion of filling, install the housing with the air filter and connect the previously disconnected sensor. Now you know how to change the thermostat in your car, so replacing the thermostat will not be too difficult for you.
Important points when replacing a thermostat
When replacing the thermostat, eliminate the risk of antifreeze getting onto the sensor connectors and into the air path of the Lada Kalina. To prevent such situations, we recommend wrapping electrical connectors and components in plastic bags. Due to the low cost of the thermostat, a more rational action would be to replace the entire thermostat. It is better to purchase original products, since analogues may not match their fastening characteristics (hole diameters, etc.). This will avoid difficult moments during installation.
Checking for correct installation
It is very easy to check the correct installation and operation of the thermostat in the Lada Kalina. Here you will need to warm up the engine and then immediately turn it off. Next, open the hood and feel for the lower pipe that goes from the radiator to the cooling jacket of the engine block. If it is heated, the thermostat opens, and there is no risk of the Lada Kalina engine overheating. When this phenomenon does not occur, the system components require careful diagnosis. Therefore, it would be a good idea to check the functionality of the new thermostat before installation.
Annotation on replacing the thermostat on Lada Kalina
Replacing the thermostat on Kalina if it goes out of working order can simply be done by the driver himself. You should look more closely at the signs of a faulty thermostat, study the instructions for replacing it with a new device, and understand what tools are needed for this.
How to check and replace?
Usually, it is possible to recognize a faulty device as soon as the following indicators are present:
- The engine takes too long to warm up;
- The coolant temperature rises unreasonably, and this causes the engine to overheat, even in the cold season.
Replacing the device with a new one is carried out as follows:
- First of all, the coolant is drained;
- The air filter is removed;
- Remove the hoses (there should be 4 of them);
- Unscrew the top nut of the thermostat and remove the ground wire;
- Now unscrew the nut on the device;
- Before installing a new thermostat, we prepare the seat. To do this, you need to clear everything of debris;
- Don’t forget to apply a layer of sealant or a new paper gasket;
- We install a new device.
And the most important thing:
Before installing the device, do not forget to pour boiling water over it. We pour water from the kettle and wait until the thermostat opens completely and then closes.
At this point the operation can be considered completed. Thus, knowing which thermostat is better for Kalina, we install the one that we like best. After this, you must definitely check how everything works.
Thermostat functions and signs of malfunctions
The thermostat is one of the main components of the cooling system of any car; it is responsible for its optimal temperature conditions and preventing the engine from overheating.
A working thermostat can significantly reduce the time required to warm up the engine in winter.
The operation of the designated unit of the machine’s cooling system is carried out using 2 automatic valves. The valves are opened using a temperature-sensitive element, which, when the temperature in the system exceeds the normal temperature, begins to melt. The movement of cooling water in the system can be in a large or small circle. When the car engine quickly warms up, the large circle is blocked and the coolant flows through the small circle. When the system temperature reaches 85°C, the valve partially opens and the liquid begins to move in a large circle. Its full opening occurs at a temperature of 100°C. When the cooling water temperature drops, the valves close.
What is it for?
As you know, this device regulates the temperature of the antifreeze, preventing overheating or underheating through a built-in valve. It is installed in the cooling system and automatically opens/closes depending on a certain situation. For example, if the liquid temperature is above normal, the valve opens and vice versa - if it is below normal, it closes.
In the second case
, the valve closes to reduce the warm-up time of the power unit in the cold season.
Closing the valve involves closing a large circle. As you know, the coolant moves in small and large circles. When the large circle is closed, the coolant flows through the small circle and after reaching 85°C the valve opens.
It is also worth noting that the thermostat is a completely mechanical device and the opening/closing of the valve occurs thanks to a special element, which is very sensitive. It is capable of melting when heated and opening the damper for non-stop movement of antifreeze in a large circle.
If for any reason this device does not work effectively, do the following:
- Purchase a thermal insert from Luzar;
- The air pipe is disconnected from the sensor. In addition, the connectors of the mass air flow sensor and the adsorber valve are removed;
- The air filter housing rises;
- The coolant is drained into some container;
- Remove the screws securing the thermostat cover clamps. They are removed;
- The device cover is removed along with the thermal insert;
- A new part is installed in your own garage (the approximate cost of a thermal insert is 140 rubles).
- After such modernization, Kalina will begin to warm up much faster, and the temperature will remain stable at around 90°C.
Instructions for replacing the unit
Before changing the thermostat on Kalina, you need to carry out preliminary work, including purchasing a new device and selecting the necessary tools. For the upcoming work you will need:
- thermostat Lada Kalina;
- empty 5 liter canister;
- Screwdriver Set;
- silicone sealant;
- socket wrenches for 8, 12 and 13.
Now you can start doing the main work, having first installed the machine on the overpass. A complete replacement of the thermostat consists of a sequence of simple steps:
- The coolant
is drained into the prepared canister. - Remove the air filter by unscrewing the top bolts and nut, removing the connector, valve, and air hose from the housing, having first loosened the clamp.
- 4 hoses are released; to do this, use an 8 socket wrench and a set of screwdrivers to release the clamps.
- Unscrew the nut and stud using socket wrenches 12 and 13 and a screwdriver, remove the ground wire and the thermostat itself.
- The seat for the new thermostat is being prepared: dust, dirt, and old materials are removed.
- A thin layer of silicone sealant is applied to the seat, which is left for 10 minutes to crystallize.
- A new thermostat is installed in the prepared place, and do not forget to replace the temperature sensor from the old device.
- All steps to secure the new thermostat are performed in the reverse order: the ground wire is screwed in, 4 hoses are connected and coolant is poured into the system, do not allow air pockets to occur.
- The correct installation of the device is inspected with the engine running; if necessary, the clamps are tightened to prevent leaks.
After replacing the thermostat on the Lada, you should carry out a control check.
When driving the car, monitor the current temperature level of the cooling system .
Correct installation of a new thermostat
should completely eliminate all signs of malfunction of the vehicle’s cooling system.
The material below was prepared by one of the blog readers, who, of course, is the owner of a Lada Kalina. The man decided to contribute to the development of the site and wrote his own guide to replacing the thermostat. With the permission of the author, some points have been edited and structured for easier reading.
Sooner or later, all Kalinovods encounter a problem when the engine overheats. One of the reasons for this may be a non-functioning thermocouple, which, depending on the resistance, should open the damper to supply antifreeze. In this article, I will tell you how to properly approach replacing a thermostat. To get started, you need to prepare the tools, and about them in order:
- The set of tools is the simplest without unnecessary bells and whistles
- Candle key
- Wire
- Metal clamps (for replacement. If you don’t want to, don’t change them)
- Compressor
- Rubber tube
- Gloves. It is necessary so as not to disturb and not get burned
- Antifreeze canister, maybe even empty
Management
We bring to your attention detailed instructions for completely replacing the thermostat with a new one. Even if you don’t understand how to replace the thermostat on a viburnum, the video will help clarify the situation.
1. Disconnect the sensor from the air filter housing and remove the air filter. As a rule, it will take no more than ten minutes to dismantle it. This is done correctly like this:
- completely unscrew the 2 screws located on top, as well as the nut located on the side of the engine compartment. We recommend leaving these parts in one place so that later you don’t have to look for them separately on the market;
- remove the connector installed on the recirculation valve (it, in turn, is based on the filter housing);
- lift the valve up, and then, without disconnecting the tubes, move it all to the free side;
- by unplugging the plug from the air sensor, remove the air hose by loosening the clamp;
- Having slightly loosened and turned the air filter housing, it should come out.
3. Take a 8mm socket wrench and a screwdriver. Use it to loosen the clamps , and then remove the four hoses.
A well-pumped system will not allow liquid to spill in large quantities.
4. Take a 12mm wrench and remove the wire by unscrewing the top nut on the thermostat.
5. Now take the key for 13. There is a nut and a stud on the thermostat - you will find the first in the upper part of the housing, the second at the bottom. Try to remove the thermostat by gently loosening it.
Helpful advice: loosen the thermostat carefully, sometimes helping yourself with a screwdriver.
These actions must be performed because during operation, high temperatures literally “solder” the thermostat, causing the housing to stick. Help with a screwdriver will solve this problem.
6. Next, clean the seat from accumulated dirt (there will be a lot of it there). Don't leave the old gasket in place - get rid of it completely. Wipe the seating areas with a clean cloth. Using sealant, 1-1.5 mm of substance per seat, or use a paper gasket. The best option at the moment is sealant. If you have applied it, stop working for 5-10 minutes. During this time, the sealant needs to crystallize. In the case of a paper gasket, work can be carried out immediately.
7. Installation of a new thermostat is carried out in the exact opposite order of removal. It is important not to forget to replace the temperature sensor from the old thermostat. It is also important to connect the ground wire. This is done by screwing the ground wire onto the top stud.
8. After all hoses are reconnected, add coolant to the system . Its quantity can be selected based on how much liquid you drained during disassembly of the old faulty device. To accomplish this task, the method of removing air pockets is used.
In test mode, start the engine. While it is idling, make sure that all hose attachment points are not leaking . If such a problem occurs, tighten the loose clamps.
Dismantling and installing the Kalina thermostat using the example of a 1.6 8-valve engine
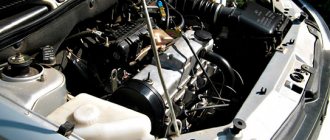
To start work, we need to prepare a workspace so that we can get close to all the tubes and sensors that we will have to unscrew.
Unscrew the filler cap, then remove the plastic casing from the top of the engine:
After this, it is necessary to make access to the Kalina thermostat more free. To do this, you need to remove the air filter housing, read more about this here. Then it is worth keeping in mind that we will need to unscrew other pipes, and therefore we need to unscrew another large tube that connects the air filter and the throttle assembly.
And you can immediately look at the condition of the clamp and change it if necessary:
Now, in order to incur minimal losses of coolant, you need to pump out all the antifreeze or antifreeze from the engine. Now I will show you the fastest and easiest way to do this. We disconnect the fluid supply hose to the throttle assembly so as not to get confused, this is the one that is closer to the cable:
Then we need a compressor pre-connected to the cigarette lighter or battery terminals, depending on the type of wires. Then we screw the cone-shaped nozzle onto the end of the compressor and insert it into the fluid supply hose to the throttle assembly (marked with a blue arrow), and put a similar-sized hose onto the throttle assembly fitting, and the other end will go into a canister with the remains of the old antifreeze.
But my advice is to use an empty one, then just pour everything into the expansion tank so that after changing the thermostat and pumping the unit, fill in everything that was pumped out, and not pump or top up.
It is necessary to take into account that we pumped out the coolant from the engine cooling jacket bypassing the radiator (small circle), which means the liquid remained in the large circle, therefore, when disconnecting the pipes from the thermostat, you will need 2 of them, which go from and to the radiator, when removing tie them so that their ends point up. In this case, the liquid will not leak out.
And we also disconnect the sensor’s power plug, and now you can begin to remove the temperature sensor itself.
The thermostat itself is attached with two bolts diagonally, which need to be unscrewed:
After unscrewing the 2 bolts, carefully pull the thermostat towards the battery and reassemble everything in the reverse order!
Coolant pumping
After everything is assembled in the reverse order, we perform the following steps to pump the coolant.
- We start the car and wait until the car warms up to a temperature of 90-94. 1 fan will turn on.
- We wait, wait for the temperature to reach 100-105 - the 2nd fan will turn on
- Wait 4-5 seconds and turn off the car. The fan will still run to cool the engine. When the temperature is 85-89, the thermostat starts working, the peak is 102 degrees. At this moment, the valve opens completely and begins to circulate water in a large circle.
- We unscrew the filler cap while the fan is running, then immediately close it.
- We wait until the fan turns off completely and then open the lid again and the water will immediately go down. We top up to the MAX mark (what was pumped out) and that’s it. This completes the work.
On my own behalf I can say: Take a thermostat and DTOZh from Luzar. It works great and keeps the temperature at 81-90. I think this article will teach you to approach the maintenance of your car wisely. One of the readers of this blog, Vertass, was with you. No nail or rod for everyone.
How can you modify the heater?
The new models Lada Kalina 2 and Lada Granta use a cooling system operating scheme with parallel connection of the heater radiator. Because of this, the operating temperature is reduced to 85 degrees, which is slightly lower than on previous models of the VAZ family. Many car owners seriously believe that this temperature cannot be normal - there is increased fuel consumption, as well as a decrease in the service life of moving engine parts due to premature wear. But according to experts, there is no connection between the reduced operating temperature and engine life.
The cooling system of the Lada Kalina works more efficiently thanks to a single-circuit design. Such a modernization only benefited the engine; it made it possible to change the ignition timing, resulting in fuel savings. The inertia of the thermostat is also reduced. The downside was the mediocre heating of the cabin at sub-zero temperatures. The way out of the situation is to independently modify the thermostat. Modification involves two main methods:
- shorten the rod of the solid-state temperature-sensitive element;
- replace the thermocouple.
For cars with a cable gas pedal, a heated throttle assembly from the cooling system is used. In this case, an additional circulation circle is added.
Adjusting the thermocouple rod
Shortening the end of the thermosensitive element rod will allow you to adjust the operating temperature to 90-95 degrees. Trimming is carried out sequentially in increments of no more than one millimeter. The metal is soft, so the procedure must be carried out carefully. It is advisable to reinstall the thermostat after each millimeter cut and check how much the operating temperature rises while driving.
If the result does not meet expectations, you can adjust the rod further until the arrow on the instrument panel shows 95 degrees and the air in the cabin begins to warm up faster. The method is simple but effective. Among the disadvantages, there is a slight increase in wear of SOD parts due to operation at high temperatures. If you overdo it with shortening, you can ruin the device.
Replacing the temperature sensor
The thermocouple can be replaced entirely. The Wahler brand thermostat insert is suitable for Lada Kalina: 3017.87 D (at 87° C) or 3091.92 B (at 90° C). The thermoelement is replaced as an assembly with a spring, and the device will have to be cut with a hacksaw to remove the insert. A more convenient option is to buy a thermostat from BEHR - you don’t have to cut or adjust anything
You can also use analogues from Daewoo Nexia or Renault Logan cars. Logan's thermal insert requires adjustment.
If a LUZAR thermostat is installed on Grant, then replacing the temperature-sensitive element is not possible.
Judging by the reviews of car owners who have made such modifications, fuel consumption while warming up the engine has decreased slightly.
Throttle body heating
Another way to upgrade the heater is to create an additional throttle valve heating circuit. Some drivers are trying to prevent the unit from freezing in winter in this way. The method is clearly not for beginners. It consists of drilling a hole in the cover of the device and welding an additional fitting to it, through which heated antifreeze will be discharged. The thermostat mounting studs will also have to be lengthened. The process is labor-intensive and ultimately impractical. Freezing of the throttle assembly is the exception rather than the rule, so there is no point in carrying out such an upgrade.