A breakdown of the generator leads to the car losing power and draining the battery. It is important to know what signs indicate a malfunction of this unit and when it needs to be replaced.
The generator in Russian VAZs breaks down quite often. One of the common causes of breakdowns is increased energy load and the installation of additional current-consuming devices and devices. We will tell you which generator is better to install on the VAZ 2106, 2107, 2109, 2110, 2112, 2114, and also introduce you to the recommendations of specialists regarding the purchase and replacement of this equipment.
Design Features
A standard generator for AvtoVAZ JSC cars consists of the following elements:
- Back and front covers.
- Air intake.
- Brush holder.
- Rectifier block.
- Stator.
- Capacitor.
- Voltage regulator.
- Pulley.
- Rotor.
Some electric generators do not have a built-in voltage regulator. For example, this element is missing in generators for the VAZ-2101.
The most common faults
The main sign of a generator failure is its refusal to charge the battery.
The cause of the malfunction can be various factors:
- Bearing jamming . When the car moves, the parts in the generator are constantly moving, so after some time there is a lack of lubrication. In the absence of lubrication, the elements begin to jam, which leads to breakdown of the generator. Due to the high strength of the bearing, the belt responsible for their rotation may break before jamming.
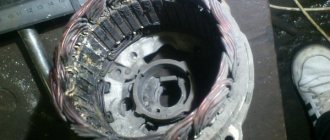
- Winding burnout . Due to a violation of the integrity of the winding, the generation of electricity in the generator stops. Winding combustion most often occurs due to the fact that in winter salt and chemicals from the roads get inside the device.
- Worn or jammed brushes . The graphite rods found in the brushes can wear out. It is necessary to change the unit in a timely manner.
- Failure of control relay . If the part is faulty, the battery is constantly recharged, which reduces the battery life.
When repairing a generator, the faulty part is first identified. After diagnosis, the feasibility of repair is determined.
If most of the generator parts need to be replaced, sometimes it is cheaper to simply replace the device completely.
Types of generators
There are different types of generators for VAZ cars depending on their design. The most common generators are compact in size - 94.3701 and others.
Owners of Russian-made cars install brushless inductor-type generators. For example, devices modification 955.3701. Such generators differ from traditional equipment by the presence of permanent magnets on the rotor and field windings on the stator. Thanks to this, the design of the generator set does not contain slip rings and an alkaline unit, which is one of the most vulnerable and poorly protected.
Generators of type 955.3701 have not previously been used in passenger cars. Now they are manufactured by various Russian enterprises, including the Altai Tractor Equipment Plant. Among the main disadvantages of these electric generators are the high noise level during operation and heavy weight. This must be remembered before choosing a VAZ generator with a brushless design.
Generator set belt for VAZ 2107
The VAZ 2107 car was produced from 1982 to 2012. Initially, the model was equipped with a smooth drive belt (old model). Over time, the “seven” was modified several times and at the end of the 1990s, the generator began to work with a new type of belt with teeth.
The most popular among car owners are rubber products from the German company. These belts fit perfectly into the operation of a domestic car and serve for the entire period specified by the manufacturer.
The design numbers and sizes of the belts are indicated in the vehicle’s service book:
- 2101–1308020 (smooth surface), dimensions - 10.0x8.0x944.0 mm;
- 2107–1308020 (toothed surface), dimensions - 10.7x8.0x944.0 mm.
How to tension a belt on a generator
The operation of the generator, as well as the water pump, primarily depends on the correct tension of the belt on the pulley. Therefore, existing rules cannot be neglected. The belt is installed and tensioned in the following order.
- Place the assembled generator in place, lightly tightening the fixing nuts.
- Take a pry bar and use it to fix the gap between the generator housing and the pump.
- Place the belt on the pulley.
- Without releasing pressure from the pry bar, pull the belt onto the pulley.
- Tighten the top nut securing the generator until it stops.
- Check the degree of belt tension - the rubber should not sag, but it should not be too tight.
- Tighten the lower nut securing the generator.
Interchangeability of autogenerators
Interchangeability of generators for Lada cars is achieved if the following requirements are met:
- the main technical characteristics of the installed generator are not lower than those of the device being replaced;
- the gear ratio from the internal combustion engine to the generator is the same;
- the devices have similar electrical circuits;
- The new generator is suitable in terms of weight and dimensions and type of fasteners.
Most Russian-made automobile generators have a 2-leg mount. These fasteners are found on both covers. For equipment of foreign brands, installation is carried out using 1 paw, the fasteners are located on the front cover.
In order to correctly install and securely fasten a foreign generator in a car from AvtoVAZ, it is necessary to replace the bracket.
Generator maintenance after repair
In order for the generator to serve for a long time after repair and not cause new problems to the car owner, one must remember to properly care for it . It is necessary to remove the generator from the engine every 12 - 15,000 km, disassemble it and clean it from dirt and dust. If necessary, replace the grease in the bearings. To do this, rinse them thoroughly, dry them and fill them one third full with fresh lubricant.
How to repair a car generator of the VAZ 2101 - VAZ 2115 at home is shown in the video.
About the current-speed characteristic
TLC is the dependence of the current supplied by a car generator to the on-board network on the rotor speed at a constant voltage. This parameter is calculated when the device is operated together with a charged and serviceable battery with a rated capacity of at least 50% of the rated current of the generator. The characteristic is calculated in the heated and cold states of the equipment.
Main consumer characteristics
- Maximum current.
- The magnitude of the operating voltage.
- Rated power.
- Gear ratio.
- Efficiency
- Dimensions and weight.
The main operating parameters, type and brand are usually indicated on the device label.
Criteria for choosing car generators
- Maximum power. Power is one of the main characteristics of VAZ generators. It must ensure an uninterrupted supply of current and supply electricity to the battery, which is discharged due to the operation of regular electricity consumers at low speeds of the power unit. To perform basic tasks, the device must have the required power. The required indicator is indicated in the vehicle operating instructions.
- Current strength. The factory generator installed in the car is not designed for a large number of additional consumers, but at the same time it has a certain reserve. If the autogenerator is “not enough,” then before purchasing a new device, first inspect the old equipment, clean the contacts, check the bearings, etc. You shouldn't use 120A generators in every car. First of all, it's expensive. Secondly, the current may be excessive. Such power-generating devices are installed in tuned cars with a powerful acoustic system.
- Dimensions. Before purchasing, it is also worth comparing generators by overall dimensions. The device must be compact with high technical characteristics.
- Noise level. The generator should not make too much noise during operation. This “disease” often affects high-power generators that are sold at a low price. One of the main reasons for the appearance of extraneous sounds (hum) is the poor quality of bearings, which wear out quickly.
- Availability of guarantee. If there is a warranty, you can exchange a faulty device for a new one if it is defective.
G222
This generator is intended for use on Niva cars. It is capable of delivering 50 A of current, which is quite enough for full-fledged electrical work. It differs from a standard “six” generator in the presence of a built-in regulator relay. Here it is assembled into one unit with brushes. Therefore, to install it on a VAZ 2106, you just need to make some minor modifications. This electric machine is installed on 2107 without any special interference or modifications.
There are several ways to refine such a generator. The easiest way would be to install brushes from the G221 generator. They fit perfectly in place of the relay assembled with the brush assembly. No modifications are required, this allows you to install such a generator, even for people without special skills. It is possible to install the G222 with a standard regulator, but to do this, you will have to redo the generator connection diagram. Otherwise, nothing will work out.
Which generators are better to put on a VAZ?
Below are recommendations for different models of domestically produced cars.
VAZ - 2106
G-222 is a more powerful and stable self-generator compared to the standard G-221. It has a built-in battery charging relay and increased output (50 A versus 42 A), suitable for the “six”, provided that brushes from the G-221 are used or the connection diagram is changed.
VAZ - 2107
The simplest option for modernizing the electrical network is the G-222 device. The generator is installed in the VAZ-2107 without additional problems. This car will fit a device with a current of 55A from model 2108. The only modification that will be needed during installation is the use of an additional power relay.
VAZ - 2110
The standard generator of the VAZ-2110 is KZATE with a current of 80 A. It has a factory index of 5102.3771. Estimated mileage is 140,000 km. As alternative options, it is worth considering devices 94.3701 and 120 A. It is better to install the second generator on a VAZ 2110 with an injection engine in cars with a large amount of additional equipment, in addition to a DVR and a powerful sound system.
VAZ - 2112 and 2114
It is better to install a generator from Priora or Kalina with air conditioning in VAZ-2112 and VAZ-2114 cars. This device produces a power of 115 A, which is 35 A more than the factory equipment. The only difficulty that the owner of 2114 will encounter during installation is the need to replace the pulley.
As an alternative, you can consider an Eldix brand autogenerator with a capacity of 115 A. However, it is difficult to find spare parts for it, which will cause certain difficulties even with minor breakdowns.
Cars with injection engines are equipped with generators with an output of 80A. This is the standard model 94.3701. To increase power, consider the option with KZATE 9402.3701 90A, which is suitable for the type of fastener and has a similar pulley. If necessary, ensure the operation of a large number of energy-consuming devices.
Operating principle and design of generators
We will not consider ancient DC models within the scope of this article. This is the lot of owners of equipment originally from the 60s. Starting from the seventies, AC alternators with external excitation and V-belt drive from the engine crankshaft pulley began to be used. The voltage regulator from the external device (“chocolate bar”) moved to the brush assembly and received the popular name “tablet”. Such models are used on carburetor VAZ cars.
With the advent of injection engines at VAZ, a lot of electricity was needed to power the control unit (ECU, “computer,” “brains”) and the electric fuel pump (EFP). Dynamos became more powerful; the traditional V-belt drive could no longer cope with the increased load and began to slip. This is how poly-V-belts (wide) belts came into automotive electrical installations.
If the number of auxiliary units is more than two (air conditioning compressor, power steering pump), then deflection rollers are used to increase the contact area of the belt with the pulleys. The tension force is adjusted by a tension roller or by moving the generator housing or hydraulic pump.
Lada Priora - generator replacement
The Priora requires a powerful generator; the car has a lot of electronics and a weak installation cannot cope with it.
A generator labeled 5102.3771 is recommended for the Priora, providing a power of 80 A; on luxury versions with even more electronics, a 115 A device is installed. Then which generator is better to install on the Priora?
Car owners recommend a unit produced by KZATEtm Samara plant under number 9402.3701-14, producing 115 A.
There is no need to modify it during installation, you just need to find the connector, because there are differences from the standard one. You can use a plug from a VAZ-2108 from the limit switch for turning on the reversing lights, which costs only 20 rubles.
Next, you will have to make a little modification when connecting to the “B+” power terminal in order to fit it to the desired size.
The cost, of course, of domestic units is higher than that of Chinese or Bulgarian ones, sold for 2200 and 3000, respectively. For Russian ones they ask for about 4000. But if you need repairs with Russian-made components, you can easily find spare parts.
Charging diagram for VAZ with injection engines
This scheme is identical to the schemes on other VAZ models. It differs from the previous ones in the method of exciting and monitoring the serviceability of the generator. It can be carried out using a special control lamp and a voltmeter on the instrument panel. Also, through the charge lamp, the generator is initially excited at the moment it starts working. During operation, the generator operates “anonymously,” that is, excitation comes directly from pin 30. When the ignition is turned on, power through fuse No. 10 goes to the charging lamp in the instrument panel. Then it goes through the mounting block to pin 61. Three additional diodes provide power to the voltage regulator, which in turn transmits it to the excitation winding of the generator. In this case, the indicator lamp will light up. It is at that moment when the generator operates on the plates of the rectifier bridge that the voltage will be much higher than that of the battery. In this case, the control lamp will not light up, because the voltage on its side on the additional diodes will be lower than on the side of the stator winding and the diodes will close. If the control lamp lights up while the generator is running, this may mean that additional diodes are broken.
Which generator is better to put on a VAZ 2110
VAZ 2110 factories install KATEK generators with a current of 80 A. The service life is 140,000 km, which is approximately 10 years of vehicle operation. Answering the question of which generator is better to install on the VAZ 2110, experts recommend products from Russian manufacturers.
What to consider when choosing
- Russian manufacturer or foreign? Of course, first of all, Russian manufacturers are preferable. If only because it is easier to find spare parts in the event of a minor breakdown. If you purchase a generator for a VAZ 2010 from a not so popular company, it may be difficult to find spare parts, and they will not cost you so much.
- Current strength. Factory models for VAZ 2010 - 3771 or 94.3701 - are designed for 80 A, this current is enough, even if there are additional devices that consume it. More powerful ones - 120 A - are installed in the presence of powerful acoustics, no harm is done to the battery, and you will provide all energy consumers with uninterrupted current.
- It is better to purchase a generator if there is a warranty on it. There may well be a defective product, and the warranty will provide the opportunity to replace it with a new one.
Generator Manufacturers
It is best for 2010 to purchase a standard generator from KATEK or KZATEtm Samara plant, and about 50% of owners do just that, according to statistics. They are reliable, cope perfectly with their functions, creating the necessary tension.
Generators for VAZ 2115
VAZ 2115, created on the basis of the “nine”, adopted the main components and assemblies from it. Accordingly, there are also many problems with equipment. If the car has a carburetor engine, it can be equipped with a 55 A generator 37.3701, which differs from the above in the mounting method. However, this voltage is not enough for the constant use of modern audio systems, fog lights and other energy-consuming options. Which generator is better to install on a VAZ 2115 - car owners definitely recommend installing it with a power of at least 80 A. Now on the VAZ 2115, as well as on 2113-2114, three-phase 94.3701 with an output of 80 A are installed.
For more power, you can install a 90 A Priorov generator KZATE 9402.3701 in 2015, which is suitable for the mounting and pulley. A reliable unit will provide you with the necessary energy for any number of energy-consuming devices.
Summarizing the above, it can be noted that when buying a generator at a VAZ to replace a broken one or to increase power, it is better to choose Russian models, since they are most suitable in design and you will not have to carry out expensive modifications. In addition, you will always find the necessary
The best prices and conditions for the purchase of new cars
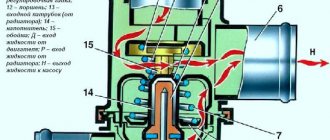
When repairing a VAZ 2107 car generator, you will need this generator set diagram and a detailed current path in the field winding circuit.
1. Battery. 2, 5. Basic rectifier semiconductor diodes. 6. Generator stator winding coils. 7. Semiconductor integrated voltage regulator (charging relay). 8. Excitation winding (rotor) of the generator. 9. Noise filtering capacitor. 10. Mounting block (relays and fuses). 11. “Battery charging” indicator lamp. 12. Voltmeter (on-board voltage indicator). 13. Ignition relay (ignition switch relay). 14. Ignition switch.
Current path of the excitation winding with the ignition on and the engine not running: Terminal “+” of the battery – pink wire – terminal “30” of the generator – pink wire – contact “1” of connector “Ш10” of the mounting block – internal current-carrying tracks of the mounting block – contact “4” » connector “w1” of the mounting block – brown wire – pin “30” of the ignition relay (installed under the dashboard) – closed contacts of the ignition relay – pin “87” of the ignition relay – black and blue wire – pin “6” of connector “w1” of the mounting block – fuse “pr 10” of the mounting block – contact “1” of connector “w 4” of the mounting block – orange wire – contact “4” of the instrument panel connector (black) – conductors and conductive tracks of the instrument panel – contacts of the “battery charging” warning lamp holder - filament of the "battery charging" lamp - socket contacts - instrument panel conductive tracks - contact "2" of the instrument panel connector (white) - white-brown wire - contact "3" of the mounting block connector "w5" - internal conductive tracks of the mounting block - contact “7” connector “Ш10” of the mounting block – white-brown wire – terminal “61” of the generator – connecting bus for additional rectifier diodes – short conductor – charging relay terminal – internal semiconductor junctions of the charging relay – first brush – first contact ring of the rotor – generator excitation winding – the second contact ring of the rotor – the second brush – the “minus” contact – car body parts – the “-” terminal of the battery.
After starting the engine, a positive potential appears at the point “connecting bus of additional rectifier diodes”, current flows from it further to the brushes. The control lamp is shunted (shorted) by open additional diodes and goes out.
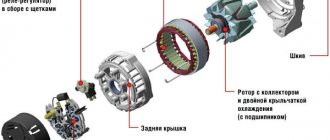
Generator device
The design of a car generator implies the presence of its own rectifier and control circuit. The generating part of the generator, using a stationary winding (stator), generates three-phase alternating current, which is then rectified by a series of six large diodes and the direct current charges the battery. Alternating current is induced by the rotating magnetic field of the winding (around the field winding or rotor). Next, the current is supplied to the electronic circuit through the brushes and slip rings.
Generator structure: 1.Nut. 2. Washer. 3.Pulley 4.Front cover. 5. Distance ring. 6.Rotor. 7.Stator. 8.Back cover. 9.Casing. 10. Gasket. 11.Protective sleeve. 12. Rectifier unit with capacitor. 13. Brush holder with voltage regulator.
The generator is located at the front of the car engine and is started using the crankshaft. The connection diagram and operating principle of a car generator are the same for any car. There are, of course, some differences, but they are usually associated with the quality of the manufactured product, the power and the layout of the components in the motor. All modern cars are equipped with alternating current generator sets, which include not only the generator itself, but also a voltage regulator. The regulator equally distributes the current in the excitation winding, and it is due to this that the power of the generator set itself fluctuates at a time when the voltage at the power output terminals remains unchanged.
New cars are most often equipped with an electronic unit on the voltage regulator, so the on-board computer can control the amount of load on the generator set. In turn, on hybrid cars the generator performs the work of the starter-generator; a similar circuit is used in other designs of the stop-start system.
The principle of operation of a car generator
Connection diagram for the VAZ 2110-2115 generator
The alternator connection diagram includes the following components:
- Battery.
- Generator.
- Fuse block.
- Ignition.
- Dashboard.
- Rectifier block and additional diodes.
The principle of operation is quite simple: when you turn on the ignition, the plus goes through the ignition switch through the fuse box, the light bulb, the diode bridge and goes through the resistor to the minus. When the light on the dashboard lights up, then the plus goes to the generator (to the excitation winding), then during the process of starting the engine, the pulley begins to rotate, the armature also rotates, due to electromagnetic induction, electromotive force is generated and alternating current appears.
The most dangerous thing for the generator is the short circuit of the heat sink plates connected to the “ground” and the “+” terminal of the generator by metal objects accidentally falling between them or conductive bridges formed by contamination.
Next, the diode passes plus into the rectifier block through a sine wave into the left arm, and minus into the right arm. Additional diodes on the light bulb cut off the negatives and only positives are obtained, then it goes to the dashboard assembly, and the diode that is there allows only the negative to pass through, as a result the light goes out and the positive then goes through the resistor and goes to the negative.
The principle of operation of a car DC generator can be explained as follows: a small direct current begins to flow through the excitation winding, which is regulated by the control unit and is maintained by it at a level of slightly more than 14 V. Most generators in a car are capable of generating at least 45 amperes. The generator operates at 3000 rpm and above - if you look at the ratio of the size of the fan belts for the pulleys, it will be two or three to one in relation to the engine frequency.
To avoid this, the plates and other parts of the generator rectifier are partially or completely covered with an insulating layer. The heat sinks are combined into a monolithic design of the rectifier unit mainly by mounting plates made of insulating material, reinforced with connecting bars.
Next, let's look at the connection diagram for a car generator using the example of a VAZ-2107 car.
DIY Generator Connection Guide
The reason for replacing a VAZ 2107 generator with an injector or carburetor may be:
- burnt windings;
- an interturn short circuit has occurred;
- mechanical damage to the housing;
- malfunction of a three-level regulator, etc.
The generator replacement procedure consists of removal, installation and connection.
- First of all, we de-energize the car by removing the negative terminal from the battery.
- Disconnect the connector from the generator set.
Disconnecting the connector from the unit
- Having removed the protective cover, you need to disconnect the terminal with a “10” key and remove the wire.
- After loosening the generator, you need to remove the drive belt.
- Using a “17” wrench, unscrew the nuts and remove the adjusting bar.
- After unscrewing the lower fastening nut, remove the bolt and bushing.
- We dismantle the generator.
Unit removed for repair
The generator set is installed in the reverse order. Before installing the unit, you need to thoroughly study the connection diagram of the 2107 generator with an injector or carburetor, as well as the electrical connection diagram. In this case, you need to pay attention to the difference between 37.3701 and G222.
After installation, you need to adjust the belt tension. To adjust the belt tension, you need to loosen the two bolts securing the unit. Using a pry bar, tighten the belt and secure it in this position with a nut on the adjusting plate. Then you need to check the degree of tension. To do this, you need to press the belt in the gap between the pulleys.
The deflection should be in the front from 10 to 17 mm. The procedure should be repeated until the desired value is achieved. After tensioning, all fastening nuts are finally tightened. At this point, the connection of the unit can be considered complete.
Modern cars are equipped with a large number of electronics, so the generator must be powerful to provide power to the on-board network and the operation of network elements. Therefore, you need to carefully monitor its technical condition.
Generator VAZ 2106: connection, replacement, how to check
A generator in any car, even a diesel one, is a real general manager of the engine. Without it, the car won't move. It can be a shame when the engine works well, but the electrical equipment begins to malfunction. If we talk about the six, then most likely it contains the G 221 generator, which was also equipped with the Fiat 124.
If you compare the electrical circuits of the VAZ 2101 and VAZ 2106 cars, it becomes obvious that they are almost the same. The six only has a few additional electrical devices. However, the generator there is the same. That is the problem.
The fact is that initially the G 221 model was not intended to serve such a number of energy consumers. As a result, the relay-regulator receives insufficient current, the battery is undercharged and slowly dies.
The problem gets worse when the car owner installs additional devices, such as:
- Fog lights;
- Good audio system;
- Preheating before starting;
- second stove, refrigerator, TV, etc.
In general, any step that increases energy use can make the battery prone to drain even while you're on the road. If modifications are still necessary, then you will have to install a more stable and powerful generator G 222.
Generator operation diagnostics
All diagnostic procedures can be carried out both on the removed device and directly in the car. Before starting work, be sure to remove the wires from the battery and generator.
To diagnose the rectifier unit, disconnect the regulator wire. If you don't have an ohmmeter, you can use a battery and a test light. On the ohmmeter, the needle should point to “infinity”, and the control light should not light up. This indicates that the valves are working properly.
We carry out general diagnostics of the device . You need to check if the valves are broken. To do this, we attach the “plus” of the device to pin 30, and the “minus” to the body. If the device shows zero, this indicates a short circuit, which is a consequence of a breakdown of the valve.
Clarifying diagnostics. We check the resistance of the negative valves. To do this, we attach the “plus” to one of the mounting bolts, and connect the “minus” to the body of the device. A short circuit or breakdown is indicated by a reduced resistance.
To check the positive valves, you need to attach the “plus” of the ohmmeter to terminal “30”, and the “minus” to one of the mounting bolts. If the resistance is low, you can judge that the valve is broken.
In such cases, the easiest way is to replace the entire rectifier unit. Of course, you can replace individual diodes, but this is a labor-intensive process that includes re-coring. Only a specialist can handle this work.
Rotor winding diagnostics
First remove the brush holder (the procedure is described below).
We find a window on the device cover through which you need to check for a short circuit. We connect one terminal of the device to the ventilation impeller, and the second to the winding.
In a similar way, you need to check whether there is a break in the winding. To do this, we connect the ohmmeter leads to the contact rings.
Belt replacement
To make it more convenient to work, you will have to remove the battery.
- Unscrew the fastening nut. Using a mounting spatula, we move the device closer to the cylinders. If this is difficult to do, then unscrew the lower mounting bolt.
- Now that the generator has been moved to the engine, you can easily remove the old belt and put on a new one instead.
- We move the generator away from the engine, monitoring the belt tension. Having achieved the required tension, tighten the fastening nut to the adjustment bar.
- We adjust the belt tension more accurately. To do this, we measure the deflection in the place between the pulleys and the pump with a force of 10 kgf. It should be from 10 to 15 millimeters. And between the pump and the crankshaft it should be equal to 12 to 17 millimeters.
- Once the correct adjustment has been achieved, tighten the fastening nuts and put the engine mudguard in place.
Regulator replacement
- The regulator is located on the left mudguard. Unscrew the fastening nuts and remove the device.
- Disconnecting the wiring
- We install the new regulator, connect the wiring to it in the same way as they were installed on the previous device. Tighten the fastening nuts.
Replacing generator brushes on a VAZ 2106
The generator brushes need to be changed together with the brush holder, and not separately. The operation can be performed both on the removed device and directly in the car.
- Remove the plug from pin 67.
- Unscrew the fixing screw of the brush holder
- We take out the faulty brush holder and put a new one in its place.
- We tighten the fixing screw
- Insert the plug
Generator - performance check
Many car enthusiasts are interested in how to test a new generator that has just been installed on a car? Or how to check that the old one has already failed, although it seems to be working normally? After all, driving with a faulty generator can have a number of unpleasant consequences, the easiest of which is completely discharging the battery and stopping the car, and the most severe is damage to the on-board network and devices.
In order to test this device, you will need a tester (multimeter).
The diagnosis itself is performed in the following order:
- Turn on the ignition.
- Check to see if the generator/battery lights on the instrument panel come on.
- Start the engine - if the light goes out, then everything is in order, if not, then there is a malfunction.
- Wait until the engine warms up to operating temperature.
- Turn on ALL electrical consumers - lights, fans...
- We bring the engine speed to 3500.
- Turn on the multimeter in voltage measurement mode and connect the probes to the battery.
- If the generator is working, the multimeter will show 13 volts, if less, then there is a malfunction.
- Without turning off the engine and maintaining speed, turn off all electricity consumers - the multimeter should now show 14.7 volts or slightly higher - this also indicates that the device is working properly.
By performing the test according to the specified scheme, you can quickly and accurately determine whether the generator is working. But, there are a number of indirect signs that may also indicate a malfunction of this device.
These include:
- the battery charging icon is constantly lit;
- interruptions in the operation of electrical equipment, flickering headlights;
- boiling of the electrolytic solution in the battery;
- Generator operation is too noisy (as a result of bearing failure).
If you detect even one of these signs, you should immediately perform a full check (according to the scheme described above). If it turns out that the generator is faulty, a new one should be installed instead. But we’ll look at which generator is better to put on a VAZ 2114 below.
Sources
- https://FokSevmash.ru/rashodniki-i-zapchasti/moshchnost-generatora-vaz-2.html
- https://RetroTruck.ru/rashodniki-i-zapchasti/moshchnost-generatora-vaz-2.html
- https://dmsht.ru/otlichiya-generatorov-dlya-vazov/
- https://kalina-2.ru/otechestvennie-avto/kakoj-stoit-generator-na-vaz-2107-karbjurator
- https://SpecTorg.su/obzory/generator-135-amper-na-vaz-2107.html
- https://RosAvto-SPB.ru/drugoe/generator-vaz-2110-pramo.html
- https://granta-service.ru/diagnostika/kakoj-generator-luchshe-postavit-na-vaz-2110-mnenie-spetsialistov.html
[collapse]
Why do you need a generator in a car?
The generator is a part responsible for recharging the battery while the car is moving. While driving, electricity is spent on playing music or lighting the road. Lack of recharging for a long time and low battery capacity can cause the car to get stuck halfway on the road. A non-working generator leads to premature wear of the battery and its rapid discharge.
The generator ensures stable operation of the engine when driving the car.
Due to the magnetic field, electricity is generated while the rotor moves. If the generator is faulty, then the electricity that the car needs to operate the headlights or play music is taken from the battery, which is why it needs to be charged more often from the electrical network. A generator in good condition allows you to not charge the battery for several months when traveling long distances.