The question of how to set the ignition on a VAZ 2109 worries many car enthusiasts. Indeed, owners of these car brands from time to time encounter problems associated with unstable operation of the power unit.
A common symptom is normal engine starting and incorrect idle speed.
What is the reason for this phenomenon? Are there ways to solve it?
According to experienced craftsmen, you need to pay attention to the ignition system - it is the main cause of such a malfunction.
Moreover, in 90% of cases the problem can be solved independently.
instructions and purpose
Let's first consider the general purpose, design and types of distributors:
- The distributor is part of the ignition system, and is designed to regulate, transmit and control the electrical signal to the distribution coil switch, igniting the spark along the spark plugs in the required accordance (in sequence with the ignition stroke)
- There are two types of ignition systems - non-contact and contact (of course, there are others, but they are not very common), accordingly, distributors are also used of two types
- friend They differ from each other only in design: the presence of contacts (in a contact system there is a breaker), a sensor distributor (in a contactless ignition sensor system there is a distributor)
- According to the main characteristics, both systems are almost identical
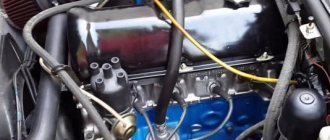
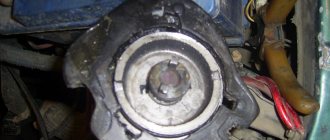
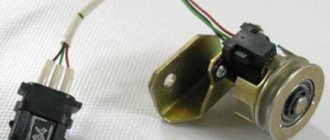
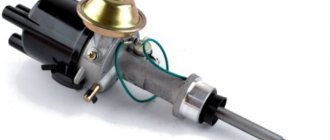
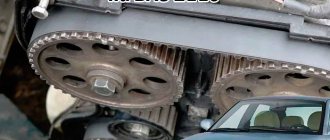
On VAZ-2109 cars, as well as 2108 models-2199, a distributor with a built-in Hall sensor, four spark, with built-in centrifugal (regulators and vacuum) ignition timing is standardly installed. You can see the main details in the photo above:
- 1 - sealing ring
- 2 - special
- 3 – coupling adjusting washers
- 4 - roller with a centrifugal regulator located on it
- 5 — support plate
- 6 – screen, protecting from dust
- 7 - the so-called “runner”
- 8 - Hall sensor itself
- 9 — lock washer
- 10 - thrust washer
- 11 — distributor, ignition housing
- 12 — vacuum corrector
Checking with a light bulb
It will simplify your work when using a strobe. The lamp requires a 12-volt lamp.
The procedure is as follows:
- one contact from the light bulb is connected to the wire running from the coil to the distributor;
- the second is applied to the mass;
- the central (high-voltage) short-circuit cable is installed there;
- start the engine and loosen the bolts on the distributor;
- the housing must be rotated to the right until the lamp goes out;
- then it is turned slowly to the left - when the light flashes, the distributor is fixed.
Sequence of doing the work yourself
Before starting work, remember that all the parts inside are stained with oil in the VAZ 2109 distributor. After dismantling, it should be washed and dried.
1. Dismantling the distributor begins with removing the negative wire, which is connected to the battery terminal.
2. Then we disconnect the high-voltage wires from it, then the vacuum hose with which the distributor is connected to the vacuum corrector.
3. The next stage of work will be removing the cable from the holder. It is used to drive the dampers.
4. Remove the bracket, which is a clamp for the wires. Complete with all the studs and those wires that were attached here.
5. Unscrew the fastening nut, making sure that the washer installed under it does not get lost. This work is carried out in several stages: Special marks are applied to the drive of auxiliary devices, on the one hand, and the distributor housing, on the other. This must be done so that when assembling the product, you can maintain the starting ignition timing without making new adjustments.
6. Using a screwdriver, press the lock on the distributor and remove the ignition wiring harness.
7. Remove the rubber plug from the car clutch housing.
8. By rotating the crankshaft, we achieve alignment of the piston in the 1st cylinder at TDC.
9. The mark marked on the flywheel, visible in the hole, must coincide with the division marked in the middle of the housing scale.
10. Remove the distributor, having first unscrewed the nuts holding it.
11. Installation is carried out in reverse order.
12. When installing the slider, it is necessary to check the position of the roller. The latter should be placed so that its external contact is located opposite the terminal that corresponds to the 1st cylinder.
13. The terminal is on the cover.
14. Be sure to align the marks mentioned above.
Below you can watch a video on how to remove and install the distributor on a VAZ 2108-09.
How to adjust the ignition timing of a VAZ 21099
We turn off the engine and remove the protective plug located on the clutch housing. It will give access to the flywheel with marks that should match the mark on the crankcase. Let's clean this place thoroughly if it's dirty, otherwise we won't see the marks. Now we connect the strobe. It couldn't be easier to do this. Using the clamps on the strobe wires, we connect to the corresponding battery terminals. We only observe the polarity. After this, we remove the central wire from the distributor, install a tee from the strobe light in its place, and insert the central high-voltage wire into the hole of the tee. We check the contacts thoroughly.
How to set the ignition on a VAZ 2109 injector
Above we described the process of adjusting carburetor engines. However, there are VAZ modifications equipped with injection power units. How to set the ignition on a VAZ 2109 with such an engine?
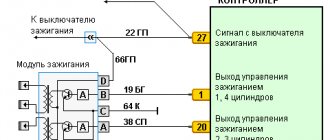
First of all, you should pay attention that in the case of injection engines, they do not have a distributor and a Hall sensor. At the same time, the system provides two ignition coils at once, and, accordingly, two switches
The main difference between the injection system and the classic one is that the control signals are generated by a special electronic unit. The operating principle is as follows:
Operating principle of the injection system
Thus, there is simply no need for a distributor, because it is the electronic control unit that determines in which cylinder and at what point in time there should be a spark. Signals from the control unit are supplied to the inputs of the switches, and from them to the ignition coils. One switch is responsible for sparking in the first and third cylinders, and the second - in the second and fourth.
As in the case of engines with a carburetor fuel system, adjustment is carried out according to special technological risks. The ignition marks of the VAZ 2109 injector are shown in the photo below:
Ignition marks VAZ 2109 injector
Please note that it is not possible to configure the injection engine system yourself. The thing is that this operation involves making changes to the software of the microcontroller of the electronic control unit. Of course, each specific microcontroller has its own specific firmware. Moreover, there are also non-standard firmwares, for example, with settings for a sporty driving style.
Only an experienced specialist with certain knowledge can flash an electronic control unit. Therefore, if malfunctions occur in the ignition system of an injection engine, you should seek help from a trusted car service center.
Preparatory activities and necessary tools
Installing the ignition of a VAZ 2109 carburetor begins with preparatory activities. In particular, you need:
- Warm up the car engine;
- Set the parking brake and install wheel chocks under the rear wheels.
Remember that you cannot ignore safety rules, because a car is a highly dangerous vehicle, and failure to comply with safety rules when driving, servicing and repairing it can cost you dearly.
An important point: before you start work, you should make sure that the carburetor is correctly configured on the car. It would not be superfluous to carry out a visual inspection of all elements of the system. If we are talking about a carburetor car, special attention should be paid to inspecting the condition of the distributor.
If you have a car with an injection engine, it is worth checking the ignition module for serviceability. The thing is that, as practice shows, it is this module that fails most often and is the reason for the inoperability of the entire system.
To complete the work we need:
- strobe;
- a set of keys.
Dismantling
After dismantling the distributor, you can disassemble the device in order to repair its components, or completely replace the distributor with a new unit.
- De-energize the car by removing the negative from the battery;
- Disconnect the high-voltage components and the vacuum ignition corrector hose from the distributor;
- Remove the drive cable responsible for the throttle valves from the bracket. Next, the fastening nuts are unscrewed and the bracket is dismantled;
- Before removing the ignition distributor, apply a mark to the housing of the distributor and drive of auxiliary elements. This way you can simplify your task of setting the ignition timing for its precise setting. The mark is applied to the metal by scratching;
- Press the latch holding the block with the power wires and disconnect it from the distributor;
- Place the piston from the first cylinder to the top dead center position by moving the engine flywheel clockwise;
- Unscrew the remaining ignition distributor screws. The first fastener was removed when removing the damper cable sheath bracket;
- Remove your damaged distributor.
Disassembly and repair
Quite often, repair work with the distributor is associated with wear and the need to change the seals (coupling). To change the oil seal, as well as other failed components of the distributor, we bring to your attention the appropriate instructions, as well as video tips.
- Remove the ignition distributor cap by releasing the locking clip.
- Remove the slider. It is wiped with a clean rag and checked for mechanical damage. If there are chips or cracks, the element must be replaced.
- The runner must fit tightly on the shaft, which is achieved due to the presence of a plate spring with a pressing action. If it stretches or breaks, replace it.
- There is a resistor in the slider housing. The normal reading of its resistance is 1 kOhm. By measuring the data with an ohmmeter, you can draw conclusions regarding the performance of the component.
- Remove the low voltage wiring terminal. To do this, unscrew the mounting screw from the housing.
- Remove the plastic screen that serves as dust protection.
- A power wire comes from the Hall sensor and is held by the holder's claws. Using a screwdriver, the claws are opened and the wire is removed. Next, you need to unscrew the pair of mounting screws securing the Hall sensor support plate.
- Remove the vacuum corrector. Just be sure to disconnect it from the support plate lever before doing this. To perform this operation, carefully remove the retaining ring from the pin.
- The next step is to remove the pair of screws that hold the corrector to the distributor body.
Replacement of battery cable terminals on all VAZ vehicles
Hello, what other objects or devices can be used instead of a car strobe light?
Hello Ivan! In fact, the easiest way to set the ignition is with a strobe light. But you can also set it up without tools, but here you will have to remove the cover from the ignition distributor and adjust it using the slider!
Hello Oleg! Because of this, the 1.5 engine on the Eight idles, the carburetor is new, the distributor is new, the gasoline filter is new, it seems to work normally, then the speed drops, then normally, then it stalls, as if there is not enough gasoline or is being filled.
Hello Yuri! Before you started changing all this, was there the same problem? If it was not there, then apparently something got into it during the installation of the new carburetor, try to blow it out, maybe the speck really got into some jet and is sitting there, except for this gasket, did you change everything when you installed the carburetor on the car? Another problem may be poor carburetor tuning (Either in this case, disassemble and adjust it yourself, or leave it to a good carburetor mechanic) Pay also attention to the spark plugs (By the spark plugs you can determine the condition of the engine, by the way, for more details on how to do this, read the article : “Checking the engine by the appearance of the spark plugs”), on the high-voltage wires (look at them first, if they break through, then exactly the same situation as yours may occur), on the coil, on the ignition module, check whether the timing marks match just in case (Although if they did not coincide, the engine would constantly work with floating speed, but still check just in case), also measure the compression with a compression meter, maybe your valves are burnt out or the khan rings have come, there are many more symptoms due to why the idle speed may float, but before you go back into the carburetor, check everything on the ignition and any small details, and if you don’t find problems anywhere, then remove the carburetor and send it in for tuning, or, as they already said, do it yourself!
Hello! Tell me why the carburetor shoots at the factory, the ignition has been set 20 times! I don’t know what to do anymore! What could it be
Hello! The cause may be either a leak in the intake tract or incorrect adjustment of the valve clearances. It is also worth checking the valve timing.
Hello. please tell me why spark plugs very often turn black? The carburetor is set up perfectly, the engine has been overhauled. I’m tired of constantly buying spark plugs. VAZ 21099
Hello, Sergey! Probably a poor quality overhaul was carried out.
Hello. please tell me why spark plugs very often turn black? The carburetor is set up perfectly, the engine is after a major overhaul. I’m tired of constantly buying spark plugs. VAZ 21099.
Hello, Sergey! Black carbon deposits are formed as a result of oil burning in the cylinders. Replace oil seals and piston rings.
Hello! Please tell me what could be the reason. I have 21099 days when the car seems to be flying and the next day it drives but not like yesterday, it wants to but can’t.
Hello, Alexander! If it is carburetor, then probably the choke valve does not open completely sometimes.
Hello, Alexander! When the early ignition is set, the engine idles steadily and develops speed well, but when you turn it off, then the starter cannot start it, although the battery is new and the starter has been repaired. But if the ignition is set later, the engine starts immediately, but no matter how you adjust the carburetor Is there no idle speed and the engine stalls?
Hello, Ainur! You need to connect the vacuum corrector to the fitting on the carb, which goes into the under-throttle space. Then, at startup, the advance angle will be smaller, and at idle it will be larger. In general, if when starting you feel resistance with jerks due to too early ignition, then you need to reduce the angle, you still can’t drive with this setting, detonation will kill the engine. Look for XX in the carb (there may be a problem in the XX system) and check the manifold for air leaks.
hello, please help me, I replaced the carburetor with a new PEKAR VAZ 21083, after installation it worked perfectly, but when the engine heats up, the speed stays at 2000 or more, and when the engine is cold, the speed at idle is 900 1000
Hello Dado! Where did you get the idea that the new carburetor does not need to be adjusted?
At what level is the ignition installed on the VAZ 2109?
The engine ignition system is responsible for igniting the mixture in the combustion chamber at the right time at the end of the compression stroke. The mixture ignites when a spark forms between the electrodes of the spark plug. As follows, adjusting the VAZ ignition timing is the choice of the time the spark appears relative to the location of the piston in relation to its top dead center (TDC).
Do-it-yourself ignition adjustment on a VAZ 2109
Ignition problems lead to incorrect engine operation. Adjusting the ignition of the VAZ 2109 with your own hands allows you to quickly and cheaply adjust the settings. Before starting, be sure to read the instructions for adjusting the ignition.
Diagram for setting ignition timing.
Lada 2109 with an injection engine is equipped with an electronic ignition module. Ignition adjustment is carried out by programming the electronic control unit. It is impossible to carry out such a procedure without a service station - you need special software.
Checking and adjusting the ignition timing is done while the engine is idling. The crankshaft speed should be in the range of 820–900 rpm.
Photo of the ignition switch on a VAZ 2109.
- Warm up the engine to 90 degrees.
- Set the crankshaft speed at 820–900 rpm. If the idle speed goes beyond the limits, adjust the amount of fuel assemblies in the carburetor.
- Disconnect the vacuum hose from the fitting.
- Turn off the car engine.
- Remove any gap in the vacuum hose.
- Unscrew the three nuts securing the breaker-distributor.
- Remove the rubber plug from the gearbox housing - there is an inspection hole for the flywheel.
- Disconnect the first cylinder wire from the camshaft cover.
- Connect the strobe light to the place of the disconnected wire and to the battery.
- Start the car - the strobe light will begin to send impulses in time with the flywheel.
- Rotate the camshaft until the marks are compared with the mark on the flywheel.
- Mark the label.
Adjustment by marks is impossible without the device.
There are ways to adjust without a strobe. To make adjustments using a light bulb, you will need a crankshaft wrench and a standard 12-volt light bulb.
Setting the ignition timing by loosening the spark timing sensor.
- Use a special wrench to turn the crankshaft until the marks match. If you do not have a crankshaft key, engage 4th gear and push the car until the marks match.
- Connect a 12-volt light bulb to the wire connecting the distributor and the ignition coil.
- Connect the light bulb to ground using the second wire.
- Connect the central wire to ground Lada 2109.
- Loosen the bolts on the distributor body and turn on the ignition - the light should light up.
- Rotate the body to the right until the light goes out.
- After the light goes out, smoothly turn the distributor to the left.
- Stop when the light comes on.
- Tighten the housing bolts.
To carry out this type of economical ignition adjustment of the Zhiguli 2109, two people will be needed. One should be in the interior of the Nine, the second should rotate the distributor.
- Turn on the ignition and watch the tachometer needle.
- A second person must loosen the bolts securing the distributor and turn it.
- When you turn the key in the ignition, the tachometer needle sharply deviates and returns to zero.
- The distributor should remain in the position when the tachometer needle deviates.
- This method of adjusting the ignition timing requires patience, as it is very difficult to adjust the first time.
Ignition check
To check the adjustment of the VAZ 2109 ignition system, you need to drive out onto a flat road.
- Accelerate the car to 50 km/h.
- Engage 4th gear and press the gas pedal all the way.
https://youtube.com/watch?v=PlArkxUcB1E
The appearance of quiet and short detonation sounds means the ignition is set correctly.
Verifying that the settings are correct
After we have dealt with the question of how to install the ignition on a VAZ 2109, we will consider the process of checking whether the adjustment work has been carried out correctly.
So, if configured correctly:
- during the process of rapid acceleration of the power plant (when the car is warm), there is no violation of the stability of its operation;
- When the car is moving at a speed of about 50 km/h in fourth speed and during sharp acceleration, there should be a short detonation of the engine. If there is no detonation, ignition is later; if it is present, but does not go through, it is earlier. We make the adjustment by turning the distributor in one direction or another.
Remember that it is often impossible to achieve stable operation of the power unit due to improper operation of the fuel system or even due to low quality gasoline. In this kind of situation, the best way out of it would be to set the carburetor to the most optimal operating mode and then adjust the ignition timing.
Incorrectly set ignition does not have the best effect on the operation of the engine, worsening its performance characteristics. Many car owners, as soon as the first problems with the engine appear, due to lack of experience, decide that the cause of everything is a carburetor failure. In reality, the problem often lies in incorrectly adjusted ignition timing and can be eliminated if you know how to set the ignition on a VAZ-2109 (carburetor) using a simple set of tools.
- Difficulty starting the engine;
- unstable idling and uneven operation of the power unit as a whole;
- a noticeable decrease in engine power, as well as its throttle response;
- increased fuel consumption;
- the appearance of dips in speed when accelerating the car;
- the presence of thick black smoke in the exhaust gases when starting the engine and while driving (indicates that the timing is too early and, as a result, poor fuel combustion).
Each of these signs is the reason that the engine begins to work less efficiently, and this, in turn, affects the operating comfort of the car as a whole. Therefore, we recommend that you read the guide on how to set the ignition on a VAZ-2109 car with a carburetor engine in order to apply this knowledge in practice, if necessary.
In garage conditions, even a driver who has no experience in car repairs can adjust the advance angle. To do this, you will need a 10" wrench and a strobe light or light bulb. Naturally, with the help of a strobe, setting the ignition of the VAZ-2109 (carburetor) will be more convenient and accurate, but with the help of a light bulb you can also achieve a satisfactory result. Next, we will look at how adjustment work is carried out using both options.
Operating principle of the ignition system
We replace the VAZ 2114 heater radiator with our own hands, instructions and nuances. The process of burning the mixture in the cylinder takes some time. If the mixture ignites while the piston is at TDC, then it will burn after the piston passes TDC, catching up with it, that is, during the expansion stroke of the combustion chamber and exhaust gases. This will create insufficient pressure on the piston, as a result of which efficiency will be noticeably reduced and fuel consumption will increase (ignition is delayed).
When the mixture is ignited long before the piston passes TDC, a significant part of the energy will be spent on overcoming the pressure by the piston during the process of explosive combustion of the mixture. In this case, detonation occurs (early ignition). In addition, if the VAZ ignition is set incorrectly, the engine will overheat due to the increased absorption by the cylinder walls of the heat released during combustion of the mixture.
That is why the optimal ignition timing is considered to be one at which the mixture ignites shortly before the piston passes TDC, so that the combustion of the mixture coincides as much as possible in time with the piston passing TDC. In this case, the VAZ ignition timing provides the best operating mode.
In order to control the ignition of the VAZ 2109, divisions are applied in the clutch housing hatch shaft, and a mark is installed on the flywheel. When the point on the flywheel coincides with the central mark in the hatch, the pistons in the first and fourth cylinders are set to top dead center (TDC).
The way to control the VAZ ignition installation “on the move” is as follows: moving at a speed of 40-50 km/h on a flat section of the road with fourth gear engaged, you need to press the gas pedal to the floor. If, while accelerating, a slight detonation is heard, which disappears almost immediately, the ignition is set correctly. The absence of detonation manifestations indicates late ignition. Excessive detonation is a sign of early ignition of the combustible mixture.
Terminology
Ignition distributor
- an electromechanical device that ensures timely supply of high voltage pulses to the spark plugs.
It is often called a distributor
.
Ignition advance
- ignition of the working mixture in the cylinder before the compression stroke ends.
Ignition timing (IDA)
— the angle of rotation of the engine crankshaft from the position corresponding to the appearance of a spark on the spark plug until the piston reaches top dead center.
Contact ignition system
- a system in which switching of the ignition coil is provided by a mechanical interrupter.
Contactless ignition system
- a system in which switching of the ignition coil is provided by an electronic module controlled by an electronic crankshaft position sensor - for example, a Hall sensor (VAZ-2108) or magnetoelectric (GAZ-2410).
Breaker
ignition system - a mechanical switch in the distributor, directly connected to the primary circuit of the ignition coil.
Runner
- a distributor element that alternately transmits high voltage from the ignition coil to high-voltage wires connected to the engine spark plugs.
Angle of closed state of contacts (UZSK)
- a value indicating how long the contacts of a mechanical breaker should remain closed. For classic Zhiguli cars, the UZSK is approximately 55 degrees. A correctly selected UZSK gives the ignition coil the opportunity to gain the necessary energy and completely transfer it to the spark plugs.
Ignition check
How to check the correctness of the procedure?
There is no point in doing this in the garage - you should drive out onto a flat road to check.
- To check the correctness, you need to accelerate to 50 km/h.
- Then, to check, the fourth speed is activated, while the gas pedal is pressed all the way.
If, after changing gear, you hear the engine begin to knock quietly, while the sounds are short, then this means that you did everything correctly. If the ignition is set too late, this will be indicated by the absence of sounds when accelerating. If the ignition is too early, the sounds will be quite loud.
Do-it-yourself ignition system repair
So, if problems with the engine indicate problems with the ignition system, you should proceed with immediate repairs. The essence of the work being carried out comes down to installing or setting the correct ignition timing. The engine will only run stably when you adjust the ignition system. To begin repairing this mechanism, you need to stock up on some tools:
- strobe;
- tachometer;
- flat screwdriver;
- key to 10.
Having a strobe light on hand will greatly facilitate the process of setting up the ignition, so we recommend purchasing one for personal use.
Before you start setting the ignition timing and angle, do some preparatory work. The first thing you need to do is start the engine. Then either wait or rev the engine until the engine temperature is 90 degrees Celsius and the idle speed should be around 800 rpm (use a tachometer to determine this parameter). To obtain the required values, use the fuel regulator located on the carburetor body.
As the engine operating temperature reaches 90 degrees, remove the silicone tube through which the discharge occurs from the fitting. The lever for adjusting the fuel supply is located on the ignition timing distributor panel or distributor. The distributor is attached to the carburetor itself. Place your finger on the other edge of the tube and check if there is a vacuum effect. It can be checked very simply: if your finger is stuck to the tube, it is there; if not, then there is no effect either. Now you need to reduce the number of revolutions until the vacuum completely disappears.
Then turn off the engine. Bend the silicone tube so that there is no gap. Take a 10mm wrench and unscrew the distributor nuts. The photo above clearly shows the flywheel and crankcase hatch. The gearbox housing contains a hatch with a flywheel scale. Remove the plug and, if there is dirt, wipe it off the inspection hatch. On the scale you will see stripes responsible for correct ignition setting. Next we focus on them.
Using a flathead screwdriver, rotate the flywheel to the long line on the scale. Before setting the ignition, you need to align the long strip exactly opposite the triangular cutout on the scale. The fact is that this position means a zero ignition angle. At the moment when the long strip is in this position, the first and fourth cylinders remain in a fixed position.
If, due to poor visibility, you doubt that the selected strip is the longest, it is worth re-evaluating its location relative to the camshaft. To do this, you need to remove the timing belt cover and see if the mark you are interested in matches the mark on the rear cover.
Next you need to use a strobe light. To connect it, you need to perform several simple manipulations:
- first connect the red wire to the positive on the coil;
- then place the dark wire anywhere on the body;
- and secure the mount to the fourth cylinder along with the wires.
Before connecting the device, it is better to read the instructions for use.
Setting the ignition timing (ignition timing) on VAZ-2108, 2109, 21099 cars
Setting the ignition timing
(ignition timing)
on VAZ-2108, 2109, 21099 cars
(second slide)
Setting the ignition timing is one of the main settings of a car engine. Incorrectly set ignition (both in the direction of increasing the advance angle and in the direction of decreasing) immediately affects its operation for the worse.
Signs of incorrectly set ignition timing
overheating, detonation, shots into the muffler or carburetor, this is not a complete list of such malfunctions.
It should be borne in mind that similar symptoms occur with an incorrectly adjusted or faulty carburetor, faulty valve mechanism, etc.
Purpose of setting ignition timing
Set the optimal ignition timing at which the main characteristics of the car engine - power, throttle response, idle speed, fuel consumption - will be normal.
Tools for work
— Tachometer
(you can use the built-in one in the instrument panel, you can connect an external one (for example, an auto tester, a multimeter in tachometer mode), you can use your ear, if you have experience).
strobe and autotester
- Socket or open-end wrench.
Either a matching ratchet socket or an L-shaped wrench. Size 10.
— We warm up the car engine to operating temperature (85-90
)
.
— Set the minimum idle speed (750-800 rpm)
.
To do this, turn the “amount” screw of the fuel mixture on the carburetor. You can set the minimum speed using the tachometer or by ear. If they correspond to the norm, then we skip this point. location of the adjusting screw for the “amount” of the fuel mixture on the carburetor 2108, 21081, 21083 Solex
- Remove from the fitting on the housing of the vacuum ignition timing regulator
,
on the distributor-distributor, a silicone vacuum supply tube coming from the carburetor.
— We check by placing a finger on its hole to see if there is a vacuum in it.
It shouldn’t be there, since in theory it should start working at speeds above 800. If it is, slightly reduce the idle speed (by rotating the “amount” screw of the fuel mixture on the carburetor) until it disappears.
— We plug the hole in the silicone tube with a small bolt or simply bend it in half (tie it in a knot).
— Using a 10mm wrench, loosen the three nuts securing the breaker-distributor housing.
— We are looking for a hatch on the gearbox housing with a scale and a visible part of the flywheel. It is usually closed with a rubber stopper.
We remove the plug.
location of the inspection hatch in the clutch housing on VAZ 2108, 2109, 21099 cars
- Wipe the scale in the hatch with a rag so that the installation marks are clearly visible on it.
— Using a screwdriver, turn the flywheel by the teeth of its crown and find a long transverse alignment mark on it.
When it stands opposite the triangular cutout on the scale in the hatch, it means that the ignition timing is 0 0, and the pistons of the first and fourth cylinders have risen to top dead center. If it is poorly visible due to oiling or contamination, we wipe the edge of the flywheel through the hatch until we find it. You can highlight the mark with chalk.
mark for setting the ignition timing on the flywheel and a scale with degrees
— We check whether this is a risk (what if your flywheel is installed incorrectly).
We check using the following marks - the long mark on the flywheel should be opposite the triangular cutout on the scale, the mark on the camshaft pulley should be opposite the protrusion on the rear timing belt cover (to see them, remove the plastic timing belt cover).
— We connect the strobe.
We carry out the connection according to the instructions for your strobe, since their models are different and the methods of connecting them may differ in detail. Basically, the connection of the strobe looks like this - a red wire to the “K” (+) terminal of the ignition coil, a black wire to the “minus” of the battery, or any part of the housing, a metal clamp to the high-voltage wire of the fourth cylinder (closest to the breaker-distributor).
procedure for connecting a strobe
(twelfth slide)
Setting the ignition timing (ignition timing)
- We start the engine, once again check with the tachometer that the idle speed is minimal.
— We direct the flashing beam of the strobe into the hatch with the scale.
— In the light of the strobe light, the long, highlighted mark on the flywheel should be opposite the desired division on the scale.
Each division on it corresponds to one degree of ignition timing. The bottom of her middle triangular cutout is zero degrees.
Angles for 92nd gasoline
On engine 2108, ignition timing (-1 0; +-1 0), 21081 (1 0; +-1 0), 21083 (1 0; +-1 0).
Angles for 95 gasoline
For engine 2108, the advance will be 1 degree - one mark on the scale towards the windshield from the bottom of the triangular cutout in its center, 21081 - 5 degrees (5 divisions), 21083 - 4 degrees (divisions). An error of one degree is permissible both in the direction of decreasing the angle and increasing it.
— The ignition timing is adjusted by rotating the body of the ignition distributor-distributor (distributor).
By rotating clockwise (as viewed from the side of the breaker-distributor cover), the advance angle increases (ignition becomes earlier), counterclockwise, the advance angle decreases (ignition becomes later). You can navigate by the scale with divisions and signs “+” and “-” on the body of the breaker-distributor. By rotating the breaker-distributor, we move it relative to the protrusion on the housing of the auxiliary units. In the negative direction, we ignite earlier, in the positive direction, later. One division of this scale is equal to 8 0. Therefore, we turn the breaker-distributor slowly, carefully and at a small angle.
Ignition control control
In order to ensure that the settings are correct, it is necessary to perform some control measures. Let's look at the list of these events:
- We warm up the power unit to “operating” temperature and smoothly press the accelerator pedal, bringing the speed to maximum. There should be no “failures” in the operation of the power plant.
- We drive out onto a flat section of the roadway and accelerate the car to a speed of 40-50 kilometers per hour.
- Press the accelerator pedal sharply. The occurrence of short-term detonation indicates that the VAZ 2109 ignition adjustment was performed correctly.
In conclusion of our article, a few words about injection “nines”. The ignition module installed on the VAZ 2109 injector is adjusted through programming of the ECU (electronic control unit). Performing such a procedure independently is possible (theoretically), but requires special software created for a specific type of controller and certain, fairly specific knowledge.
Settings
The strobe is used like this:
- the red wire is applied to the “plus” on the coil;
- black – to the body;
- the clamp is connected to the veins installed on cylinder number 4.
After this, the actual adjustment begins.
The work is carried out in the following order:
- start the engine, bring its speed up to 800 and no more (measurements are made with a tachometer);
- the beam from the strobe is aimed at the inspection hatch;
- the long line is placed in the zero position (scale in degrees).
The angle is adjusted by rotating to the right - this increases the angle, respectively, movement in the opposite direction decreases it.
It is not difficult to find out the exact direction - it is indicated by the scale marked on the distributor (there is an o and a “plus” there). Each division corresponds to 8 degrees. For this reason, adjustment is slow. After finding the desired position, the distributor is secured.
Description and modifications
As such, a “nine” engine does not exist in nature. At least, the AvtoVAZ plant did not produce it. All 2109 models were equipped with a figure-eight power unit and its modifications. Of course, in many documents you can find the VAZ 2109 engine, but this is deception or ignorance.
But in the technical documentation of the manufacturer you cannot find information about the 2109 engine, since such an engine does not exist. During the entire period of their production, all “nines” were equipped with engines with the following markings: VAZ-21081 (1.1 8V), VAZ-2108 (1.3 8V), VAZ-21083 (1.5 8V), VAZ-2111 -80 (1.5i 8V) and VAZ-11183-20 (1.6i 8V).
How to regulate
Practice shows that most often problems with the ignition system are observed in older models with a carburetor type of power plant.
To perform the setup you will need the following tools:
- Screwdriver Set;
- strobe light (you can basically do without it, but with its help you can set the angle more accurately);
- 10mm wrench (suitable for both socket and socket wrenches);
- tachometer (it is available in almost any car multimeter).
I will give advice on installing the timing belt (the toothed belt that is placed on the camshaft).
If your eight or nine was assembled by a would-be master who installed the flywheel incorrectly and the top dead center mark turned out to be turned 180°, but then he realized that he had messed up and simply put the belt on the mark of the front pulley and not on the flywheel, but you don’t know this, then When you install the belt according to the marks on the flywheel and camshaft pulley, and try to start the engine, all the valves will bend. I know many cases when the timing belt of cars broke and people put the belt on the marks of the camshaft and flywheel and bent the valves, and all because when assembling the engine, the would-be master screwed the flywheel incorrectly.
Chassis
The suspension allows you to soften shocks to the body that occur while driving. Not only the comfort of movement, but also safety depends on its operation. The car should feel confident on the road and also withstand potholes and bumps well. The suspension helps absorb impacts, therefore extending the life of the car body. Tuning the VAZ 2109 suspension allows you to improve its characteristics, therefore it is relevant and in demand.
You can improve the chassis as follows:
- replace shock absorbers with gas-oil ones. It is recommended to buy shock absorbers and springs as a set. Monroe and Plaza sports shock absorbers are suitable for standard springs. For aggressive highway driving, Koni Sport or Bilstein Sport shock absorbers are more suitable. To improve the car's handling, it is enough to install a Monroe Gaz-Matic or Plaza;
Improvement of the car brake system is as follows:
- replacing rear drums with disc brakes;
- installation of a larger disc-caliper pair;
- replacing the master brake cylinder. This must be done with the obligatory implementation of the two previous options, since the standard cylinder will not be able to cope with the task.
Possible causes of failure
There are a number of reasons why the distributor mechanism may break down and after which there is a need for urgent replacement of the part.
- Cracks appear on the surface of the cover;
- Damage to the Hall Sensor;
- Burnt out “runner”;
- Burnt contacts in the cover;
- Loose bearing that holds the Hall Sensor;
- Poor connection of contacts in sensor plugs.
There are also reasons why the mechanism may malfunction.
Here are some of them:
- It happens that the ventilation hole becomes dirty and gases escape through the roller, oiling the slider.
- Sometimes ground breakdowns occur due to small cracks in the distributor cap.
- If the assembly is of poor quality, the mechanism quickly fails (in particular, individual parts).
- The bearing may become loose.
Any of these situations (not including poor contact with sensors) require prompt replacement of the distributor part. But sometimes it is enough to simply adjust some defects in the ignition systems and this will instantly return the engine to working condition.
There are a number of reasons that may indicate such a situation.
For example:
- Detonation is too strong. This problem occurs due to early ignition due to which the rings (piston) are deformed. One of the symptoms is a ringing noise when pressing on the gas pedal.
- Dark smoke coming out of the chimney while the car is running is a consequence of the ignition being turned on early.
- Fuel is consumed much more, but engine performance has become less. In this case, the ignition starts too late.
- Uneven engine operation can be caused by both early and late ignition.
In order for you to be able to regulate the condition (position) of the distributor, you will need to purchase:
- Slotted screwdriver;
- Strobe;
- Spanners;
- Tachometer.
What do ignition malfunctions promise?
Difficulties in starting the power unit, strange color of exhaust gases, incorrect operation of the engine at idle speed - all this can be the cause of incorrectly adjusted ignition timing.
At the same time, many car enthusiasts blame the carburetor and spend a lot of time cleaning or repairing it. As a result, money and time are wasted, but there is no result.
On the other hand, if the ignition system does not produce a spark, and the spark plugs are regularly filled, then the problem may lie elsewhere.
An incorrectly set angle manifests itself as follows:
1. Powerful detonation appears during operation of the power unit.
It is not difficult to recognize the problem. The main symptom is an uncharacteristic ringing sound that is heard when you press the accelerator pedal.
This malfunction is a common occurrence among motorists who do not properly monitor the condition of their vehicle.
The cause of detonation is early ignition timing, which not only reduces the comfort of driving a car, but can also lead to deformation of the pistons.
Alternatively, the rings may be defective, which in this case will inevitably have to be replaced.
2. The appearance of smoke from the exhaust pipe.
— after starting the power unit, black smoke comes out of the exhaust pipe. This problem is a clear indication of pre-ignition.
3. Motor power decreases.
This is especially noticeable when the vehicle picks up speed.
There may be a delay of several seconds between pressing the gas pedal and the car starting to accelerate. If the car starts to accelerate, it happens jerkily.
4. Fuel consumption increases.
One of the main consequences of incorrect system configuration. This and the problem described above are evidence of late ignition.
This is explained by the fact that when the piston reaches the top point, the fuel mixture does not burn completely and continues to burn even when the piston moves back.
5. Uneven idle.
An incorrectly set ignition immediately manifests itself as engine malfunctions at idle.
In such a situation, experts recommend setting up the system first, and only then starting to check other systems.
Adjustment with strobe light
How to configure and adjust the OZ on a VAZ 2109 or 21099 using a strobe? Anyone can cope with this task, but you need to take into account that if there are malfunctions in the operation of the module, then most likely the adjustment will not solve the problem. When adjusting, engine speed should be in the region of 820-900 rpm. The method of adjusting the SOP using a strobe is considered one of the most accurate.
How to perform this procedure:
- First you need to start the power unit and set the appropriate number of revolutions for its operation. If this value on a carburetor engine is outside the limits, then you need to adjust the air-fuel ratio to form a combustible mixture.
- Next, you need to disconnect the vacuum line from the fitting. Having done this, the car engine should be turned off, after which the gap in the vacuum hose will need to be removed. If there is no clearance, you will need to unscrew the three nuts that secure the distributor or switchgear housing.
- Once these steps are completed, you will need to remove the rubberized plug from the transmission housing; directly behind it is the flywheel inspection hole. In addition, you will need to disconnect the high-voltage wire from cylinder number 1 from the distribution unit cover.
- After this, you should activate the strobe itself. This device is connected instead of the disconnected wire, as well as to the battery. After starting the power unit, the device will transmit impulses in time with the flywheel. In this case, the distributor body will rotate until the mark on it coincides with the one marked on the flywheel itself. Once the marking is complete, you will need to secure it in place. For diagnostics, make sure that the marks on the flywheel and crankshaft match; if this is the case, then the installation of the OZ was carried out correctly (the author of the video is Nail Poroshin).
Setting the ignition
Now that the preparations are complete, you should set the correct ignition timing angle for the VAZ-21099. This is easy to do using the step-by-step instructions below:
- start the engine. The number of revolutions should be minimal - no more than 800 rpm. Use a tachometer to check;
- the strobe beam should shine through the observation window on the hatch;
- The longest mark on the flywheel should be set at the zero mark (in degrees). Determine the position on the mark specific to your fuel.
You need to change the ignition angle from the zero position of the long line, i.e. from the center of the triangle towards the windshield of the car. To avoid mistakes, gradually turn the ignition distribution housing to the right. This movement increases the advance angle, while counterclockwise movement decreases it.
The exact direction of movement will be helped by the scale on the distributor with a plus and a minus drawn. It is very convenient to use for proper adjustment. It is worth keeping in mind that each division is equal to 8 degrees, so to avoid errors you need to adjust slowly. Once the desired position is achieved, disconnect the distributor and secure it in the desired position.
Adjusting the ignition by light bulb
There are ways to adjust without a strobe. To make adjustments using a light bulb, you will need a crankshaft wrench and a standard 12-volt light bulb.
Setting the ignition timing by loosening the spark timing sensor.
The procedure for adjusting the ignition by light bulb
- Use a special wrench to turn the crankshaft until the marks match. If you do not have a crankshaft key, engage 4th gear and push the car until the marks match.
- Connect a 12-volt light bulb to the wire connecting the distributor and the ignition coil.
- Connect the light bulb to ground using the second wire.
- Connect the central wire to ground Lada 2109.
- Loosen the bolts on the distributor body and turn on the ignition - the light should light up.
- Rotate the body to the right until the light goes out.
- After the light goes out, smoothly turn the distributor to the left.
- Stop when the light comes on.
- Tighten the housing bolts.
The ignition control circuit based on the light bulb is ideal for carrying out the operation at home without additional costs for the device.
Adjusting the ignition timing
For subsequent actions, use a 13 key to loosen the fastening nut of the distributor (ignition distributor). Connect one wire from the light bulb (it will act as a voltmeter, that is, indicate the presence of voltage) to the low-voltage terminal that the coil has, the second to ground.
Now turn on the ignition
Slowly and carefully rotate the distributor body clockwise, stopping immediately when the light goes out. The sparks that appear will indicate the moment of ignition
Move the distributor counterclockwise until the contacts are disconnected and the lamp lights up again. Everything is in order, you can safely tighten the distributor, the setup is complete.
Methods for adjusting the ignition of a VAZ 2109 carburetor and injector with your own hands
Adjusting the electronic ignition on the injector
If you have an injector and find signs of early ignition, then keep in mind that all injectors are equipped with an electronic module. Accordingly, on the injector, the procedure for adjusting and setting the desired spark moment on the spark plugs is carried out by programming the control unit. To implement a scheme for adjusting the spark timing of the electronic module on the injector, you will need special software. Therefore, owners of “nines” with an injector need to contact a service station to adjust the module.
Placing marks on the VAZ 2109
Adjustment with strobe light
You can adjust the module malfunction using another scheme, using a strobe light - in this case, the adjustment process is carried out at idle speed of the engine with a carburetor. It should be noted that the crankshaft speed in this case should be from 820 to 900 rpm. Many experts consider this method the most accurate!
How to set the ignition on a VAZ 2109 carburetor using a strobe light:
- As stated above, the rpm should be no more than 900. If this parameter on the carburetor is outside the limits, it is necessary to adjust the volume of the fuel-air mixture.
- Then it is necessary to disconnect the vacuum pipe from the fitting, after which the vehicle engine is turned off. In this case, it is necessary to remove the gap in the vacuum pipe.
- If there is no clearance, the next step is to unscrew the three nuts securing the distributor-breaker device.
- Next, you need to remove the rubber plug from the gearbox housing. Behind it there is an inspection hole for the flywheel. It is also necessary to disconnect the cable for the first cylinder from the camshaft cover.
- Now the strobe light is turned on in operation - it is connected instead of the disconnected cable, as well as to the battery. When you start the engine, the device will send signals in time with the flywheel. You need to rotate the camshaft until the mark matches the one on the flywheel. When setting a mark after connecting the strobe, it must be fixed. To check the mark in accordance with the diagram, diagnose its position. If the marks on the flywheel and crankshaft coincide, this indicates that the ignition adjustment on the carburetor was successful (video author - Dmitry).
Adjusting the ignition by light bulb
If the strobe light does not turn on or you simply do not have one, then a malfunction of the switch or other element that led to the need for adjustment can be solved using a light bulb. By the way, switch malfunction is a problem for many. So, to set the spark moment on the module you will need a regular 12 volt lamp. The procedure itself consists of setting the module torque by loosening the spark regulator lock.
The procedure is carried out as follows:
- To correctly set the spark torque on an internal combustion engine module with a carburetor, using a special key, you need to turn the crankshaft until the marks match. If you don’t have such a key (you need a special key), then put the car in fourth gear and move it until these marks coincide.
- You need to connect the prepared lamp to the wire that connects the distributor to the coil. Using the second wire, you need to connect the lamp to ground.
- Now you can connect the central cable to the vehicle ground, that is, to the car body. You should loosen the fixing screws on the distributor body, and then activate the ignition - if there are no problems, the lamp will light up.
- Next, in order to correctly set the spark on the module, you should rotate the housing to the right until the lamp goes out. When the lamp goes out, start turning the distributor to the left. You only need to stop when the light comes on. Try not to move the devices anymore, just tighten the case screws. The spark adjustment circuit on the carburetor using a lamp allows you to solve the problem of adjustment yourself, and you will not need to spend money on a device. In principle, any motorist can cope with such a task (the author of the video is Nail Poroshin).
Adjusting the ignition timing
Ignition timing is the moment a spark occurs at the spark plug electrodes. It is determined by the angle of rotation of the crankshaft journal relative to the top dead center (TDC) of the piston. The ignition angle has a noticeable effect on engine performance. If its value is too high, ignition of the fuel in the combustion chamber will begin much earlier than the piston reaches TDC (pre-ignition), which can lead to detonation of the fuel-air mixture. If sparking is delayed, this will lead to a decrease in power, engine overheating and increased fuel consumption (delayed ignition).
The ignition timing on the VAZ 2106 is usually set using a car strobe light. If there is no such device, you can use a test lamp.
Setting the ignition timing using a strobe light
To adjust the ignition timing you will need:
- car strobe light;
- key to 13;
- a piece of chalk or a correction pencil for printed text.
The installation process itself is carried out in the following order:
- We start the car engine and warm it up to operating temperature.
- Disconnect the hose from the vacuum corrector located on the distributor body.
- We find three marks (low tide) on the right engine cover. We are looking for the middle mark. To make it better visible in the strobe beam, mark it with chalk or a correction pencil.
Video: adjusting the ignition using a strobe light
Setting the ignition timing using a warning light
To adjust the ignition using a lamp you will need:
- the warning lamp itself;
- 36 head with handle;
- key to 13;
- 16mm spark plug wrench with wrench.
The work order is as follows:
- Using a 36mm socket, placed on the crankshaft pulley ratchet, we rotate the shaft until the mark on the pulley aligns with the casting on the cover. When using gasoline with an octane rating of 92 and higher, the mark on the pulley should be aligned with the middle ebb. If the octane number is less than 92, the mark is placed opposite the last (long) ebb.
- We check whether the distributor is installed correctly in this position. Unfasten the latches and remove the distributor cover. The outer contact of the distributor slider should be directed towards the spark plug of the first cylinder.
Video: adjusting the ignition using a light bulb
Installing the ignition by ear
If the valve timing is set correctly, you can try to set the ignition by ear. This is done as follows.
- Warm up the engine.
- We drive out onto a flat section of the highway and accelerate to 50–60 km/h.
- We switch to fourth gear.
- We sharply press the accelerator pedal all the way and listen.
- With the ignition set correctly, when the pedal is pressed, a short-term (up to 3 s) detonation should occur, accompanied by the ringing of the piston pins.
If detonation lasts more than three seconds, ignition is early. In this case, the distributor body is rotated several degrees counterclockwise, and the verification procedure is repeated. If there is no detonation at all, the ignition is late, and the distributor body must be turned clockwise before repeating the test.