We install the ignition on the VAZ-2114 according to the marks: setting the timing belt and injector
Any injection engine, including the 8-valve VAZ-2114, is almost completely electronically controlled and does not require adjustments during operation. Nevertheless, it becomes necessary to accurately place marks on the pulleys and flywheel in several cases - when the timing belt breaks, as well as after repairing the cylinder head. We'll deal with the causes and consequences later, but for now let's set the ignition correctly according to the marks.
The video shows the process of replacing the timing belt with marking on a VAZ-2114
How to set the ignition correctly
Setting marks on an injection engine not only corrects the ignition timing, but also coordinates the operation of the gas distribution mechanism and the injection system.
Therefore, by correctly setting the marks on the VAZ-2114 engine, we fully regulate the operation of all its systems.
The adjustment should begin with preparation - placing the car on a level surface and tightening the handbrake. You can use several methods, but we will offer one of the optimal ones, without any special acrobatic tricks, which are not particularly desirable, especially in winter.
The work is carried out in the following order:
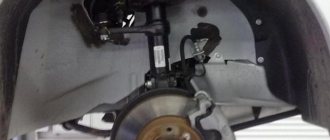
- For ease of work, it is recommended to remove the right front wheel. It will provide full access to the timing mechanism drive, and this way you can set the marks more accurately and quickly. In addition, you must first remove the plastic timing belt cover from under the hood.
Removed the wheel and plastic protection
Loosening or dismantling the timing belt on a VAZ-2114 (8 valves)
- Before setting the ignition to the marks or replacing the timing belt, it is necessary to loosen or completely remove the generator drive belt. If the timing belt is normal, then there is no need to change it, then there is no need to dismantle the alternator belt.
- To accurately set and check the position of the crankshaft, it is necessary to remove the generator drive pulley itself. This is done with a 19mm head. If it doesn’t work the first time, you can rest the knob against the lower arm of the front suspension and turn the crankshaft with the starter. The bolt will definitely break.
- Now you need to loosen the timing belt tension roller. We do this using a regular open-end wrench size 13.
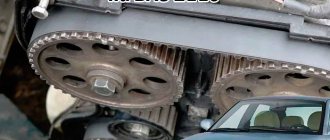
- We control the position of the camshaft drive gear. There is a mark on it that should correspond to the mark on the timing belt. We bring the gear to the mark.
- We check the bottom mark on the crankshaft, or more precisely, on the gear, which is rigidly fixed on it. The mark on the gear should match the mark on the top of the cylinder block boss.
Checking the set ignition
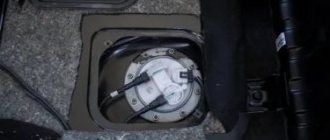
- We check that the mark on the flywheel matches the mark on the gearbox housing. To do this, remove the hatch in the gearbox; the mark on the flywheel should be visible, which in this position of the shaft must coincide with the mark on the crankcase.
Checking the marks on the hatch
Belt is on and tight
conclusions
This way you can quickly and effectively check or set the ignition marks on the injection VAZ 2114. Good luck to everyone!
Getting ready to adjust the ignition
In order to correctly set the ignition timing of the VAZ 2114 and carry out debugging, you need to prepare. The method described below does not require acrobatic agility from the owner and is quite feasible both in the uncomfortable and cramped environment of a garage and if the car enthusiast has a tummy.
IMPORTANT! Thorough preparation always speeds up the process of technical work significantly, regardless of what exactly needs to be repaired.
Preparation for debugging ignition marks is carried out as follows:
- The car is placed on a flat surface and placed on the handbrake.
- The second step is to remove the front right wheel, which will subsequently allow you to gain access to the gas distribution mechanism itself, which will speed up the work, make it convenient and easy, for this: a. unscrew the fastenings of our wheel and place a wheel chock under the diagonally opposite wheel (rear left); b. We lift the car with a jack, twist the wheel mounts completely and remove it.
- Finally, we need to remove the timing belt splash guard (if there is one, of course). By the way, you can not remove it entirely, but just unscrew the two lower fasteners, then it can be moved away without damaging it.
VAZ 2114 timing marks: do-it-yourself installation
How to correctly and accurately set the timing marks of a VAZ 2114 with an eight-valve engine will be discussed in this article. In fact, the engines on the 14th Lada model are installed the same as on the eights, nines, and tens. There are minor differences. Therefore, this guide will also be useful to owners of these models. Let's look at the most important questions that a motorist asks himself.
How often to change the timing belt and pulley?
There is no clear answer here. The fact is that all car mechanisms constantly wear out and are subjected to excessive loads. Therefore, you can pay attention to the recommendations of the manufacturer only if the car is new - up to 5-7 years. In this case, replacement is carried out every 55-60 thousand km. If the car is old, then reduce it by 15 thousand km. this figure is bold. The fact is that only engines with a volume of 1.5 liters will survive the break calmly and without consequences. But on eights, for example, they installed 1.3 engines, in which the valves bend.
Very often the timing belt on the VAZ 2114 and similar models wears out. This happens due to severe wear of the liquid pump. Its resource is no more than 90 thousand km. And then only if it is of high quality. What if you come across a defect or an obvious fake? Then it can break down even after half an hour of driving.
When the pump wears out, the roller eats rubber from the outside. And the more wear on the pump, the more visible the damage to the belt. So, the conclusion is this: change the timing kit (roller and belt) every 40-45 thousand km, install a new pump every second.
Timing marks VAZ 2114: install correctly
There is nothing difficult in the work - there are only three marks that you need to focus on. The preparation stage for replacement is as follows:
- Place the car on a flat surface and place chocks under the left rear wheel.
- Loosen the front right wheel bolts.
- Raise the right side with a jack.
- Completely unscrew the bolts and remove the wheel.
- If present, remove the protection.
- Remove the timing belt compartment protection cover - three bolts with a “10” socket head.
“If you do all the work carefully and fix the shafts, then there is no need to set marks” is a standard misconception, but it does exist if certain conditions are met. In most cases, this “trick” does not work; the shafts still need to be installed. Further work takes place in several stages:
- Remove the generator belt.
- Turn on the fifth gear and have an assistant sit behind the wheel and hold the brake pedal.
- Using a 19mm wrench, unscrew the crankshaft pulley bolt.
- Using a key set to “17”, loosen the tension roller.
- Remove the VAZ 2114 timing belt.
That's all, now you need to turn the crankshaft until the mark on the flywheel matches the slot in the bar. You observe this through a special window located in the clutch housing. If you make the adjustment yourself, first rotate the crankshaft and watch when the notch on the pulley points up. After this, make an accurate installation through the viewing window. And don’t forget about the camshaft - there is a mark on its pulley that aligns with the bar located on the cylinder head.
Having set the VAZ 2114 timing marks, you can install the belt. And don't forget to change the video! The old one will quickly become unusable and, at best, will begin to make unpleasant sounds. At worst, the belt will jam and break. Installation is carried out in reverse order. After tightening, it is extremely important to make sure that all marks match - turn the crankshaft several turns. Check the marks on the flywheel and camshaft. If they match, then you can put the wheel and casing in place.
Checking completed actions
To diagnose the actions performed, you will need pliers, a standard tool and a tester (multimeter). High voltage wires can be checked with a multimeter. Normal wire resistance is from 5 kOhm to 12 kOhm.
At this stage, we will perform diagnostics of circuits, and not microprocessor elements. To check the latter, you will need specialized equipment and experience, which we do not have.
So, how is the check done:
- First you need to turn off the ignition and diagnose the contacts on all plugs and pads. It is also necessary to diagnose the tightness of the fit, as well as the contact of the high voltages in the module.
- Next, remove the block from the module and diagnose the voltage at terminals C and B. In this case, the tester must be configured in the mode for measuring low alternating current.
- Check the high voltages. To do this, you need to install a working spark plug in the cap and attach it to the block head. At this point, your assistant should try to start the engine by turning the starter. If the wire is working, then a spark will jump between the spark plug and the block head. Thus, it is necessary to diagnose all wires.
- In the event that there is no spark on only one cable, it is necessary to thoroughly diagnose the module itself, but in most cases the device must be replaced. If everything works correctly, the spark plugs are working properly, but there are still problems with the engine, you need to check the power system.
We set the ignition correctly on the 8-valve injection VAZ-2114 (+video inside)
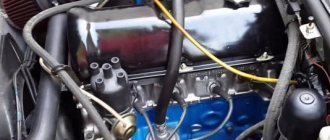
The second Samara became the first car among VAZ front-wheel drive vehicles with an injection power system initially. The first copies of the VAZ-2114 were still going on sale with an eight-cylinder injection engine and a contactless ignition system, and the following engines already had a fully electronic system with the same 8 valves. Before you set the ignition, you need to find out what system is installed on the engine, which is what we will do now.
Ignition systems of the 8-valve injection VAZ-2114
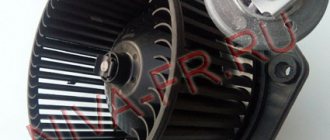
Ignition system module
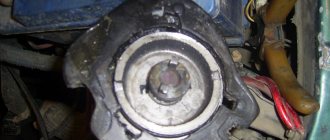
It is quite simple to calculate the cost of the ignition system on a VAZ-2114 - if a breaker is installed, an analogue of the distributor of a contact ignition system, this means that the system is non-contact, but with a breaker-distributor. In this case, the ignition timing is set by turning the distributor to a certain degree . The accuracy of the adjustment depends on the experience of the technician, as well as the equipment used. Nevertheless, such a system will allow you to flexibly and accurately set the ignition using a strobe light.
Contactless electronic ignition system
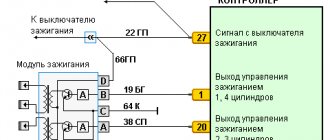
On most engines that were installed on the second Samara and VAZ of the tenth family, the ignition system is contactless electronic. There is no distributor here, so the ignition timing is adjusted automatically in real time and exclusively by means of the engine control system and electronics. The system does not require maintenance, and its diagram is shown in the photo below.
Useful video
You can find interesting information by watching the additional video below: https://www.youtube.com/watch?v=pNyBny-_HoQ
On a car with contactless ignition, everything is even easier; you don’t have to remove the wheels, but you will need an assistant. It is necessary to find the compression stroke of the fourth cylinder. To do this, insert a rubber cone into the spark plug hole and turn the ratchet. Pushing out the cone will mean that the compression stroke has been found.
Having illuminated the spark plug hole, we align the longest mark of the cover with the mark of the pulley. We set the breaker to the appropriate clock and check the operation of the system according to the fourth point described above.
The procedure for connecting high-voltage wires VAZ
Diagram, procedure for connecting VAZ high-voltage wires.
First, let's decide which of the four cylinders is first?
The first cylinder in front-wheel drive VAZs is located closer to the timing belt. If you look at the engine from the front, the first cylinder is the leftmost). And then everything is simple - from left to right - 1, 2, 3, 4.
In rear-wheel drive VAZ Classic and Niva, the first cylinder is located closer to the front bumper of the car.
General tips for connecting high-voltage wires.
Checking high-voltage wires. To check the wires, you will need a multimeter tester. Check the resistance of the wires - it should be no more than 20 KOhms (in practice, the longest wire of cylinder 1 has a resistance of up to 10 KOhms). If the wire resistance is more than 20 Kom, it must be replaced. Carefully inspect the wires for chafing on parts of the motor or other wires. In case of significant abrasion, replace the wire. In case of minor abrasion, it is possible to lay the wire so that it does not rub and fix it in this position.
Laying wires. Do not try to connect the wires in a bundle. Disassemble the wiring harnesses, release the wires from the plastic holders. Connect the high-voltage leads to the corresponding cylinder spark plugs. Lay the wires so that they do not rub against each other, engine parts, or hoses. Avoid sharp bends and tension on the wires. After connecting all the wires, secure them into the bundle with special comb holders included in the delivery kit.
The procedure for connecting I/O wires to a VAZ carburetor (2108, 2109, 21099)
The central wire from the distributor cover always goes to the ignition coil (bobbin).
The outlet of the distributor cover, which faces towards the front of the car, is connected to the first cylinder.
The outlet of the distributor cap, looking down, is connected to the third cylinder.
The outlet of the distributor cap, looking rearward, is connected to the fourth cylinder.
The outlet of the distributor cap, looking up, is connected to the second cylinder.
The procedure for connecting high-voltage wires to a VAZ Classic, Niva with a carburetor and distributor.
Central wire from the ignition coil (bobbin)
1 cylinder - above the vacuum corrector. Next, clockwise, the order is 1-3-4-2.
Injection VAZ produced before 2004 with an old-style ignition module (4-pin low-voltage connector)
Actually, on the module body it is already indicated which cylinder the pins correspond to - but we duplicated them in red in case the module gets completely dirty, and you might not be able to see it in the photo.
Injection VAZ produced after 2004 with a new ignition coil (3-pin low-voltage connector)
As with the old-style ignition modules, the new coils are also marked with pins corresponding to the cylinders. But the connection order is different from the order on the old-style ignition module. Be careful.
Recommendations
To avoid problems with the system, it is not recommended to carry out the following manipulations:
- As a “spark” test, do not unscrew the wires with the spark plug onto the working engine;
- To protect the switch from burning out, do not disconnect the battery terminals on the working motor;
- Change “consumables” – spark plugs and high-voltage wires – in a timely manner.
Ignition on a VAZ 21099: how to properly adjust and set?
Incorrectly set ignition leads to car damage
Most owners of VAZ 21099 cars have probably had problems starting the engine, when when you turn the key inserted into the ignition switch, the engine starts to work, but does not hold idle speed at all. Why is this happening? One of the likely causes of this and some other malfunctions may be an incorrectly set ignition, but if the spark plugs are flooded or there is no spark when starting the engine, then it is better to immediately look for the problem in the carburetor.
On a VAZ 21099 with a carburetor engine, eliminating the problem of incorrect ignition adjustment with your own hands is quite simple, but you will need a special tool - a strobe light. It is advisable to purchase it for your own use, because you will have to adjust the ignition timing more than once over the long life of the car. How to set the ignition correctly and without difficulty?
What malfunctions can be caused by an incorrectly set ignition?
All of the problems listed below when operating a car can be caused by other reasons (carburetor defects, malfunctions in the valve mechanism, etc.). But it’s worth checking what’s simpler first, so as not to waste time looking for possible faults where there may not be any. So, the most common engine problems are:
- Increased detonation in the piston group when you press the gas pedal (“fingers ringing or knocking”). Appears with very early ignition and if you do not pay attention to the car, it can lead to destruction of the piston rings and repair.
- The appearance of black smoke from the muffler indicates early ignition.
- A decrease in engine power and throttle response and excessive fuel consumption occur with late ignition. This is due to the fact that combustion of the mixture does not have time to occur when the piston is positioned at the top dead center (TDC) of its ascent and continues when the piston moves down. An indirect sign of this may be excessive heating of the exhaust pipe.
- With late ignition, interruptions in engine operation may occur when you press the gas pedal - failures. In this case, the engine stops working for a while, “chokes,” or the car jerks while driving.
- Unstable operation of the engine at idle (the engine troits).
Thus, an incorrectly set ignition timing affects the adequate operation of the VAZ 21099 engine, and the only way to help your car is to adjust the ignition.
The appearance of black and profuse smoke from the muffler indicates an incorrectly set ignition
How to adjust the ignition of a VAZ 21099 carburetor?
The purpose of the work performed is to set the ignition timing at a point at which normal engine performance will be achieved. To work you will need some tools:
- strobe;
- tachometer (standard car, built into the tester);
- slotted screwdriver;
- spanner or open-end wrench 10.
Return to contents
Scheme of required preparatory work
Before turning the ignition on a VAZ 21099 car, you need to insert the key into the ignition and start the engine, warm it up to a temperature of 80-90 ° C and set the idle speed to 700-800 rpm according to the tachometer, turning the "quantity" regulator fuel" on the carburetor (diagram in Fig. 1.).
After this, remove the vacuum supply tube (silicone) from the fitting on the ignition timing regulator. It is located on the distributor (ignition distributor). The other end of this tube is attached to the carburetor. You need to bring your finger to the disconnected end to check for the presence of vacuum in it. If there is a vacuum and the finger “sucks”, then you should reduce the engine idle speed using the “fuel quantity” regulator until the vacuum disappears.
Turn off the engine. Plug the tube or bend it in half to close the hole. Loosen the distributor mounting nuts using a 10mm wrench.
On the gearbox housing there is an inspection hatch closed with a rubber plug with a scale on the flywheel. Scheme in Fig. 2. indicates its location. It is necessary to remove the plug, clean the scale from dirt so that you can see the marked marks for setting the ignition timing.
Use a slotted screwdriver to slightly turn the flywheel until a long mark is visible on it. Before setting the ignition, you need to install it in the position opposite the triangular cutout on the graduated scale. which corresponds to an ignition timing angle of 0°. In this case, the pistons of the 1st and 4th cylinders are at TDC. In order not to confuse this risk with anything else, you need to check the location of the mark on the camshaft pulley by removing the timing belt cover. The mark should align with the protrusion on the rear timing belt cover.
Connect the strobe. An approximate connection diagram is as follows:
- red wire to the ignition coil output (+);
- black wire to any part of the case;
- Connect the crocodile clip to the wire of the 4th cylinder (the first from the distributor).
It is worth considering that the connection diagram of the strobe may be different, so it is better to follow the instructions supplied with the device.
How to adjust the ignition timing?
The time has come to set the ignition on the VAZ 21099. The step-by-step work diagram below will help you do this correctly:
- Start the engine. Check the tachometer for the presence of a minimum speed (no more than 800 rpm).
- Direct the strobe beam into the inspection hole of the hatch.
- The location of the long mark on the flywheel must correspond to the position for 0 °, it is necessary to adjust the ignition to the mark indicated depending on the fuel used (diagram in Fig. 3)
Set the ignition to the mark depending on the type of fuel used
The ignition timing should be adjusted starting from the neutral position of the long mark on the flywheel (the center of the base of the triangular cutout, corresponding to 0 °) towards the windshield of the car.
To do this, you need to gradually rotate the ignition distributor housing clockwise (when viewed from the side of its cover), increasing the angle, or counterclockwise to decrease it. On the distributor body there is a scale marked “+” and “-” . It can also be used to adjust the ignition: towards the “-” side the ignition is set earlier, towards the “+” side the ignition is set later. It must be borne in mind that each division here is equal to 8 °, which is why the distributor should be turned very carefully. After reaching the required indicators on the scale near the flywheel, turn off the engine and secure the distributor in the appropriate position.
How to check the ignition module of an injector with 8 valves?
Before setting up the ignition of an injection engine, you will need to prepare:
- laptop with ID diagnostic program;
- tester;
- keys, screwdriver.
Before checking the VAZ 21099 ignition module, it is necessary to monitor the components of the control system. Everything must be connected and working properly; if necessary, the required parameters must be adjusted. Turn on the ground and ignition, while gasoline is pumped. When a red light appears, diagnose problems on the car’s on-board computer and the PC connected to it.
Check the throttle device: turn on the ignition, use a tester to check the voltage values for the on-board network and the sensor. Reference diagram of indications: BS voltage - more than 12 volts, sensor voltage - approximately 0.5 volts, opening degree - up to 1%.
Before removing the module, monitor all system components
When the gas pedal is pressed, the sensor voltage readings and the throttle opening degree will change: approximately 4.5 volts and at least 90%, respectively. It is best to achieve 100% throttle opening.
Next, you should turn off the additional air flow regulator, achieve 50% opening of the throttle for air flow when starting the engine easily in a warm state. Then adjust the throttle so that it is completely closed.
Testing Angle Setting
If the ignition angle was adjusted correctly, then when the engine is started after the work, the existing problems disappear:
- failures in engine operation stop when the accelerator is pressed, at idle speed, when the engine is “hot”;
- when driving at a speed of about 50 km/h in 4th gear, sharply pressing the gas pedal leads to a short detonation for 3-5 seconds;
- The engine power increases and its throttle response becomes better.
If problems continue to appear even after you adjust the ignition, then their cause should be sought in what spark plugs are on the engine, whether the ignition switch is working properly, or whether there is a breakdown in the wires. If the long mark on the flywheel is constantly displaced, problems may be in the distributor and voltage regulator in the generator, wires or ignition coil.
How to set the ignition on an injector with your own hands
Injector types
The injector controls fuel injection and can also control the ignition. On all new injection machines, the ignition is set by a computer and regulated by filling in different firmware. But this was not always the case, and on older cars, the same Japanese from the 90s, the computer regulates only fuel injection, and the ignition timing is set using a distributor and is set in the same way as on old Lada models, and depending on the speed The ignition timing is adjusted using a more complex vacuum system than on carburetor Zhigulis. Sometimes, one tube breaks, and during operating mode the traction may disappear; you will have to look for and correct this defect.
But let’s return to more modern ignition systems that are controlled using a computer, especially since these were the ones that were originally installed on the injection VAZ.
Ignition system sensors and marks
For the ignition system to operate correctly, the computer needs to read the correct information from the sensors. Subsequently, this information will be processed in accordance with the fuel maps hardwired into the injector.
The main signal comes from the crankshaft sensor. This sensor shows what position the crankshaft is in at a given time and, based on it, calculates at what moment it is necessary to inject fuel, and at what moment this same fuel should be ignited, depending on the engine speed, which is also determined by this sensor.
1 – crankshaft drive disc; 2 – crankshaft position sensor; 3 – angle of rotation of the crankshaft; 4 – output signal of the crankshaft position sensor
And this is what a typical signal received by a computer from the crankshaft sensor looks like. Pay attention to 270° - this is like the zero point, showing the computer that the engine has completed a revolution and a new cycle begins. This is achieved due to the absence of a tooth on the crankshaft drive sprocket.
Ignition control
Electronic ignition control
How to set the ignition angle? On systems with electronic ignition control systems, this can be done using computer diagnostics that connect to the Electronic Control Unit (ECU) or the “brains” of the car. And there you can see how the engine operates in real time - what signals are received from the sensors, what engine speed, fuel consumption, injection timing, ignition timing and other input and output data.
Basically, you don’t need to change anything during operation unless you change the firmware. That is, if the machine somehow began to work incorrectly, then most likely there could be several reasons:
- An incorrect signal is received from the sensors; in this case, you can replace the supposed faulty sensor with a replacement one that is known to be working, and see if the result changes.
- The voltage in the network is incorrect and, accordingly, the sensors give the wrong signal. The input signal to the sensor is 5V, if this indicator is different, the ECU will receive incorrect input data and the engine will not be able to operate normally.
- The ECU is faulty. Quite often it happens that after going through everything possible, it turns out that your brains have flown. But don’t worry, they are inexpensive at VAZ.
Therefore, as such, the ignition is not set on injection machines, it is already built into the system, but it is worth checking whether the marks are set correctly.
Adjusting the ignition marks on the VAZ-2110 injector
When the engine is running, there are some phases that must work synchronously, the camshaft must coincide with the crankshaft, and the timing of fuel injection and ignition must correlate with them. Let's look at all this using the example of the VAZ-2110.
Starter problems
Many VAZ 2110 owners had a situation where the starter did not turn after inserting and turning the key. They heard characteristic clicks. This indicates that the solenoid relay is not working.
But the fact is that the “ten” does not have a starter relay, that is, an ignition relay as such. Instead, a solenoid relay works. It is supplied with a positive contact from the ignition switch. Mount this relay to the starter. It has a round shape and is approximately half the size of the starter itself.