Heater radiators for VAZ (Lada) Kalina
for repair of VAZ (Lada) Kalina
Installed by VAZ 2 years ago. And it seems he started to flow. More precisely, he sweats. It will flow soon.
I installed a luzar stove radiator on the viburnum, complete shit, the stove heated very weakly at -20, my head without a hat was frozen.
The Luzar's heater radiator is completely g..., it doesn't heat at all.
Everything was fine with the original stove, first I changed it to a very rare piece of shit, then replaced it with a Daaz, it’s warm, but the flow even into the legs does not burn the hands, but into the windshield it’s a little warm.
Installed Luzar stove radiator. Not particularly happy. But I don't like heat. Sometimes I even set it to 24.
In November the heater radiator leaked. “Out of my stupidity” I bought a Luzar radiator. The weather was 10-13°C, the flight was normal. But with the arrival of - 25, all the “p-ts” problems began: In the morning there was a “waterfall”, an air lock, at idle it blows cool (like Conder) and when driving it’s a little warm. I thought it was an air lock. No matter how I tried it, I accelerated it on the hill, and then unscrewed it and lowered it, but nothing helped.
Radiator like Luzar, Pramo, Boutler - don’t expect any heat. The correct radiator is DAAZ...
DAAZ heater radiator. I went out in the evening and installed everything. It heats no worse than copper!
This summer I changed it to DAAZ, installed a ceramic faucet in Yavva (Ulyanovsk), now I have Tashkent in my car! The DAAZ one has fewer honeycombs, has swirlers inside, and is more reliable.
My Kalina has been driving me around for three years now and keeping me warm thanks to this radiator. The swallow warms me regularly. When there is a big minus overboard in my car, the Maldives are on vacation)
Write your review about stove radiators
Help others - tell us about your experience using the spare part.
- loading.
- loading.
- loading.
- loading.
- Vectra
- Mokka
- Antara
- Astra
- SPORTS TOURER
- Meriva
- Zafira Tourer
18 July 2022, 18:23
Voted AGAINST Akebono brake pads on the rating page
18 July 2022, 18:22
18 July 2022, 18:19
VIS brake pads only have 6 reviews. Perhaps you will add another one?
18 July 2022, 18:17
PRASCO pads have only 3 reviews. Perhaps you will add another one?
18 July 2022, 18:07
The SRL stove radiator has its first review!
18 July 2022, 18:07
Patron ball joints only have 7 reviews. Perhaps you will add another one?
18 July 2022, 17:49
Goodyear anti-rain has its first review!
18 July 2022, 17:27
The Fujitsubo muffler has only 10 voices! Do you recommend?
18 July 2022, 16:42
The Metelli brake cylinder only has 30 voices! Do you recommend?
18 July 2022, 16:35
50 reviews have already been written on TOTACHI motor oils.
18 July 2022, 16:09
TRANSMASTER brake pads have only 20 votes! Do you recommend?
18 July 2022, 15:02
There are already 15 manufacturers participating in the auto rating of windshield wiper blades for Kia Rio!
18 July 2022, 12:55
There are already 10 manufacturers participating in the auto rating of silent blocks for Toyota Corolla!
18 July 2022, 12:10
There are already 10 manufacturers participating in the auto rating of hubs for the Ford Focus!
18 July 2022, 09:52
25 reviews have already been written on ELF manual transmission oils.
18 July 2022, 09:15
18 July 2022, 08:11
There are already 20 manufacturers participating in the ranking of the best air conditioner radiators!
18 July 2022, 01:13
17 July 2022, 18:00
Voted FOR Varta battery on the rating page
17 July 2022, 17:52
Voted FOR DELPHI brake pads on the rating page
17 July 2022, 05:06
17 July 2022, 01:19
There are already 50 reviews written on LICOTA tool sets.
Expansion tank cap
16 July 2022, 21:52
There are already 30 manufacturers participating in the ranking of the best expansion tank caps!
16 July 2022, 12:07
There are already 20 manufacturers participating in the ranking of the best preheaters!
16 July 2022, 09:02
An old BMW third series in the back of an E30 (last restyling, 1992) was fitted with a Febest wheel bearing.
15 July 2022, 19:50
After a long (11 hours over 2 days) selection of a boot for the Nissan Tiida Mexican 1.6 AT 2013, a boot was chosen.
15 July 2022, 19:40
I installed anthers on the Mitsubishi Sigma drive, everything fit perfectly. The anthers feel like the original, dense, not plastic, cut.
13 July 2022, 17:57
So maybe before you dissuade people from buying anything, can you give some arguments? You didn't say anywhere in .
Flushing the cooling system
12 July 2022, 19:39
There are only 13 manufacturers in the rating of the best cooling system flushes. Perhaps you know of someone else?
12 July 2022, 11:42
There are only 11 manufacturers in the ranking of the best gas equipment. Perhaps you know of someone else?
July 11, 2022, 11:46 pm
Where is the real review, I see a lot of dirt on the filter? .
11 July 2022, 13:28
After the replacement, there is silence in the car, and this is a reason to give a rating of 5. Yes, install any new one and there will be silence. .
10 July 2022, 19:24
There are only 12 manufacturers in the ranking of the best liquid glass. Perhaps you know of someone else?
8 July 2022, 15:40
I voted AGAINST TRACK ball joints for VAZ (Lada) Granta on the auto rating page.
6 July 2022, 14:44
Voted FOR Mando brake pads for Chevrolet Cruze on the auto rating page.
July 3, 2022, 11:03
Voted FOR Mitsuboshi timing belt for Subaru Forester on the auto rating page.
Other spare parts for VAZ (Lada) Kalina
Having found out which heater radiators VAZ (Lada) Kalina owners prefer to install, you can look at other popular spare parts for this car. In July 2022, the leaders on PartReview were:
- #1 SAAZ shock absorbers - 14% of votes.
- #1 PILENGA brake discs - 14% of votes.
- #1 TIIR brake pads - 13% of votes.
- #1 ZIC motor oil - 11% of votes.
- #1 Nokian Tires - 6% of votes.
You can also find out what VAZ (Lada) Kalina owners chose among manufacturers of such spare parts as: Drive belt, Timing belt, Cooling radiator, Pump, Thermostat, and others.
Stories from our readers
“Fucking basin. "
Hi all! My name is Mikhail, now I’ll tell you a story about how I managed to exchange my two-wheeler for a 2010 Camry. It all started with the fact that I began to be wildly irritated by the breakdowns of the two-wheeler, it seemed like nothing serious was broken, but damn it, there were so many little things that really started to irritate me. This is where the idea arose that it was time to change the car to a foreign car. The choice fell on the melting Camry of the tenth years.
Yes, I had matured morally, but financially I just couldn’t handle it. I’ll say right away that I am against loans and taking a car, especially not a new one, on credit is unreasonable. My salary is 24k a month, so collecting 600-700 thousand is almost impossible for me. I started looking for different ways to make money on the Internet. You can’t imagine how many scams there are, what I haven’t tried: sports betting, network marketing, and even the volcano casino, where I successfully lost about 10 thousand ((The only direction in which it seemed to me that I could make money was currency trading on the stock exchange, they call it Forex. But when I started delving into it, I realized that it was very difficult for me. I continued to dig further and came across binary options. The essence is the same as in Forex, but it’s much easier to understand. I started reading forums, studying trading strategies. I tried it on a demo account, then opened a real account. To be honest, I didn’t manage to start earning money right away, until I understood all the mechanics of options, I lost about 3,000 rubles, but as it turned out, it was a precious experience. Now I earn 5-7 thousand rubles a day. I managed to get the car buy after half a year, but in my opinion this is a good result, and it’s not about the car, my life has changed, I naturally quit my job, I have more free time for myself and my family. You’ll laugh, but I work directly on the phone)) If If you want to change your life like me, then here’s what I advise you to do right now: 1. Register on the site 2. Practice on a Demo account (it’s free). 3. As soon as you get something on the Demo account, top up your REAL ACCOUNT and go to REAL MONEY! I also advise you to download the application to your phone, it’s much more convenient to work from your phone. Download here.
About heater radiator fluid swirlers. Coolant turbulators or swirlers are plastic spirals that increase heat transfer from the radiator when the engine is running at low speeds. As Gennady Krivutsky, leading test engineer of the General Development Department of AvtoVAZ JSC, states: the absence of turbulators in the radiator reduces the efficiency of the heater by 27% at idle, by 17% when driving at a speed of 50.60 km/h, by 5% - at engine speed 5000 rpm. Thus, swirlers serve to increase the heat exchange of antifreeze with the radiator. If there are no swirlers, then the antifreeze “flies” through the radiator without having time to transfer heat, and as a result, the heater in the cabin blows cold air.
How to check if there are swirlers in the heater radiator? Just shake the radiator and hear something rattling inside – that means they are there. However, sometimes the “noodles” (as swirlers are called differently) will not rattle due to the peculiarities of its composition, in which case its presence will have to be determined visually. You are unlikely to be allowed to disassemble the radiator in a store, so we try to shine a flashlight inside the radiator; the swirl rings should be clearly visible.
The set of methods described will allow you to distinguish the original “hot” stove radiator from a fake, but you cannot be 100% sure of the quality of the product. There are known cases when the turbulators inside the radiator are spaced at intervals, or they are not the full length. If you come across such an “under-swirled” radiator, or there are no swirlers at all, do not rush to throw it away, because... There is an opportunity to modify the stove radiator with your own hands! To do this, it is enough to cut aluminum or copper strips 1-1.5 mm thick and 5-6 mm wide (select according to the diameter of the tubes), clamp one end into the drill chuck, fix the other and carefully curl it.
All the methods in the article will be useful not only to owners of VAZ (and these are “tens”, Lada Priora, Kalina and Grant, etc.), but also foreign cars. And one more piece of advice: take your old stove radiator with you to the store and compare it with new ones, honeycomb sizes, workmanship, etc. By the way, do you know which brand of heater radiator is better?
How often have you bought a heater radiator with poor heat transfer (with which the stove does not heat)?
Dismantling the old heater radiator Lada Kalina
So, when the antifreeze is drained, remove the pipes supplying the stove from the upper and lower fittings of the engine.
The diameters of the lower and upper pipes on the engine side are 20 mm.
The diameter of both fittings excluding the sides is also 20 mm.
If you pay attention to the protruding sides on fittings , it becomes clear why it is very difficult to put a reinforced hose with a diameter of 18 mm . In any case, I was unable to do this. But the 20th hose fit perfectly, so I recommend that you use a hose with a diameter of 20 mm .
Looking ahead, I will say that a reinforced hose at a regular hardware store at a price of 60 rubles per meter. Two pieces of 1.5 meters each are enough to spare even for installing a heater radiator from a Gazelle, and for installing an inverted standard radiator, 1 meter in each direction will be enough. It’s better to buy a hose with a diameter of 20 mm (it’s on the right in the photo), because... it is easier to put it on the fittings on the engine side.
I had the 20th hose installed with a radiator from a Gazelle, but when replaced with a standard radiator, these hoses went to waste, and their place was taken by a hose with a diameter of 18 mm (since it was in stock). However, to connect it to the engine, I made adapters, but more on that below.
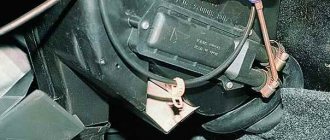
Next we need to get to the heater radiator and remove the old pipes from them. This is not easy to do - the fittings are in a hard-to-reach place , so I unscrewed the left link from the steering rack (in the photo it lies on top of the steering rack), although you may be able to do without this operation. The clamps on the fittings were heavily oxidized , and there was simply no room for working with a wrench, so I was able to unscrew the clamps only with long, thin-nose pliers :
When the hoses are removed, unscrew the nut, which is located on a long pin, to the left of the heater radiator :
Looking ahead, I will say that this pin a steel plate to the engine shield , on which a rubber gasket , ensuring the tightness of the interior. Here is a photo of it from the pedal side:
The lower pipe is easier to unscrew:
The pipes have been removed. The upper hose is longer (in the photo it is below)
Now we move into the interior and unscrew the three screws securing the heater radiator , as well as the shiny steel plate :
Next, remove the gas pedal from the bracket. You can disconnect it from the throttle cable, but I didn’t do this - I just moved it to the side.
At the same time, we’ll immediately pull out the brake pedal - this will provide us with enough space to remove the radiator from its niche. You need to disassemble the brake pedal if you prefer to easily get out the old radiator without sawing it with a hacksaw, as is done here. To do this, remove the locking plate and take out the cotter pin that secures the pedal the rod :
Next you need to remove the brake pressure sensor . the two terminals from the sensor , loosen the plastic nut by 19 and unscrew the sensor from its thread.
Hint : if you mark with a marker the place on the thread where the nut was located, then during assembly, setting up the brake light will take you much less time.
When the pedal is disconnected and sensor is removed, the pedal moves freely in the longitudinal direction. We move the pedal back (towards ourselves) and to the left. This will be prevented by the stop on the pedals , into which the dismantled sensor previously rested. The stop may even bend slightly - this is not a big deal (during reassembly we will return it to its original position), the main thing now is to pull the pedal towards you.
Next, raise the Shumka and use a 10 mm socket to unscrew the three bolts securing the gas pedal bracket to the body.
We remove the bracket, turn the excess noise to the side and you can try to remove the heater radiator from its socket. If you succeed, then this whole article was written in vain, because in the same way you can put a new radiator in place)). If a miracle did not happen, and you were prevented from pulling out the radiator by the fittings sticking into the engine compartment, then take some pliers and feel free to bite the fittings under the base. Try not to damage the seal attached to the steel plate - we will need it later.
When the outer part of the fittings is broken off, remove the steel plate with the seal . If the fittings are still in the way, break them off at the base.
Next, lightly remove the old radiator from its seat. Now you can start installing the new one. If you try to install the radiator as is, try not to crush its edges - the aluminum plates are very thin and can be easily damaged.
Choosing the right radiator: the key to its flawless operation
If you need to install a new stove on a Lada Kalina car, you need to choose this part correctly, focusing on the following criteria:
- the material from which the product is made. Aluminum devices are less expensive, but they have one significant drawback - if cracks or other defects appear, replacing the radiator is not possible. You can throw it away immediately without wasting time. Therefore, it makes sense to purchase, albeit expensive, but reliable and repairable copper-brass part;
- the presence of coolant swirlers, which are made of high-quality plastic. Radiators with such elements work much more efficiently and become less clogged.
Let's sum it up
Now you know how to remove the radiator and heater, as well as how to change everything yourself. The main disadvantage of this method is the damaged radiator panel of the Lada Kalina heating circuit. This is not critical as it can be corrected. The cut piece can be fixed with a sealing agent or glue. To hide the flaw, the repair area of the surface can be covered with black tape.
Hello, dear readers! The topic that will be discussed will be of more interest to owners of the Lada Kalina car. Winter is a harsh time. But severe frosts are not scary if the car heater is in good condition. However, if the unit breaks down and the stove is leaking, then the problem needs to be solved as quickly as possible. We will tell you how to correctly replace the heater radiator of a Lada Kalina.
How to choose the right heater radiator
Before choosing a stove radiator, you should know that they can be either aluminum or copper-brass. It is difficult to clearly prioritize the choice of one material, but each one has specific features of its work. These features are dictated by the properties of the material. Copper has a slightly lower thermal conductivity than aluminum, and therefore warms up more slowly. This cannot be said to be bad, since the thermal inertia of such a radiator is quite large. This means that it may not cool down for a long time.
Selection of spare parts
The choice of a stove radiator should be approached carefully, since changing it is quite inconvenient. The majority of motorists choose an original part that is available for sale. But few people know that there are several analogues.
Let's consider the heater radiator options for Kalina, their catalog numbers:
- 1118-8101060 is the article number of the original catalog number of the heater radiator for Kalina. It fits perfectly and does not require any modifications. The average cost in the Russian Federation is 1500-1700 rubles.
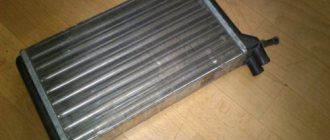
Original heater radiator and hoses
- There are several analogues that are in no way inferior to the original in terms of quality. Thus, spare parts from the following manufacturers are suitable for Kalina: Pekar (1118-8101060), Fenox (RO0001O7), Luzar (LRH 0118) . The average cost of an analogue is 1200-1500 rubles.
Kraft stove radiator
Reasons for failure
There are not many reasons for the failure of a stove radiator, but you need to know them. Let's consider the main ones:
- Radiator clogged , which led to pressure, resulting in a breakdown of the internal tube.
Antifreeze flows into the cabin due to a breakdown in the heater radiator
Perhaps these are the main reasons, but others may arise due to the operation of the car.
When should a new part be installed?
During the Soviet era, all VAZ radiators, including the heater, were made of copper, and therefore were durable and repairable. Only from time to time they needed to be descaled.
Since the early 90s, cheaper aluminum heat exchangers have appeared, which the manufacturer still equips the Lada Kalina 2 with to this day. As a result, the owner of this model is faced with the following problems:
- The aluminum radiator of the stove on Kalina is short-lived and often begins to leak after 2-3 years of operation. However, it is impossible to reliably seal a leak from an aluminum tube.
- Harmful antifreeze vapors, sublimated by the fan, spread throughout the cabin, causing an unpleasant odor and a greasy coating on the glass.
- Under the place where the Kalina heater radiator is located, there is a controller. If antifreeze gets in, the controller fails and it also has to be replaced.
- Getting to the stove of this representative of the VAZ family is very difficult, even to clean the element from dirt.
One of the reasons why the radiator of the Kalina stove fails quite quickly is the use of cheap liquids in the cooling system, and among them there are often fakes. Counterfeit antifreeze may contain various substances that have a detrimental effect on aluminum and cause leaks.
Sometimes a small leak can be fixed by using coolant-soluble sealants. But this method does not always help, so it is better not to wait for the controller to break down and replace the Kalina heater radiator.
Many people unanimously talk about which one is better to replace the old element. The first place is confidently taken by the DAAZ radiator (Dimitrovgrad Automobile Unit Plant). Copper parts are only in second place, followed by products from all other brands.
How to replace a radiator: basic methods
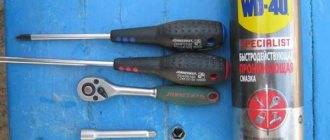
As we mentioned above, replacing the radiator on Lada Kalina cars is a rather complicated procedure that requires disassembling the entire front panel. To do it yourself, you will need to prepare tools - pliers, a Phillips screwdriver, a wrench, as well as knowledge of the sequence of work described below:
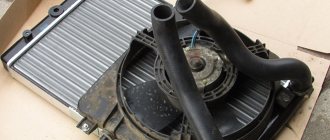
Cooling radiator Lada Kalina
When the owner of a Lada Kalina notices an antifreeze leak from the cooling circuit in the radiator area, immediate dismantling of this unit will be required in order to determine the causes of the malfunction. A fairly common option for eliminating leaks is to add a special sealant to the system. This is a simple method that does not imply the need to dismantle the radiator, is ineffective and can harm many components. Also, repairing the product will not be an effective measure, since it is not possible to restore the full functionality of an aluminum radiator in most situations. This is confirmed by the specialists of specialized services. As a result, the most effective action will be to replace the cooling radiator. We will tell you further about how to remove it correctly and how to change the radiator.
Preparatory stage before replacing the radiator
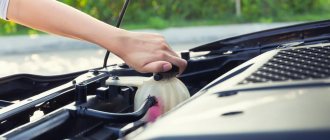
Any repair of the power plant cooling system requires draining the coolant. If you need to replace the cooling radiator, you will need to drain the liquid in full.
How to remove the radiator, how to change it? We act like this.
- We place the Lada Kalina in the middle of a flat area.
- Taking a “10” size key as our “helpers,” we dismantle the metal protection sheet located under the engine sump. This is necessary so that the process of draining the antifreeze is carried out directly into the container, and not along the surface of the crankcase protection.
- Draining the liquid should begin after the Lada Kalina engine has cooled. This will eliminate the risk of hand burns.
- We continue the process by dismantling the air filter housing.
- To gain access to the drain plug on the engine block, it is necessary to remove the ignition coil. To do this, you will need to de-energize the network by removing the terminals from the battery. It is also necessary to remove the high-voltage wires. The coil fastener is unscrewed using a hex key of size “5”.
- The plug on the block is unscrewed if you use the key at “13”.
- Don’t forget to first place a container of the appropriate size under the drain hole.
- After waiting for the antifreeze to completely drain, we move the container to the radiator.
- Disconnect the lower hose and continue collecting the refrigerant in the same container. The liquid will come out of the system more readily if you open the cap on the expansion tank.
- Having completed the “draining event”, we return the cylinder block plug to its original place, tightening it to the required torque.
- Now, using a suitable screwdriver, remove and tighten the clamp securing the system pipe to the fitting of the throttle assembly heating unit. This is necessary to bleed air from the circuit while charging refrigerant.
The replacement of the cooling radiator is complete.
Radiator dismantling in Kalina
To remove the designated assembly and related components, you will need to use the following tools:
- wrench "10" (socket type);
- pliers with thinned grips;
- Phillips screwdriver;
- If the Lada Kalina is equipped with an air conditioning system, then we additionally stock up on a set of Torx (star profile).
- Disconnect the power connector from the system fan.
- Let's dismantle this unit. It is held on the radiator with 4 bolts. To unscrew them, you will need to use a “10” key. Extraction is carried out in the upward direction.
- Next, we move on to removing the pipes from the radiator fittings. We loosen the clamps using pliers or a screwdriver. We use the same wrench to unscrew the two nuts that hold the radiator assembly in the seat.
- Now we tilt the product slightly towards the engine and lift it up.
When dismantling the unit on a Lada Kalina equipped with air conditioning, you will need to resort to removing additional components that are directly attached to the radiator. To carry out this activity, you should stock up on a key with an asterisk profile.
You need to unscrew 4 screws. During dismantling, look towards the lower radiator cushions. They can either be removed along with the product or left in the landing niches. Experts recommend removing these support elements to assess their condition. It would also be useful to remove the rubber-metal bushings present on the body of the LADA Kalina radiator unit. It is better to replace them with new analogues.
After dismantling, the radiator is checked. For this purpose, plugs are used that are installed in the bends. Then air is pumped into the unit placed in water (through a small fitting) with a pressure of approximately 1 bar. If there are a lot of fistulas, then the unit must be unconditionally replaced. When the leaks are insignificant, you should try to negotiate with the technicians to repair the unit in the station conditions. The new product is installed in the reverse order. Particular attention should be paid to rubber pipes and clamps. If the condition of these components is in doubt, then it is better to replace them with new analogues.
When all the elements of the system are assembled, we begin to fill the refrigerant. We perform this action until liquid begins to leak from the throttle heating unit pipe.
Eliminating air jams
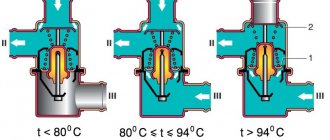
- First we replace the thermostat. Instead of a standard product with five holes, we install a component with six such holes.
- We add a refrigerant filter to the circuit.
- We install a shut-off valve on the pipe leading to the stove.
These actions are not capable of radically transforming the system. Experienced owners of LADA Kalina have moved further in this matter. They add steam exhaust pipes, install a forced fan activation button, etc. To install the designated outlet, the diagram looks like this: we cut a tee into the pipe leading to the expansion tank. It is connected through a separate hose to the pipe of the throttle body heating unit. We place the second tee in the return from the radiator of the heating system and connect it with an expansion tank. Now you know how to remove, as well as how to change the radiator, and fix other problems yourself.
Let's sum it up
Replacing the cooling radiator in the LADA Kalina cooling system is not considered difficult. If all the necessary conditions and means are available, the work is carried out manually. What you won’t be able to do yourself is soldering the aluminum honeycombs of the radiator assembly. Not every specialist will take on such a painstaking task as replacing a cooling radiator.
Features of replacing the stove radiator on Kalina
There is only one official method for replacing the heater stove on Kalina. And it inspires sacred awe - complete disassembly of the interior, removal of the front panel, seats and center console. This takes a lot of time, effort and nerves, and if you ask for help at a service station, then the price of replacing the Kalina heater radiator may not fit into 4 thousand.
But there's no need to rush. If it’s cold in the cabin, this does not mean that the radiator is to blame. The problem may not be buried that deep. The cause of poor heater performance may be an air lock, which does not completely allow antifreeze into the heater radiator, or may block it completely. We won’t go into detail about this problem, suffice it to say that by draining the old coolant, flushing the cooling system and adding new fluid, you can avoid problems with the stove.
Often, novice drivers panic about a cold interior simply because the dampers are closed, the cabin filter is clogged, or the heater motor is not working well. Which, when replaced, also requires either acrobatic training or complete dismantling of the interior. The air conditioner also requires some experience, which sometimes ends up in Kalina’s interiors and does not always interact correctly with the heater. However, replacing the Kalina heater radiator is relevant not only when there is a coolant leak.
What if you turn the stock radiator upside down?
So, friends, with the arrival of cold weather, I noticed that the stove was heating rather weakly, and at an outside temperature of -10°C, the windows thawed only after 30-40 minutes of intense traffic. It was impossible to drive like this, and during the next thaw I decided to start the third (I hope the last) replacement of the stove radiator .
By this time, I had come to the understanding that enough experiments were enough and I still needed to install the original heater radiator from Kalina , ideal in size and shape. Moreover, before installation, it must be carefully sealed with foam rubber so that the air from the fan passes through the radiator fins and not past it.
At that moment, I didn’t yet know how I was going to install a standard radiator, but I still didn’t intend to cut out the air ducts or disassemble the dashboard. It seemed to me that there must be some simpler and more logical way to install a standard radiator. Having purchased new pipes and a heater radiator from Kalina in advance (650 rubles), I removed the installed radiator from the gazelle and tried to install the standard radiator in its place. As one would expect, the fittings rested against the partition of the engine compartment, so the standard radiator could not be pushed into the niche even half its length.
After dismantling the radiator from the gazelle, I began to think about how to install a standard radiator without breaking anything. I twisted and turned the radiator, placed it this way and that way, and suddenly an idea came to my mind: what if we turn the heater radiator with the fittings not towards the engine, but towards the driver?
The idea, although bold, was viable, so after 4 hours hot air was already blowing from the heating system deflectors. Now, let's look at the whole process of replacing the stove on Kalina from start to finish using the radiator reverse method . Let's start by making a list of everything we'll need.
Heater radiator - copper or aluminum? Expert opinion
The manufacturer equips domestic cars with copper heater radiators. However, these radiators do not always cope with their responsibilities and the owners are faced with the question of replacing the stove radiator. The radiator installed from the factory lasts about 3-4 years, then it starts to leak. When choosing a radiator, a logical question arises - which radiator to choose, copper or aluminum.
The plant manufactures cars with aluminum radiators from DZA LLC
- Aluminum radiator
- Advantages of an aluminum radiator
- Minuses
- Copper stove radiator
- Advantages of copper radiators
- Minuses
- Manufacturers and costs of radiators
- Expert opinion
- Which brand of radiator should I choose?
Preliminary disassembly
- First, you will need to empty the system of working fluid before replacing the heater radiator. This is done by opening the cap on the main radiator and draining the antifreeze into a previously prepared container.
- Now it is necessary to dismantle the air filter along with the suction pipe.
- We remove the battery.
- When access to the stove pipes appears, we first move the container under the junction of the pipes with the heating radiator. After removing the hoses, at least 1 liter of antifreeze will collect in the container.
- Near the pipes we find a nut that secures the plate inside. It will need to be moved, since there is a likely risk of interfering with the process of removing the radiator assembly. To do this, loosen and unscrew the nut from the engine compartment. We do this after the liquid has completely drained from the designated pipes.
- We go into the interior and remove the accelerator drive cable.
- Next you will need to dismantle the pedal itself. It is secured with three bolts.
- Remove the decorative radiator panel (it is located on the right side of the gas pedal).
- The brake pedal of the LADA Kalina can also cause inconvenience during the disassembly operation. There is no need to dismantle it, but by removing the rod it can be raised above its working position.
At this point, the preliminary disassembly procedure is complete.
Aluminum radiator
Samara frets after 2007 were equipped with aluminum radiators, which have a number of pros and cons. However, some car owners complain about cold interiors and foggy windows.
Advantages of an aluminum radiator
They have a higher density compared to copper The width of the radiator channels is larger, which means more heat transfer
Minuses
If a leak occurs, it is not repairable Heats up quickly enough, but also cools down quickly
Copper stove radiator
Initially, domestic cars were equipped with copper radiators. However, later, as we wrote above, they were replaced with aluminum ones. Now it is quite difficult to find a high-quality copper radiator, since some manufacturers use impurities instead of pure copper.
Advantages of copper radiators
Among the obvious advantages is its heat dissipation of 389.6 W/(m. deg), it is significantly higher than that of aluminum
A copper radiator takes a long time to heat up, but also takes a long time to cool down.
If it leaks, it can be repaired. The copper radiator can be soldered.
Minuses
This type of radiator has fewer fins and thin channels that can become clogged.
At idle, the copper radiator does not warm up to the required temperature and cool air can flow
As you can see, when choosing a radiator, it is best to look towards aluminum.
Manufacturers and costs of radiators
Today there are quite a lot of manufacturers, but among them there are the most popular ones, the radiators of which can be easily found in stores.
- LUZAR
- FENOX
- OberKRAFT
- BAUTLER
- DZA LLC
- Radiator Iran Co.
- Orenburg radiators
As you can see, there are a lot of manufacturers, and each of them has its own pros and cons. If you decide to buy a high-quality radiator that will serve, it is better to choose a radiator from DZA LLC. It is the radiators of this company that are installed on the conveyor. Its cost varies between 700-1000 rubles depending on the region.
Expert opinion
We advise you, dear readers, to purchase an aluminum stove radiator. Despite its disadvantages, practice shows that this type of radiator has proven itself well. For example, a VAZ 2114 from 2008, the heater radiator was replaced only in 2014, its service life is about 5 years.
Which brand of radiator should I choose?
As already mentioned above, it is better to purchase a factory radiator. Cheaper but of good quality are Luzar, Fenox and Orenburgskie.
When replacing the radiator, we advise you to immediately replace the heater tap.
For 15 years I have been repairing various types of cars, including brands such as VAZ, UAZ, Chevrolet, Mazda, Kia and many others. Everything related to the gearbox, engine or chassis. You can write me your question below in the comments and I will try to answer it in detail.
For me, I give preference to copper radiators; they, of course, retain heat longer after heating the interior itself, although it takes a long time. But if you have the right hands, if necessary, you can solve this problem yourself by fixing the radiator. I saw copper radiators in the store, but how high quality they are can only be shown by the time of use. At first glance, there seems to be no catch. The previous car had a copper radiator, but I didn’t experience any problems with it, you get used to how it works and the problem with foggy windows is also solved, you just have to open the window a little.
Copper ones are not on sale now, and if you find them, the price will be sky high. Available in brass. The thermal conductivity of brass is much less than the thermal conductivity of aluminum. Almost 2 times. I bought a Tektan heater radiator from UAZ. It heats well and the price is normal.
Article: 1118-8101060, additional articles: 11180810106000
Order code: 115225
Hello readers of my review and visitors to the AvtoAll online store.
In this review we will talk about my purchase of a stove radiator on a first generation Lada Kalina. I want to say right away that this radiator is only suitable for a car without air conditioning, keep this in mind when choosing a radiator for your car. The original radiator began to leak and therefore decided to replace it with exactly the same original one produced by the Demitrovgrad Automotive Accessory Plant (DAAZ). Now I’ll tell you why I chose this particular stove radiator and not a cheaper analogue. I try to install only original spare parts on the car that were installed at the factory, unless of course they are available for sale. DaAZ radiators were installed on my VAZ 2107 and VAZ 2115 and left only good impressions. The first and, in my opinion, main advantage of these radiators is heat transfer; they warm up the car interior much better compared to analogues. I checked this from my own experience, I tried different manufacturers, I won’t write which ones so as not to create anti-advertising, but I settled on the original DaAZ radiator. I am also quite satisfied with the workmanship and they also serve well among their competitors. It’s a pity that the kit does not include a sealing foam that is glued to the ends of the radiator; it serves as a seal between the casing and the radiator itself. I purchased it separately at a hardware store; in my case, a 30mm wide door seal was suitable. and 1.5mm thick. glued it onto a thin layer of automotive sealant. It fell into place a little tight, but it did and that’s the main thing. Radiators can be supplied either in a red-and-white factory box or in a blue-and-white VAZ box, as in my case.