At the beginning of any trip, the driver of a car manufactured by AvtoVAZ listens to how the VAZ 2110 starter works. The successful operation of the car depends on the driver’s knowledge of its structure and skillful operation of the vehicle. There is a proverb that every car loves one owner. Moreover, an owner who understands the intricacies of operating all the units under the hood.
Sometimes by hearing you can not only judge the correct and reliable operation of the unit in question, but also be able to identify in time a possible malfunction and the need for repair. Therefore, it is worth paying a little attention to consider the design of the VAZ starter, the operating procedure (the circuit diagram of the unit is very indicative here) and its possible malfunctions.
The VAZ starter has a power of 1.55 kW and consumes an operating current of about 375 A from the main source of the car - a battery with a voltage of 12 V. Such a large value of current consumption when starting the VAZ 2110 starter forces us to take seriously the time it turns on and the reliability of the contacts responsible for power switching.
Design and principle of operation
The VAZ 2110 starter does not have a very complex design, but a person who wants to repair this mechanism should know that its elements include:
- Drive shaft;
- Hubs with ring;
- Cover sleeve;
- Gears equipped with teeth and a coupling ring;
- Carrier;
- Drive shaft supports equipped with a liner;
- Anchor core.
- Gear axles are of the planetary variety.
- Permanent magnet;
- Gaskets;
- Frame;
- Collector;
- Lever bracket;
- Drive lever;
- The back cover is equipped with a special sleeve;
- Anchor relay and shaft;
- Holding winding;
- Brush holder;
- Traction relay core;
- Contact plate and bolts;
- Staples.
The starter components described most often require replacement, diagnosis or repair when problems occur.
Four devices creating a magnetic field are mounted to the starter housing. On the inside they are secured with an aluminum sleeve. The lid is tightly attached to the body. Reliable fixation is ensured thanks to two studs. The anchor shaft rotates in special bearings.
The starter plays a major role in starting the car, as it rotates the crankshaft
Through a planetary type gearbox, the torque “goes” to the drive shaft. Its transmission is ensured by a special gear. After the vehicle starts moving, it ensures their separation in order to protect the gearbox from damage.
When starting the engine, voltage is transmitted to two windings of the traction relay. After closing the contacts it stops working. The voltage should not exceed 8 V. If its value is higher or lower, then this “indicates” that there is a problem in the system.
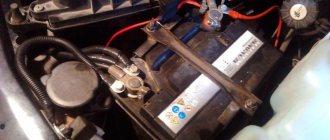
The starter on the VAZ 2110 is located to the left and slightly below the battery
Gasoline tools, scooters
You can diagnose starter failures on a scooter using the same principle as on cars. The device and principle of operation are almost the same here. Often, most malfunctions are associated with severe contamination of the main components.
The process of starting the brush cutter is carried out by pulling the cord. The pawl then engages the teeth of the reel. Next, if you pull more vigorously, the engine will start. If you pull very sharply and forcefully, this will cause the pawl and the coil to fail. The second reason is a break in the flexible shaft. It is impossible to repair the trimmer starter yourself. Manufacturers only allow complete replacement of the module.
Where is the VAZ 2110 starter relay located?
The solenoid relay is built inside the main body along with the starter itself. To dismantle, you need to follow the following algorithm:
- Determine the location of the starter itself. It is located to the left, just below the battery. You need to look for it in the immediate vicinity of the checkpoint.
- Disconnect the negative contact from the battery. This will help avoid troubles during dismantling (electric shock).
- Dismantle the air filter to free up the “passage” for further actions.
- Disconnect all wires that go to the relay.
- Dismantle the nut that serves as a fastener for the end of the wire. For this procedure you need a key of 13.
- Unscrew the nuts that focus the starter itself. To unscrew them, you need to use a 15mm wrench. The top one can be unscrewed without any noticeable problems, but to remove the bottom one, you will need to apply a noticeable force (it is located in an inconvenient place).
- Completely remove the starter.
- Remove the nut that secures the output of the relay that performs the retracting functions, and disconnect the wiring.
- Unscrew the bolts securing the relay (you need to use a wrench
 and remove it.
Assembly is carried out in reverse order.
What is a starter
VAZ 2110 problem with starter
The starter has a rather complex design. To repair a starter, you need to know the causes of breakdowns, since the equipment can have several types of troubles. A mechanism breakdown can occur at any time, but mechanical experts say that at least five years must pass before the first problems in a new car. Since repairing this mechanism is almost impossible for a person far from mechanics, it is better to buy this equipment in specialized stores.
Node malfunctions
The most common starter breakdowns are divided into several types. These include:
- Damage to the electrical circuit. A sign of such problems is slow rotation or complete absence of it at the crankshaft when starting the internal combustion engine. The reasons for this phenomenon may be a discharge of the battery, rupture of the contacts of the ignition device, unreliable fixation, wear of the wires, or violation of the integrity of the wiring suitable for the relay contact group. If, when starting the internal combustion engine, the armature does not respond and the relay does not operate, then the cause of the failure is most likely due to a break in the solenoid relay wire. In the absence of the described “symptoms”, it is necessary to dismantle, check the plates for short circuits, and the presence of traces of “burning” in the collector system.
- Worn starter brushes. The presence of such problems may be indicated by difficulty starting the car, but not always. The reason for this phenomenon may be “hidden” in a battery failure. Complete wear of the brushes leads to the spring “resting” against the brush holder (contact is ensured only due to its mass). This can be easily checked by changing the position of the starter. The reason for premature wear is the misalignment of the brushes during the operation of the starter.
- Broken traction relay. This is indicated by a failure of the internal combustion engine, since it will not be possible to start the engine without a working relay. The “symptoms” of a malfunction of this starter element include its rapid rotation, even after starting the internal combustion engine, idling movement (without contact with the flywheel of the engine, which does not start), and a click after turning the key in the ignition device. It may not exist if there is a break in the coil, the armature is jammed, or there is no power for some reason.
- Lack of starter rotation with a characteristic “buzzing” sound. This phenomenon indicates the occurrence of a short circuit in the electrical circuit, in which power is supplied to the brushes of the electric motor. However, it is in working condition. In such a situation, the holding coil often does not work and the bendix does not move. Its gear cannot engage the flywheel gear, and the electric motor runs in idle mode. The reason may be that the force of the retracting element “enters” the bendix through a lever made of plastic (has the shape of a grip). If the movement resistance of the bendix is high, then the plastic elements break down. As a result, it is not moved to the working position and the starter rotates, but does not transmit torque to the flywheel. Another reason for the failure of the rotor can be severe wear of the teeth, which are located on the rotor shaft of the electric motor. Do not forget that complete destruction of the mentioned teeth can also cause failure. This type of malfunction is related to the breakdown of the motor and is not related to the functioning of the drive. The presence of such a breakdown is indicated by the activation of all starter mechanisms, that is, the rotation of the electric motor and the transition of the bendix to the working position. It can be locked by turning the key in the ignition.
The main malfunctions of the unit include: the appearance of oxide on the wires and terminals, failure of the traction relay and traction winding, wear of the brushes, breakage of the armature
The listed faults can cause more serious problems if they are not corrected in time. Ignoring problems will most likely lead to vehicle failure at the most inopportune moment. The best solution is to contact a specialized service station when the first signs of the listed problems appear.
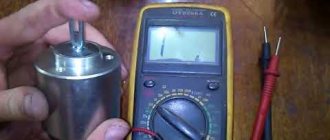
Checking the starter using the battery
Before contacting a car service center, buying a new unit or spare parts for it, you should try to check its performance yourself. With the right approach, it is possible to independently identify problems.
First of all, if you suspect a malfunction of the starting device, you need to check the contacts on the battery and starter terminals, their tightness and the presence of oxidation, the battery charge, since in many cases the problem in starting the internal combustion engine is the above factors.
A simple way to check that the electrical network is working is to close the terminal bolts of the electric motor with a screwdriver; before this procedure, you need to put the car in neutral speed (or move the selector lever to park or neutral mode).
If the starter starts the engine, you should look for a fault in the electrical circuit. Otherwise, remove the unit by disconnecting all fasteners from the engine and removing terminals and other wires.
How to check Bendix
After removing the electric motor, it is necessary to inspect the bendix (the gear at the very end); if there is increased wear of the teeth or cracks in it, it should be replaced.
The Bendix should only turn in one direction, otherwise it will have to be replaced. By connecting the unit to the battery, it is unlikely to be able to diagnose the serviceability of the Bendix, since it can spin, but with insufficient force to start the internal combustion engine.
How to check Solenoid relay
When you turn the ignition key, you should hear a click, indicating that the armature is retracted and the bendix is engaged.
Before checking the serviceability of the starter, it is necessary to firmly secure it (either in a vice, having previously wrapped it with a thick layer of fabric, or with the help of a strong assistant who will hold the unit), since a very strong jerk may occur when starting it.
It is necessary to connect the positive from the battery to the positive on the starter, and the negative from the battery to the body of the unit. If the unit is working properly, then there should be a quick and sharp click and the bendix will extend and begin to spin.
If there is no click or movement of the overrunning clutch, it is necessary to replace the solenoid relay. When the power from the battery is disconnected, the bendix should retract.
How to check the Anchor and Brushes
To check the brushes and armature, you will need a multimeter or a 12-volt light bulb. Checking with a light bulb involves connecting its contacts to ground and the brush holder with the starter connected to the battery. When the light comes on, it indicates high brush wear.
When checking with a multimeter, the contacts are connected identically, only the results of measuring the resistance should tend to infinity, otherwise there is a short to ground.
The armature can only be checked by disassembling the electric motor. In addition to carrying out a visual inspection for the presence of oxidation, traces of short circuits, and increased wear, to check the armature you will need a special device PPYA (armature testing device) to check the interturn closure.
The difficulty of diagnosing armature malfunctions, as well as its repair, will require contacting specialized specialists, but in order to avoid unnecessary costs, it is necessary to check all other parts of the unit.
How to check the starter winding
To check the motor winding you will need a multimeter or a light bulb. The wires of the control lamp are connected to the winding terminal and the starter housing. If the light comes on, then there is a breakdown in the winding.
Using the same connection, the winding resistance is checked, for which the multimeter must be switched to the appropriate mode. The average reading of a serviceable winding will be 10 kOhm.
The starter is the most important element of the car, and its malfunction will immediately make itself felt either by the inability to start the car or by difficulties with it.
This unit is very reliable, but problems do occur with it. Some of them are easy to determine on your own, but to identify others you will need special equipment, which is available only to highly specialized specialists.
DIY starter repair
Maintenance or repair of the starter must be carried out in accordance with certain algorithms, compliance with which requires certain experience and knowledge, as well as the use of the necessary tools. Troubleshooting always begins with disassembling the starter, after which diagnostics are carried out, and if problems are detected, repairs are carried out.
Tools and Supplies
To troubleshoot, you need to prepare the following tools:
- Socket heads for 13 and 15.
- Extension.
- Handle equipped with a ratchet.
- Ohmmeter.
- A special analyzer equipped with a light bulb.
- Phillips and flathead screwdrivers.
Spare parts will be used as consumables to replace failed components. You can determine which parts require replacement at the diagnostic stage described above. To repair the starter, it is recommended to use only high-quality parts.
How to remove and disassemble
To prepare for repairs, it is necessary to completely disassemble the starter. This procedure should be carried out in the following sequence:
- Remove the negative battery terminal.
- Remove the air filter housing to ensure convenience for further operations.
- Disconnect the wire leading to the traction relay.
- Place the disconnected wiring to the side so that it does not interfere with further repairs.
- Unscrew the nuts that secure the starter to the gearbox.
- Remove the unit and carry out further repairs in more convenient conditions.
- Disconnect the wire that is in contact with the mounting bolt.
- Remove the traction relay. To do this, you need to unscrew the two bolts that secure it.
- Remove the relay armature. To do this, you need to lift it up a little, and then remove the loop from the lever.
- Unscrew the nuts securing the tie rods.
- Remove the cover with the drive, as well as the gearbox assembly.
- Completely “remove” the tie rods. This will make it easier to further remove the drive and gearbox.
- Remove the planetary gears. They need to be replaced if there is damage to the teeth or the integrity of the needle bearings is compromised.
- Replace the brush holder assembly (if necessary).
- Remove the cover from the manifold side.
- Unscrew the two screws and then remove the brush holder from the cover.
- Bend the clips and remove the spring.
- Check the anchor for defects. To do this, you need to remove it from the case.
- Remove the gear from the anchor shaft.
- Remove the armature from the stator mechanism.
- Remove the sealing support from the lever.
- Knock the stopper off the retaining ring using a special mandrel.
- Dismantle the restrictor and retaining rings.
- Remove the drive assembly.
General view of a completely disassembled starter
Assembly must be done in reverse order.
Troubleshooting
When conducting a full check of the functionality of the VAZ 2110 starter, you must act in accordance with the following algorithm:
- Check how well the unit rotates. If the crankshaft moves poorly, you should pay attention to the presence of lubricant and, if necessary, lubricate the mechanisms. There are situations when the oil does not correspond to the current season. Replacing it with a more suitable one will solve the problem.
- Check the battery for charge and oxidation of tips and inputs. If necessary, it is necessary to charge and replace failed elements. In such a situation, it is necessary to carry out maintenance of the contact group and the battery itself, after which the functioning of the starter will be restored.
- Inspect the brushes and check the tightness of the wire ends. To do all the necessary actions, you will need to dismantle and disassemble the device, clean the commutator, replace the brushes and adjust the degree of spring tension.
- Determine the presence or absence of clutch slipping. If necessary, it is necessary to completely replace the starter drive. Another way to solve the problem is to wash the threaded shaft and then lubricate it.
- Inspect the flywheel ring teeth for nicks. Their presence may be indicated by a characteristic grinding sound. To eliminate it, you will need to eliminate the nicks or install a new buffer spring if the old one is noticeably weakened.
- Carry out diagnostics of the starter pole fastening. Its weakening may be indicated by the characteristic noise present during operation of the mechanism. The problem can be solved by securely fastening the starter or reinforcing the said fastening.
To ensure that the bolt is in contact with the plate, it is necessary to measure the resistance on the contact bolts
If you check using the described algorithm, you will be able to accurately determine the “source” of the malfunction and effectively eliminate it. However, there are breakdowns that cannot be eliminated during an inspection.
How to fix
After the preparatory work is completed, you can begin the repair procedure. To achieve a positive result, you must act in accordance with the following algorithm:
- Check whether the bolt is locked to the contact plate. You need to “push” the armature inward, and then measure the resistance on the contact bolts using a tool called an ohmmeter. If it is missing, then the relay must be replaced or repaired.
- Repair the relay (if necessary). To do this, you need to unscrew two screws, dismantle the winding terminals, remove the cover and clean the contact plate and bolt heads using special sandpaper. If they are “burnt” quite badly, then you need to turn them 180 degrees.
- Repair the gearbox. The gears, which are located inside the housing, wear out over time, and the properties of the lubricant deteriorate noticeably; moreover, metal shavings appear, making work difficult. Repairs are carried out by replacing worn elements, as well as cleaning the housing from chips and old grease, after which the internal components must be re-lubricated. The wear of the elements of this mechanism in the future can be reduced by periodically “renewing” the lubricant.
- Check the winding using a light bulb rated for 220 V. It should not burn if voltage is applied to the core and collector plate.
- Replace bendix (if necessary). To do this, you need to pull it out of the gearbox cover along with the drive.
- Replace the ring if it has lost elasticity or is severely bent.
Broken gear teeth cannot be repaired, so they must be replaced
It is possible to carry out the procedures in the described algorithm, even in a private garage, without having special tools or equipment for computer diagnostics at hand.
Starter repair, which includes checking, determining the “source” of the malfunction, completely disassembling the mechanism and installing serviceable components to replace the failed ones, can take varying amounts of time depending on the person performing the maintenance and the individual characteristics of a particular vehicle. In a specialized car service, such a procedure takes no more than a few hours, if you do not need to wait a long time for the delivery of spare parts.
Cleaning nickels from carbon deposits on the solenoid relay
All this is best done on a removed part, which you can read about here. After this, you need to use a deep socket and a wrench to unscrew the three nuts securing the cover to the body, as is clearly shown in the photo below:
When all the nuts are unscrewed, you need to press on all the bolts from the same side and pull them out from the back:
Now carefully fold back the relay cover, but not all the way, as the wire will get in the way:
Pay attention to the central copper plate: it will definitely need to be cleaned of plaque and carbon deposits, if any. Also, you need to unscrew the nickels themselves (two in total) by unscrewing the two nuts on the outside of the cover: And then you can take them out from there with your hands, from the back side:
And then you can take them out from there with your hands, from the back side:
DIY VAZ 2110 starter repair step by step and with photos
Sometimes it didn’t work the first time, the retractor shoots, but the starter doesn’t turn. Sometimes it would turn with a crunch.
I decided that it was the Bendix, but it turned out that it was not the problem, it was perfect.
removed the starter
Bendix is ideal
Just in case, I checked the flywheel ring, it is also in perfect condition.
To begin with, I sentenced the retractor. Although it worked, the contact of the supply pin was burnt. The pin got so hot that it melted the attachment point. It is clear that this is most likely not a cause, but a consequence.
burnt contact
I immediately bought a new retractor.
New traction relay
Further disassembly of the starter revealed a broken planetary gear. It is plastic, burst and crumbled. Now it’s clear why the starter jammed.
The cost of a new metal gear is 150 rubles. The cost of the assembled gearbox is 750 rubles. There is no point in taking it as a collection, because... All other parts of the gearbox are in excellent condition. I also purchased a tool to remove the retaining ring for RUR 170
I assembled the gearbox with a new metal gear. Lubricated it with CV joint.
I put the starter in place, and a miracle happened: the car started up normally.
Repair cost
Retractor - 620 RUR Gear - 150 RUR Pliers for circlips - 170 RUR Lubricant, wash
total 1000 RUR
But it was too early to rejoice, after driving for a couple of days, the problem partially returned. The starter sometimes jammed and in general began to turn noticeably slower. I had to take it off again. This time, I was not lazy and disassembled it completely. It turned out that the magnets had fallen apart.
Most likely, this happened as a result of the starter jamming on an old, broken gear and its subsequent overheating.
As a result, I didn’t bother with further repairs and bought a new, factory, KZATE gear starter for 3200 rubles.
Now it starts just fabulous. The new starter spins like a hurricane. I should have not been too lazy right away and disassembled the starter completely, it would have saved money and time. But there is also a plus: I gained interesting experience in repairing gear starters.
Faulty brushes and bushings
Using brushes, current is transmitted to the rotor winding of the starter. All four stator windings are connected in series-parallel, as shown in the diagram below.
If one stator winding is damaged, the rotor will not be fully powered. And if the brushes are faulty, then power will not flow to the excitation winding. Since it is not possible to check the starter for functionality using the battery, remove the back cover and brush assembly.
If there is severe wear, install new brushes - they are sold separately and can be purchased at any store. It is advisable to replace the bushings, since as they wear out they take on the shape of an ellipse. Because of this, friction increases significantly. The current consumption also increases due to deteriorated contact. The old bushing is knocked out of the back cover with a hammer and a mandrel of a suitable size.
The starter does not turn on the injection VAZ 2110?
It is no secret that it is impossible to start a car without a starter. Therefore, his condition should always be treated with increased attention. If it was not possible to save the element, then it is quite possible to carry out the repair yourself. It will be much cheaper than going to a service station.
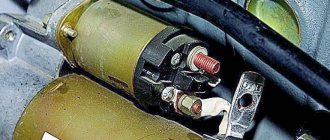
First, study the VAZ 2110 starter from the photo, which will allow you to get a first idea about it. Don't worry if you've never even seen this element. This is not a hindrance to understanding the device.
It may have two problems - a complete breakdown that requires replacement, or it simply does not turn the engine. We will consider each issue separately in order to understand the causes and methods of eliminating the malfunction.
Bendix diagnostics
If the starter turns on but the engine does not turn over, it's time to find out how to check the starter bendix. Bendix is usually not repaired, but replaced, but you need to know the reasons for its failure. There are not many of them:
- the lubricant has dried out or thickened;
- the springs are worn out;
- Defects and abrasions have appeared on the rollers or diametrical wear has occurred.
Checking the Bendix is done without any difficulties. Consider using a soft pad to wrap around the mechanism to prevent damage.
Then place it in a vice, with the device coupling turning one way. If there is rotation in both directions, the cause of the breakdown is a defective coupling.
This part will have to be replaced. By following the exact procedure and instructions, you can easily check the starter and replace defective parts.
Subscribe to our feeds on Facebook, Vkontakte and Instagram: all the most interesting automotive events in one place.
Doesn't it turn?
If the starter on an injection VAZ 2110 does not turn, there may be several reasons for this.
- The culprit is the solenoid relay. If you insert the key, turn it, the instrument panel lights up, the fuel pump turns on, but when you turn it further, the panel goes out and the starter does not turn on, you should check the solenoid relay. Make sure there is voltage in it. Try closing the starter, turning off the alarm, which can also cause problems. If everything works separately, but in the end the starter does not turn on, then the reason is in the solenoid relay. It needs to be replaced with new ones and the problem will disappear.
- Overrunning clutch does not work. You started a cold engine, drove a couple of tens of kilometers, stopped to get out for a couple of minutes, returned, and the starter clicks, but does not turn on your VAZ 2110. Only when the car cools down, you manage to start the engine. First of all, the overrunning clutch, or popularly Bendix, is to blame. Replace it with a geared analogue. Additionally, check the wires that go from the Bendix to the battery.
- There are no contacts. The starter starts, but it is very difficult, making a lot of clicks. If the situation repeats regularly, be sure to check your contacts. The terminals are probably oxidized. Cleaning didn't work? Then check the ground contact with the car body and the starter contacts. For them, oxidation is a natural phenomenon. Another way is to ask a friend to turn the key in the ignition, and then hit the relay with a hard object a couple of times. If the car starts, then the closing contacts are simply stuck. But here it is better to completely replace all the relays than to repair and disassemble the unit.
- The problem is in the immobilizer. It is not uncommon for the starter activation circuit on the injection VAZ 2110 to be disrupted due to the immobilizer. The engine may suddenly stall, the starter stops turning, and it is not possible to start it even with a push. The terminals are clean and the battery is charged. If the immobilizer is turned on, this may be the cause. Due to the protection being triggered, the engine does not respond. You will no longer be able to start the car, so call a tow truck and go to the nearest service station.
- Problematic injector. We have examined almost all starter problems characteristic of a carburetor engine. But today the “tens” are injection ones. They don’t really like low-quality fuel, which VAZ 2110 owners so often like to refuel with. Therefore, the starter may not work for the simple reason that the injector is clogged or dirty. By performing a flush, you will eliminate the problem.
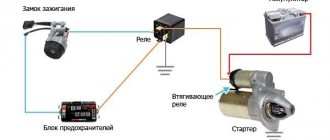
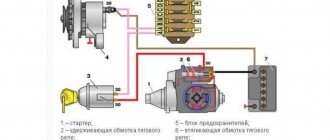
Operating principle of the solenoid relay
Before moving directly to the malfunctions and methods for eliminating them, it will be useful for car owners to know the device of the starter retractor relay and how it works. It’s worth noting right away that the mechanism is a classic electromagnet, consisting of two windings (holding and retracting), a diagram for connecting it to the starter, as well as a core with a return spring.
When the ignition key is turned, voltage from the battery is supplied to the coils of the solenoid relay. This creates an electromagnetic field that moves the core located in its body. That, in turn, compresses the return spring. As a result of this, the opposite end of the “fork” moves towards the flywheel. In this case, the gear connected to the bendix is squeezed out until it engages with the flywheel ring. As a result of engagement, the contacts of the built-in starter circuit are closed. Next, the retracting winding is turned off, and the core remains in a fixed position with the help of a working holding winding.
Scheme of operation of the solenoid relay
After the ignition key turns off the engine, voltage to the solenoid relay stops supplying. The anchor returns to its original position. The fork and bendix, which are mechanically connected to it, disengage with the flywheel. Thus, a malfunction of the starter solenoid relay is a critical failure due to which it is impossible to start the engine.
Main causes of malfunction
Minor or partial repairs will not always save the situation. But before removing the starter from the VAZ 2110, we recommend that you familiarize yourself with the main reasons for its failure, which serve as a reason for replacement.
- When turning the ignition key, a grinding noise occurs in the engine compartment. This is the cause of a faulty bendix or flywheel.
- Clicking noises are heard when turning the key. The reason is the solenoid relay, which needs to be replaced.
- The engine turns over with a friend. This indicates that the starter brushes are worn out.
Possible starter failures
There can be a large number of starter breakdowns, but most often they are all of the same type. Below are all the most common starter failures.
Brush wear
Starter brushes are a copper-graphite part that conducts electric current. The brushes are in direct contact with the starter armature and rub against its commutator, conducting electric current. During long-term use, brushes become unusable due to friction and must be replaced. This breakdown is not expensive or complicated; you just need to remove the starter and replace the brushes.
Bendix wedge
The Bendix is directly connected to the flywheel and quite often, wear appears inside it or on its gears due to high load, which makes it impossible to start the car from the starter. By design, Bendix is an overrunning clutch that rotates freely in one direction and is locked when rotating in the other direction. This part is sold separately and can be replaced as soon as possible.
Replacing the unit
Now another question arises - how to disassemble it? There shouldn’t be any particular problems with this matter if you arm yourself with the instruction manual and also read our recommendations.
Arm yourself with a set of keys for 10, 13, 15 and 8 millimeters. Actually, you don’t really need anything else in terms of tools.
The sequence of dismantling and repair is as follows:
- Drive the car into the pit or lift it using a lift. You must have access to the underside of the car.
- If you have just arrived, give the engine some time to cool down. It is better to work with a cold engine.
- Remove the negative cables from the battery.
- First remove the protection and then the tin casing that protects your gearbox. To do this, you will need two keys - 8 and 10 millimeters.
- The power wire plug is removed from the starter. You just need to pull it towards yourself a little.
- Now take a 13 mm wrench and use it to unscrew the power wiring located on the solenoid relay.
- Place the loose wire aside and secure it with something temporarily so that it does not interfere with further repairs.
- The starter is attached to the gearbox housing with two nuts. They are easily loosened with a 15mm wrench. If you have problems unwinding, lubricate the fasteners with the almighty WD40.
- Dismantle.
- Now check the condition of the bushings on the gearbox housing.
- Make sure that the armature shaft is in good condition; when moving, there should be no play or jamming. If such defects occur, then it is recommended to immediately replace the bushings with new and high-quality ones.
- There are always two bushings. One is at the bottom of the starter, and the second is on the gearbox housing. The bushing on the starter can be changed without any problems, but difficulties may arise with the second one. To dismantle it, you need a special tool called a rubber. It is better to entrust the work to specialists from a service station.
- If the cause of the starter malfunction is the bendix or the solenoid relay, there is no need to call the experts for help.
- To remove the relay, unscrew the power wire, or rather its fastening, from the starter housing. You will need a key for 13.
- Using a size 8 wrench, remove the two bolts securing the relay to the starter housing. It is important to be careful here, because when removing the bolts, there is a spring in the relay that can spring back. Hold it with your hand when dismantling.
- Remove the relay piston from the rocker arm hook located on the bendix.
- Proceeding in reverse order, install a new relay.
- If you need to replace the bendix, then remove the solenoid relay, unscrew the two bolts with a 10mm wrench at the back of the starter. Now disconnect the starter housing from the front of the starter where the bendix, rotor and fork are located.
- Use a flathead screwdriver to pry up the plastic fork to remove it from the armature, and remove the armature itself and the bendix from the front of the body.
- Remove the retaining ring located on the tip of the armature and remove the desired bendix.
- The structure can be assembled in the reverse order, but the splines must first be lubricated with Litol.
- Test the new starter in place before beginning installation. To do this, connect the power terminals of the battery.
- The nuts responsible for fastening the terminals are tightened with a 13mm wrench. But it is not recommended to apply much force, since the terminals are made of copper. Clamping too hard will damage the threads, causing even more problems.
We figured out how to disassemble the starter on a VAZ 2110 and we can say that this procedure is not particularly simple, but it does not require mandatory execution by a professional auto mechanic.
The starter on the “ten” is somewhat capricious, but if you operate the car correctly, check the condition of the contacts, and also periodically flush the engine on the injection VAZ 2110, it can last a long time and reliably.
The third method is closure
And finally, we come to the actual topic of this article: correctly closing the starter with a screwdriver. In this case, brute physical force or towing is not needed. It will be enough to arm yourself with a simple screwdriver, preferably with a long handle. Before moving directly to the process algorithm, let's dwell on the question: what is better to close the starter - with a screwdriver, wrench or pry bar? Let us note right away that a mount is an option for a rainy day when you don’t have a screwdriver or a key at hand. As a rule, a screwdriver and a wrench help in cases where the relay is faulty. The characteristic clicks coming from under the hood when turning the key in the ignition are full confirmation of this. The Bendix gear is not able to turn the crankshaft because the relay does not provide enough energy. It remains to close the starter, giving voltage directly to the windings. As mentioned above, it is advisable to arm yourself with a large screwdriver or wrench that would reach both power terminals of the relay in order to bridge them. Don’t forget to set the gearbox lever to idle and tighten the handbrake all the way. The key in the ignition switch must be turned half a turn so that the corresponding lights on the instrument panel come on. A screwdriver attached to the terminals in this case works like the relay itself. The method, as we see, is not tricky. But you must always be on your guard. The fact is that you can damage the coil. It easily fails if you do this several times in a row. It’s just that on classic contact systems the coil does not have the appropriate protection, as on non-contact systems. To protect the coil from burning out, it is recommended to do the following:
- Ask the assistant to get into the car;
- Have him put the ignition key in the ignition position while you close the contact.
Thus, having learned how to revive the starter yourself, you can safely go to the longest distances.
The problem will be solved in one minute. But then it will be necessary to visit a car repair shop, where the starter will undergo a thorough diagnosis by specialists. They will immediately determine the cause, eliminate it, and you will no longer fall under Murphy's Law. Although no one can guarantee that this will not happen after a certain period of time.
Basic car starter malfunctions
Starter malfunctions are divided into two categories
- mechanical failure or wear
- damage to the electrical circuit
Since the motor shaft spin-up device consists of two electrical elements, damage to the electrical circuit is also divided into two subcategories:
- electric motor malfunction
- Solenoid relay malfunction
Malfunction of the mechanical part of the starter can be repaired by replacing the bearings or bendix.
Blendix VAZ 2110 in perfect condition
Failures of the electrical component of the structure are eliminated by replacing the entire blocks, perhaps with the exception of replacing the carbon brushes.