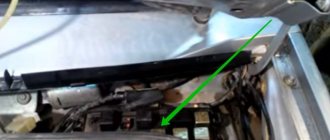
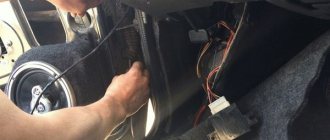
Hi all! I’ll tell you about a very useful modification that will be useful for owners of elderly VAZ 2110. Many ten-year-olds have encountered a problem when, in hot weather, a hot engine does not respond to the movement of the key. The starter does not turn and you have to go under the hood with a screwdriver and make a direct connection to the contacts. In the case when the starter is working (in my case it is completely new), the culprit for this trouble may be the contact group of the ignition switch. Over time, the contact group in the ignition switch wears out or the current collector contacts burn out. This problem is successfully solved by installing an additional unloading relay. By the way, such a relay is installed on many cars from the factory.
To install this relay we will need: 4-pin relay with a metal ear (30-40A); 80r Wires 1.5 sq. mm; about three meters -80r relay block - 1 piece; 20r Flat male connector - 1 piece; Flat female connector - 1 piece; Ring tips - 2 pcs. Electrical tape, heat shrink, corrugation.
Fuses and relays VAZ 2110 - 2112, electrical diagrams
If some devices on your VAZ 2110 or VAZ 2112 , fuses or relays may be to blame. At the very least, the first thing you need to do is check them, and then draw some conclusions regarding the malfunctions.
Correct diagnosis of many electrical problems will allow you to accurately determine the cause of the inoperability of a particular unit. To find out what the fuses and relays of the VAZ 2110 - 2112 are responsible for and how to find the right one, read this article.
As in many other cars, in the VAZ-2112 and VAZ-2110, when the engine is turned off, the devices are powered directly from the battery. When the engine is running, voltage is supplied to the devices from the generator, which simultaneously charges the battery. If the current exceeds the permissible value or a short circuit occurs, the circuit fuse will blow. Powerful electrical appliances are connected via relays.
What else you should know
The main and additional fuse blocks of the VAZ 21124 do not protect all electrical circuits of the car. If you look closely behind the open main mounting block, you can see a separately located fuse to eliminate problems in the fog lights. There, behind the mounting block in a separate plastic box, there is a fuse that protects the central locking.
But that's not all. Depending on the configuration, in addition to the fact that there is already a fuse block on the VAZ 21124 with 16 valves, there may be protective devices installed in the equipment, for example, in a car radio or alarm system. All this should be taken into account when looking for problems in the vehicle's electrical system. We also recommend watching a video on this topic:
Today we will look at the location of fuses in VAZ cars of the tenth family, namely models 2110, 21102, 21103, 2111, 2112. We will also show where the fuses and relays are located on the diagram and talk about the purpose of each of them and how to replace the fuses with your own hands. We will also touch on the most common problems with fuses among owners of these cars, diagnostic methods and replacement.
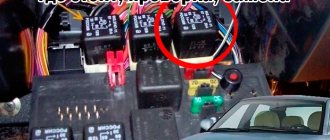
Fuse and relay box
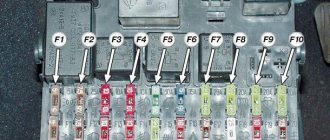
The fuse and relay box is located on the left, lower part of the instrument panel. It is accessible by pressing the button and folding the lid down. To remove fuses, there are special non-conductive pliers in the upper left part of the mounting block.
1 - K5 - high beam relay . If the high beams in two headlights do not work, check this relay. If one of the high beam headlights does not work, check fuses F3 and F13, as well as the lamps and the high beam switch.
2 - K4 - low beam relay . If the low beam in both headlights does not work, check this relay. If only one low beam headlight does not work, check fuses F2 and F12, as well as the lamps themselves and the light switch.
3 - K1 - lamp health control relay.
4 - non-conductive tweezers for removing fuses.
5 - power window relay . If your power windows stop working, check this relay. It could also be in fuse F5, or in the window lift drive system itself. To get to the mechanism, you need to remove the door trim. Check the electric motor, the appearance of the gears and the absence of binding of the mechanism.
6 - K3 - turn signal and hazard warning relay . If your turn signals or hazard lights do not work, check this relay and fuse F16, as well as the turn signal lamps themselves and their switch.
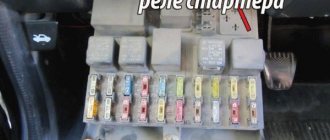
7 - starter relay . If the car does not start and the starter does not turn, check this relay. It could also be a dead battery, as well as the starter mechanism itself.
8 - backup fuses.
9 - fog lamp relay . If the fog lights do not work, check this relay and fuses F4 and F14. Also check their connection diagram, the serviceability of the wiring and connectors, as well as the lamps in the headlights and the power button.
10 - K2 - windshield wiper and washer relay . If your windshield wipers or windshield washer are not working, check this relay. Also check the wiper motor, washer pump and washer fluid level in the washer reservoir.
11 - K7 - rear window heating relay . If the heating does not work and the rear window fogs up, check this relay and fuses F8 and F9. Also check the connection contacts to the terminal points of the heating elements (at the edges of the glass at the rear pillars). If everything is in order, but the heating does not work, the issue may be in the wiring (the wires are frayed or something else).
12 - K6 - add. relay, ignition relay . If your ignition does not turn on or is having problems with it, check this relay. This relay protects the ignition switch contacts from burning. Also check the ignition switch itself and the contact group.
13 - row of fuses F1-F10
14 - row of fuses F11-F20
Circuit breakers
Now let's see which fuses are responsible for what in the same mounting block. I will also give the main reasons for troubleshooting.
F1 (5 A) - license plate lighting lamps, dashboard lighting, side lights on the panel, trunk lamp, left side lights . If any of the listed lamps do not work, check this fuse, as well as the lamps themselves and their contacts. If everything is in order, check the headlight switch button.
F2 (7.5 A) - low beam in the left headlight . If both low beam headlights do not work, also check relay K4 and the lamps themselves. It could also be the light switch and its contacts.
F3 (10 A) - high beam in the left headlight . If both high beam headlights do not work, check the K5 relay, the lamps themselves and the high beam switch knob.
F4 (10 A) - front fog lamp on the right side . If both fog lights do not work, check relay 9 and the headlight bulbs themselves, as well as the switch and its contacts.
F5 (30 A) - window lift motors . If the power windows do not work, check this fuse and relay 5. In winter, check if the windows are frozen, warm them up and clear them of ice if necessary. It could also be the window lift motor, its mechanism and gears; in order to get to it, you need to remove the trim of the desired door.
F6 (15 A) - portable lamp fuse.
There may also be problems with the cigarette lighter. To check, unplug the cigarette lighter from the connector. If this fuse stops burning, then the problem is in the cigarette lighter.
F7 (20 A) - engine cooling fan, sound signal . If the cooling fan does not turn on and the engine overheats, check this fuse. Also check the operation of the fan motor by connecting it directly to the battery. It could also be the coolant temperature sensor or thermostat.
Additional starter relay VAZ 2110
As it was already found out earlier, the Lada of the tenth family does not have a starter relay . The starter retractor is controlled directly from the ignition switch, and therefore the contact group loses good contact. Therefore, many VAZ 2110 owners install an additional starter relay . This will relieve the contact group, as well as significantly increase the tension on the retractor.
_For an additional VAZ 2110 starter relay you will need:_
- 4-pin relay (30-40 A);
- Wires;
- Flat female connector - 5 pcs;
- Flat male connector - 1 piece;
- Ring tips for 6 mm and 8 mm - 1 pc.
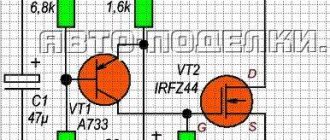
_The VAZ 2110 starter relay diagram looks like this:_
Are the instructions useful? Yes 23 No
- VAZ (Lada) 2110 Where is the VAZ 2110 starter relay?
5.11.2013, 14:50 | 18k 2
VAZ (Lada) 2110 Where is the starter relay 2110 located?
03/12/2014, 18:33 | 3k 1
VAZ (Lada) 2110 The starter clicks but does not turn
03/22/2015, 20:38 | 3k 3
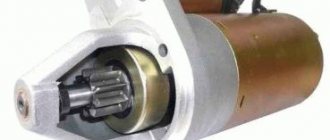
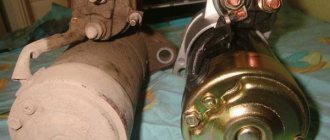
Device
The part looks like a small square box with four connectors. It consists of an armature in a housing containing an electromagnet with a winding. Its operation is ensured by electrical contacts and return springs.
The electromagnet is represented by two independent coils with holding and retracting independent parts. The first of the devices is docked with the housing and connected to the control input. The retractor coil goes to the control terminal and communicates with the starter motor.
Replacing the VAZ 2110 starter relay on your own
All drivers know that without a starter, the car not only won’t move, it won’t even start. It drives the crankshaft. In this case, the shaft is accelerated to a certain frequency. As soon as the desired frequency is reached, the engine will start. One of the starter components is a two-winding traction relay. Replacing the VAZ 2110 starter relay is a mandatory procedure, because without the correct operation of this mechanism, the vehicle will not move. On a VAZ 2110, replacing the starter relay can be done on your own.
Starter relay: description, purpose, device, repair, photo, video
The movement of any car begins with starting the engine . If you want to understand the principles of operation of the main components of a car, we recommend starting your study with the starting system. One of the most vulnerable points of this system is the starter relay. Almost everyone has heard about this detail, but not many understand the principle of its operation. Before we start talking about the starter relay, it is worth noting that the design of the car simultaneously has two parts with the same name, only the first is responsible for turning on the starter, it is usually located in the engine compartment, and the second is the starter solenoid relay.
WHAT IS A STARTER RELAY
So, let's start with the basics. Two relays are responsible for the starter. The first is installed in the engine compartment. The design can have its own housing or be installed in a common unit.
In this article, we will be much more interested in the second relay, which is responsible for the operation of the starter, namely the retractor. It performs the following functions:
- redistributes energy between the starter and the electromagnetic relay;
- feeds Bendix gears;
- synchronizes the starter components,
- returns the gears to their original position after you turn off the engine.
In the automotive world, this unit has two names: traction and retraction. The first is most often used in specialized literature, the second is popular.
To understand why a starter solenoid relay is needed, let’s look at the engine’s operation schematically. To start the engine, the crankshaft must begin to rotate. Only after this does the fuel-air mixture ignite in the combustion chamber.
Usually the engine starting process takes place within a second. The role of the relay in it is quite simple. Thanks to it, the gear elements engage with each other. It synchronizes the operation of the starter. This unit also removes the bendix from the flywheel.
Main components and operating principle of the engine starting system
To understand the operation of the starting system, it is worth first considering the design of the car starter. The purpose of the starter is to start the engine. The starter device for all cars is identical, they differ only in size or parameters. So, the design consists of the following required elements:
- Electric DC motor;
- Bendix;
- Starter solenoid relay.
The main role here is played by the electric motor, and the bendix and starter relay are auxiliary elements. The electric motor includes standard elements such as a stator, a rotor, and a starter brush assembly. Bendix, even the smallest detail, plays a very important role. It is necessary to transmit rotation from the electric motor to the gear ring of the engine flywheel, thereby ensuring starting.
Until 2000, the bendix was located on the same shaft as the rotor, and then a new arrangement appeared, where the bendix began to have its own separate shaft and rotate through a gearbox.
That’s why we sometimes hear the name “gear starter”. The starter retractor relay is a more complex element and performs several functions at once:
- Redistribution of electricity supplied from the battery between the electric magnet of the starter relay and the electric motor;
- Synchronization of the operation of all components when starting the engine;
- Feeding the Bendix gear until it engages with the flywheel ring gear;
- Returning the working gear to its original position after starting the engine.
The principle of operation of the starter is as follows: in order to start the car engine into operating mode, it is necessary to forcibly rotate the crankshaft until the fuel mixture in the cylinders begins to burn.
Typically, it takes quite a bit of time to start a working engine. The task of the starter retractor relay is to maintain the engagement of the Bendix gear with the flywheel and rotate the crankshaft equally until the start occurs. No more and no less. If you hold it longer, you can break parts, and if you hold it longer, the engine won’t start.
What is a relay for?
Replacing the starter relay on a VAZ 2110
The traction relay ensures that the drive gear starts. Starting occurs in clutch with the gear mechanism of the crankshaft flywheel. It also provides power to the starter motor. When the starter is turned on, energy begins to be transferred from the battery. The energy path passes through the ignition switch.
VAZ 2110 additional starter relay
In this way, power is supplied to each winding of the traction relay. Windings have two types:
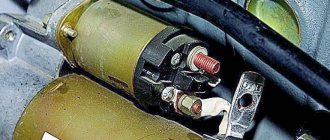
As soon as the process of closing the relay contacts takes place, the retractor winding is turned off. A working relay has a voltage limit that should not exceed 8 V. The temperature during this process should not exceed 25 degrees Celsius. If the voltage when starting the relay exceeds this indicator, then you should pay attention to the drive and the traction relay itself. They may become damaged or stop working. The traction relay can be visually examined. Perhaps the breakdown can be seen with the naked eye, but the starter will have to be dismantled and disassembled.
VAZ 2110 starter lock relay
General Tips
To make the solenoid relay last longer, you should:
- carefully tighten the bolts securing the current-carrying conductors to the starter relay;
- periodically clean the starter housing from dust and dirt;
- start the engine for no more than 15 seconds;
- If extraneous noise appears during startup or when the starter does not turn, dismantle the starter and perform routine maintenance.
This is interesting: Description and performance indicators of the MR479QA motor
How to check device operation
When any devices on the car stop working, the driver should first check the serviceability of the fuses or the relay circuit. After a complete diagnosis has been carried out, it will be possible to draw a conclusion about what exactly has become faulty and how to fix the problem. Diagnostics are performed in the following order:
- Take two small wires 35-45 cm long and connect them to the battery
- Directly connect the wire coming from the negative terminal of the battery to the relay, taking into account the polarity. Do the same with the wire that comes from the terminal with a positive charge.
- After connecting the VAZ-2112 starter relay, make sure that the relay has retracted the core, and a characteristic click should be heard
- If retraction does not occur, then the relay is faulty.
When the diagnosis has been completely carried out and the cause of the breakdown has been identified, you need to replace the old relay. In this case, it is recommended to inspect the starter and perform its maintenance for preventive purposes. To do this, unscrew the back cover after all the dirt has been cleaned from it. Then the condition of the Bendix brushes and forks is determined. Experts advise inspecting the starter regularly so that it does not fail somewhere along the way.
Principle of operation
The relay is necessary to start the engine system, so it was built into the fuel pump. When power is applied to a contact communicating with the control, electromagnetic induction appears inside the coil. This occurs under the influence of current, through this process a magnetic field is created. The attraction of the armature contributes to the compression of the return spring.
At the same time, the bendix is pushed out, which connects the engine and starter using a flywheel. The positive terminal supplies power to the pull-in winding. In this case, the contacts are closed to each other. At this time, the armature is located inside the coil, in which the magnetic field ceases to be generated. When the power plant starts, the power is turned off, and the armature is sent to its original position using the return force. The contacts open. During this process, the bendix stops interacting with the flywheel.
Causes of breakdowns
The most important reason for the malfunction of the VAZ-2112 starter relay is the burnout of the contact plates located inside. Other breakdowns that also often occur in this mechanism include:
- short circuit of the negative terminal;
- clogged contacts
- malfunction of the armature on the solenoid relay;
- winding burnout;
- broken wiring.
These relay malfunctions occur due to the use of low-quality consumables. They quickly fail and wear out. Experienced drivers already determine by the sound of the engine when a breakdown occurs. For example, after turning the key in the ignition, the starter continues to rotate, but the engine is idling, or with a characteristic buzzing sound when the engine develops medium speed, but the starter does not turn off.
Connection after repair
For some reason, some car owners feel unsure when connecting a unit after carrying out certain repair-related manipulations on it. For everything to go smoothly, you must remember to mark the disconnected terminals. But when installing the starter in place, there will be no unnecessary problems. All contacts must be cleaned and degreased with a special automotive cleaner before connecting.
Lack of ignition is not always associated with the starter device; it may be a burnt-out electromagnetic circuit or electrical wiring, as well as incorrect battery operation.
Any car owner can check, repair and install the traction relay. The work is simple and takes very little time. The only nuance is the location of the starter in the car’s structure, namely, how convenient it is to carry out its maintenance.
How to remove
In order to remove the VAZ-2112 starter relay, you need to disassemble the entire system. Therefore, this mechanism is removed along with the starter. On the other hand, this is even better, because at the same time as repairs, you can prevent starter breakdowns. To remove the starter, you need to drive onto an overpass or inspection hole. Further removal of the part is carried out in this order:
- Disconnect the battery, thereby de-energizing the vehicle.
- Remove the mudguard or other protection
- Find the nut at the bottom of the starter and unscrew it
- Disconnect the terminal located on the solenoid relay
- Remove the top nut that holds the starter in place.
- Unscrew the tape with a flat-head screwdriver and remove the relay by pulling lightly on the housing.
If this block is removed with force, then you need to lift it a little to unhook it from the fasteners. You need to be careful not to lose the spring located inside the mechanism. Often she jumps out and gets lost. Now that the device is disconnected from the starter, you can perform troubleshooting and find out why it broke.